
LibreELEC Raspberry Pi HTPC - How to Install LibreELEC on the Raspberry Pi
One of the first Raspberry Pi projects I completed when I purchased a Raspberry Pi 2 back in the day was a retro gaming console with RetroPie. I then experimented with Recalbox, and discovered a slew of Kodi-based media center software options such as OSMC, OpenELEC, and LibreELEC. While these are pretty similar, I'm a huge fan of LibreELEC. Though I've been through a slew of different Raspberry Pi boards, I still enjoy using my Pi for a Kodi home theatre PC (HTPC). Here's how to make a LibreELEC Raspberry Pi 4 media center PC!
What is the Raspberry Pi?
The Raspberry Pi is a maker board capable of running loads of Linux and non-Linux operating systems (OSes). This single-board computer (SBC) arrives with all components such as RAM, GPU, and CPU baked-in. Just add an operating system by flashing one to a microSD card. The Raspberry Pi comes in a few different variants, ranging from the Raspberry Pi 1 and Raspberry Pi Zero to the Raspberry Pi 3 B+ and Raspberry Pi 4.
Raspberry Pi Zero specs:
- 1 GHz single-core CPU
- 512MB RAM
- micro USB power port
- Mini HDMI port
- Micro USB power supply
- HAT-compatible 40-pin header
- CSI v1.3 camera connector
- microSD card slot
- Lots of compatible OSes including Raspbian, OSMC, and more
Raspberry Pi Zero W specs (same as Raspberry Pi Zero plus):
- Bluetooth 4.1
- 802.11 b/g/n wireless

Raspberry Pi 3 A+ specs:
- Broadcom BCM2837B0, Cortex-A53 (ARMv8) 64-bit SoC @ 1.4GHz
- 512MB RAM
- 802.11 b/g/n/ac Wi-Fi
- Bluetooth 4.2/BLE
- Extended 40-pin GPIO header
- HDMI
- USB 2.0 port
- CSI connector
- DSI connector
- 4-pole stereo output and composite video port
- microSD card slot
- 5V micro USB power slot
Raspberry Pi 3 B+ specs (same as Raspberry Pi 3 A+ as well as):
- Ethernet
- PoE support
- 4 x USB 2.0 ports
- 1GB RAM
Raspberry Pi 4 specs:
- Broadcom BCM2711, Quad-core Cortex-A72 (ARM v8) 64-bit SoC @ 1.5GHz
- 1GB, 2GB or 4GB LPDDR4-2400 SDRAM (depending on model)
- 2.4 GHz and 5.0 GHz IEEE 802.11ac wireless, Bluetooth 5.0, BLE
- Gigabit Ethernet
- 2 USB 3.0 ports; 2 USB 2.0 ports.
- Raspberry Pi standard 40 pin GPIO header (fully backwards compatible with previous boards)
- 2 × micro-HDMI ports (up to 4kp60 supported)
- 2-lane MIPI DSI display port
- 2-lane MIPI CSI camera port
- 4-pole stereo audio and composite video port
- H.265 (4kp60 decode), H264 (1080p60 decode, 1080p30 encode)
- OpenGL ES 3.0 graphics
- Micro-SD card slot for loading operating system and data storage
- 5V DC via USB-C connector (minimum 3A*)
- 5V DC via GPIO header (minimum 3A*)
- Power over Ethernet (PoE) enabled (requires separate PoE HAT)
- Operating temperature: 0 – 50 degrees C ambient
What is LibreELEC?
LibreELEC is a Kodi-based media center operating system. This standalone Linux distribution (distro) boots into Kodi for robust home theatre PC capabilities. The highlight of Kodi is its vast library of add-ons for streaming from the likes of Plex, Emby, Funimation, and PlayStation Vue. However, it's also a fantastic choice for local file playback. Kodi can handle virtually any video or audio file you throw at it.
LibreELEC Raspberry Pi 4 Installation and Review
For a Raspberry Pi LibreELEC HTPC, you'll need only the Pi, LibreELEC, and a few peripherals. It's an inexpensive yet functional project. While you can run LibreELEC on a Raspberry Pi Zero, I suggest using a Raspberry Pi 4. Its dual-micro HDMI outputs and 4K-support should provide quite a home theater boost.
What you'll need for a LibreELEC Raspberry Pi 4 HTPC:
- Raspberry Pi board
- Case
- micro HDMI cable
- microSD card
- PSU
- Peripherals (keyboard, mouse)
- Internet connection (Ethernet or Wi-Fi)
Total cost: $35+ USD. You can snag the 1 GB variant of the Raspberry Pi 4 for just $35 or step up to the 2GB, 4GB, or 8GB models. Since RAM won't help your device run any faster unless you're multitasking, a basic HTPC running LibreELEC on the Raspberry Pi 4 should be fine with 1GB of RAM. If you plan to dual-boot or swap microSD cards and run desktop apps, then opt for a 2GB or 4GB variant. Notably, even the Raspberry Pi Zero and Zero W should run LibreELEC, and the installation is pretty much the same.
How to Install LibreELEC on the Raspberry Pi 4
First, download either the installer or a direct LibreELEC image. For the SD creator method, you'll need to pick what operating system you're running, Windows, macOS, or Linux. Alternatively, select the direct download for your board. The Raspberry Pi v1 and Raspberry Pi Zero have the same image, while the Raspberry Pi v2 and v3 run the same image. The Raspberry Pi 4 features its own image, an img.gz.
Download the correct image for your board. It's an img.gz, so you may need to extract the image with a program such as 7Zip. Once you've got your image ready to mount to a microSD card, burn it to your bootable media with an app like Etcher.
Once your microSD card is properly prepared, pop it into your Raspberry Pi and power it on.
Raspberry Pi 4 LibreELEC Review - 4K Support and Excellent Media Playback
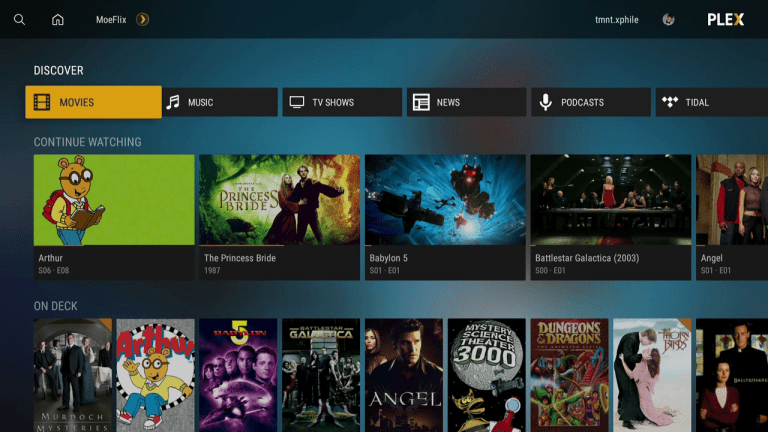
When you first boot into LibreELEC, it's completely usable for local file playback. Merely plug in an external drive such as a harddrive or USB stick, and you can play virtually any video or audio file type. But internet connectivity will add the ability to stream from add-ons such as Plex, Emby, YouTube, and PlayStation Vue.
You can either plug in an Ethernet cable or head to Add-ons>Program add-ons>LibreELEC configuration and select Connections. A pop-up menu should appear, and you can hit Connect.
While I wasn't able to test 4K video output, 4K playback should work well. However, you don't even need to set LibreELEC to display its user interface (UI) in 1080p to watch 4K videos.
If you're running media off of a networked drive, you'll benefit from the Pi 4's upgraded Gigabit Ethernet and improved Wi-Fi. Even playing local files from a harddrive or USB stick will see enhanced throughput from its USB 3.0 ports.
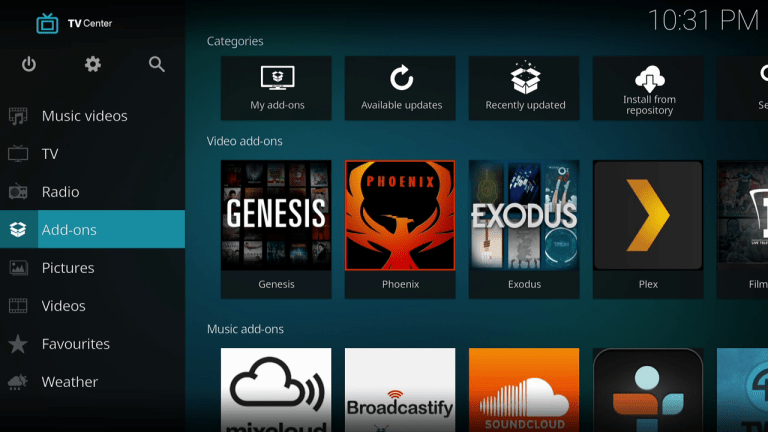
To add add-ons, head to Addons > Addon installation (the package icon) > Install from Repository > Kodi add-on repository. Then, pick the type of Kodi add-on you'd like to install, such as Video add-ons or Music add-ons. Scroll down to find the add-ons you'd like to install, click them, and choose Install. Then, wait for the installation to finish, and backtrack to the main LibreELEC menu where you can access your add-ons in the appropriate add-on sections.
Likewise, you can access networked media via LibreELEC such as movies, TV shows, and music on a media server. Navigate to Videos > Files > Browse and you'll see various types of drive shares. Select Add network location and pick the proper network protocol, such as Windows network SMB. Plug in all required info, then click Ok when you're finished. After that, select the media folders you'd like to use, and enter a name for the media source such as "Movies," or "TV Shows." Now, under the section This directory contains pick Movies, TV Shows, or something else. This will allow you to select settings such as the default scraper, and folder nesting information.
LibreELEC runs extremely well on the Raspberry Pi 4. I used the 4GB variant, and general navigation and everyday use requires little to no CPU, RAM, and GPU use. Unfortunately, I don't have a 4K TV or monitor to test with yet (if you'd like to donate one to the cause, head to the comments section and let me know), but 1080p files streamed via my Plex media server and played from a flash drive plugged directly into the Pi were flawless. It's a snappy experience that doesn't slow down.
Add-on experiences will vary since many of these are third-party applications. Plex for Kodi ran extremely well to no surprise, and PS Vue ran beautifully. Streaming through a networked media drive, my TS140 media server, rather than the Plex for Kodi add-on yielded similar results.
LibreELEC Raspberry Pi 4 Review - A Top-notch Media Center Distro
I'm pleased to report that LibreELEC on the Raspberry Pi 4 runs like a champ. It's incredibly easy to install, and a LibreELEC HTPC needs little more than the Raspberry Pi board itself. If you're just running LibreELEC, a 1GB or 2GB Pi should be fine, though desktop use benefits from a 4GB Raspberry Pi board. With 4K capabilities, LibreELEC really impresses. The biggest issues aren't with LibreELEC itself, but rather Kodi. Many mainstream apps aren't available, so you'll probably want a dedicated home theatre PC or another streaming device. But for power users looking to stream from various legal Kodi add-ons like Plex, Funimation, and YouTube, playback videos and music from harddrives or networked drives, LibreELEC for the Raspberry Pi is a great choice. Since the Pi is so small and uses little power, you can even consider mounting it behind a monitor or TV.
What media center OSes are you using, and what distros are you running on the Raspberry Pi?

Moe Long is an editor, writer, and tech buff with a particular appreciation for Linux, Raspberry Pis, and retro gaming. Writing online since 2013, Moe has bylines at MakeUseOf, TechBeacon, DZone, SmartHomeBeginner, DEV.to, DVD Netflix, and Electropages. You can read his writings on film and pop culture at Cup of Moe, check out his tech reviews, guides, and tutorials at Tech Up Your Life, and hear his thoughts on movies on the Celluloid Fiends podcast. Aside from writing and editing, Moe has an online course, the Beginner's Guide to Affiliate Blogging From Scratch. When he's not hammering away at his keyboard, he enjoys running, reading, watching cinema, listening to vinyl, and playing with his dog Sebastian.


Leave your feedback...