
How to Install Madsonic on Raspberry Pi
The Raspberry Pi, with a credit card-sized footprint and its superb price-to-performance ratio, works extremely well for media server projects. Chiefly, Plex, Emby, Jellyfin, and a slew of other server software options run on Raspberry Pi boards. One of the most popular media server solutions is Madsonic. The Subsonic fork is easy to use, well-documented, and extremely versatile, especially for music server use. Learn how to install Madsonic on the Raspberry Pi for a small but powerful Raspberry Pi media server!
What is Madsonic?
A cross-platform media server application, Madsonic presents a sort of do-it-yourself (DIY) Spotify or Netflix solution. Rather than streaming content from a paid service, you can access your library of digital movies, TV shows, and music on compatible Madsonic client devices. Instead of paying for access to content, you provide the files. Plus, Madsonic is an excellent local jukebox for in-home network streaming. A cross-platform media server solution, Madsonic is a fork of Subsonic. In addition to Linux, you can install Madsonic on macOS and Windows as well.
Based on Java, Madsonic is incredibly easy to install. While there's a focus on music playback as with Volumio, Madsonic works for video streaming as well. Since it's browser-based, you can pull up Madsonic in a web browser. However, its REST API means that you can find many client apps for the likes of Android and iOS. Playlist functionality rocks. You can create your own playlists and share those with users, rate and comment on albums, and more. Its transcoding engine lets you convert to MP3 on-the-fly. You can import a slew of playlists including PLS, XSPF, and M3U. And there's SHOUTcast protocol support, Last.fm integration, more. Plus, Madsonic touts compatibility with Sonos, Chromecast, UPnP, and DLNA for widespread use with a slew of devices.
Unfortunately, certain features are limited to the premium version. If you want a personal server address such as name.madsonic.org (i.e. moe.madsonic.org), you'll need to shell out for the paid tier. Likewise, Sonos, Chromecast, DLNA, and UPnP support are limited to Madsonic premium.
What is Madsonic: An open-source, Java-based, cross-platform compatible media server solution.
How to Install Madsonic on the Raspberry Pi
A Madsonic Raspberry Pi server requires little more than a Raspberry Pi board, microSD card, power supply, case, display such as a monitor, TV, or projector, and peripherals like a keyboard and mouse. Then you'll need a compatible operating system such as a Debian-based Linux distribution (distro), CentOS, Fedora, FreeBSD, or OpenMediaVault. And of course, you'll need a collection of (legally obtained) music, movies, and TV shows.
Madsonic Raspberry Pi media server requirements:
- Raspberry Pi (Raspberry Pi 4 recommended)
- Compatible OS (Debian-based Linux OS, CentOS, Fedora, FreeBSD, OpenMediaVault)
- Power supply
- MicroSD card
- Peripherals (keyboard, mouse)
- Micro HDMI cable
- Case (optional, recommended)
- Display (monitor, TV, projector)
- Active internet connection
- Collection of digitized media
Total cost: $35+ USD. You can get started with Madsonic on the Raspberry Pi for a mere $35 which will get you a Raspberry Pi 4 1GB unit. Step up to the 2GB RAM Raspberry Pi 4 for $45, or max out with the 4GB Pi 4 for a cool $55. Alternatively, the Raspberry Pi 3 B+ works too. And depending on which operating system you select, you might have to opt for a Pi 3 B+.
Install Madsonic on Debian/Raspbian/Ubuntu on the Raspberry Pi
Spinning up a Mediasonic media server on a Debian-based distro such as Raspbian or Ubuntu is pretty simple. First up, run an update:
sudo apt-get update && apt-get upgrade
Next up, install Java:
sudo apt-get install openjdk-8-jre
You can check that Java 8 is properly installed by running java -version. Once you've installed Java, download the latest Madsonic DEB package (where you replace "Madsonic-x.x.xxxx" with the most recent DEB version):
sudo dpkg -i Madsonic-x.x.xxxx.deb
The Madsonic installer will configure its software to auto-start at first boot. After installation completes, you can head to http://localhost:4040 on your Raspberry Pi. Or, if you're setting up Madsonic via SSH, find your Raspberry Pi's IP address using:
hostname -I
From any PC on your network, you can head to YOUR_PI_IP_ADDRESS:4040 where YOUR_PI_IP_ADDRESS is, well, your Raspberry Pi's IP address, and you can then browser your entire Madsonic collection.
Run Madsonic on Fedora
Fedora is available for the Raspberry Pi although, at the time of writing, it's not compatible with the Raspberry Pi 3 B+ and earlier. As such, you can't use a Raspberry Pi 4 (yet). However, you can load Madsonic on a Raspberry Pi running Fedora. Start by updating Fedora with Yum:
su -c 'yum update'
Now, install Java:
sudo yum install java-1.8.0-openjdk
Then, download the latest Madsonic RPM installer and proceed to install it using (where you replace "Madsonic-x.x.xxxx" with the most up to date RPM package):
sudo yum install --nogpgcheck Madsonic-x.x.xxxx.rpm
When that's finished, head over to http://localhost:4040 or, if using a different device than your Pi, YOUR_PI_IP:4040.
How to Install Madsonic on the Raspberry Pi with FreeBSD
You can run FreeBSD on the Raspberry Pi, and with a Madsonic FreeBSD installer, it's a solid media server ecosystem. Start off by updating FreeBSD:
sudo freebsd-update fetch install
Likewise, update your FreeBSD ports:
portsnap fetch update
Now, change directory into the Madsonic port:
cd /usr/ports/multimedia/madsonic
And install Madsonic on FreeBSD:
sudo make install clean
If anything goes awry, you can check your logs:
/var/db/madsonic
CentOS Madsonic Raspberry Pi Installation
You can use CentOS on the Raspberry Pi as well. The Raspberry Pi 2, 3, and 3 B+ are great for CentOS but the Pi 4 (at the time of writing) doesn't run CentOS. Run an update on CentOS:
yum update
Now, install Java:
sudo yum install java-1.8.0-openjdk
Proceed to download the Madsonic RPM installer and load it up (where "Madsonic-x.x.xxxx" is the latest RPM package):
sudo yum install --nogpgcheck Madsonic-x.x.xxxx.rpm
With Madsonic on CentOS successfully installed, you can view it at http://localhost:4040 or YOUR_PI_IP:4040.
OpenMediaVault Raspberry Pi Madsonic Install
For a fantastic server environment, OpenMediaVault (OMV) runs like a champ on the Raspberry Pi. OMV works on the Pi 2, 3, 3 B+, and 4. With OpenMediaVault 3.0.79 on your Raspberry Pi, go ahead and install Java:
sudo apt-get install openjdk-8-jre-headless
Then, head to the Plugins tab and install the OpenMediaVault Madsonic DEB package openmediavault-madsonic_6.x.xxxx_all.deb.
Madsonic Server on the Raspberry Pi Set Up
After you've successfully installed Madsonic media server on the Raspberry Pi, you'll need to add your media. Head to http://localhost:4040 or YOUR_PI_IP:4040 if using a device on your home network other than your Raspberry Pi.
Add Media Folders on Madsonic
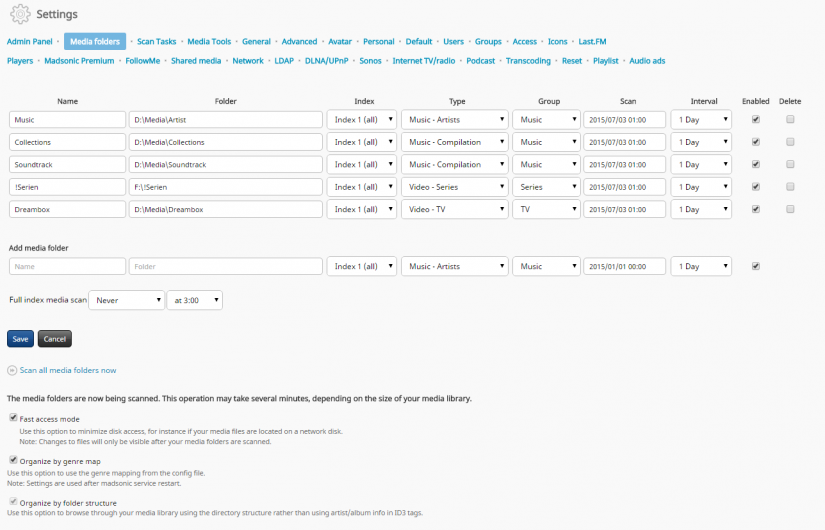
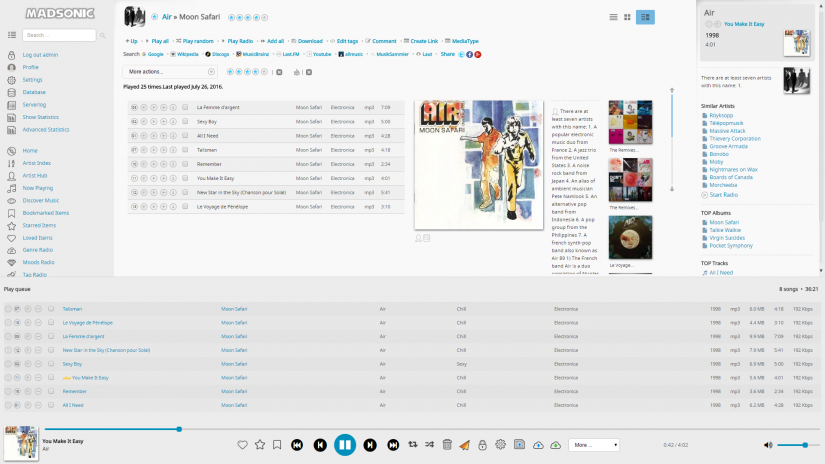
Navigate to Settings > Media Folders to add your media folders in Madsonic. You can set up multiple media folders. Whereas many jukeboxes read tag information, Madsonic organizes music files by folder organization. As such, it makes sense to use an Artist/Album/Song folder structure. I keep my music stored under Media/Artist/Album/Song.
Similarly, my movies are stored under Media/Movies/Movie Name (Year)/Movie_Name(Year).extension. And TV shows fall under Media/TV Shows/TV Show Name/Season/Episodes. For your Madsonic media folders, you can add names, import folders, and select information such as indexing, organization type (i.e. TV shows, music by artist, etc.), group (i.e. Music, Series, TV, Movies, etc.), and more. I simply created three different media folders: Music, Movies, and TV Shows.
Remote Access on Madsonic Media Server
You can browse your Madsonic server right away from devices on the same network as your Raspberry Pi NAS (network-attached storage) device. But for remote access, such as streaming Madsonic to an Android or iOS phone or tablet, you'll need to set up a port forward. There are two means of accomplishing this. You can try an automatic port forward. Head to Settings > Network and toggle on Automatically configure your router. Click Save, and watch the status section. If all goes well, your port forward is configured and you can stream to devices outside of your network. Otherwise, you'll need to perform a manual port forward.
The website PortForward.com offers instructions for setting up a port forward on specific routers, and for many individual programs. You'll first need to access your router at an address like 192.168.0.1, 192.168.1.1, 192.168.2.1, or another common default address. My Linksys router was available at 192.168.1.1. Then, login. Yeah, it's probably a username of admin with a password of admin. Or, if you actually bothered to change your router login info, congrats! Give yourself a pat on the back. From here, find a section such as "port forwarding," or "apps and gaming." To set up a port forward on my Linksys router, I navigated to Security > Apps and Gaming > Single Port Forwarding where I found options for port range triggering and port range forwarding. Enter your information as necessary. The port Madsonic uses by default is 4040, but you can change this if you prefer. If using the default value, enter 4o4o for both private and public ports, and select TCP as your protocol is prompted.
Finding a Madsonic Client
For in-home streaming, if you're on the same network as your Raspberry Pi Madsonic server you don't even need a client. Merely fire up a web browser on your Windows, macOS, or Linux PC and head to Your Pi's IP address:4040. Alternatively, there are tons of different client apps. On Android, I've had success with Madsonic PRO, Madsonic, Subsonic, and DSub. for iOS, iSub, Audiophone, and SubStream work well. SubsonicTV for Roku allows Roku users to stream Madsonic to TVs, and My Music To Me for Sonos lets you enjoy Madsonic server on your Sonos speakers. SubAir and Subclient on Windows run great, and there's Thumper or Submariner for macOS. However, Madsonic clients abound, so you can find an app for your device that you like.
Madsonic on the Raspberry Pi Review
I really enjoy running Madsonic on the Raspberry Pi. It's ridiculously easy to install and flaunts compatibility with a bunch of different operating systems. My preferred OS is simply a Debian Linux distro such as Raspbian. You'll find loads of client apps for the likes of Android, iOS, macOS, and Windows. Performance is excellent. For music streaming, the Pi 4 should handle anything you throw at it. What's more, a Pi 4 can handle remote streaming for music. Unfortunately, remote streaming of video won't work on a Pi 4.
Set up is a bit more involved than with Plex, Emby, or Jellyfin. But Madsonic is an awesome option for a DIY music server. I self-host my massive music collection featuring tons of FLAC vinyl rips on a Raspberry Pi Madsonic media server, and it runs flawlessly. Performance is superb on my home network, or streaming to my Android phone and tablet on-the-go.
Should You Use Madsonic on the Raspberry Pi?
For music buffs, definitely consider a low-power Raspberry Pi Madsonic server. It's extremely energy-efficient, features minimal set up, run on virtually any Raspberry Pi-compatible OS, and handles music transcodes flawlessly. While video does work too, you're not going to be able to transcode well, and remote video streaming is out of the question. Still, Madsonic is a nifty media server application that's great for cobbling together a sort of DIY Spotify.
Your turn: Which media server software do you run on the Raspberry Pi?

Moe Long is an editor, writer, and tech buff with a particular appreciation for Linux, Raspberry Pis, and retro gaming. Writing online since 2013, Moe has bylines at MakeUseOf, TechBeacon, DZone, SmartHomeBeginner, DEV.to, DVD Netflix, and Electropages. You can read his writings on film and pop culture at Cup of Moe, check out his tech reviews, guides, and tutorials at Tech Up Your Life, and hear his thoughts on movies on the Celluloid Fiends podcast. Aside from writing and editing, Moe has an online course, the Beginner's Guide to Affiliate Blogging From Scratch. When he's not hammering away at his keyboard, he enjoys running, reading, watching cinema, listening to vinyl, and playing with his dog Sebastian.


Leave your feedback...