
How to Make a Raspberry Pi Game Server
The Raspberry Pi is a nifty little single-board computer. It's perfect for use as a basic Linux desktop, media centre PC, retro gaming device, development machine, or any number of projects. Because of its low power consumption and respectable processing capabilities, the Raspberry Pi makes a superb server. Whether it's a network-attached storage (NAS) device for media or file storage, smart home hub, or something else, the Raspberry Pi is a fantastic choice. Notably, you can run a game server on the Raspberry Pi with ease. From a Minecraft Pi server to a Quake or Doom server, to FreeCiv, here's how to make a Raspberry Pi game server!
Raspberry Pi Game Server Requirements
Using a Raspberry Pi as a game server requires little more than a Raspberry Pi board, Linux operating system, power supply, MicroSD card, and case. Plus, you'll need a monitor and active internet connection, either connected via Wi-Fi or ethernet. And or course, you'll need to install the specific server software you'd prefer to run.
Raspberry Pi game server hosting requirements:
- Raspberry Pi board (Raspberry Pi 3 or higher, Raspberry Pi 4 recommended)
- MicroSD card
- 5.1V @ 2.5A micro USB power supply (Pi 3/Pi 3 B+), 15.3W USB-C power supply (Raspberry Pi 4)
- Linux operating system
- Active internet connection (Wi-Fi or ethernet)
- Peripherals (keyboard, mouse)
- Monitor/TV/projector for a display
Total cost: $35+ USD. You can use your Raspberry Pi as a game server for as low as $35. A Raspberry Pi 4 with 1GB of RAM clocks in at $35, with the 2GB unit sliding in at $45, the 4GB Raspberry Pi board retailing for a cool $55, and the 8GB for around $75.
Can the Raspberry Pi Run a Game Server?
The Raspberry Pi admittedly might not be a beast of a computer. Still, the credit-card-sized single-board computer packs a respectable performance punch, especially considering its low price tag and energy efficiency. Don't expect to be able to host a massive Team Fortress 2 or Counter-Strike Source server with a Raspberry Pi. But a Quake, Doom, or Minecraft Pi server should run like a champ on the Raspberry Pi.
How to Make a Raspberry Pi Minecraft Server
While the Raspberry Pi might not be a gaming powerhouse, certain games run extremely well on the Pi. Emulation of retro games is great, and Minecraft Pi edition plays well. Likewise, you can create a Raspberry Pi Minecraft server running on a Raspberry Pi. You'll need to start with a version of Raspbian or another compatible Debian-based Linux operating system on the Raspberry Pi. First up, run an update:
sudo apt update

sudo apt upgrade
or
sudo apt-get update && apt-get upgrade
Since your Raspberry Pi gaming server requires a decent amount of system resources, particularly RAM, you'll want to raise the memory split to 16MB. Navigate to Menu > Preferences > Raspberry Pi Configuration tool > Advanced Options > Memory Split and change the selection to 16MB.
Now, head over to Menu > Preferences > Raspberry Pi Configuration tool > Boot Options > Desktop/CLI and choose Console.
Head under Menu > Preferences > Raspberry Pi Configuration tool > Advanced Options > SSH and enable SSH. Under Advanced Options select GL Driver and hit Enter, then select GL (Fake KMS) and hit enter, finally press Finish. Reboot when you're prompted to.
How to make a Minecraft server - Installing Java Runtime Environment
In order to make a Minecraft server on a Raspberry Pi, you'll need to install the Java runtime environment. In a terminal, run:
sudo apt install default-jdk
Check which version of Java is installed using:
java -version
Install Minecraft on the Raspberry Pi
Now, add a Minecraft user:
sudo useradd -r -m -U -d /opt/minecraft -s /bin/bash minecraft
After that, proceed with installing Minecraft on the Pi:
sudo su - minecraft
Create two different directories, one for the server and one for tools inside your home directory:
mkdir -p ~/{tools,server}
Then, download and compile mcrcon, an RCON client coded in C that lets you connect to a Minecraft server and issue commands:
cd ~/tools && git clone https://github.com/Tiiffi/mcrcon.git
Head to the repository directory:
cd ~/tools/mcrcon
And compile mcrcon with:
gcc -std=gnu11 -pedantic -Wall -Wextra -O2 -s -o mcrcon mcrcon.c
Test the mcrcon installation using:
./mcrcon -h
Download the Minecraft Server
Once you've installed Minecraft Raspberry Pi edition, you'll need to download the Minecraft server (the most up to date version may have changed, so check the Minecraft downloads page for the latest iteration):
wget https://launcher.mojang.com/v1/objects/3dc3d84a581f14691199cf6831b71ed1296a9fdf/server.jar -P ~/server
Next, navigate into the server directory and start up the Minecraft server:
cd ~/server

java -Xms512M -Xmx768M -jar server.jar nogui
Before you can actually run your Minecraft server, it's necessary to opt into the Minecraft EULA. Open the eula.txt file and switch eula=false to eula=true:
nano ~/server/eula.txt#By changing the setting below to TRUE you are indicating your agreement to our EULA (https://account.mojang.com/documents/minecraft_eula).
#Thu Sep 19 21:06:24 BST 2019
eula=true
Save and close with Ctrl + O, then CTRL + X, then Y. Then, configure your server properties:
nano ~/server/server.properties
And find the lines:
rcon.port=25575
rcon.password=strong-password
enable-rcon=true
Replace strong-password with, well, a strong password.
In order to run Minecraft as a service, it's first necessary to generate a Systemd file. Open up the minecraft.service file:
sudo nano /etc/systemd/system/minecraft.service
Inside, copy:
[Unit]
Description=Minecraft Server
After=network.target

[Service]
User=minecraft
Nice=1
KillMode=none
SuccessExitStatus=0 1
ProtectHome=true
ProtectSystem=full
PrivateDevices=true
NoNewPrivileges=true
WorkingDirectory=/opt/minecraft/server
ExecStart=/usr/bin/java -Xmx768M -Xms512M -jar server.jar nogui
ExecStop=/opt/minecraft/tools/mcrcon/mcrcon -H 127.0.0.1 -P 25575 -p strong-password stop

[Install]
WantedBy=multi-user.target
You may need to change the Xms and Xms flags. Xms specifies the initial memory allocation pool, whereas Xmx states the max memory allocation pool for your JVM (Java virtual machine). Double-check the RCON port as well as password. When everything's properly configured, save and close using Ctrl + O, then CTRL + X, then Y.
Then, reload the systemd config:
sudo systemctl daemon-reload
Now, start up your Minecraft server:
sudo systemctl start minecraft
If you'd like to check the server status you may use:
sudo systemctl status minecraft
Additionally, you can monitor your server log:
tail -f /opt/minecraft/server/logs/latest.log
Should you like to enable Minecraft to start automatically upon first boot you can run:
sudo systemctl enable minecraft
You might want to view the Minecraft console. To accomplish this, and use the mcrcon program, enter:
/opt/minecraft/tools/mcrcon/mcrcon -H 127.0.0.1 -P 25575 -p strong-password -t
A message should read:
Logged in. Type "Q" to quit!
>
That's it! You've properly installed a Minecraft server on your Raspberry Pi.
Raspberry Pi Quake Server
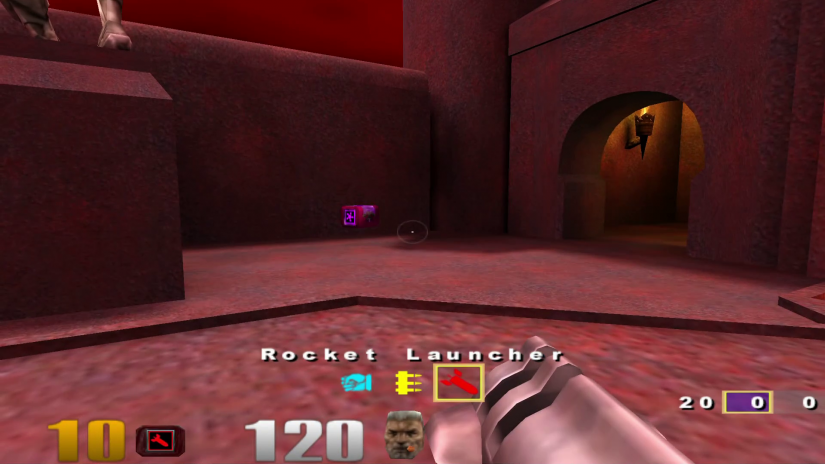
The likes of Doom and Quake proved revolutionary in the gaming world. These ground-breaking first-person shooters (FPS) solidified the genre, and paved the way for a slew of epic releases, exhibiting an influence even today. While Quake III Arena may be old, it's still a blast to revisit. Thankfully, the Raspberry Pi runs Quake III with ease. Moreover, you can easily create a Raspberry Pi Quake server.
With Raspbian or another Debian-based Linux distribution (distro) installed, perform an update:
sudo apt-get update && apt-get upgrade
We're using a Docker-based installation. In a command line, run:
sudo apt update
sudo apt install -y \
        apt-transport-https \
        ca-certificates \
        curl \
        gnupg2 \
       software-properties-common
Then, download the Docker key:
curl -fsSL https://download.docker.com/linux/$(. /etc/os-release; echo "$ID")/gpg | sudo apt-key add -
Add the official Docker repos:
echo "deb [arch=armhf] https://download.docker.com/linux/$(. /etc/os-release; echo "$ID") \
        $(lsb_release -cs) stable" | \
       sudo tee /etc/apt/sources.list.d/docker.list
After that, install Docker:
sudo apt update
sudo apt install -y --no-install-recommends \
      docker-ce \
      cgroupfs-mount
With that completed, install the Quake 3 Docker server:
curl -sSL https://github.com/wouterds/rpi-quake3-server/raw/master/install.sh | sh
Run it using:
cd ./quake3 docker-compose up -d # start server in background
FreeCiv Server on the Raspberry Pi
Sid Meier's Civilization is a popular video game series. The free, open-source FreeCiv provides an easy to use Raspberry Pi Civilization server for the Pi. What's more, it's a breeze to install:
sudo apt-get update && apt-get upgrade
Then, install the FreeCiv server:
sudo apt-get install -y freeciv-server freeciv-client-gtk
Now all you need to start the server is:
freeciv-server
You'll be able to connect to your server from any device on your network running the FreeCiv game client.
Assault Cube Server on the Raspberry Pi
For a Counter-Strike like experience, check out the free FPS AssaultCube. The Raspberry Pi works really well as an AssaultCube game server. Begin by creating a new directory:
mkdir assaultcube;
cd assaultcube
Proceed to download the source code:
wget http://http://sourceforge.net/projects/actiongame/files/AssaultCube%20Version%201.1.0.4/AssaultCube_v1.1.0.4.tar.bz2
Followed by:
wget http://http://sourceforge.net/projects/actiongame/files/AssaultCube%20Version%201.1.0.4/AssaultCube_v1.1.0.4_source.tar.bz2
Then, unpack the source code using:
tar -xvf AssaultCube_v1.1.0.4.tar.bz2
mv 1.1.0.4 ac
tar -xvf AssaultCube_v1.1.0.4_source.tar.bz2
mv 1.1.0.4 source
Compile the server using:
cd /home/pi/assault/source/source/enet
Next:
sudo sh ./configure -build=x86-linux -host=arm-unknown-linux-gnueabi
sudo make clean && sudo make && sudo make install
When that finishes, run:
cd /home/pi/assault/source/
mkdir bin_unix
cd bin_unix
mkdir native_server
cd /home/pi/assault/source/source/src
sudo make server_install
And your server should be ready to go! But you now need to copy the program file to the Linux program data:
cp -R /home/pi/assault/source/bin_unix/native_server/ac_server /home/pi/assault/ac/bin_unix/native_server
Similarly, download a library file so that you can run a server:
sudo ln -s /usr/local/lib/libenet.so.1.0.0 /use/lib/libenet.so.1
And start your server with:
sh server.sh
How to Make a Raspberry Pi Game Server - Final Thoughts
When most people think of Raspberry Pi gaming, it's usually playing the likes of Quake III, Doom, or emulation with the likes of RetroPie, Recalbox, and Lakka. But the Pi is a fantastic game server as well. Sure, it's not going to host a massive party, but for a small LAN party or a modest game server, the Pi is a solid choice that won't run up your electricity bill.
Your turn: What game servers are you running on the Raspberry Pi, and what games are you playing on the Raspberry Pi?

Moe Long is an editor, writer, and tech buff with a particular appreciation for Linux, Raspberry Pis, and retro gaming. Writing online since 2013, Moe has bylines at MakeUseOf, TechBeacon, DZone, SmartHomeBeginner, DEV.to, DVD Netflix, and Electropages. You can read his writings on film and pop culture at Cup of Moe, check out his tech reviews, guides, and tutorials at Tech Up Your Life, and hear his thoughts on movies on the Celluloid Fiends podcast. Aside from writing and editing, Moe has an online course, the Beginner's Guide to Affiliate Blogging From Scratch. When he's not hammering away at his keyboard, he enjoys running, reading, watching cinema, listening to vinyl, and playing with his dog Sebastian.


Leave your feedback...