
How to Install Subsonic on Raspberry Pi
The Raspberry Pi boasts many uses. I enjoy using my Raspberry Pi 4 as a basic desktop PC, and have created retro gaming emulation arcades, smart home hubs, and a slew of other Raspberry Pi-based projects. Easily one of the best, most functional, and easiest Raspberry Pi builds is a media or file server. There's a ton of home server software available for transforming the Pi into a homelab. Learn how to install Subsonic on the Raspberry Pi for a low-power home media server!
What is Subsonic?
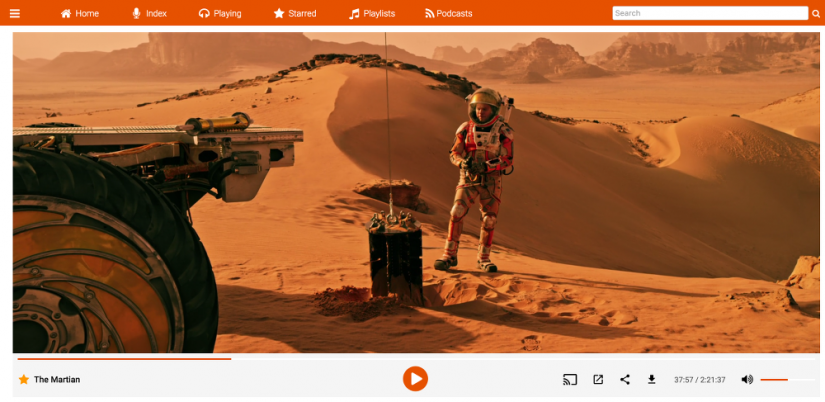
Subsonic is a media server software option. While it's perfectly capable of handling videos such as movies and TV shows, its original intent was music. And that's exactly where Subsonic shines. Using Subsonic, you can browse your media library from anywhere. There's a modern, crisp web interface, and tons of functionality such as the ability to add ratings or comments to albums. You can generate playlists and share those with friends. It's something of a roll-your-own Spotify or Netflix, where you can stream movies, TV shows, and music files on your mobile devices, PCs, and streaming boxes. But you provide all of the content, so your digitized and legally obtained Blu-ray, DVD, CD, and vinyl rips.
File handling is superb. You can play back MP3, OGG, AAC, FLAC, WMA, and APE. Virtually any networked media player such as VLC, Windows Media Player, and Winamp can read a Subsonic server. A robust transcoding engine lets you stream lossless and lossy formats with on-the-fly MP3 conversion. There's also on-the-fly resampling to lower bitrates with a high-quality ffmpeg encoder. You can access your Subsonic library via a browser-based web app, download apps for Android and iOS, as well as stream via Chromecast and Sonos gadgets. Plus, there's an integrated podcast receiver. The cross-platform Subsonic runs on Windows, macOS, and Linux. Subsonic has been forked into the likes of Madsonic, Airsonic, and Libresonic. Although it began as an open-source project, it's now closed-source.
Why Use the Raspberry Pi for a Media Server?
The credit card-sized Raspberry Pi makes the perfect network-attached storage device (NAS). Because of its small footprint, the Raspberry Pi takes up virtually no space. Just hook up an external harddrive or flash drive for file storage. Moreover, a Raspberry Pi boasts incredible efficiency, sipping power. And the base price, $35 USD for a 2GB DDR4 RAM Raspberry Pi 4, is cost-effective. Although you won't necessarily win any benchmarking tests, the Raspberry Pi 4 can actually tackle music streaming to even remote clients, as well as music file transcoding.
Video is a different matter. For in-home video streaming with no transcodes, a Raspberry Pi 4 is able to muster around four simultaneous 1080p videos. That's pretty impressive, particularly considering its affordability. 4K video streaming, so long as on transcoding is necessary, is possible on a Pi 4. If you're mostly streaming music, or largely streaming to a limited number of clients within your home network, the Raspberry Pi makes an excellent NAS. Because of its superb Linux support and a slew of media server applications including Plex, Emby, Madsonic, Volumio, and Subsonic, the Raspberry Pi is an ideal SBC homelab.
Why use a Raspberry Pi as a media server:
- Cost-effective
- Energy efficient
- Small physical footprint
- Lots of media server software
- Runs Linux well
- Easy to set up
How to Install Subsonic on the Raspberry Pi - Build a DIY Raspberry Pi Media Server
A Subsonic personal media streamer with a Raspberry Pi is a pretty cheap project. You'll need little more than a Raspberry Pi board, a Linux-based operating system (OS), and some software. On the hardware side, a Pi is required. I suggest a Raspberry Pi 4 for best results, although a Pi 3 B+ and even Pi Zero or Zero W should suffice. A case is optional but recommended, and you'll need a compatible power supply unit (PSU). Plus, a microSD card will be mandatory for installing an operating system. Of course, you'll need a library of media files such as music, movies, or TV shows. I suggest storing these on an external harddrive or flash drive.
On the software side, you'll need a Raspberry Pi-compatible Linux distribution (distro). Additionally, you'll need to download the Subsonic software and its requisites, as well as a client app if you'd like to access Subsonic on your Andriod or iOS devices.
What you'll need for a Subsonic personal media server on a Raspberry Pi:
- Raspberry Pi (Raspberry Pi 4 recommended, but other iterations should work fine)
- microSD card with compatible Linux distro installed
- Case (optional, recommended)
- Media library - best stored on an external harddrive or flash drive
- Raspberry Pi power supply
- Peripherals (keyboard, mouse)
- Subsonic server software
Total cost: $35+ USD. If you've already got a spare Pi lying about, this is a really affordable project. Even if you have to purchase everything necessary, you can snag a full-on kit for around $45, making this ridiculously cheap.
Install Subsonic on the Raspberry Pi - Debian and Ubuntu
For Debian and Ubuntu-based Linux distros such as Raspbian, Ubuntu MATE, and Linux Mint, begin by installing Java.
In a fresh command prompt, enter:
sudo apt-get install openjdk-8-jre
This will begin downloading required Java packages. You'll be asked if you want to download the packages and told how much disk space it will take up. Accept press Y to continue, or N to stop. Hit Y and wait for OpenJDK to finish installing. After that, Java 8 should be installed, but you can check this by entering:
java - version
This should return a string telling you the version, if any, of Java installed on your Raspberry Pi. But programs like Subsonic will need to know where to look for Java. So run:
sudo nano /etc/environment
Add the line:
JAVA_HOME=/usr/lib/jvm/jdk-8-oracle-arm-vfp-hflt
Save with CTRL + O, then exit with CTRL + X.
With Java properly installed, download and install Subsonic. Head to the downloads page and obtain the latest DEB package. Change directories into the folder where your DEB package is downloaded. So if that's in your Downloads folder, enter:
cd /home/pi/Downloads
Alternatively, instead of downloading the DEB package to your Pi you may instead merely enter the following in the command line, replacing x.x.x with the current version of Subsonic, i.e. 6.1.6:
wget –O http://downloads.sourceforge.net/project/subsonic/subsonic/x.x.x/subsonic-x.x.x.deb
Then, run (where x.x is replaced by the version of Subsonic you downloaded, i.e. subsonic-6.1.6.deb):
sudo dpkg -i subsonic-x.x.deb
Now, Subsonic should be installed and start running. You can check out a log of Subsonic's activity with:
sudo tail /var/subsonic/subsonic_sh.log
And you can stop Subsonic with:
sudo /etc/init.d/subsonic stop
Subsonic Raspberry Pi Set Up
By default, Subsonic installs with the user root. It's totally usable as it, but for security purposes, it's best to change it to a non-root user account such as a Subsonic user.
Run the command:
sudo adduser subsonic
While I'm making Subsonic its own user profile, you can use a different name as well. You'll be prompted to enter some information for this user such as a full name, room number, work phone, and home phone. You can leave certain spots blank, like phone numbers, but input a name like Subsonic or even your own name.
To force Subsonic to use this new user account, edit the config file:
more /etc/default/subsonic
The last line reads:
SUBSONIC_USER=root
Change that to:
SUBSONIC_USER=subsonic
or whatever user name you picked. And make Subsonic an owner of /var/subsonic:
sudo chown subsonic:subsonic /var/subsonic –Rv
Subsonic on the Raspberry Pi Configuration
Make sure Subsonic is running by starting it:
sudo /etc/init.d/subsonic start
Now, head to http://localhost:4040/ or, if you're on a machine other than your Raspberry Pi, http://[Pi IP Address:4040/. To find your Raspberry Pi's IP address, enter:
hostname -I
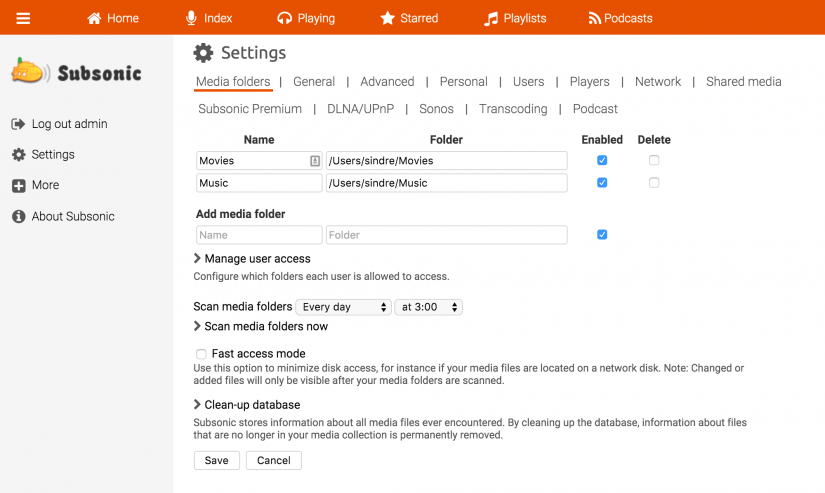
From here, you'll be greeted by the friendly Subsonic installation screen. To add your media, head to Settings > Media Folders. Here, you can add different folders such as Music, Movies, Movies, Soundtracks, Series, etc. Input names, paths to your folders, and the type of content, for instance, Music - Artists, Music - Compilations, or Video - Movies. Input group information, like Music, TV, or Series.
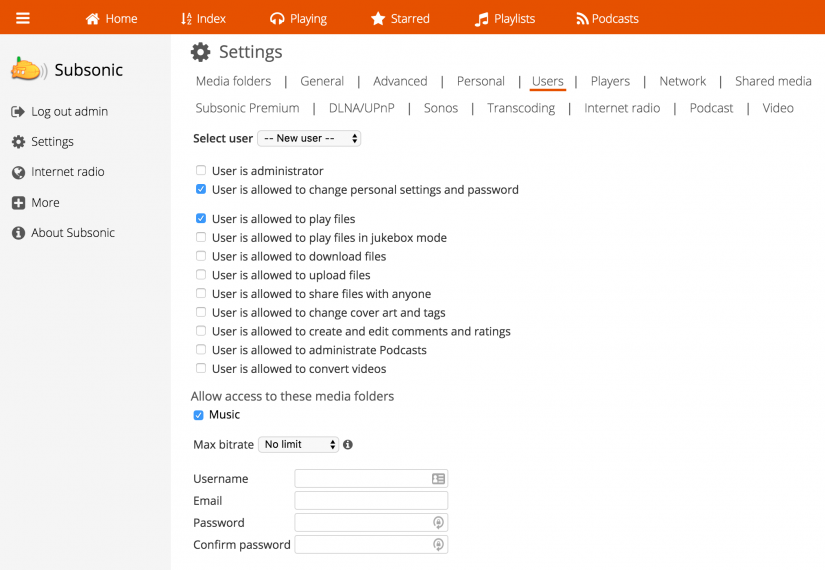
There are tons of different settings you can tweak. Under Users, you may select different users and check various options such as whether a user is an administrator, and permissions like the ability to download files or play files in jukebox mode. Plus, you can pick max bitrates. You'll be able to integrate with Sonos under the Settings > Sonos, and configure transcoding at Settings > Transcoding.
Port Forwarding - Remote Subsonic Streaming on the Raspberry Pi
Subsonic is now completely functional and ready for prime time. But you might want to listen remotely, outside of your home network. Navigate to Settings > Network and tick the box for "Automatically configure your router to allow incoming connections to Subsonic." Additionally, check the box next to "Access your server over the Internet." Input a URL that you'd like to acces s Subsonic from, and hit Save.
If everything proceeded as normal, you'll see a message reading "Successfully registered web address." That means your router is capable of automatic port forwarding. If it didn't work, you'll need to manually establish a port forward on your router. The way this is accomplished varies by router. Consult the website Portforward.com to find out how to set up a port forward on your specific router. Log into your router at an address such as 192.168.0.1, 192.168.1.1, 192.168.2.1. On my Linksys WRT 3200 ACM, that was 192.168.1.1.
Enter the user name and password required to log in. Then, locate a section such as Apps and Gaming, or Port Forwarding. With my router, the port forwarding section was Security > Apps and Gaming > Single Port Forwarding, and I saw options for Port Range Forwarding as well as Port Range Triggering.
Download a Subsonic App

You can find tons of different Subsonic apps for Android and iOS devices, Amazon Fire gadgets, as well as Windows or macOS devices. There's a Sonos plugin, a Roku app, and even a Kodi plugin. Whatever devices you're using, there's a Subsonic app for that. Personally, I prefer Subsonic Music Streamer, but have had excellent experiences with DSub as well.
Build a Personal Media Streamer with Subsonic on the Raspberry Pi - Final Thoughts
The Raspberry Pi absolutely rocks with Subsonic. Music streaming is great, and lets you run your own sort of personal Spotify or Netflix. Set up is simple enough, and Subsonic offers a host of features for tweaking transcoding settings, creating user profiles, and even integrating with popular music streaming environments such as the Sonos ecosystem. Cost-effective, energy-efficient, and fun, a Raspberry Pi NAS with Subsonic is an awesome project idea.
Looking for more media server software for the Raspberry Pi? Consider Jellyfin!

Moe Long is an editor, writer, and tech buff with a particular appreciation for Linux, Raspberry Pis, and retro gaming. Writing online since 2013, Moe has bylines at MakeUseOf, TechBeacon, DZone, SmartHomeBeginner, DEV.to, DVD Netflix, and Electropages. You can read his writings on film and pop culture at Cup of Moe, check out his tech reviews, guides, and tutorials at Tech Up Your Life, and hear his thoughts on movies on the Celluloid Fiends podcast. Aside from writing and editing, Moe has an online course, the Beginner's Guide to Affiliate Blogging From Scratch. When he's not hammering away at his keyboard, he enjoys running, reading, watching cinema, listening to vinyl, and playing with his dog Sebastian.


Leave your feedback...