
How to Install OpenMediaVault on RockPro64
A home server is a fantastic device for everything from media server purposes to file backups. And while there are plenty of off-the-shelf NAS (network-attached storage devices) available. a more cost-effective solution is a do-it-yourself (DIY) NAS. Learn how to make your own home server that's energy-efficient and affordable with OpenMediaVault (OMV) running on the RockPro64!
What is OpenMediaVault (OMV)?
OpenMediaVault, or OMV, is a Linux-based server operating system (OS). It's a Debian Linux OS with various server components baked in such as SSH, SFTP, BitTorrent, DAAP media server, and RSync. There's an easy-to-use web user interface (UI) that allows for volume management and simple installation of plugins for the likes of Plex. The open network attached storage distro is perfect for home office use as well as small business deployment. What's best of all is that OpenMediaVault remains free to use.
What is the RockPro64?
From Pine64 comes the RockPro64, a single-board computer (SBC) and Raspberry Pi alternative that features superb specs. Sporting a Rockchip RK3399 system-on-a-chip (SoC) with a Mali T860 MP4 GPU, the RockPro64 boasts blistering fast, particularly for a maker board of its credit card size, processing power. Up to 4GB of LPDDR4 allow for ample multi-tasking, and there's a microSD card slot as well as eMMC module for software installation. Gigabit Ethernet further makes the RockPRo64 a great consideration as a NAS device.
RockPro64 Specs
- Rockchip RK3399 SOC with Mali T860 MP4 GPU
- LPDDR4 RAM (up to 4GB)
- Gigabit Ethernet
- MicroSD Slot
- eMMC Module Slot
- SPI Flash 128Mbit
- 4K Digital Video Out
- 2x USB 2.0 Host
- 1x USB 3.0 Host
- 1x USB-C Host (With Video Out)
- PCIe 4x Open-Ended Slot
- 40 GPIO Pins
- Expansion Bus
- PI-2 Bus
- Touch Panel Port (TP)
- Display Serial Interface (DSI) Port
- eDP Port
- Stereo MiPi-SCI Port for 12MPx cameras
- IR R/X Port
- Real-Time Clock Port (RTC)
- Lithium Battery Port
- CMOS Sensor Interface Port
- Optional 802.11 AC + BT 4.0/5.0 Expansion Module
- Headphone Jack with Mic Input
- 5.5″ Barrel Power (12V 3A/5A) Port
How to Install OpenMediaVault on the RockPro64
Building an energy-conscious yet powerful DIY home server with a RockPro64 is super easy. You'll need a RockPro64 board, case, power supply, microSD card or eMMC module, as well as peripherals including a keyboard and mouse. On the software side, you need the RockPro64 OpenMediaVault image, image mounting software such as Etcher, and a program like 7Zip for decompressing zipped files.
RockPro64 OpenMediaVault DIY NAS parts list:
- RockPro64 board
- PSU
- Case
- microSD card or eMMC module
- Image mounting software (i.e. Etcher)
- Decompression software (i.e. 7Zip)
Total cost: $63+ USD. The 2GB RockPro64 board retails for $63, while its 4GB variant goes for around $80. Then, you'll need to snag a case, power supply, and microSD card or eMMC module. All required software is completely free. Overall, this is a really affordable project, particularly when compared to the high cost of most off-the-shelf NAS devices. I suggest using the RockPro64 NAS case since it's got room for up to two 2.5" or 3.5" SATA drives. But any case should do just fine.
Download OpenMediaVault for the RockPro64
Begin by downloading ayufan's RockPro64 NAS image of OpenMediaVault. You can select from either the 32-bit Debian Stretch armhf microSD card and eMMC image, or a 64-bit Debian Stretch microSD card and eMMC image. The web GUI log-in information for both OMV variants is the same:
username: admin
password: openmediavault
However, the SSH and console log-in information is:
username: root
password: openmediavault
Mount Your OMV RockPro64 Image to Boot Medium
With your OMV image downloaded, mount it to a microSD card or eMMC module. Both the Stretch 32-bit and 64-bit images are compressed as XZ files, so you might be able to burn it straight to a microSD card or eMMC module as a bootable OS, or you might need to decompress it first. Once your image is ready to be mounted, fire up a program like Etcher. First, select your OpenMediaVault image. Then, choose your installation destination, an eMMC module or microSD. When you're all set up, flash the image and wait a few minutes for image mounting to complete. When that's done, pop it into your RockPro64 and power it on.
OpenMediaVault RockPro64 Set Up
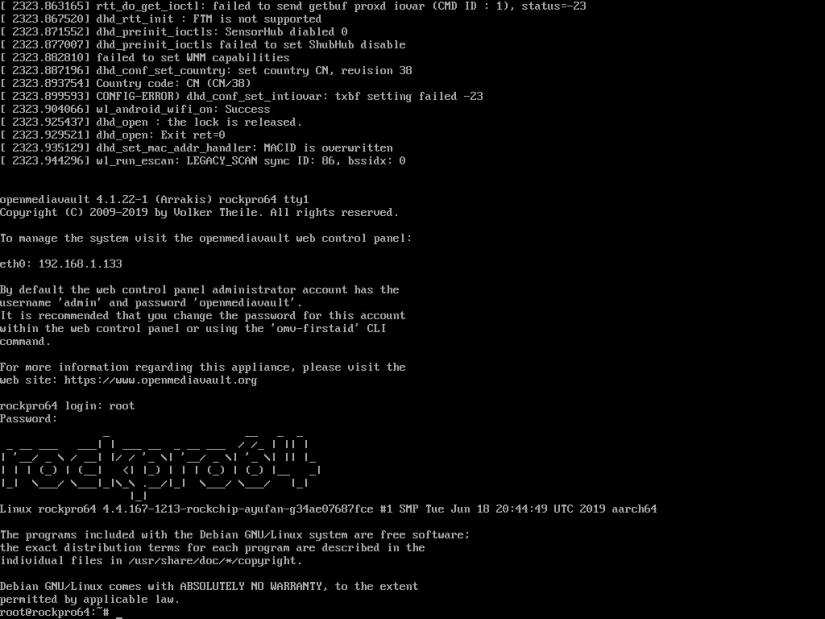
Once you've got your OpenMediaVault boot drive prepared and powered on your RockPro64 board, you'll see some preliminary set up via the command line. Eventually, that stops and you can enter the SSH/console details to login with the username root and password openmediavault. Make sure your Pine64 RockPro64 is connected to the internet either with Wi-Fi or Ethernet. I used Ethernet, and particularly for a RockPro64 NAS, you'll want to utilize its Gigabit Ethernet. When you've logged into the console via the command line note the IP address of your OMV RockPro64. Then, using another device on your home network such as a laptop or desktop, open a browser and navigate to your RockPro64's IP address. This pulls up the OpenMediaVault web GUI.

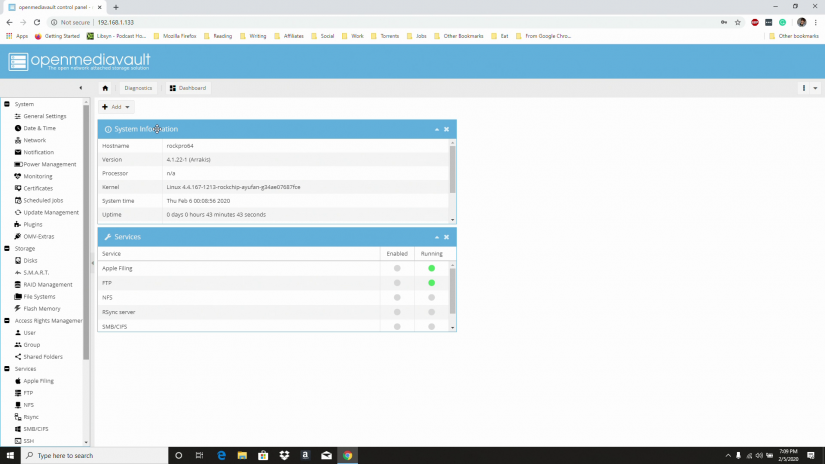
Upon first logging into the OMV web GUI, you'll be greeted by the friendly dashboard. From here, you've got tons of different options. For instance, you can proceed to install various OpenMediaVautl plugins and OMV-extras, configure storage such as various file systems, and manage services. Certain services will be running by default such as FTP.
Install OpenMediaVault Plugins and OMV-Extras
What makes OMV such a fantastic server operating system is that it's a full-fledged Debian Linux distro with a handful of helpful server components pre-installed such as SFTP as well as a modular installation. Its extensive list of plugins lets you easily download, install, and configure common server applications. To install OpenMediaVault plugins, head to Plugins and find a desired plugin. I installed the Transmission BitTorrent client by navigating to Plugins > Transmission and checking the box next to the Transmission torrent client. Then, I hit Install, and the OMV Transmission plugin proceeded to download.
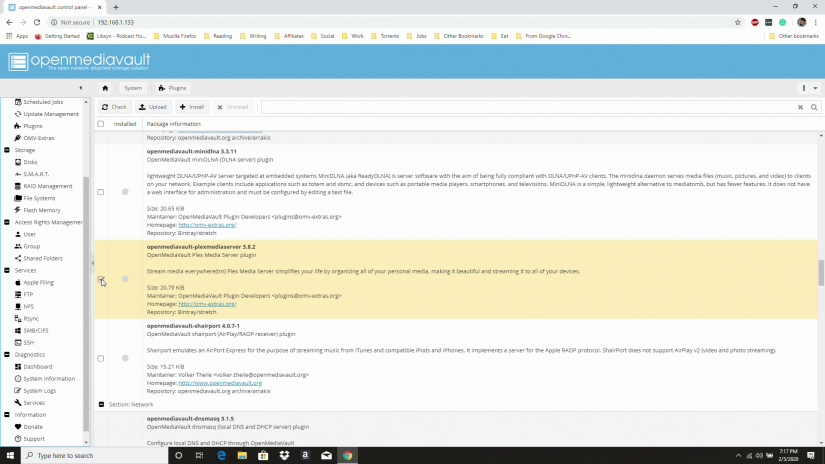
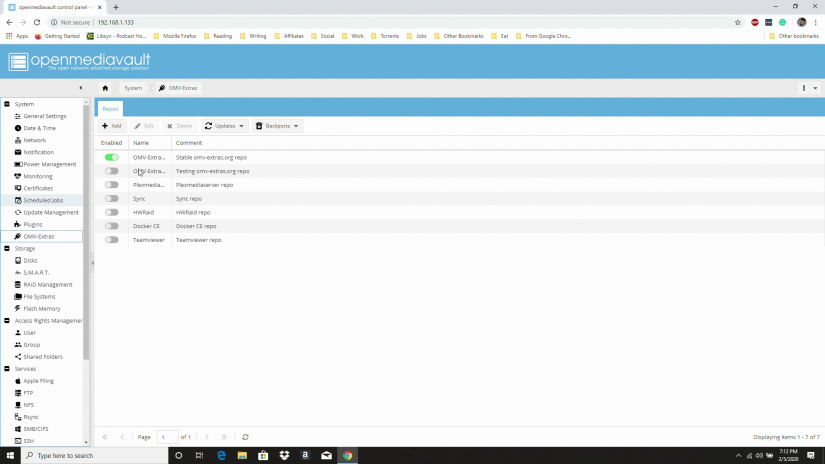
Similarly, you can add various extras under the OMV-Extras tab. Certain extras are already loaded up, but you'll need to enable the OpenMediaVault extras you want. To enable an OMV-Extra, simply toggle on the Enabled button next to a plugin. Since I wanted to install Plex on my OpenMediaVault RockPro64 NAS, I first enabled the Plex Media Server repo under OMV-Extras > Plex Media Server repo. Then, I went under Plugins > Plex Media Server > Install. After that, Plex was available under services.
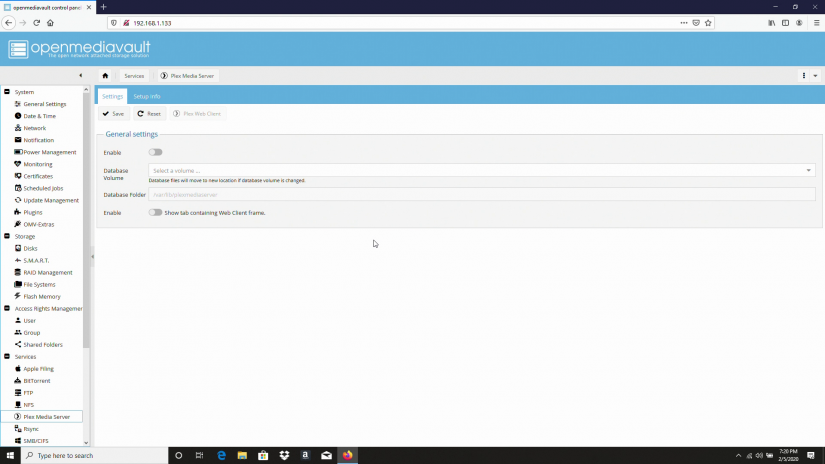
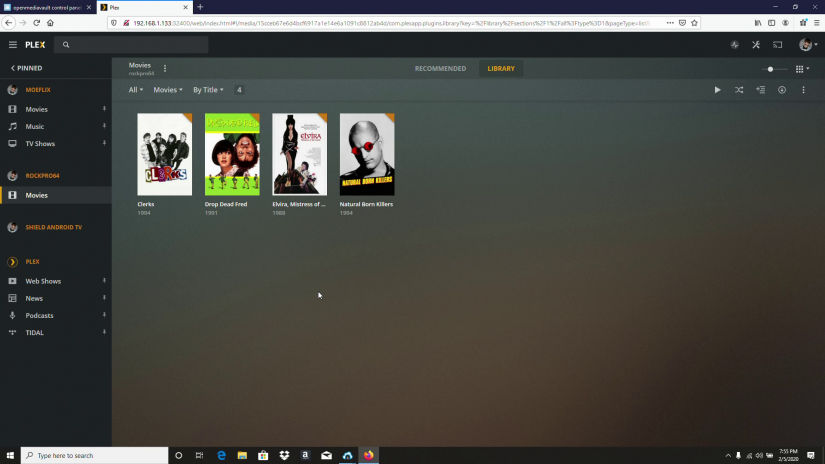
You can manage services such as Plex. For example, I set up Plex Media Server on OpenMediaVault by heading to Services > Plex Media Server. First off, I enabled Plex. Then, you can add a volume or launch the Plex web client. I proceeded to launch the web client, and from here added my movies.
Enable SSH and SFTP on OpenMediaVault Running on the RockPro64
Although SSH and SFTP come pre-installed on OpenMediaVault, you'll need to enable those as well as allow for remote logins if you want to manage your OMV RockPro64 server remotely.
To enable SFTP, head to Services > FTP and check the Enable box. You might want to tick the Permit root login box if you'd like to allow for superuser login.
Likewise, for SSH navigate to Services > SSH and tick the Enable checkbox as well as the Permit root login box.
Now, SSH and SFTP should be enabled.
RockPro64 NAS Running OpenMediaVault Review
The RockPro64 is an awesome little single-board computer. With its Rockchip Rk3399 SoC and up to 4GB of RAM, it's a competent little maker board. While you can install a compatible Linux distribution and load up server software, ranging from Plex and Emby to OwnCloud, OpenMediaVault simplifies the process. The web GUI is simple to access, and you can easily enable and disable various services, plus install extras and plugins. Remote server management is a breeze both through its extensive web GUI as well as logging in via SSH and SFTP.
In a matter of minutes, I was able to create a Plex media server on my RockPro64 with OMV. For running a headless server, OpenMediaVault is a great option. It uses few system resources, and allows for the installation of a bevy of server components, from web server apps to file server programs and media server software as well. What's more, OpenMediaVault remains easy to use. With its library of add-ons, extremely simple usability, and versatility, OMV is an amazing program that truly transforms the RockPro64 into a robust network-attached server device. There's a good balance of powerful processing and energy efficiency that makes a Pine64 RockPro64 OMV build an excellent home server, or even small business server alternative.
How to Run OpenMediaVault on the RockPro64 - Who Should Use OMV on the RockPro64?
If you're in the market for a NAS, the RockPro64 plus OpenMediaVault is a worthy consideration. It's a more affordable build than the average off-the-shelf NAS device, and yields similar performance to most network-attached server units. You can even snag a desktop metal case that holds up to two 2.5" or 3.5" drives for a completely self-contained RockPro64 server. And OpenMediaVault is ridiculously easy to set up. The web GUI allows for remote server management, and there are loads of plugins and OMV-extras for customizing your server.
What SBCs are you using and what server software do you recommend?

Moe Long is an editor, writer, and tech buff with a particular appreciation for Linux, Raspberry Pis, and retro gaming. Writing online since 2013, Moe has bylines at MakeUseOf, TechBeacon, DZone, SmartHomeBeginner, DEV.to, DVD Netflix, and Electropages. You can read his writings on film and pop culture at Cup of Moe, check out his tech reviews, guides, and tutorials at Tech Up Your Life, and hear his thoughts on movies on the Celluloid Fiends podcast. Aside from writing and editing, Moe has an online course, the Beginner's Guide to Affiliate Blogging From Scratch. When he's not hammering away at his keyboard, he enjoys running, reading, watching cinema, listening to vinyl, and playing with his dog Sebastian.


Leave your feedback...