
How to Build a Kodi Raspberry Pi Media Center
One of the best Raspberry Pi projects you can make is a Kodi-based media center. It's simple, affordable, and incredibly functional. With Kodi running on a Raspberry Pi, you'll be able to stream content from various add-ons as well as enjoy local files such as movies, TV shows, music, and photos. Learn how to build a Kodi Raspberry Pi media center, from selecting a Kodi OS (operating system) to downloading add-ons, importing local files, adding network shares, and more!
What is Kodi and Why Should You Use it?
Kodi, formerly known as Xbox Media Center (XBMC), is an open-source media player. While XBMC originally ran only on the first-generation Xbox, it eventually evolved into Kodi Media Centre, an app compatible with Linux, macOS, Windows, Android, smart TVs, and more. The free media player is cross-platform and written in C++. Because of Kodi's open-source nature, it's been ported to several just-enough OSes (jeOSes) including LibreELEC, OpenELEC, and Xbian. Essentially, a Kodi-only operating system is simply a command-line only Linux distribution (distro) that features the Kodi app installed and boots into Kodi for a graphical user interface (GUI).
Media player functionality is vast, but generally split into two different sections: local file playback and streaming media. Like VLC's VideoLan, Kodi can play virtually any media file you throw at it. I've yet, in my many years of using Kodi, encountered an audio, video, or photo file type it couldn't read. A massive library of add-ons operate similar to apps available for Android and iOS devices or streaming set-top boxes like Rokus. For instance, you can download add-ons from the likes of Netflix, Plex, and Funimation for streaming content from those services. And with add-ons such as Retroplayer or the Internet Archive's retro gaming library, you can even emulate ROMs on Kodi.
What is Kodi: A free, open-source, cross-platform media centre coded in C++.
Why you should use Kodi:
- Local file playback (movies, TV shows, videos, music, photos)
- Streaming media from add-ons (i.e. Plex, Netflix, Funimation, Spotify, YouTube, etc.)
- Retro gaming
- Free to use
- Easy to set up
- Lightweight, uses few system resources
Why Should You Use Kodi on the Raspberry Pi?
Being lightweight and using very few system resources, Kodi is an excellent means of spinning up a home theater PC (HTPC). By installing Kodi as an app, or with a dedicated just-enough Kodi OS, you can play pretty much any file from your media collection either from a directly-connected harddrive, flash drive, or network share. Then there's the sea of Kodi add-ons available for streaming media. With its small form factor and low power draw, the Raspberry Pi runs Kodi like a champ.
Which Raspberry Pi Board is Best for Kodi Use?
Almost any Raspberry Pi board will run Kodi perfectly, even the tiny, inexpensive Raspberry Pi Zero. Using a Pi Zero/Zero W, you can create a cheap, portable media centre. What ultimately dictates which Raspberry Pi you should run Kodi on is your needs. The Raspberry Pi 4 boasts 4K 60 FPS (frames per second) support, so if you need 4K video output, snag a Pi 4. Although Kodi will use system RAM for buffering files for a few seconds, it uses very little RAmf or video caching. Often, it's no more than 60MB of RAM. Therefore, even the 1GB Raspberry Pi 4 should work. The Raspberry Pi 3 B+ also works great for Kodi, although you're limited to 1080p. For most users, the Raspberry Pi 4 is the best option. But the Pi 3 B+ remains a solid choice if you only need 1080p and below. For a USB-powered streaming stick build, the Pi 0/0W would work really well.
Best Raspberry Pi board for Kodi:
- Raspberry Pi 4 for 4K and best overall
- Raspberry Pi 3 B+ for 1080p
- Raspberry Pi Zero/Zero W for an ultra-affordable Kodi stick
How to Build a Kodi Raspberry Pi Media Center - Pick a Kodi OS
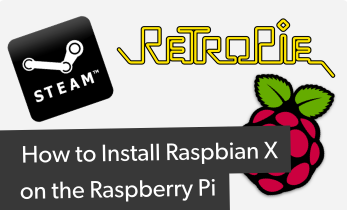
The first step in cobbling together a Kodi HTPC using a Raspberry Pi is selecting a Kodi OS. First, decide whether you'd like to run Kodi as an app on a Linux or Android operating system. This route allows you to run various programs and browse the internet, use office productivity software, and more. Alternatively, you can use a standalone Kodi OS which just runs Kodi, a great choice if you only need media centre capabilities. Gamers may prefer to run a retro gaming distro such as RetroPie, Recalbox, or Batocera which include Kodi as an app.
Just-enough Kodi OSes for the Raspberry Pi
The best overall Kodi distro for the Raspberry Pi is LibreELEC. It boasts 4K 60 FPS output. OSMC is an awesome pick as well with excellent support. In fact, OSMC even offers its own hardware in the Vero 4K, a Kodi box ready-to-use out-of-the-box. Similarly, XBian touts bleeding-edge updates, pre-installed popular packages such as VNC and Samba, plus a rolling release schedule. XBian and LibreELEC both run on the Raspberry Pi 4, while OSMC lacks (at the time of writing), Raspberry Pi 4 compatibility.
- LibreELEC: Best overall, features Raspberry Pi 4 support and 4K 60 FPS capabilities
- OSMC: Great community support
- Xbian: Bleeding edge updates, rolling release schedule
Retro Gaming OSes with Kodi
Although you can install various retro gaming Kodi add-ons, if you're a big gamer you might prefer using a retro gaming distro that includes Kodi as an add-on. RetroPie is the top pick since it includes the largest community. Recalbox is a worthy alternative with loads of users. And Batocera, a fork of Recalbox, works extremely well. Power users should select RetroPie since it sports the most customization options such as shaders and experimental packages. Recalbox and Batocera are fantastic for beginners, even carrying gamepad support out-of-the-box, no button mapping required.
- RetroPie: Best overall, top pick for power users
- Recalbox: Best for beginners
- Batocera: Great for beginners
Kodi as an App
Aside from a standalone Kodi OS, you can run Kodi as an app from within an operating system such as a Linux distro like Debian, Raspbian, or Ubuntu. Android works too as well. The dedicated Debian-based desktop distro RaspEX features Kodi pre-installed with a few legal Kodi add-ons pre-loaded such as Plex and Netflix.
- Roll-your-own Kodi distro: Install Kodi as an app on a Linux or Android OS
- RaspEX: A full-on Debian desktop with Kodi baked in
How to Install LibreELEC on the Raspberry Pi
Head over to the official LibreELEC website. Download the latest release of LibreELEC for the Raspberry Pi. You can use the LibreELEC bootable drive creator, or use a standalone image download. If you choose the LibreELEC USB-SD creator method, pick the option for the host OS you're using. If you're browsing on a Windows machine, select Download for Windows. On Linux, pick the 32-bit or 64-bit Linux USB-SD card creator utility, and for macOS choose Download for macOS. With the appropriate utility downloaded, run it and in the first drop-down, pick your Pi version, for instance, Raspberry Pi 2 and 3 or Pi 4.
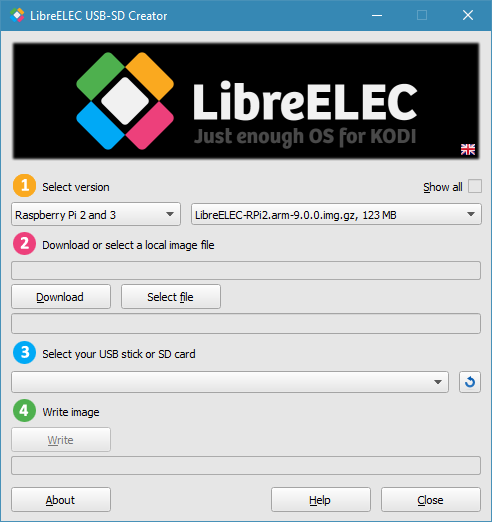
Next, download or select a local image. If you have your image already downloaded, click Select File and browse for it on your harddrive. Alternatively, hit Download to obtain it.
After that, select your boot medium, in this case a microSD card. When all is set up correctly, hit Write Image and wait for the image to successfully write to your microSD card.
If you'd prefer to use a different image mounting program, such as Etcher, head to the downloads section, and browser for your Raspberry Pi version (Raspberry Pi 0/W, Pi 1, Pi 2, Pi 3/3 B+, or Pi 4) and download the image file. It's an IMG.GZ file, so you may, depending on the mounting software you're using you might need to first decompress it with a program like 7Zip. With Etcher, for example, you can mount an IMG.GZ straight to a microSD card that will be bootable by the Pi. Either unzip the image file with 7Zip, then burn it to a microSD card, or mount the IMG.GZ directly.
With either method, the USB-SD card utility or a standalone image mounting procedure, when your microSD card is properly created, pop it into your Raspberry Pi and fire it up.
How to Install OSMC on the Raspberry Pi
OSMC, or Open Source Media Center, is a fantastic Kodi OS that runs on the Raspberry Pi. Navigate to the OSMC downloads section, and you can download the bootable image creation tool or a direct disk image. For a bootable medium program, there's a Windows option and a macOS app (sorry Linux users, no bootable image creation tool for you).
As standalone images go, you'll find a Raspberry Pi 1/Zero/Zero W image, and a Raspberry Pi 2/3/3 B + option. It's an IMG.GZ. With a program like Etcher, mount it to a microSD card. When finished, insert your microSD card into your Raspberry Pi.
How to Install XBian on the Raspberry Pi
Where XBian differentiates itself from the likes of OSMC and LibreELEC is its bleeding-edge updates and rolling release schedule. Bounce on over to the downloads page and snag the XBian installer for Windows, macOS, or Linux. Alternately, grab an image for the Raspberry Pi and mount it with a program such as Etcher.
How to Install RetroPie, Recalbox, and Lakka
As with just-enough Kodi OSes LibreELEC, XBian, and OSMC, installing retro gaming distros for the Raspberry Pi is pretty simple. For RetroPie, download the correct image for your Pi board, either the Pi 0/1 image, or Pi 2/3 image. It's an IMG.GZ, so you might need to decompress the RetroPie IMG file prior to mounting it on a microSD card.
With Recalbox, you'll again need to pick out the proper installer for your Raspberry Pi board, either the Raspberry Pi 1/Pi 0/GPi case, Pi 2, or Pi 3/3 A+/3 B+. The Recalbox image is an IMG.XZ, so you can either extract the compressed IMG, or mount it straight to a microSD card.
Batocera comes in a slew of flavors. Specifically for the Raspberry Pi, there's a Raspberry Pi 0 W/WH image, Pi B/B+ installer, Pi A/A+ option, Pi 2 B, Pi 3 B/B+, and Pi 3 A+ iterations. After you've copped the latest Batocera IMG.GZ, either decompress the image file or mount it directly on a microSD card with a program such as Etcher.
How to Install RaspEX Kodi
By installing RaspEX Kodi, you'll benefit from a Raspbian 10 Buster-based desktop distro with Kodi v18.3 Leia pre-installed, and legal Kodi addons such as Plex, Netflix, and Amazon Video already loaded up, just sign in to use. Plus, several common Raspberry Pi apps are included such as Firefox, Chromium, and VLC. Over on the RaspEX Kodi page, download the IMG file. It's a zipped IMG, so unzip it, then use an application such as Etcher to mount it to a microSD card. After that, pop it into your Pi and boot up.
Roll-Your-Own Kodi Media Centre
If you'd rather just use a desktop distro of your choice and install Kodi as an app, it's pretty simple. Open a command line and run an update:
sudo apt-get update && apt-get upgrade
Next, install Kodi:
sudo apt-get install kodi
That's it! Easy as pi(e).
How to Install Kodi Add-ons and Suggested Add-ons
After installing Kodi, you'll want to perform a bit of basic set up which includes installing add-ons. It's a good idea to allow for installation of Kodi add-ons from unknown sources, or apps not in the Kodi repositories. Navigate to Settings > System Settings and toggle Unknown Sources to on. You'll see a warning, read it and click Ok.
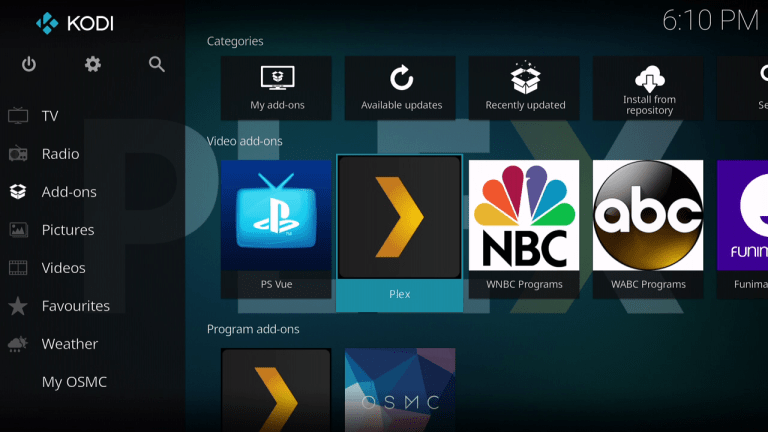
Now, head back Add-ons > Download and select your add-on type such as Video Add-ons or Music Add-ons. For example, you can install the official Plex for Kodi add-on from the Kodi repo by going to Add-ons > Download > Video Add-ons > Plex > Install. Then, the Plex add-on for Kodi downloads and installs. Once it's loaded up, open the Plex add-on, and sign in with your Plex credentials. You'll then be able to stream from your Plex server.
There are tons of legal Kodi add-ons available for your entertainment needs. I recommend using Plex, Spotify, PopcornFlix, BBC iPlayer, Crackle, Funimation NOW, and YouTube. Classic Cinema Online is an excellent option as well, and one of the best free legal streaming movie sites around. USTVNow and Pluto TV are great for live TV streaming. And for retro gaming, the ROM Collection Browser opens the door for emulation with Kodi.
Best legal Kodi add-ons:
- Plex
- Netflix
- Spotify
- PopcornFlix
- BBC iPlayer
- Crackle
- Funimation NOW
- Pluto TV
- YouTube
- USTVNow
- Classic Cinema Online
- ROM Collection Browser
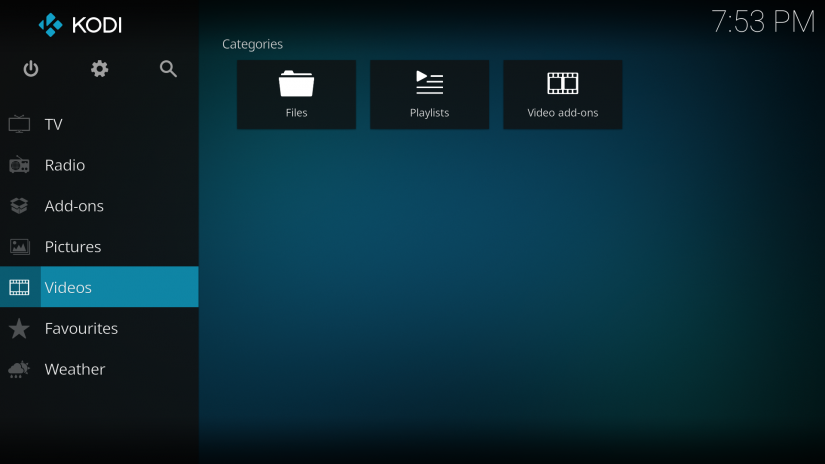
How to Add Media Sources in Kodi
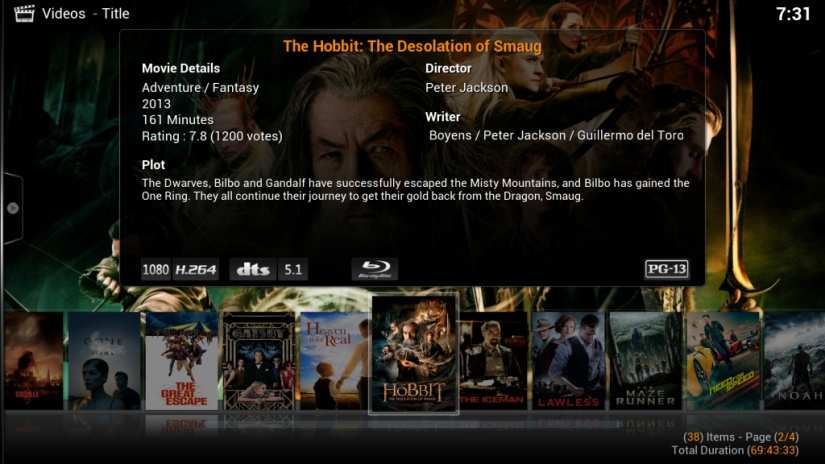
Aside from streaming media, you can also add local media sources such as network drives or files from connected harddrives. For videos, head to Videos > Files > Add Videos > Browse and find a folder of videos on a connected harddrive or flash drive. Then, hit Ok. After that, use the default name or rename that video source.
Next, set the content type. This could be Movies, TV Shows, Music Videos, or None. Choose your scraper information, such as The Movie Database. There are tons of different settings you can pick, such as keeping the original title, enabling fan art, and enabling trailers via YouTube.
If you've got a remote source, you might want to add your network share. I've got a ThinkServer TS140 Plex server running headless and I added that as a network share to my Raspberry Pi Kodi HTPC. As such, I was able to playback any movies, TV shows, and music on my server. Head over to Videos > Files > Add Videos > Browse > Add Network Location... and select your SMB server or remote NAS. For this, you'll need to enter a server name, protocol (i.e. SMB), and the network address (IP address) or device name.
The process is the same for photos or music, but you'll replace videos with music or photos.
How to Build a Kodi Raspberry Pi HTPC - Final Thoughts
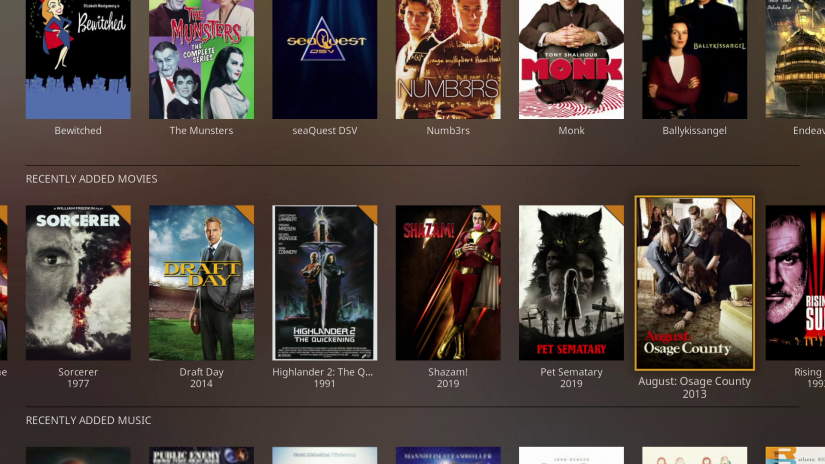
Building a home theatre PC with Kodi on a Raspberry Pi is incredibly simple. Yet it provides tons of functionality. You'll be able to play your entire media collection of movies, TV shows, and music all in one place complete with lovely box art. And streaming add-ons for Kodi let you access content from a variety of sources including Spotify, Funimation, and YouTube. It's a great app for cord-cutters. Personally, I prefer running LibreELEC on my Raspberry Pi 4, or RetroPie on my Pi 3 B+. I've got my Plex server synched up via a remote network share, as well as a slew of plugins installed including Plex, Funimation, and Netflix. And it's easy enough to connect a flash drive full of DVD or Blu-ray rips for playback with Kodi. Overall, a Raspberry Pi Kodi media centre is one of the easiest yet most useful Raspberry Pi projects you can complete.

Moe Long is an editor, writer, and tech buff with a particular appreciation for Linux, Raspberry Pis, and retro gaming. Writing online since 2013, Moe has bylines at MakeUseOf, TechBeacon, DZone, SmartHomeBeginner, DEV.to, DVD Netflix, and Electropages. You can read his writings on film and pop culture at Cup of Moe, check out his tech reviews, guides, and tutorials at Tech Up Your Life, and hear his thoughts on movies on the Celluloid Fiends podcast. Aside from writing and editing, Moe has an online course, the Beginner's Guide to Affiliate Blogging From Scratch. When he's not hammering away at his keyboard, he enjoys running, reading, watching cinema, listening to vinyl, and playing with his dog Sebastian.


Leave your feedback...