
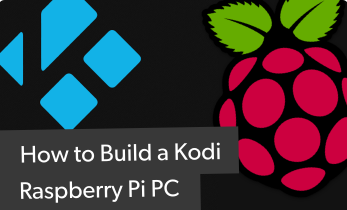
How to Install LibreELEC on the ASUS Tinker Board: ASUS Tinker Board HTPC
The ASUS Tinker Board is an awesome single-board computer. Touting impressive horsepower, the Tinker Board runs a bevy of operating systems (OSes) including Linux and Android. For a home theatre PC (HTPC), LibreELEC offers a solid standalone media centre experience. Learn how to install LibreELEC on the ASUS Tinker Board for an ASUS Tinker Board HTPC!
What is the ASUS Tinker Board?
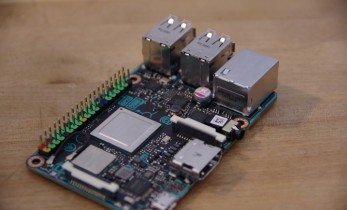
A powerful maker board, the ASUS Tinker Board remains one of the top Raspberry Pi alternatives. Since there's even an ASUS Tinker Board RetroPie installation, this development board offers many of the same capabilities. Additionally, the ASUS Tinker Board case options include virtually any Raspberry Pi 2 and 3 case since the Tinker Board's form factor mimics that of the Raspberry Pi.At its core, you'll find a Rockchip RK3288 Cortex-A17 quad-core system on a chip (SoC), and an ARM Mali-T764 GPU. It's outfitted with 2GB of DDR3 RAM, Bluetooth, 802.11 b/g/n Wi-Fi, a 40-pin GPIO header, and four USB 2.0 ports. Because of the ASUS Tinker Board GPU and CPU combo, you can achieve 4K video output, and the Tinker Board should play any file you throw at it.
ASUS Tinker Board specs:
- Rockchip RK3288 Cortex-A17 quad-core SoC
- ARM Mali-T764 GPU
- 2GB DDR3
- 802.11 b/g/n Wi-Fi
- Bluetooth 4.0
- 4 x USB 2.0 ports
- 1 x 15-pin MIPI CSI slot
- 1 x 40-pin GPIO header
- microUSB port for power
How to Install LibreELEC on the ASUS Tinker Board
For an ASUS Tinker Board HTPC running LibreELEC, you'll need the ASUS Tinker Board along with a microSD for boot medium. Plus, you'll need the Rockchip LibreELEC image, peripherals such as a keyboard and mouse, and an optional but recommended case.What you'll need to run LibreELEC on the ASUS Tinker Board:
- ASUS Tinker Board SBC
- microSD card
- LibreELEC download
- micro USB power supply
- Peripherals (keyboard, mouse)
- ASUS Tinker Board case (optional, recommended)
ASUS Tinker Board HTPC with LibreELEC
After booting into LibreELEC on the ASUS Tinker Board, you're greeted by a fairily vanilla Kodi interface. If you've used Kodi, whether as a standalone app or a Kodi media centre OS such as OSMC or OpenELEC, you'll notice a familiar interface. From here, you can begin loading add-ons which are essentially streaming apps like you'd find on a Roku or Android TV box.Kodi add-ons range from YouTube to PlayStation Vue, Plex, Emby, and Funimation. While Kodi may be famous, or infamous, for its streaming add-ons, its capabilities as a robust local media player are phenomenal. It's played any video or music file I've thrown at it.
To install an addon, head to Addons > Addon browser. Next, click install from repository > Kodi addon repository. Scroll to the appropriate section, such as game add-ons or video add-ons and select the proper category. Then, scroll down to the specfic add-on you'd like to install such as the Kodi PS Vue add-on or Plex add-on, click it, and hit install. Once installation completes, you'll see an add-on enabled notification.
Though I wasn't able to test 4K video, only 1080p, video and audio playback was silky smooth. But the Tinker Board will handle up to 60 frames per second (FPS) 4K video playback. Despite the alpha build of LibreELEC, the Tinker Board handles 4K videos with ease. CPU temps may get a bit warm but nothing bordering on overheating.
You may also wish to add separate libraries for your local media. To do so, highlight the appropriate library type in the left-hand Kodi bar, such as movies. Then, click enter files section. Select files and click into the storage section where your videos are. For me, that was a flash drive. After that, find your movies folder and select it. Now, choose the set content option and pick what the directory contains. You can opt for movies, TV shows, and music videos. Now, your preferred setting under choose information provider. This is the scraper which will find information for your various movies.
Underneath, there's a section of additional settings. If you organize your movies in subfolders under the movies folder, toggle on movies are in separate folders that match the movie title. You might want to scan recursively as well or exclude paths from library updates.
Running LibreELEC on the ASUS Tinker Board for a Kodi HTPC: Final Thoughts
Though I've got no shortage of devices with Kodi installed, from my RetroPie Raspberry Pi set up and Odroid XU4 N64 Classic Mini, to my Nvidia Shield TV and WeTek Play 2, LibreELEC on the Tinker Board is easily one of my favorite ASUS Tinker Board projects. It's a simple means to create a home theatre PC, and the Tinker Board pumps out 4K content easily. It's a solid solution for spinning up a low-power HTPC that's capable of both streaming media and local file playback. If you've got a spare ASUS Tinker Board, consider installing Kodi for an excellent DIY HTPC.
Moe Long is an editor, writer, and tech buff with a particular appreciation for Linux, Raspberry Pis, and retro gaming. Writing online since 2013, Moe has bylines at MakeUseOf, TechBeacon, DZone, SmartHomeBeginner, DEV.to, DVD Netflix, and Electropages. You can read his writings on film and pop culture at Cup of Moe, check out his tech reviews, guides, and tutorials at Tech Up Your Life, and hear his thoughts on movies on the Celluloid Fiends podcast. Aside from writing and editing, Moe has an online course, the Beginner's Guide to Affiliate Blogging From Scratch. When he's not hammering away at his keyboard, he enjoys running, reading, watching cinema, listening to vinyl, and playing with his dog Sebastian.


Leave your feedback...