
ASUS Tinker Board DietPi - ASUS Tinker Board OS Review and Installation
My home office features a prominent shelf of single-board computers (SBCs). Notably, the Raspberry Pi puts in a showing with several variants including the Raspberry Pi 2, Raspberry Pi 3 B+, and Raspberry Pi 4. However, maker boards aren't limited to the Raspberry Pi, though it's easily the most popular device on the market. I'm pretty fond of Raspberry Pi competitors such as the Odroid XU4 and RockPro64. Because of its excellent support from both official channels and third-party sources, the ASUS Tinker Board remains one of my favorite SBCs. For a nifty, lightweight Linux-based experience, DietPi is a fantastic choice. Here's how to install DietPi on the ASUS Tinker Board!
What is the ASUS Tinker Board?
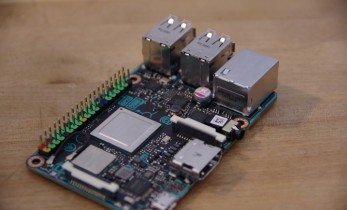
A powerful development board, the ASUS Tinker Board packs a Rockchip RK3288 system-on-a-chip (SoC). There's a robust 2GB of LPDDR3 RAM, a microSD card slot, and powerful ARM Mali-T764 GPU for graphics processing. Onboard, you'll find H.264 and H.265 video playback support.
On the input/output side, the Tinker Board boasts a 40-pin GPIO header for connectivity with various LEDs, buttons, sensors, and switches. There's a DSI MIPI for hooking up touchscreens and displays, as well as a CSI MIPI connector for cameras. Gigabit Ethernet offers fast networking, and there's integrated Wi-Fi and Bluetooth for wireless networking. Four USB 2.0 ports provide data transfer capabilities, and there's a full-size HDMI port.
ASUS Tinker Board specs:
- Rockchip RK3288 Cortex-A17 quad-core SoC
- ARM Mali-T764 GPU
- Up to 4K video support
- 2GB DDR3
- 802.11 b/g/n Wi-Fi
- Bluetooth 4.0
- 4 x USB 2.0 ports
- 15-pin MIPI CSI slot
- 40-pin GPIO header
- micro USB port for power
ASUS Tinker Board S (same as ASUS Tinker Board plus):
- 16GB eMMC
- HDMI-CEC
- Low-voltage input detection
- Plug-in detection, audio auto-switching

What is DietPi?
DietPi is a Debian-based Linux operating system (OS). It's pretty lightweight and concentrates on delivering a minimalist Linux distribution (distro). Its base installer begins at a meager 400 MB. Still, it comes with a ton of software options. On the ASUS Tinker Board, DietPi lacks graphical user interface (GUI) capabilities, and runs a commandline-only operating system by default. As such, DietPi on the Tinker Board is well suited for a server environment, and may want to run it headless. But you can install a desktop environment and loads of different software options, so it's excellent as a desktop too.
How to Install DietPi on the ASUS Tinker Board
Installing DietPi on the ASUS Tinker Board requires little more than the Tinker Board, a microSD card or eMMC module, peripherals such as a keyboard and mouse, monitor for first set up, and an active internet connection. A case is optional, though I highly recommend one for keeping your ASUS Tinker Board safe and protected.
What you'll need for a DietPi ASUS Tinker Board install:
- ASUS Tinker Board or Tinker Board S
- microSD card or eMMC module
- Case (optional, recommended)
- micro USB power supply
- Peripherals (keyboard, mouse)
- DietPi for the ASUS Tinker Board image
- Image mounting software (i.e. Etcher)
- Image extraction software (i.e. 7Zip)
Total cost: An ASUS Tinker Board retails for around $60, and should fit in pretty much any Raspberry Pi 3 or Raspberry Pi 2 case. You'll also need a microSD card or eMMC module, PSU, and some free software. Depending on what you've got lying around the house, you could get started with this for as little as the cost of the Tinker Board itself.
Download the ASUS Tinker Board flavor of DietPi. It's a 7Z file, so you'll need to decompress it with an application like 7Zip.
After extracting the image, use a program such as Etcher to mount the DietPi image to a microSD card or eMMC module. Once burning completes, remove your boot medium, pop it into the ASUS Tinker Board, and fire up your SBC.
DietPi on the ASUS Tinker Board Review
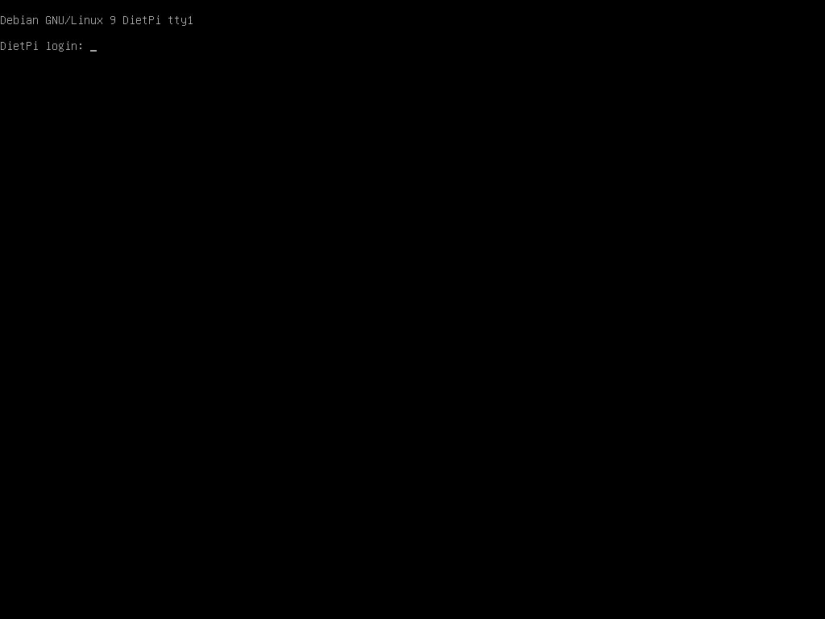
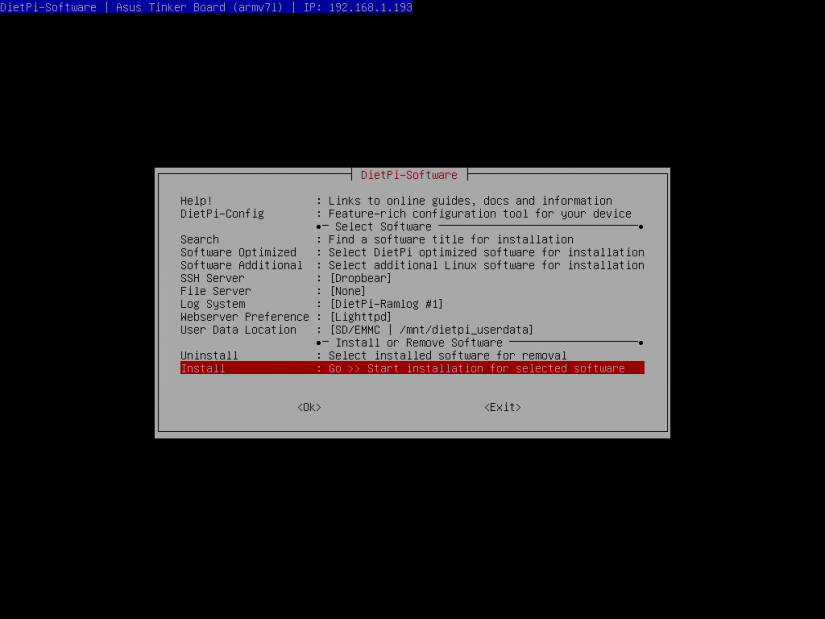
When you first boot up DietPi, you're prompted by a DietPi login. The DietPi default username is root and the password is dietpi. Enter those, and a brief update runs. You're also asked if you'd like to change the default password. Then, once a quick update runs, you're ready to begin configuring DietPi. The DietPi software menu offers a few different options including a help section, DietPi-config menu, software options, SSH servers to pick from, file server options, web server preferences, and more.
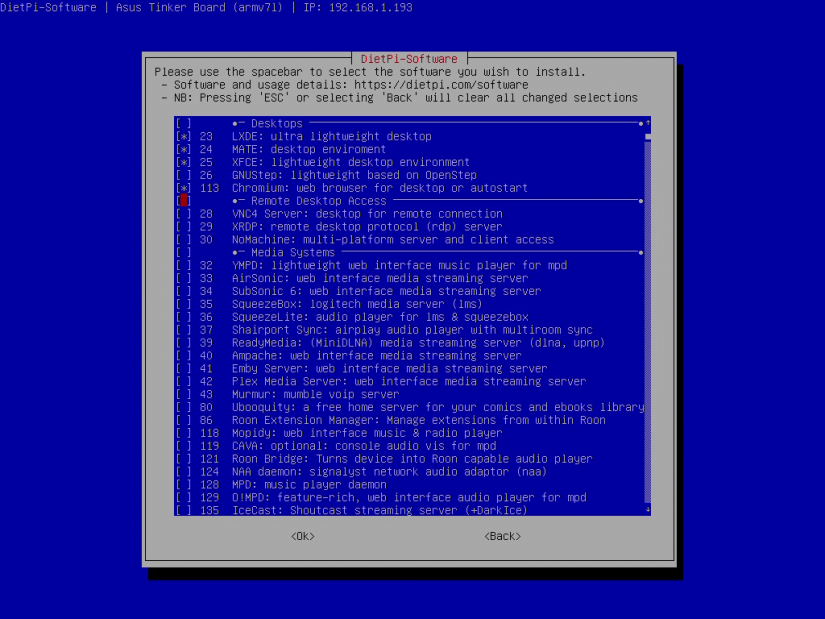
Since DietPi features a modular installation, you'll need to select the software you'd like to install. Head under a menu such as Software Optimized, and scroll through the list. When press the spacebar to tick an asterisk beside the apps you'd like to install. Your choices are nearly limitless, For desktop environments, you can choose LXDE, MATE, and XFCE, as well Chromium. There's remote desktop software such as VNC and XDRP. For media servers and media centres, you'll find the likes of AirSonic, SubSonic, Squeezebox, Plex, Emby, Mopidy, and IceCast. Torrent clients and torrent automation software such as Transmission, qBitTorrent, Lidarr, CouchPotato, Jackett, NZBget, and Radarr may easily be installed in DietPi. You can then select your AutoStart option such as Kodi, an automatic desktop login, LightDM login, terminal, RetroPie, and a slew of other choices.
I really appreciate the ease of use that DietPi affords, coupled with its comprehensiveness and customizable, modular installation. Unlike NuTyX, Gentoo, and other roll-your-own Linux distros which require compiling a kernel, DietPi is as simple as burning its base OS to a microSD card or eMMC module, selecting the software you'd like to install, then booting up.
Because it's a terminal-only operating system initially, DietPi is great as a server operating system. Whether you'd like to spin up a media server with Plex, Emby, Subsonic, AirSonic, or any other DietPi option, a web server, file server, or something in between, DietPi is an excellent option. But desktop environments are available for installation as well, DietPi could make an awesome lightweight desktop. You could install a torrent client and torrent automation software to create a do-it-yourself (DIY) torrent box with an ASUS Tinker Board and DietPi.
Bye Bye DietPi...
Although DietPi runs on a ton of different boards, it's particularly delightful on the ASUS Tinker Board. Because of its beefy SoC, GPU, and RAM, the Tinker Board handles desktop and server use well. Granted, many older laptops, servers, and NAS devices will still beat the Tinker Board in many benchmarks. But its price-to-performance ratio makes it a superb piece of hardware.

Moe Long is an editor, writer, and tech buff with a particular appreciation for Linux, Raspberry Pis, and retro gaming. Writing online since 2013, Moe has bylines at MakeUseOf, TechBeacon, DZone, SmartHomeBeginner, DEV.to, DVD Netflix, and Electropages. You can read his writings on film and pop culture at Cup of Moe, check out his tech reviews, guides, and tutorials at Tech Up Your Life, and hear his thoughts on movies on the Celluloid Fiends podcast. Aside from writing and editing, Moe has an online course, the Beginner's Guide to Affiliate Blogging From Scratch. When he's not hammering away at his keyboard, he enjoys running, reading, watching cinema, listening to vinyl, and playing with his dog Sebastian.


Leave your feedback...