
Getting Started with CentOS on the Banana Pi R2: How to Install CentOS on Banana Pi R2
The Banana Pi R2 is a single-board computer (SBC). However, where the Banana Pi R2 differs from maker boards including the Raspberry Pi, Odroid XU4, and ASUS Tinker Board is use. While it's totally capable of running a slew of operating systems (OSes) including Ubuntu, Kali Linux, and Android, its functionality as a do-it-yourself (DIY) router or network attached storage (NAS) device sets it apart. Granted, a Raspberry Pi provides ample opportunity to spin up a media or file server. As a server or enterprise environment, CentOS ranks among the top Linux distributions (distros) on the market. Learn how to install CentOS on the Banana Pi R2 for an incredible, stable Linux machine.
What is the Banana Pi R2?
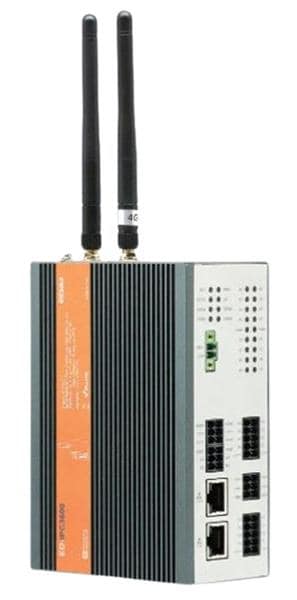
The Banana Pi R2 is a dev board that boasts NAS and router capabilities. On its rear, the Banana Pi features a whopping four Gigabit LAN ports, Gigabit WAN, and wireless N networking with up to 300Mbps. There's Bluetooth for further connectivity. Powering the Banana Pi R2 is a MediaTek MT7632N quad-core ARM Cortex A-7 CPU and a Malp 450 GPU. Onboard, the R2 packs 2GB of DDR3 RAM, eMMC and microSD card slots, plus two SATA interfaces. You'll find dual USB 3.0 ports and a USB 2.0 host, as well as a 40-pin GPIO header which maintains compatibility with Raspberry Pi GPIO hardware.Banana Pi R2 specs:
- MediaTek MT7623N, Quad-core ARM Cortex-A7
- Mali 450 MP4 GPU
- 2GB DDR3 SDRAM
- Mini PCI-E interface.
- 2 SATA interfaces
- MicroSD slot
- eMMC flash support
- MIPI display interface support
- 5 port 10/100/1000 Mb Ethernet port
- 2 x USB 3.0 and 1 x USB 2.0 OTG port
- 1080p video playback
- HDMI output
- Wi-fi 802.11B/G/N and Bluetooth 4.1
- 40-pin GPIO header
What is CentOS?
 CentOS is a Linux distro which offers an enterprise-caliber open-source experience. Touting Red Hat Enterprise Linux (RHEL) upstream support, it's essentially a free, community edition of RHEL. Because of its superb stability and RHEL upstream sources, CentOS provides unparalleled quality. While it's suitable for a variety of uses, CentOS is ideal as a server environment and remains one of the top Linux OSe for developers and programmers.
 How to Install CentOS on the Banana Pi R2
Since there's a CentOS image for the Banana Pi R2, you can build a phenomenal Linux machine with this hardware and software pairing. For CentOS running on the Banana Pi R2, you'll need a few items. Namely, a Banana Pi R2 board, optional but recommended case, barrel jack power supply, eMMC or microSD card for a boot medium, and of course the Banana Pi R2 CentOS image.Banana Pi R2 CentOS installation:
- Banana Pi R2 board
- Case
- Power supply
- eMMC or microSD card
- Image mounting software (i.e. Etcher)
- Internet connection
- Peripherals (keyboard, mouse)
Begin by heading over to the Banana Pi Wiki page and navigating to the CentOS 7 Lite release. Go ahead and download it. It's an image file inside a zipped folder. Proceed to extract the zipped IMG.
Once you've successfully decompressed the Banana Pi R2 CentOS image, use a program such as Etcher to mount it to a microSD card or eMMC module. After burning finishes, pop it into your Banana Pi R2, plug everything in, and power it on. I recommend starting off with an Ethernet cable connected as it makes getting started a bit quicker, but you can easily sync with Wi-Fi.
Hands-on With CentOS for the Banana Pi R2
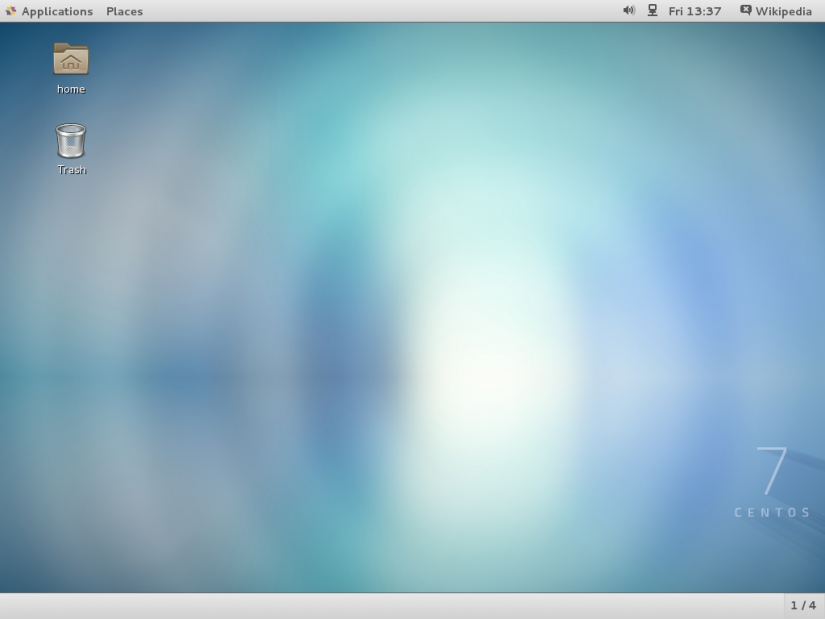
 CentOS 7 Lite runs like a champ on the Banana Pi R2. Upon first boot, you'll need to log in as a user. By default, the user name is root and the password is bananapi. With a beefy GPU and CPU combo, for a dev board, the Pi R2 handles virtually any compatible OS you throw at it. CentOS, being inherently stable and secure, offers a buttery smooth experience. You'll boot into the command line since this is the lite version of CentOS. Unlike its full version, there's no graphical user interface (GUI) build in. As such, it could be a great server OS. You might consider installing media or file server software on the Banana Pi R2 such as Plex or Emby. With software such as OwnCloud and Docker on the Banana Pi R2, this board has all the trappings of a spectacular NAS device, and running CentOS as its foundation ensures a lightweight Linux OS foundation.
 Banana Pi R2 CentOS 7 Lite username and password:
- Username: root
- Password: bananapi
Your turn: What maker boards are you using and what Linux OSes do you prefer?

Moe Long is an editor, writer, and tech buff with a particular appreciation for Linux, Raspberry Pis, and retro gaming. Writing online since 2013, Moe has bylines at MakeUseOf, TechBeacon, DZone, SmartHomeBeginner, DEV.to, DVD Netflix, and Electropages. You can read his writings on film and pop culture at Cup of Moe, check out his tech reviews, guides, and tutorials at Tech Up Your Life, and hear his thoughts on movies on the Celluloid Fiends podcast. Aside from writing and editing, Moe has an online course, the Beginner's Guide to Affiliate Blogging From Scratch. When he's not hammering away at his keyboard, he enjoys running, reading, watching cinema, listening to vinyl, and playing with his dog Sebastian.


Leave your feedback...