
EMF Camp Badge Review & Tutorial
In recent years conference badges have become quite a thing. Gone are the simple “Hello my name is ...” adhesive-backed badges in favour of badges that are full-blown computers!
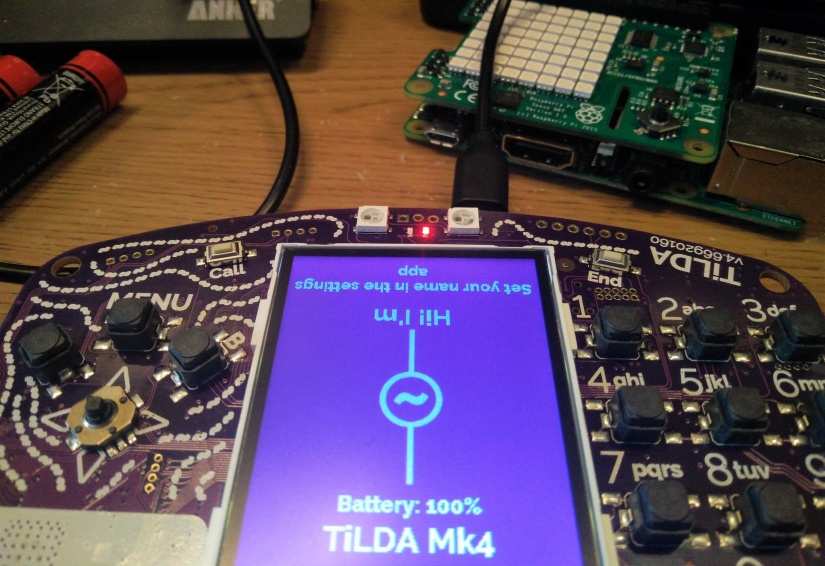
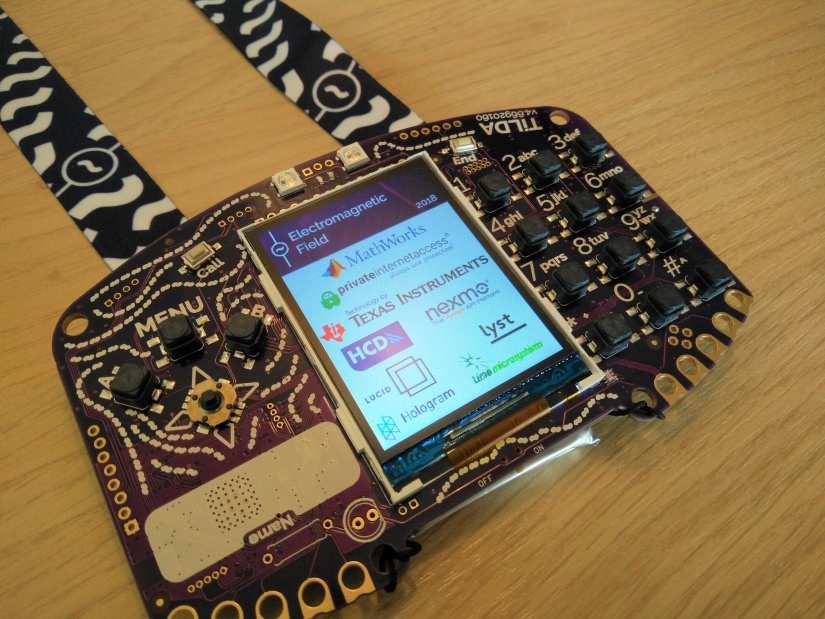
In the UK we recently had Electromagnetic Field, known as EMF Camp. This event is a weekend of celebration, invention and awe! Communities from across Europe attend this event, covering the broad spectrum that is the maker community. But one thing that every group looks forward to is the badge. A full ARM CPU powered badge with screen, keyboard, neopixels, crocodile clip connectors, mass storage, cellular connectivity all controllable via a Micro Python programming interface.
In this feature we shall take a look at the latest badge, in the best way possible. We are going to use it for four projects and learn how to use it using simple ideas and language.
The Hardware
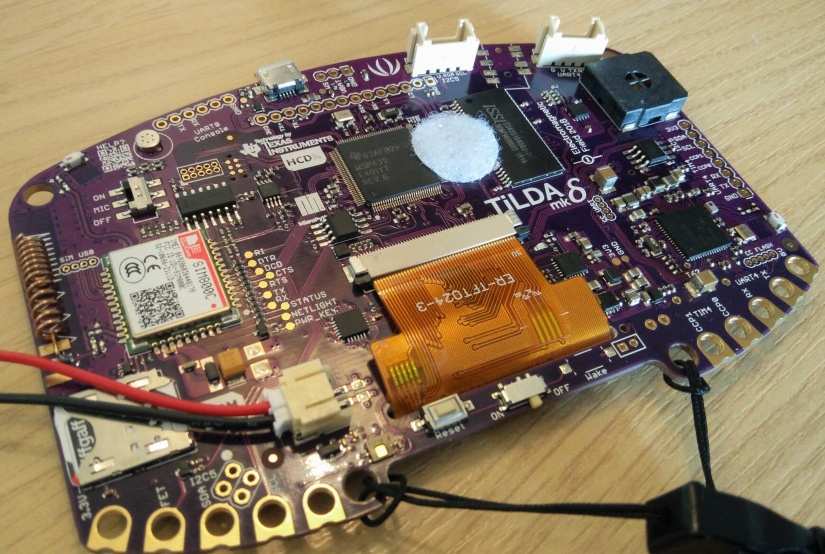
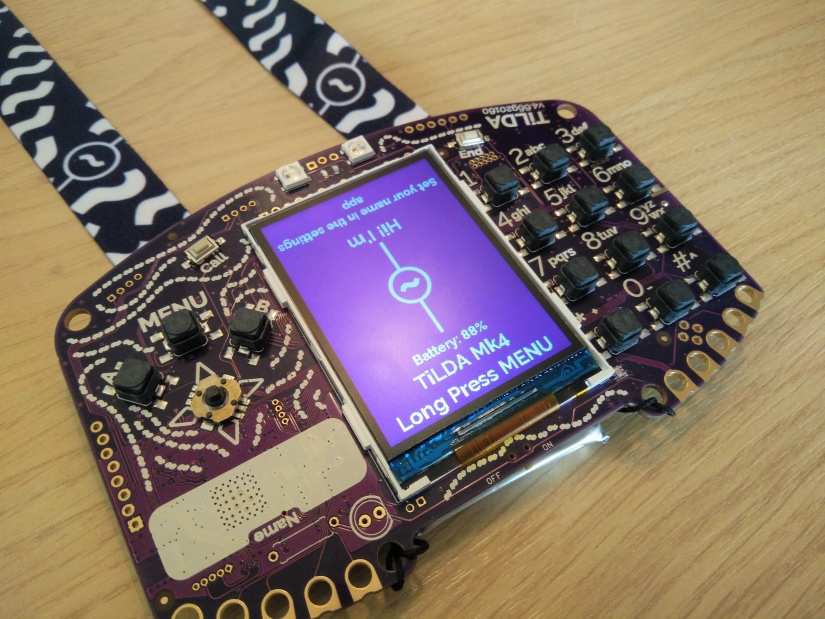
The Tilda MK4 2018 Badge is packed full of features!
- Texas Instruments MSP432E4 SimpleLink Microcontroller (ARM Cortex-M4F @ 120MHz)
- Texas Instruments CC3120 SimpleLink Wi-Fi® Network Processor
- 256KB internal RAM / 8MB external SDRAM
- 1MB internal flash (firmware) / 1MB external flash (filesystem)
- SIM800 Quad-band GSM/GPRS module with Bluetooth support
- 240x320 RGB screen
- 2 WS2812B RGB LEDs (aka Neopixels) with a 3-pin header to connect your own (And this year they’re the right way up!)
- Texas Instruments HDC2080 Low Power Humidity and Temperature Sensor
- Texas Instruments TMP102 Digital Temperature Sensor
- Texas Instruments OPT3001 Digital Ambient Light Sensor
- Texas Instruments DRV5055 High Accuracy Bipolar Hall Effect Sensor
- Speaker and Microphone
- 2000mAh Battery
- Onboard Ethernet (requires breakout)
- A T9 number keypad and a joystick
- 2 Seeed Studio Grove headers (one UART, one I²C)
- Conductive thread points and 0.1" header for power/UART/I2C/GPIO
- Defcon 26 Shitty Add-Ons connector
But what links all of these components is that they can all be controlled using Micropython, a version of Python 3 for microcontrollers, and that means we can use our conference badge as a development board. So why don’t we do that?
For this we shall need to get our hands on a badge, and if you were at EMF Camp, you already have! If not then they can be picked up from eBay.
Connecting to the Badge
The badge has a micro USB port that we can use to communicate with it. So connect the badge to your computer using a USB to micro USB cable and turn on the badge. When it boots to the purple “My name is” screen, long press the Menu key and when you release, the screen now shows a menu, leave the badge as is for now. By doing this step we enable access to the badges software over a serial connection.
For Windows users
Your badge will be assigned a COM port, which we can find using the Device Manager (right click on the Windows/Start button and select Device Manager.) On our test machine we were assigned COM3.
To communicate with the board we need to install PuTTY a handy tool that can be used to make serial connections. Download PuTTY for your version of Windows and install it.
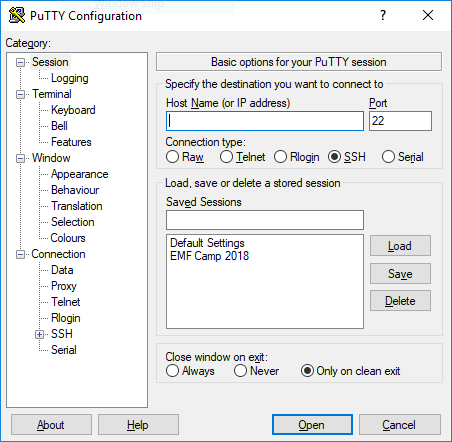
Once PuTTY is installed, open the application, and you will see the PuTTY Configuration screen. From here we can configure PuTTY to connect to the COM port that our badge is connected to.
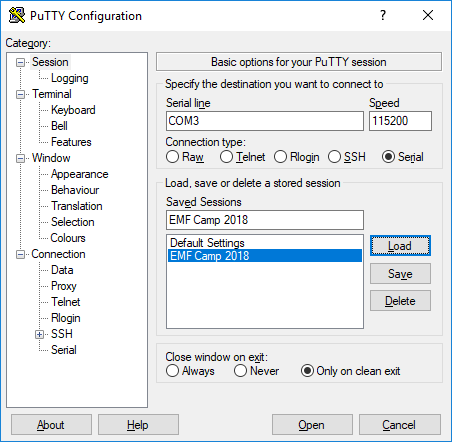
In our case it was COM3, so we changed the Connection Type from SSH to Serial, and then change the Serial Line to match the COM port (COM3 for us) and then we set the speed to 115200. An additional step here is to click in the Saved Sessions box and name the settings as EMF Camp 2018 before clicking on Save. Now whenever we wish to reuse this config, we just click on the EMF Camp 2018 line and then Load.
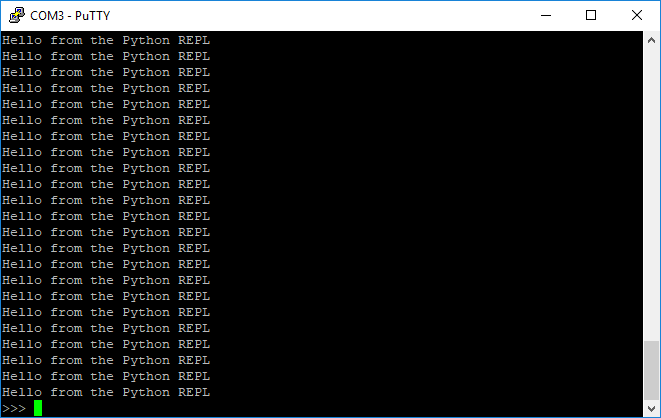
To make a connection click on Open. A terminal window will pop up, but nothing happens! That’s ok just press CTRL + C and a Python REPL (Read, Eval, Print, Loop) terminal will come to life.
For Linux Users
Open a Terminal and use the screen command. If this command is not installed then it can be installed by typing
$ sudo apt install screen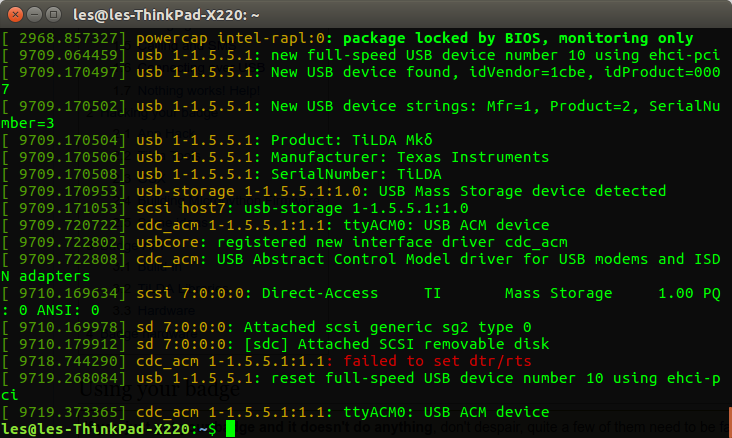
To check which serial port your badge is connected to type in
$ dmesgAnd you should see the port listed.
Using screen to connect is as follows. This assumes that the badge is connected to the serial port ttyACM0.
$ screen /dev/ttyACM0 115200Once connected, nothing will happen, we need to press CTRL + C to enter the Python REPL.
Just in case nothing happens, there may be a background service on your computer that is also accessing the tty. To check this type.
$ systemctl | grep -i modemAnd if you see “ModemManager” then type the following to stop it.
$ systemctl stop ModemManager.serviceEnter your password and try to connect via Screen again.
For Mac Users
You can connect via the Terminal in a similar manner to Linux users.
MAC TERMINAL $ screen /dev/tty.usbmodemTiLDA2Remember to press CTRL + C in the Terminal once a connection is made.
Writing our first few lines of code
We are now at the Python Shell (REPL) and here we can write Python code, line by line and the badge will react.
The first test is to make sure that we can use the Python library for the badge and for that we shall control the built-in LEDs just above the screen.
Project 1: Blink the LEDs
Blinking an LED is a rite of passage, the “Hello World” of hardware hacks, and who are we if not traditional and a little sentimental.
For this project we shall work in the Python shell / REPL and type each line of code, pressing Enter at the end of the line.
The first line we enter imports the LED class from the TiLDA library. This class enables us to control the two built-in LEDs (Red and Green) on the board, just above the screen.
from tilda import LEDThe next line is another import, this time for the sleep function from the time library. We shall use it to control how fast the LEDs flash.
from time import sleepWe now move to two lines that will control the LEDs default behaviour. When the code runs, we first need to set the Red LED on and turn the Green LED off. So using the LED class, we specifically instruct each LED to do so.
LED(LED.RED).on()
LED(LED.GREEN).off()
Then we create an infinite loop, while True, and in there we add two lines of code that will ‘toggle’ each LED. This means it will reverse the current status of the LED. So if red is on, it will turn off and vice versa. The last line is a sleep statement that will pause the code for 0.1 seconds, causing the blinking/flashing LEDs.
while True:
    LED(LED.RED).toggle()
    LED(LED.GREEN).toggle()
    sleep(0.1)
With the final push of the Enter key, the LEDs present on the board will come life and flash like an emergency vehicle. Congratulations you’ve completed Project 1. Move on to the next project!
Oh and if you get tired of the flashing LEDs, just press CTRL + C to stop them.
Project 2: Neopixels
![]()
LEDs are great, but we have access to two neopixels (WS2811) LEDs that can be any colour, brightness and much more! So let’s start writing some code. Just as in Project 1, each line of code requires us to press the Enter key. Once completed the code will run after the final Enter keypress.
The first line is an import, as always. But this import is from the machine library and it imports the Neopix class.
from machine import NeopixThe next line is another import, this time for the sleep function from the time library.
from time import sleepFor us to use the neopixels, we need to create an object called ‘n’ which will create a connection to them.
n = Neopix()Next, we create an infinite loop, while True:
while True:To set the colour of the neopixels, we use a special function called ‘n.display’ and this function takes an argument, in fact, we pass it a list containing two items. The first item is the colour of the first (left side) neopixel, and the second item is the second neopixel colour.
Colours are represented as hex values, and if you are familiar with CSS (Cascading Style Sheets, used to control and decorate web content), then you will be at home. If not then don’t panic as there are plenty of online resources to help.
The colours are broken down into six values after ‘0x’
ff 00 ,00 and they refer to Red, Green and Blue values. To turn on a neopixel colour we set that colour to ‘ff’ and if we do not wish to turn any other colours on we set them to ‘00’. So, for example, our first command to turn on the neopixels will turn them on Red only.
.display([0xff0000,0xff0000])Then we sleep for 0.2 seconds.
sleep(0.2)Then we repeat the process, this time we turn both neopixels to Green.
    n.display([0x00ff00,0x00ff00])
    sleep(0.2)
The final two lines set the neopixels to Blue, and then pause the code for 0.2 seconds.
    n.display([0x0000ff,0x0000ff])
    sleep(0.2)
With the final press of the Enter key, the neopixels will come to life, be careful! They are really bright and can cause headaches if used for a long duration.
![]()
With Project 2 in the bag, we move to Project 3.
Project 3: Sensors

The EMF Camp badge is full of sensors. For humidity, magnetic flux, light levels and in this quick project, temperature.
Again we are in the Python shell/REPL and after every line of code we should press Enter to move on.
We start by importing the Sensors class from the TiLDA library and then import the sleep function from the time library.
from tilda import Sensors
from time import sleep
Next we create a loop, this will repeatedly run the code that we write inside of it.
while True:Each time the loop goes round, we need to capture the temperature, and to do that we create a variable called ‘temperature’ and in there we store the output of running the ‘Sensors.get_tmp_temperature()’ function. This will return the temperature in Celsius.
temperature = Sensors.get_tmp_temperature()With the temperature stored in our variable, we next print the temperature to the Python shell, before sleeping for 1 second and then repeating the loop.
    print(temperature)
    sleep(1)
With the final press of the Enter key, you will see the temperature scroll across the screen!
On to the final project, and we saved the best till last!
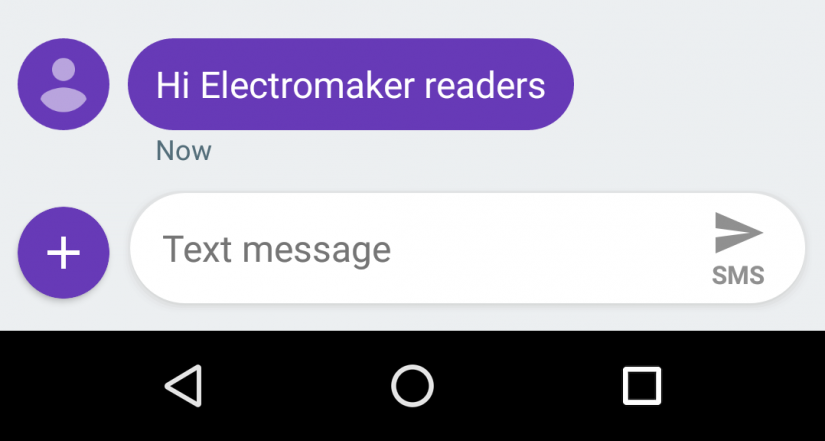
Project 4: Sending SMS
To complete this Project, you will need to turn off the badge, install the sim card, and then reconnect as per your operating system and the guidance above.
Yes, you read that correctly, you can send an SMS from a badge, in fact, you can also make phone calls! All you need to do is pop a sim card in, we had a spare giffgaff sim that we used for testing. We next long press Menu on the badge, and then select “4: Phone” to change the settings. Option 8 in the new menu will enable us to change the Operator from EMF to whoever the sim card belongs to. This will trigger the sim to auto setup as per the network operators settings, and we can now start sending SMS using Python!
In the Python shell / REPL type the following, line by line. Press Enter at the end of each line to move on.
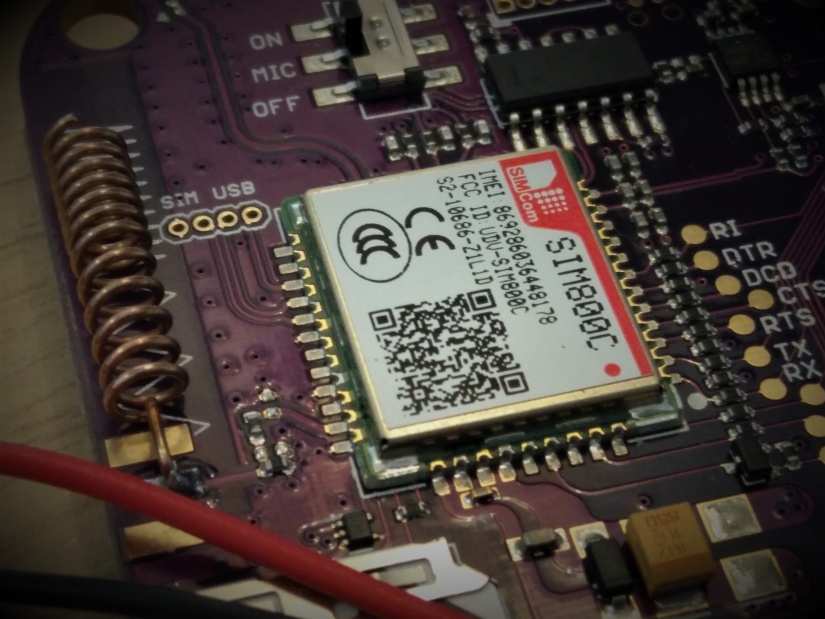
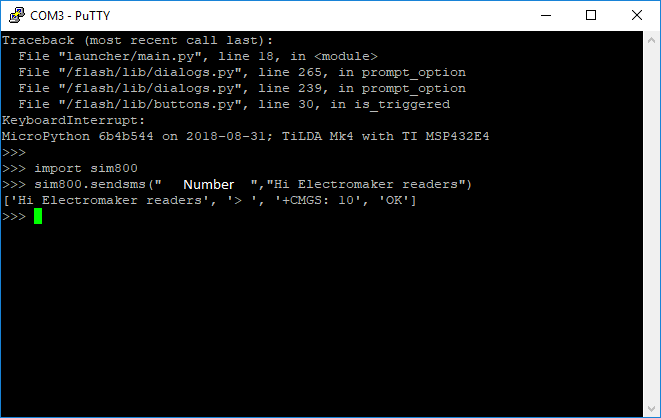
We start by importing the sim800 library, used to directly access the sim/phone services.
import sim800Then from the sim800 library we call the “sendsms” function and this takes two parameters. The first parameter is the number which we want to text, and the second is the message. Each of these parameters must be inside “ “ as they are passed as strings to the function.
sim800.sendsms("Number to text","Message to send")Press Enter and in a few moments your message will be sent.
Conclusions
Conference badges are now more sophisticated and fun, we can use them to make projects, name badges, calls, texts. Thanks to Micro Python we also have a stable and easy to use platform that is very similar to its desktop counterpart.
But here is something that may interest you, dear reader. All four of these projects can be mashed together. So we can have a badge that will check the temperature, and if it goes over a certain threshold, it will trigger the neopixels to light up and send an SMS to our phone, all we need to do is add a few more lines of code and we can do it!
Happy hacking!

Les Pounder loves hacking and tinkering with Arduino, Raspberry Pi and new technologies. He passes on his skills and discoveries to Electromaker readers via tutorials and reviews.


Leave your feedback...