
SenseHAT: Part 1 Temperature and humidity
Pi...In...Space!!!!!
![]()
Onboard the International Space Station there are two Raspberry Pi and on each of those Pis is a board that offers a platform for scientific discovery and wonder. In a joint project ct with the European Space Agency, and thanks to the extreme effort of previous Raspberry Pi employee Dave Honess (who now works for ESA) the Astro Pi project challenged children from across the UK to create code which would be run on those Pis in space. Since the first Astro Pi competition, the subsequent competitions have seen many more children writing code for space, from across Europe.
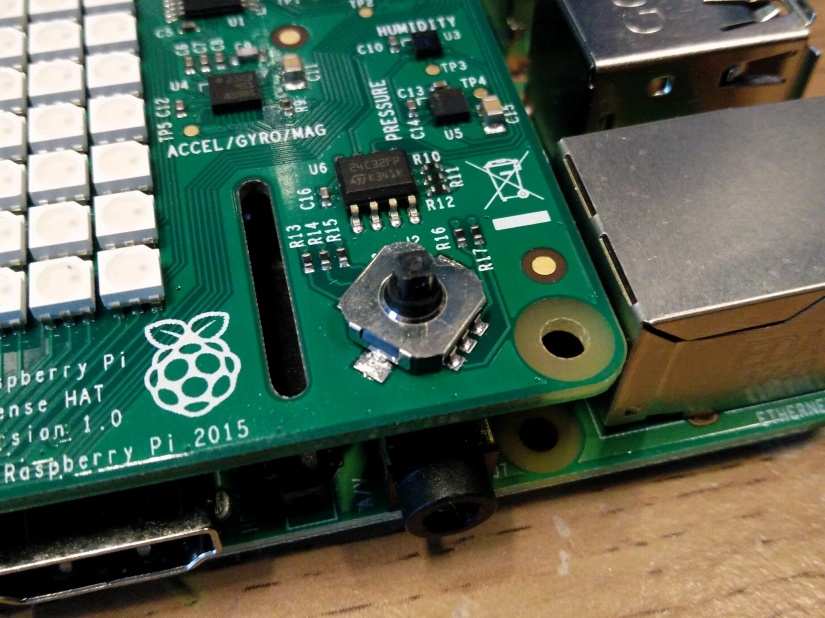
At the heart of the project is the Sense HAT, an add-on board that offers an 8×8 RGB LED grid, a five-button joystick and includes the following sensors:
- Gyroscope
- Accelerometer
- Magnetometer
- Temperature
- Barometric pressure
- Humidity


Yes there is a Pi Zero W underneath the Sense HAT!
All packed into one rather neat looking board designed for all models of Raspberry Pi after the original B+ including the Pi Zero W. However, what can this board do here on planet Earth? Well, the best way to understand something is to use it, and in this first blog post, we shall learn how to use two of the sensors on the board, the temperature and humidity sensors, to sense the world around us and report the information in a convenient manner. So let’s start this project by setting up the board and taking our first steps into the unknown.
Setting up the hardware
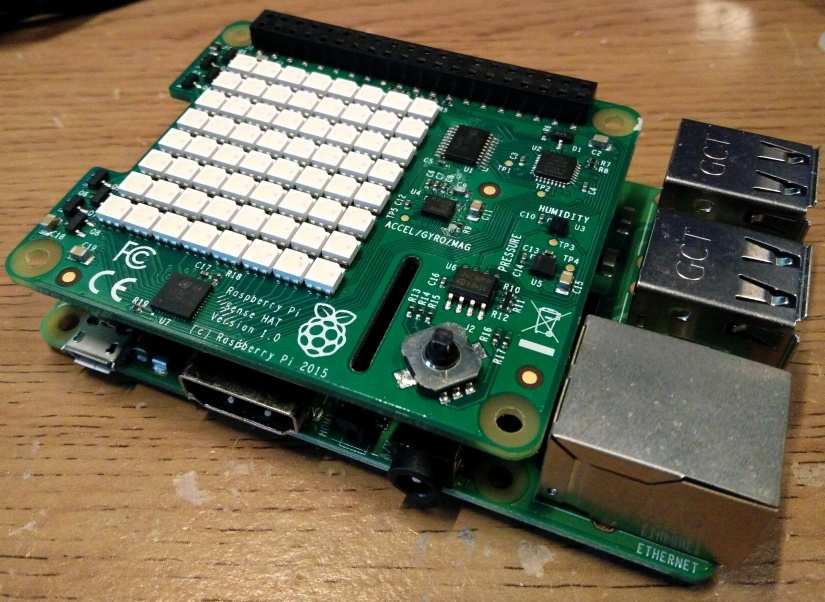
With the Raspberry Pi-powered down fit the Sense HAT on top of the Raspberry Pi so that it occupies all 40 GPIO (General Purpose Input Output) pins, and so that it fits neatly, overlapping the Raspberry Pi. With that complete, attach your keyboard, mouse, HDMI, micro SD card and finally power supply and boot the Raspberry Pi to the Raspbian desktop.
Coding the project
Thankfully Raspbian comes pre-loaded with the Sense-HAT Python library, so no installation is necessary. For these projects we shall use the Python 3 editor (IDLE3), which can be found in the Programming section of the main menu.
With the Python 3 editor open, we see the Python shell (REPL) open and ready for use. However, we shall not be using this window, instead, click on File >> New to open a new window where we can write the lines of code that will make up the projects.
Project 1: Temperature and humidity
For the first project we shall learn how to:
- Show information on the LED ‘screen’
- Show colours on the LED ‘screen’
- Use the joystick to select options
- Work with the temperature and humidity sensors and retrieve readings
As ever we start the project by importing the libraries which the project will rely on. These are the Sense HAT library, used for interfacing with the Sense HAT board, and from the time library we import the sleep function, which will be used to add a delay to our code.
from sense_hat import SenseHat
from time import sleep
For the next step we create an object called ‘sense’ and inside this object we create a connection to the Sense HAT board.
sense = SenseHat()
Using the newly created object we next perform two instructions, the first will rotate the LED grid so that when the Raspberry Pi is placed so that it stands on the USB ports, text will be orientated correctly. This requires rotating the board 270 degrees. The second instruction tells the Sense HAT to ensure that the LED grid is clear of any text or colour.
sense.set_rotation(270)
sense.clear()
In this project our Sense HAT will show different colours depending on the temperature and humidity it detects. The colours used are simply red, green and blue and for this we need to supply the Sense HAT with the correct mixture of values used to show that colour. The LEDs used on the Sense HAT have three LEDs per LED pixel. A mixture of the three LEDs (red, green, blue) will give us a colour, and the value for each LED is between 0 and 255. The value 0 means ‘off’ and 255 is the maximum intensity of that colour. The values are stored in a short three value list, separated by commas. This is called a tuple, and it is a data storage object that can be created with the values set, but the values cannot be updated, rather the tuple has to be destroyed and new values replace the old. The first tuple we create is called ‘red’ and it stores the values used to show bright red on the LED grid.
red = (255,0,0)As you can see, the red value is at maximum, but the green and blue values are at 0.
So now we create two more tuples to store the values for green and blue.
green = (0,255,0)
blue = (0,0,255)
The next part of the code is where we create two functions (blocks of code that can be used by calling their name in the main part of the code) that will handle reading the temperature and reading the humidity.
The first function is called ‘temperature’ and it will get the current air temperature using the temperature sensor present on the Sense HAT. Then the temperature will be compared against three value ranges to see if it falls within certain criteria. This will then trigger the LED grid on the Sense HAT to light up with an appropriate colour, before the temperature data scrolls across the LED grid. We start the function by giving it a name.
def temperature():The following code is indented four spaces (or one press of the TAB key) to show that it belongs inside the function. We next create a variable called ‘temp’ and in there we store the current temperature sourced using the temperature sensor on the Sense HAT. Then for debug purposes we print this temperature to the Python shell.
    temp = sense.get_temperature()
    print(temp)
So now that we have the data we need to create a series of conditional tests that will check the ‘temp’ variable, and the temperature contained within, against a series of values chosen to reflect the temperature of the location it will be used. In this case a rather warm home. The first test checks the temperature to see if it is greater than 34 Celsius, and if this evaluates as True, then the indented code to turn all the LEDs on the LED grid to red will be executed. Note that we are using our tuples to control the colour of the LEDs.
   if temp > 34:
        sense.clear(red)
However, if that first test evaluates as False, then we have two more tests to run. The next will check to see if the temperature is less than 34 Celsius and greater than 24 Celsius. If this evaluates as True, then the LED grid will go green.
   elif temp < 34 and temp > 24:
        sense.clear(green)
This code will run if the temperature is less than 24 Celsius and greater than 0. The LEDs will turn blue.
   elif temp < 24 and temp > 0:
        sense.clear(blue)
In the next line we pause the code for one second, giving us time to see the LEDs before moving on.
sleep(1)In the final step of the function we use the sense.show_message() function to scroll the temperature across the LED grid. Now to do this we need to perform two tasks to the temperature data, the first is to convert the temperature from a float value, a number with a decimal point, to a string which can be scrolled across the grid. The second task is to round the temperature data down to two decimal places. But why? Well, the temperature data is quite precise and can go to many decimal places. We do not need that level of detail, and so two decimal places is quite sufficient for this project.
sense.show_message(str(round(temp,2)))We now move on to a new function, and so there should be no indentations to our code, and our cursor should be all the way to the left of the screen. The second function is called humidity and again we need to name the function before moving on.
def humidity():We next create a variable called ‘humidity’ to store the humidity sensor reading and then print this to the Python shell. The humidity value is a percentage, with 0% being dry, and 100% being monsoon levels of humidity.
   humidity = sense.get_humidity()
    print(humidity)
So now that we have the humidity data, let’s use a similar conditional test to that we created for our temperature function, but this time it will check the humidity levels and turn the LEDs.
- If over 40% humidity, turn the LEDs blue
- If between 30 and 40% turn the LEDs green
- If lower than 24 and greater than 0% turn the LEDs red.
- Then the code will pay for one second to enable the user to see the colour.
if humidity > 40:
sense.clear(blue)
elif humidity < 40 and humidity > 30:
sense.clear(green)
elif humidity < 30 and humidity > 0:
sense.clear(red)
sleep(1)
In the last part of the function we scroll the humidity data across the LED grid in the same manner, and using the same two tasks to format the data for the small LED grid.
sense.show_message(str(round(humidity,2)))With the functions completed, our focus shifts to the main body of code, and for this we shall start with ‘try’ which is the first part of an exception handling construction, used to run the code and handle when the user wishes to exit the code. Then indented inside the ‘try’ we create a ‘while True’ loop to run the code within, indefinitely.
try:
    while True:
Now to detect joystick input, we need to use a for loop, that will look for an event (a press of the joystick in any direction), and then we check to see if the action (the act of pressing the joystick in a direction) is ‘pressed.’
        for event in sense.stick.get_events():
            if event.action == "pressed":
So if the joystick is pressed ‘up’ which is towards the GPIO, then our temperature function is executed and the LED matrix will show a colour to denote the temperature before scrolling the data across the grid.
                if event.direction =="up":
                    temperature()
Then we have another condition to test, for if the joystick is pressed ‘down’, which will run the humidity function.
                elif event.direction == "down":
                    humidity()
The code then pauses for half a second, to ensure that multiple presses of the joystick are not detected.
sleep(0.5)We are now at the end of the ‘try’ part of the code, and we next move into an exception handling section used to handle when the user wishes to exit the code. To do this the user will press CTRL + C which is called a ‘Keyboard Interrupt’, so if the user wishes to end the code, they press CTRL + C and this skips all the code in ‘try’ and goes to the final line, which will scroll ‘Bye’ across the LED grid of the Sense HAT.
except KeyboardInterrupt:
    sense.show_message("Bye!")
With the code completed, save the code as ‘temp_humidity.py’ and then click on Run >> Run Module to start the code.
Press the joystick and watch the LED grid come to life!
In the next blog post in this series we shall learn how to use the accelerometer to control the LEDs of our Sense HAT and in another project we shall create our own compass using the magnetometer.

Les Pounder loves hacking and tinkering with Arduino, Raspberry Pi and new technologies. He passes on his skills and discoveries to Electromaker readers via tutorials and reviews.


Leave your feedback...