
Build an Ambilight Clone with a Raspberry Pi
Ambilight offerings provide a means of adding pleasant backlighting to a television or monitor. It’s short for ambient lighting and Philips originally developed this technology for its TV sets. However, you’ll find loads of Ambilight type kits available for purchase. Though these are easily set up, you can always make your own Ambilight clone with a Raspberry Pi.
Build an Ambilight Clone with a Raspberry Pi: Getting Started
Creating a do-it-yourself Ambilight using a Raspberry Pi is pretty simple. But you’ll need a few items first.
- Raspberry Pi board (Raspberry Pi 4 recommended)
- microSD card
- Case (optional but recommended)
- Power supply
- Peripherals (keyboard, mouse, or wireless keyboard with touchpad)
- Media center operating system (Kodi-based operating system, RetroPie, or Recalbox)
- LED strip
- Power supply for LEDs (DC 5 v)
- Screw Terminal Strip
- Female DC Power Jack Adapter
- 4 pin JST
- GPIO push pins
- LED strip connector
- 17 AWG wire
- Velcro fasteners
- Hyperion
Total Cost: The Pi can be purchased as a kit, or pieced together. Expect about $60 for the kit. Then, around $90 for supplies. So think of about $150-175 total for the project.
Attach Your LED Strip
First, lay your TV or monitor down on a flat surface with the back facing up. Try using a soft surface, or putting a towel or blanket underneath.
Measure your LED strip. Begin at the base of the TV and lay your LED strip around the back of the monitor. Using scissors, cut the LED but make sure to do so in the proper place. You’ll need to make cuts as straight as possible at a 90-degree angle across the copper contact area. Perform this for the sides, top, and bottom. Once finished, you should have a square that you’ve made out of your LED strip.
Connect the Strips
Once you’ve laid out your build, connect the five strips together. You’ll need to peel back the 3M paper on the back to insert the LED strip copper connection area into the LED strip connectors.
Make sure that the DO and data outputs and clock outputs are connected to the connector, not the data and clock inputs.
In total, you should have five connectors: One at each of the corners connecting the strips, and a fifth at the end near the base.
Once the connectors are hooked up, remove the 3M tape from the bottom of the LED strip and gently place your LED strip around the back of the TV.
Get Wired
After that, cut the end off of the final connector strip. Remove the two center wires on this connection, as they are not necessary. You’ll only need the 5V and ground connections. Now, run the blue and black cables from that connector to the JST connector.
Next, take cut wires so that you have the following wires:
- LED strip beginning complete with all four wires of the LED connector
- LED strip end with two wires (5V and ground)
- Two strips of 17 AWG wire (for the PSU)
- 3 GPIO cables (female parts)
Get Connected
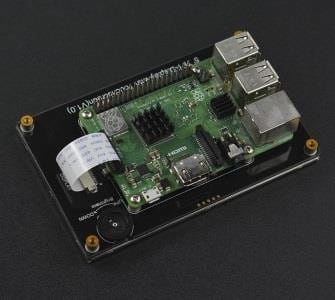
With your wires prepared, and Raspberry Pi in its case, grab the pushpin connectors or screw terminals. You’ll need to run the cables from the LED strip into the appropriate parts of the connectors and Pi board as shown below: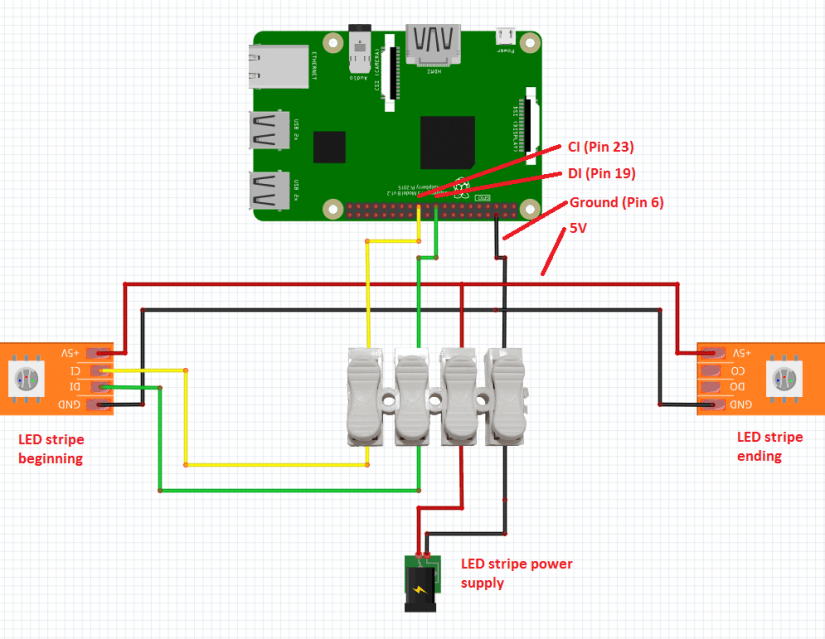
If you need to refer to Raspberry Pi 3 GPIO header info, there’s a great list: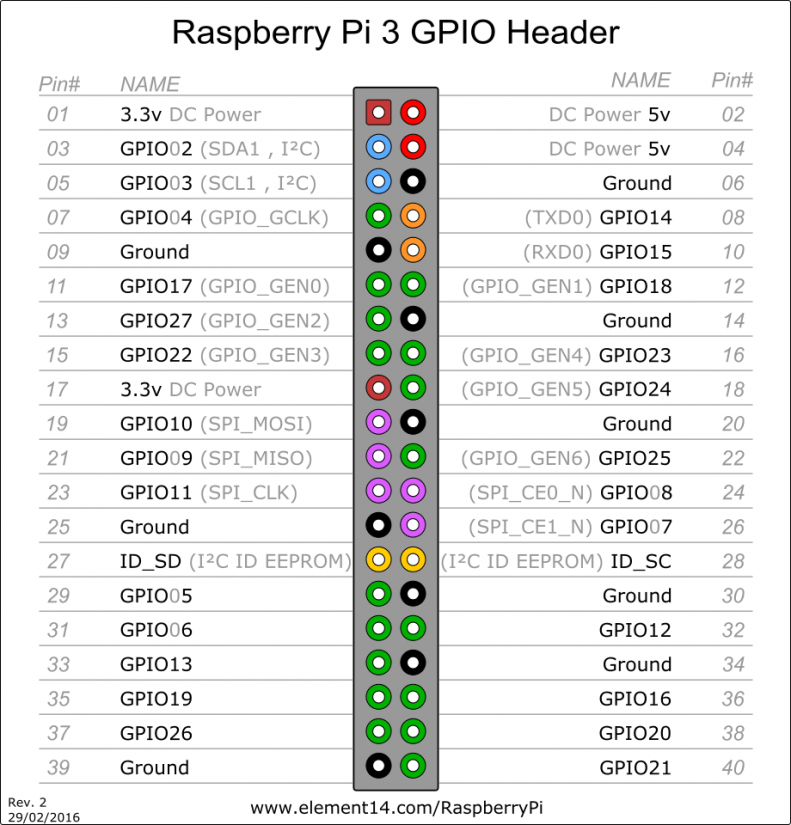
Double-check your setup and connections. You will have four ground wires, two data input wires, two clock input wires, and three 5V wires.
Set Up Your Software
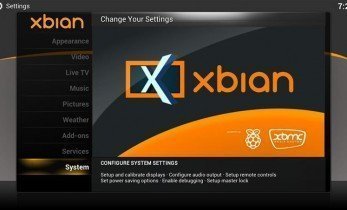
With the hardware configuration complete, now set up your hardware. You can use either OSMC or Recalbox for this.
OpenElec/OSMC/LibreELEC/Recalbox
Head to the download page. Snag the Raspberry Pi 2/3 image. Download that, and extract the IMG file. You’ll need an unzipping program to accomplish this:
- Windows: 7-Zip
- macOS: The Unarchiver
Next, mount the IMG on a microSD card using appropriate software:
- Windows: Win32DiskImager
- macOS: ApplePi-Baker
- Linux: LiveUSB Install
After that, plug in the microSD card and fire up your Raspberry Pi.
Configure Hyperion
![]()

After installing your home theatre PC (HTPC) software, you’re ready to configure Hyperion. Download HyperCon which lets you build Hyperion configuration files easily. Follow the graphical process and input the following information under the SSH tab: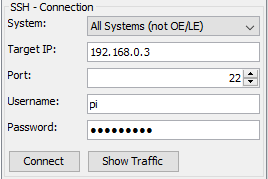
- System: Select the proper system
- Target IP: IP address of the system where you’re installing Hyperion
- Port: SSH port, often 22
- Username: Username for your system
- OpenELEC/RasPlex/LibreELEC/PlexMediaPlayer: root
- Raspbian/RetroPie/Recalbox: pi
- OSMC: osmc
- Password: Password of the user above, on:
- OpenELEC: openelec
- LibreELEC: libreelec
- RasPlex: rasplex
- PlexMediaPlayer: plex
- Raspbian/RetroPie/Recalbox: raspberry
- OSMC: osmc
Then, click connect. Once all greyed out buttons under the HyperCon SSH tab are available you are successfully connected.
Next, hit the Inst./Upd. Hyperion button This may take a few minutes. If all looks good (read: no error messages), you’re good to go. 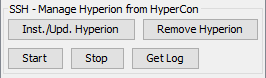
In HyperCon, go under the hardware tab. Select the LED strip type, for instance, WS2801. Then pick your output, RGB byte order, and baud rate.
Finally, count your LEDs, and input the number of horizontal, left and right LEDs in your strip. When that’s complete, click create Hyperion configuration to generate a config file. Transfer this to your device using SSH.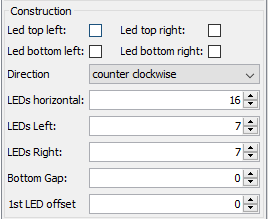
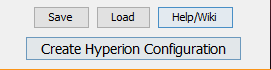
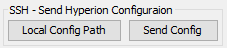
You’ll need to put this into the correct folder. On the SSH tab, select the config file you made with the local config path option, then choose send config.
Or, you may manually add the config file. For example, on my Recalbox setup that’s:
/recalbox/share/system/config/hyperion/hyperion.config.json (config/hyperion/hyperion.config.json
Then, you may need to enable Hyperion. When I did this on Recalbox, it was under the Recalbox.conf. Simply change:
hyperion.enabled=0
tohyperion.enabled=1.
Build an Ambilight Clone with a Raspberry Pi: Final Thoughts
Overall, a DIY Ambilight clone with a Raspberry Pi is pretty simple. Just use your preferred operating system, connect the hardware, and configure your software. Hyperion has a robust Wiki and FAQ for any troubleshooting and thriving community forums. It’s an awesome means of spicing up your media room.

Moe Long is an editor, writer, and tech buff with a particular appreciation for Linux, Raspberry Pis, and retro gaming. Writing online since 2013, Moe has bylines at MakeUseOf, TechBeacon, DZone, SmartHomeBeginner, DEV.to, DVD Netflix, and Electropages. You can read his writings on film and pop culture at Cup of Moe, check out his tech reviews, guides, and tutorials at Tech Up Your Life, and hear his thoughts on movies on the Celluloid Fiends podcast. Aside from writing and editing, Moe has an online course, the Beginner's Guide to Affiliate Blogging From Scratch. When he's not hammering away at his keyboard, he enjoys running, reading, watching cinema, listening to vinyl, and playing with his dog Sebastian.


Leave your feedback...