
Odroid-Go Review: An Affordable DIY Portable Game Console
What is the Odroid-Go?
![]()
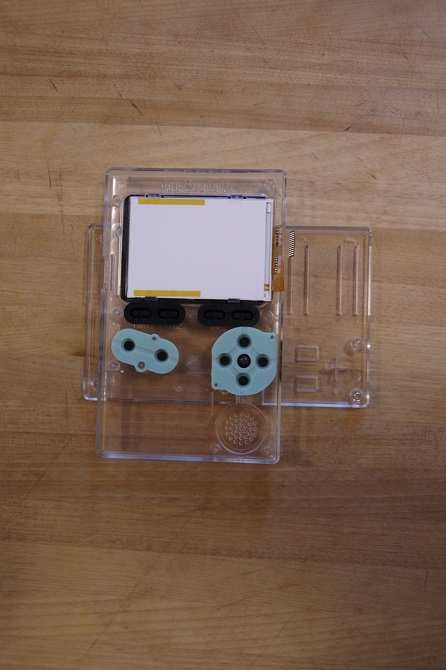
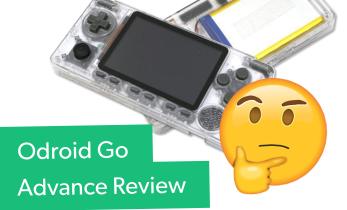
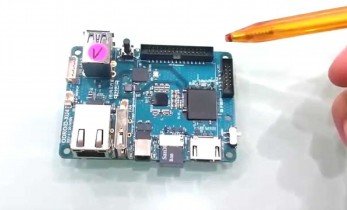
The Odroid-Go is a DIY device which boasts the functionality to play Nintendo Entertainment System (NES), GameBoy, GameBoy Color, Sega Master System, and Sega Game Gear titles. It looks similar to the GameBoy Color, but comes unassembled. While assembly is required, it's incredibly simple to configure. 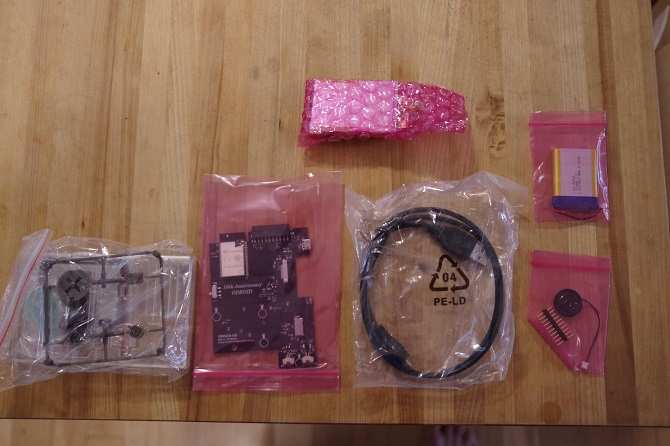
Aside from gaming, the Odroid Go handheld gaming console sports Arduino compatibility for basic programming practice. The Odroid-Go kid features everything you'll need to get started from a hardware perspective. You'll need an 8GB or larger microSD card, software available from the Odroid website, and your own ROMs (note: Electromaker does not condone piracy, so please only use ROMs for games you legally own). The Odroid-Go arrives as a 10th anniversary celebration for Hardkernel which released an portable Android retro gaming console as one of its first devices.
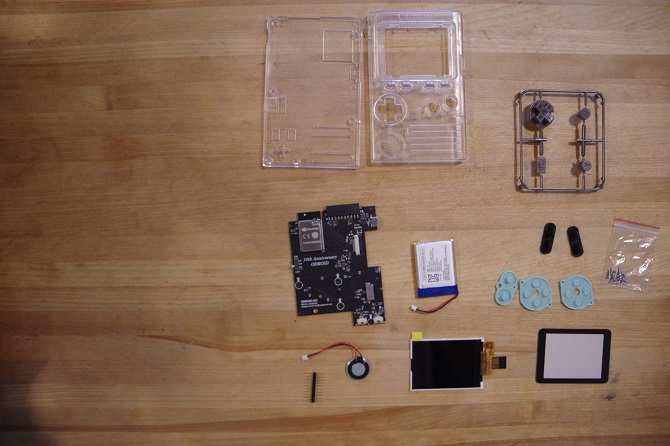
What's in the box?:
- Odroid-Go main board
- Console enclosure
- 2.4-inch LCD module
- One 4x button rubber piece
- Two 2x button rubber pieces
- One 2x button rubber piece
- 10-pin male header
- 8Ohm 0.5W speaker
- LCD window
- Button set (A, B, D-pad)
- micro USB cable
- 1200mAh Li-ion battery
- GameBoy
- GameBoy Color
- NES
- Sega Master System
- Game Gear
- Odroid-Go kit
- Small philips head screwdriver
- microSD card
- Odroid-Go software
- (Legal) ROMs
Total cost: $32
Odroid-Go Handheld Console Specs
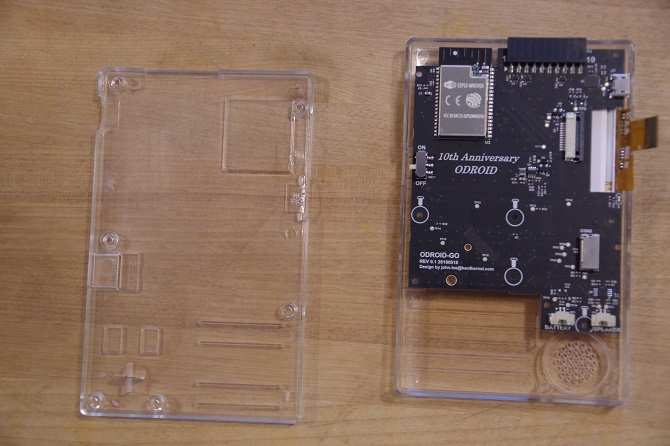
While the Odroid XU4 remains a top Raspberry Pi alternative because of its octa-core processing power, the Odroid-Go is admittedly underpowered. At its core, you'll find an ESP32-WROVER with 16MB flash memory. While the ESP32 won't compete with even a Raspberry Pi Zero, it's more than adequate for older gaming emulators. Its CPU operates from 80MHz-240MHz.How to Build a Portable Retro Game Console with an Odroid-Go Kit
Begin building your Odroid-Go handheld retro gaming unit by installing the LCD screen cover. Remove the sticker from the back of the screen protector, and place it carefully into the window on the front Odroid-Go enclosure.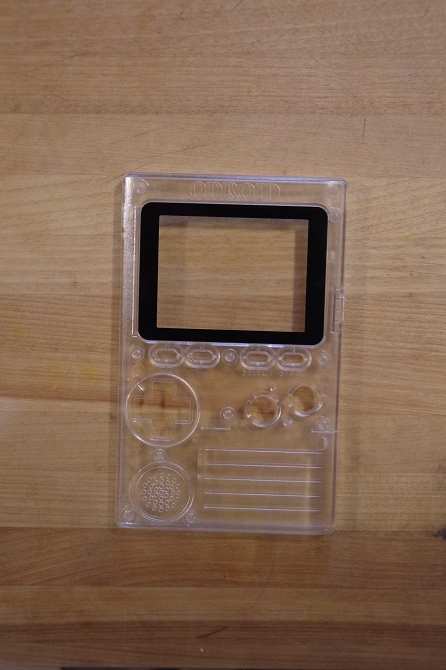
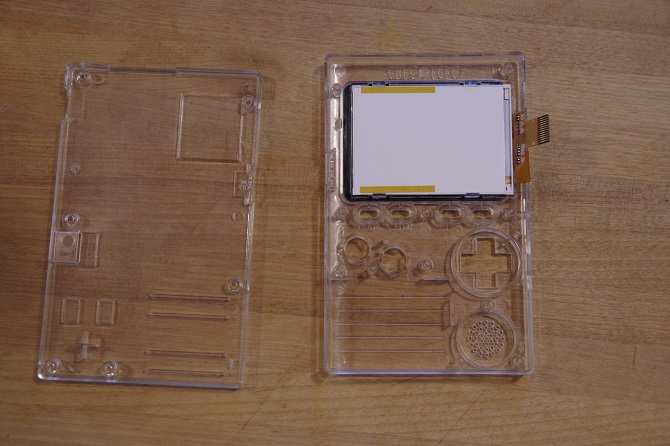
With the screen protector installed, now mount the LCD screen inside of the Odroid-Go. Place the front of the Odroid-Go enclosure face down, and gently insert the LCD screen. You'll know it's properly in place when you feel it click into place.
After that, it's time to remove the buttons and place those into the corresponding holes in the Odroid-Go shell. The menu, volume, start, and select buttons are universal two-button rubber pieces. These should fit in either of the two-hole slots at the top. The A and B buttons are manufactured such that they only fit a certain way and in the appropriate holes. As such, you can't mess up A and B button placement. The D-pad is pretty universal. Similarly, the rubber backers for the D-pad and A/B buttons fit over a few plastic pins, and you'll know when it slots neatly into place.
Once the screen protector, A/B buttons, D-pad, start/select buttons , menu/volume keys, and screen are in place, it's time to install the main Odroid-Go board. A few sections poke out of pre-made cutouts in the Odroid-Console. The 10-pin header goes at the top. You'll need mount a few screws. These are clearly designated with screw icons on the main board.
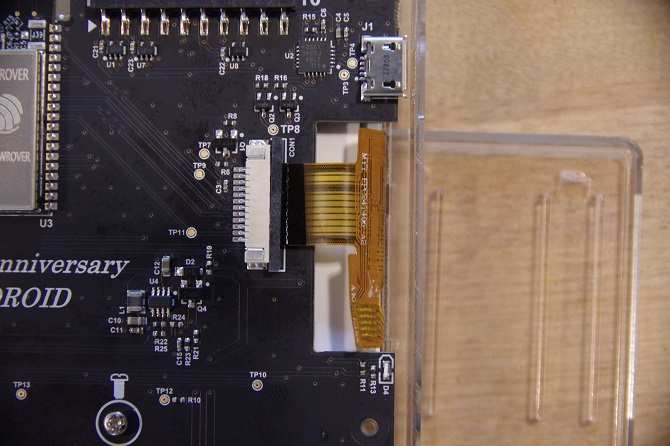
Additionally, attach the LCD screen ribbon cable to the port at the top of the Odroid-Go board. Pull the plastic slider carefully toward the outside edge of the Odroid-Go enclosure. Now, insert the LCD screen ribbon cable. It snugly nestles into place when it's properly inserted. When that's complete, gently move the slider back into position so that it's tight around the ribbon cable.
Next up, connect the battery pack and speaker. Both of these click into place, and there's only one correct configuration so you'll know when it's properly in place. It's best to curl the speaker so its wires wrap neatly into place for cable management.
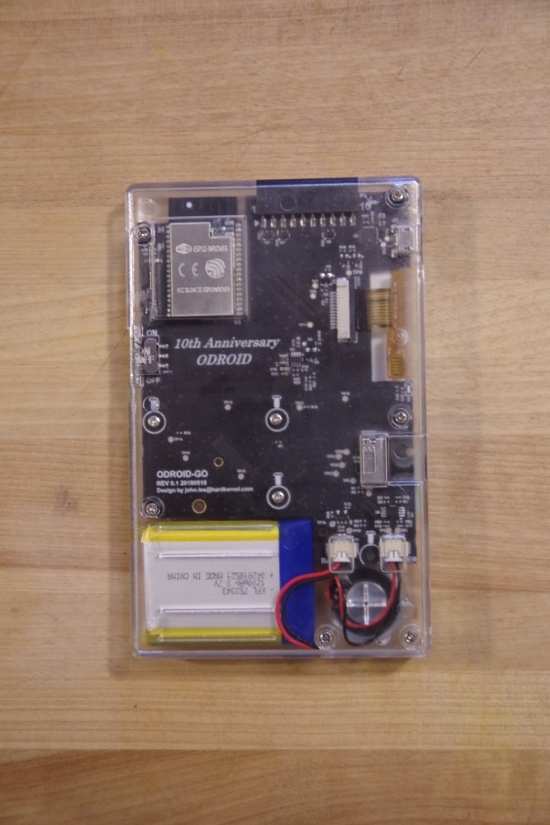
Before putting the back of the case on, you'll need to perform one final step: putting the plastic power slider on. This small tab slips over the tiny power switch. To attach it, I had to power the device on first. When you've accomplished this, it's time to screw the back enclosure on with the included screws. There are six screw holes.
Odroid-Go Portable Gaming Console: Software Installation
If you're familiar with installing operating systems on single-board computers such as the Odroid XU4, Raspberry Pi, or UDOO x86, you may suspect this calls for mounting an OS on a microSD card. However, Hardkenrel simplifies this step. You'll need a microSD card formatted in FAT or FAT32. Download the Odroid-Go operating system. It's a ZIP folder, so you'll need to extract the contents. When you decompress the archive folder, you're left with two folders: Odroid and roms. Simply drag and drop these two folders to the root of your microSD card. Hardkernel designed the Odroid-Go software to eschew burning a bootable microSD card.Pop your freshly created microSD card into the slot on the back of the Odroid-Go. Slide the power switch to the on position. If all went correctly, it should load the main user interface (UI).
Adding ROMs to the Odroid-Go
Congratulations! You've successfully made a DIY GameBoy system. For the final step, add your ROMs. At the root of your microSD card, you'll see a ROMs folder. Navigate into this directory to find folders marked gb (GameBoy), gbc (GameBoy Color), gg (Game Gear), nes (Nintendo Entertainment System), and sms (Sega Master System). Merely place your ROMs in the corresponding folders. Notably, you'll need to uncompress any archive files since the Odroid-Go can't play compressed files.Odroid-Go Review: An Awesome DIY Portable Gaming Console
![]()
I wasn't entirely sure what to expect at $32. Considering the brawn and functionality of the Odroid XU4, I predicted a decent retro gaming experience despite the underpowered ESP32 board. The Odroid Go kit comes with everything you need aside from a screwdriver, microSD card, and the freely available OS. If you're like me, you probably have a screwdriver and an embarrassingly large number of microSD cards on hand. 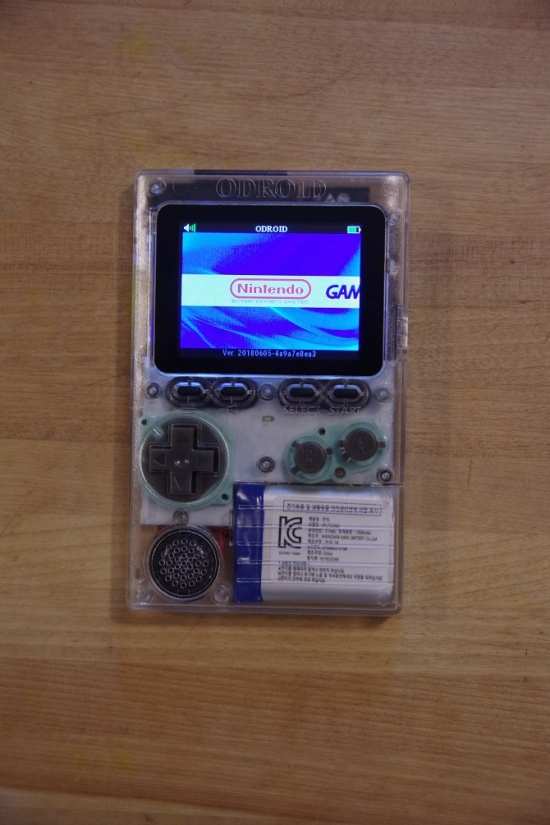
Putting together the Odroid Go handheld retro gaming console is incredibly intuitive. Buttons and connections fit either uniersally or one specific way so that it's virtually impossible to insert a part incorrectly. Essentially, it's a paint-by-numbers style DIY portable game console. Further simplifying Odroid-Go set up, you don't even need to burn a microSD card. Therefore, the Odroid-Go should appeal to both seasoned makers and beginners alike.

Real-world use is wonderful. During my Odroid-Go review, I was pleased by the fast boot up time. Even after loading an obnoxiously large ROM collection onto the Odroid-Go, the system started in a matter of seconds. Navigation is intuitive via the D-pad, A, B, and select buttons. Plus, the menu button lets you exit and create a save spot anywhere in-game. This makes resuming games simple and quick.
Initially, though my Odroid-Go booted into the main menu and showed all my ROMs, no games would start. At first, I believed this was an improperly formatted microSD card. However, I eventually discovered that switching from a Patriot microSD card to SanDisk card remedied my issues. It's tough to fault the console for this since it could have been a faulty card or just slow read/write speed.
Odroid-Go Review: Final Thoughts
Ultimately, the Odroid-Go is well worth its affordable price. For just over $30, you can snag a comprehensive kit which lets you play loads of games from five different consoles. It's inexpensive, deceptively simple to cobble together, and shockingly powerful. The Odroid-Go handheld game console played every ROM I threw at it.The one missing element is a headphone jack. Surprisingly, especially considering that the Odroid-Go is a DIY portable retro gaming device, there's no headphone jack for private listening. It's a minor oversight, with moderate ramifications. Still, for such a low price it's tough to complain. Overall, I highly recommend investing in the Odroid-Go whether for retro gaming, programming, or simply a quick, easy maker project to get acquainted with hardware and software.
Electroscore: 4.5/5 ![Electroscore: 4.5]()

Pros:
- Affordable
- Plays NES, GameBoy, GameBoy Color, Sega Master System, and Sega Game Gear Games
- Quick and easy configuration
Cons:
- No headphone jack
- Underpowered processor
Price: $3,200.00
Link: ameridroid.myshopify.com/collections/new/products/odroid-go-game-kit

Moe Long is an editor, writer, and tech buff with a particular appreciation for Linux, Raspberry Pis, and retro gaming. Writing online since 2013, Moe has bylines at MakeUseOf, TechBeacon, DZone, SmartHomeBeginner, DEV.to, DVD Netflix, and Electropages. You can read his writings on film and pop culture at Cup of Moe, check out his tech reviews, guides, and tutorials at Tech Up Your Life, and hear his thoughts on movies on the Celluloid Fiends podcast. Aside from writing and editing, Moe has an online course, the Beginner's Guide to Affiliate Blogging From Scratch. When he's not hammering away at his keyboard, he enjoys running, reading, watching cinema, listening to vinyl, and playing with his dog Sebastian.


Leave your feedback...