
Introduction to Anvil : A tool to create a web interface for any Python project
We first discovered Anvil at PyCon 2018 in Cleveland USA last May. The team gave a great demo for the attendees, along with the chance to get hands-on with the code. At PyCon UK in September we met the team again and had more time with this great piece of software. But what is Anvil? Well, it is a tool to create a web interface for any Python project, using pure Python. No HTML, CSS or JavaScript is required. All of our code is in Python. This app is used for data science projects, email services and business applications. But our interest was piqued when we learnt that there was an uplink tool. The uplink tool is used to run code on a remote server, in our case a Raspberry Pi and have the output appear in a web app. It can be used with any Python library, meaning that we can easily drop Anvil into a project and start building.
In this project we shall use a Raspberry Pi 3 and an Enviro pHAT to read live temperature data and post that data to our Anvil app, available to multiple devices simultaneously. All for free thanks to Anvil’s great free tier!
Hardware
You will need:
- A Raspberry Pi 4 or a Raspberry Pi Zero W
- An Enviro pHAT
- The latest Raspbian operating system installed on an SD card
- Equipment to use your Pi
- A laptop running Windows / OSX / Linux (For Anvil development)
For this project we need any recent model of Raspberry Pi and an Enviro pHAT from Pimoroni. The Enviro pHAT is a cost-effective sensor platform that can detect motion, light, colours, temperature and humidity. Connect the Enviro pHAT to the Raspberry Pi, then connect your accessories and power up to the desktop.
Open a terminal and in the terminal type the following to install the Enviro pHAT software.
$ curl https://get.pimoroni.com/envirophat | bashWhen prompted to install the examples, select Yes. We don’t need them for this project. But they may prove interesting for future projects.
Once the software is installed we move on to writing the Anvil code.
Software
There are two parts to the project: the web interface, written on the Anvil website, and a server application written on the Pi.
We start by working on the code and layout for our Anvil app. So we first need to visit https://anvil.works and sign up for an account. By clicking on Start Building. Then click on New App and select Material Design as the template.
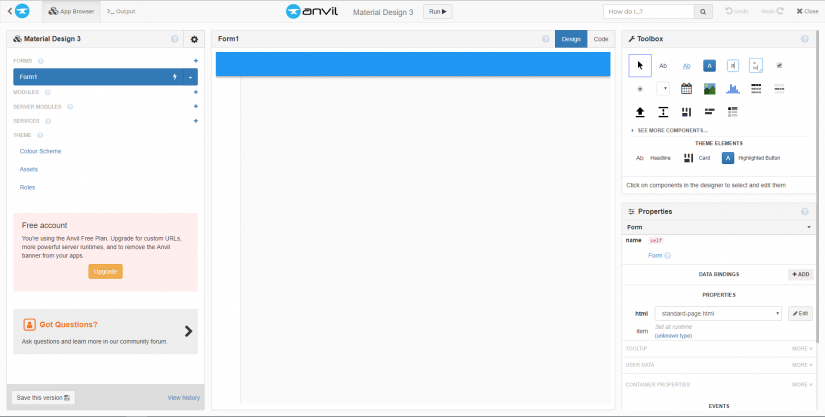
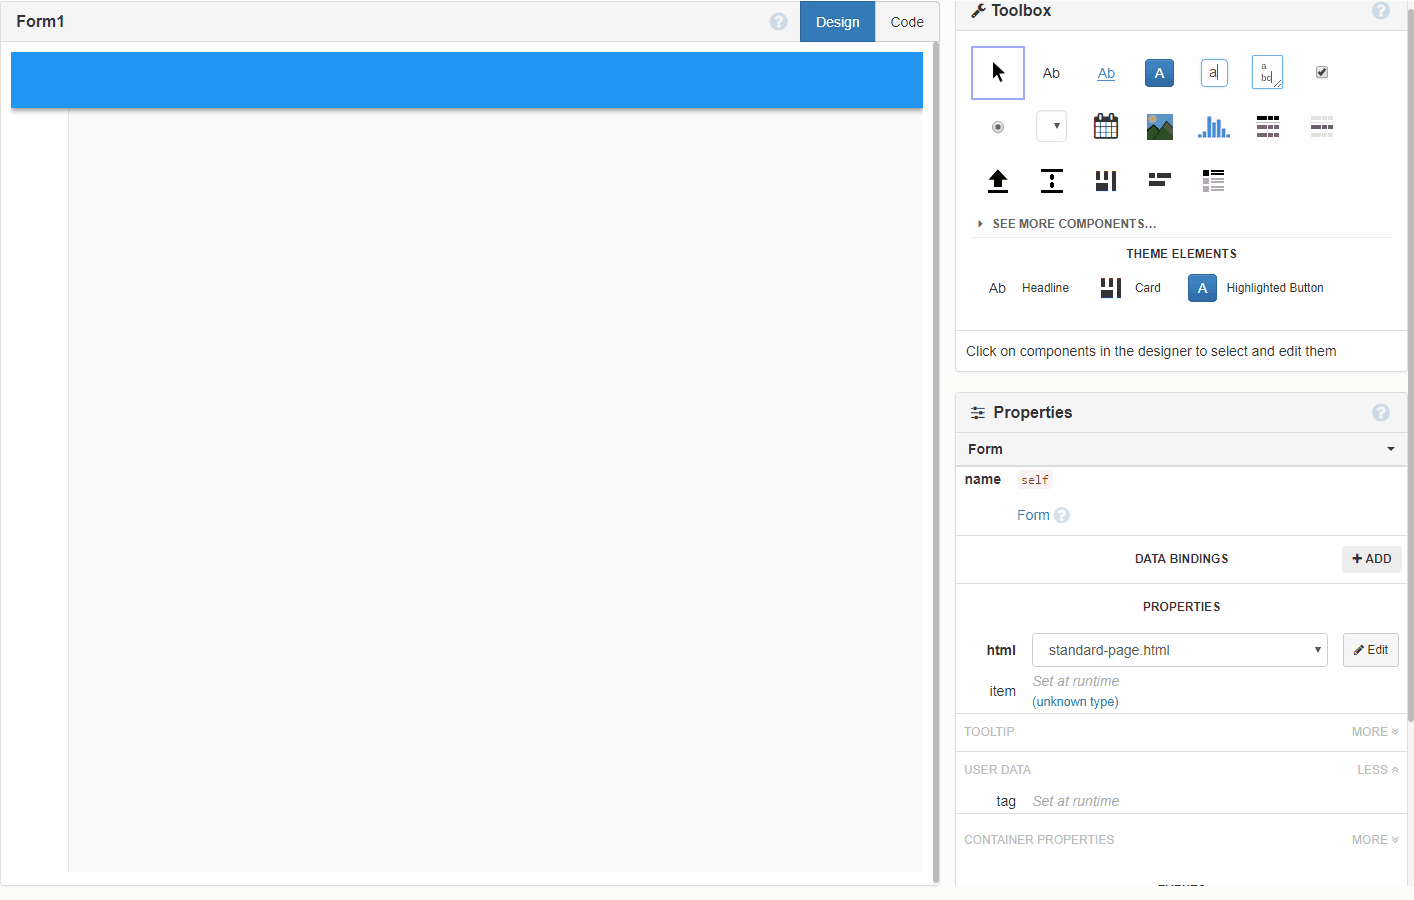
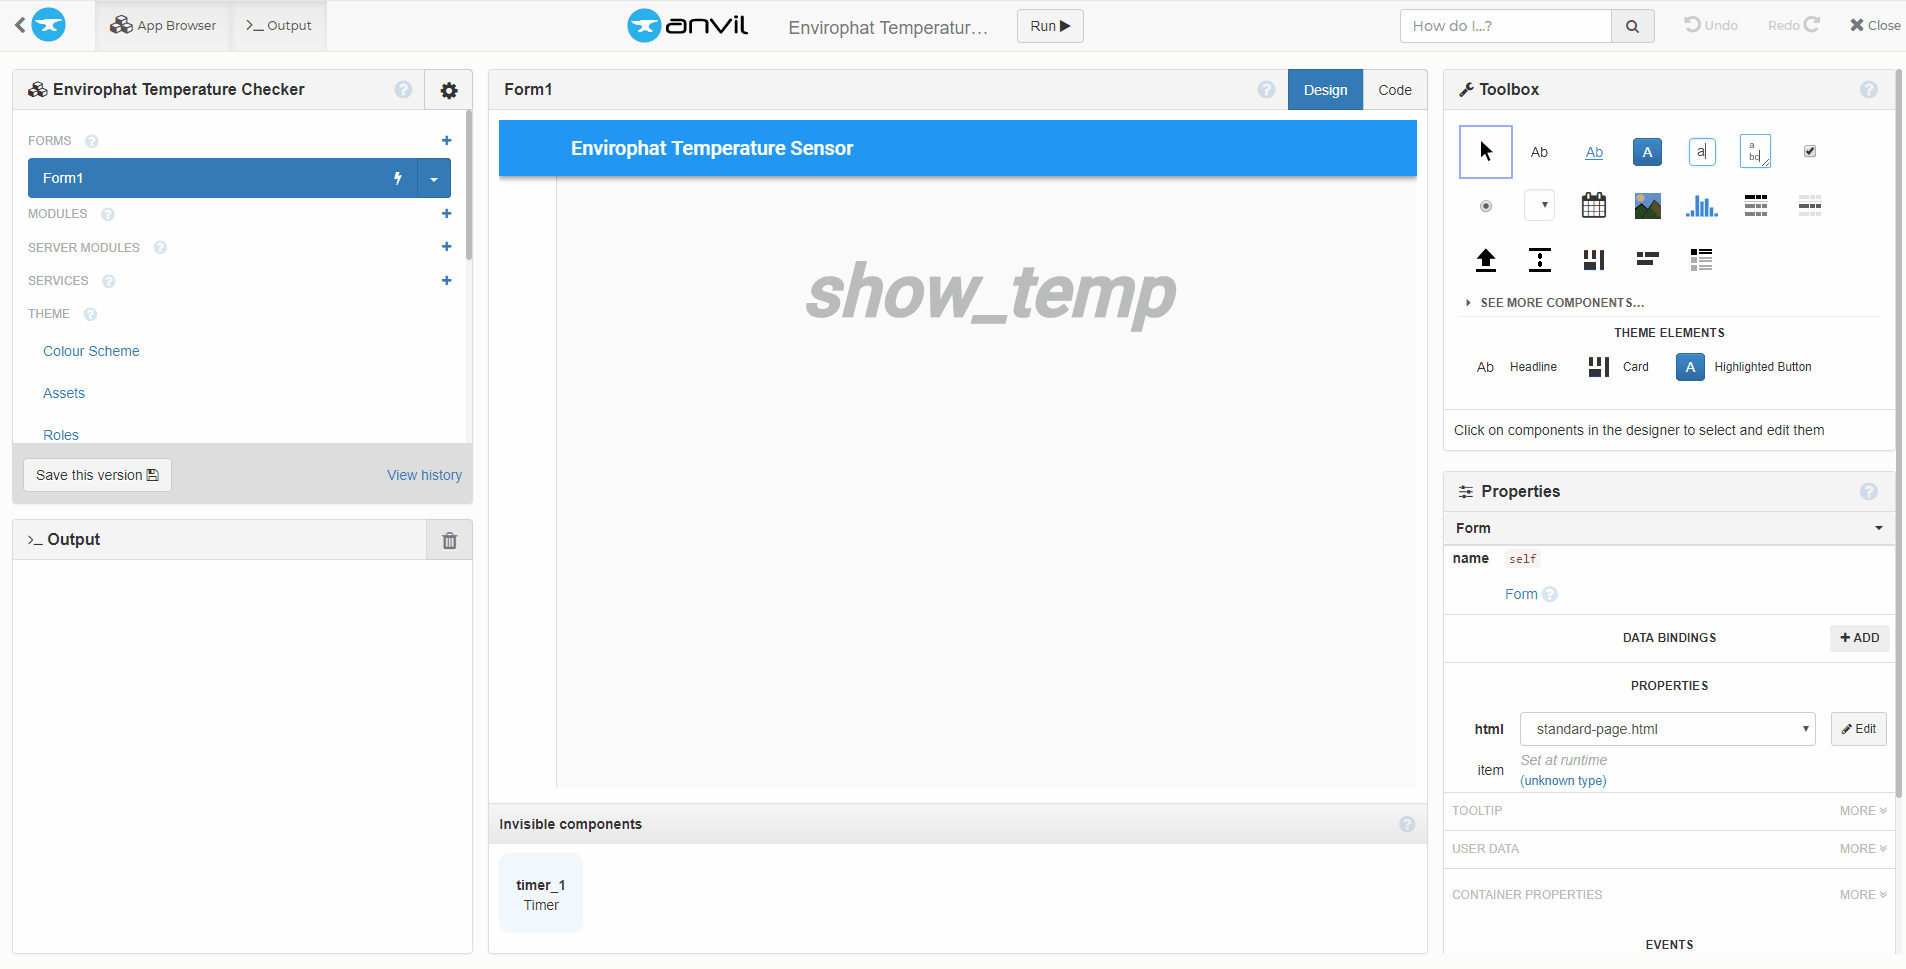
A quick look at the interface. On the left is an App Browser for this template. In the centre is where we construct the form which will be the layout of the app. On the right we have a toolbox and properties section used to drag and drop components to the layout and configure them further.
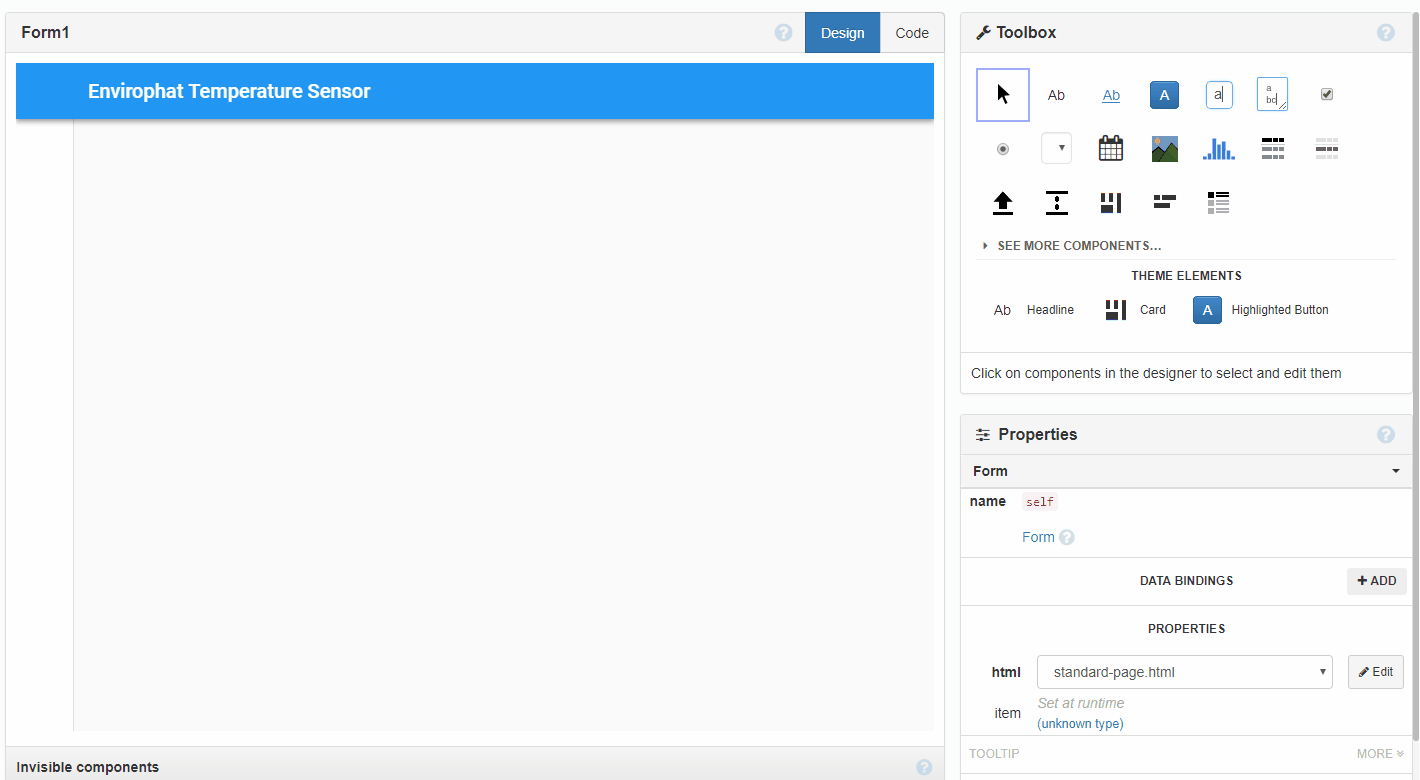
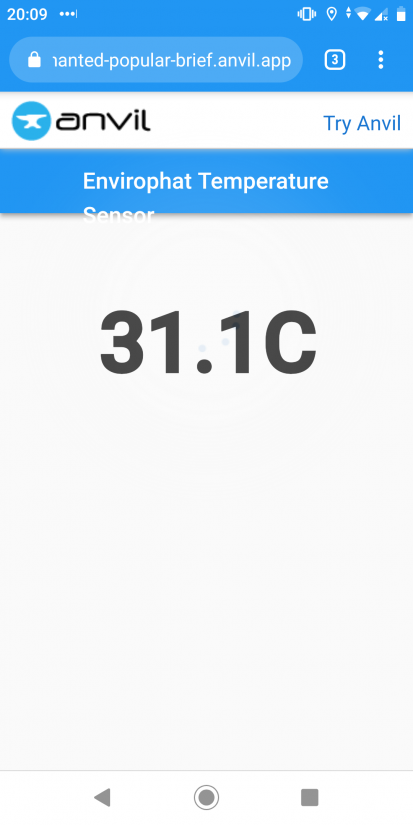
So our first step is to give our form a title, and for this we use the label tool from the toolbox, then drag it over the title at the top left of the layout. Next, change the text properties to read ‘Envirophat Temperature Sensor’.
![]()
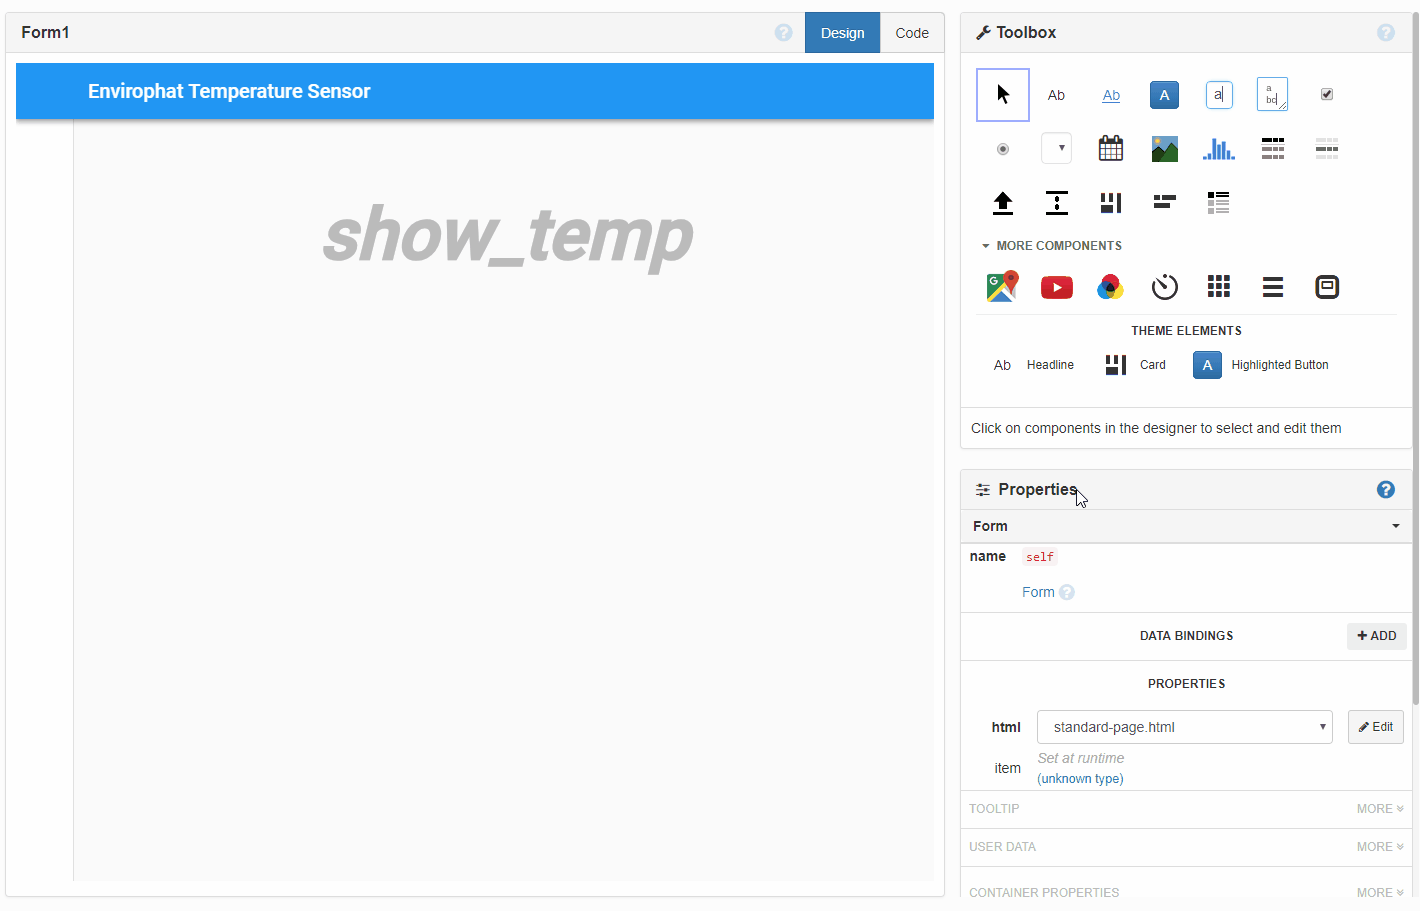
Next, we add a spacer from the toolbox, so that it is under the title.
So where will the sensor data be shown? Well, we shall use another label tool, placed under the spacer. Then we shall edit the properties of the label. Firstly we change the name of the label to show_temp and then change the text properties so that our text is 72pt in size, centre aligned and bold.
The next step is to use a timer, set for 0.5 seconds, to control how often the app is updated with the temperature data. For this we use the timer tool, found by clicking on More Components and drag this to the bottom of the layout. This is an invisible component that works behind the scenes.
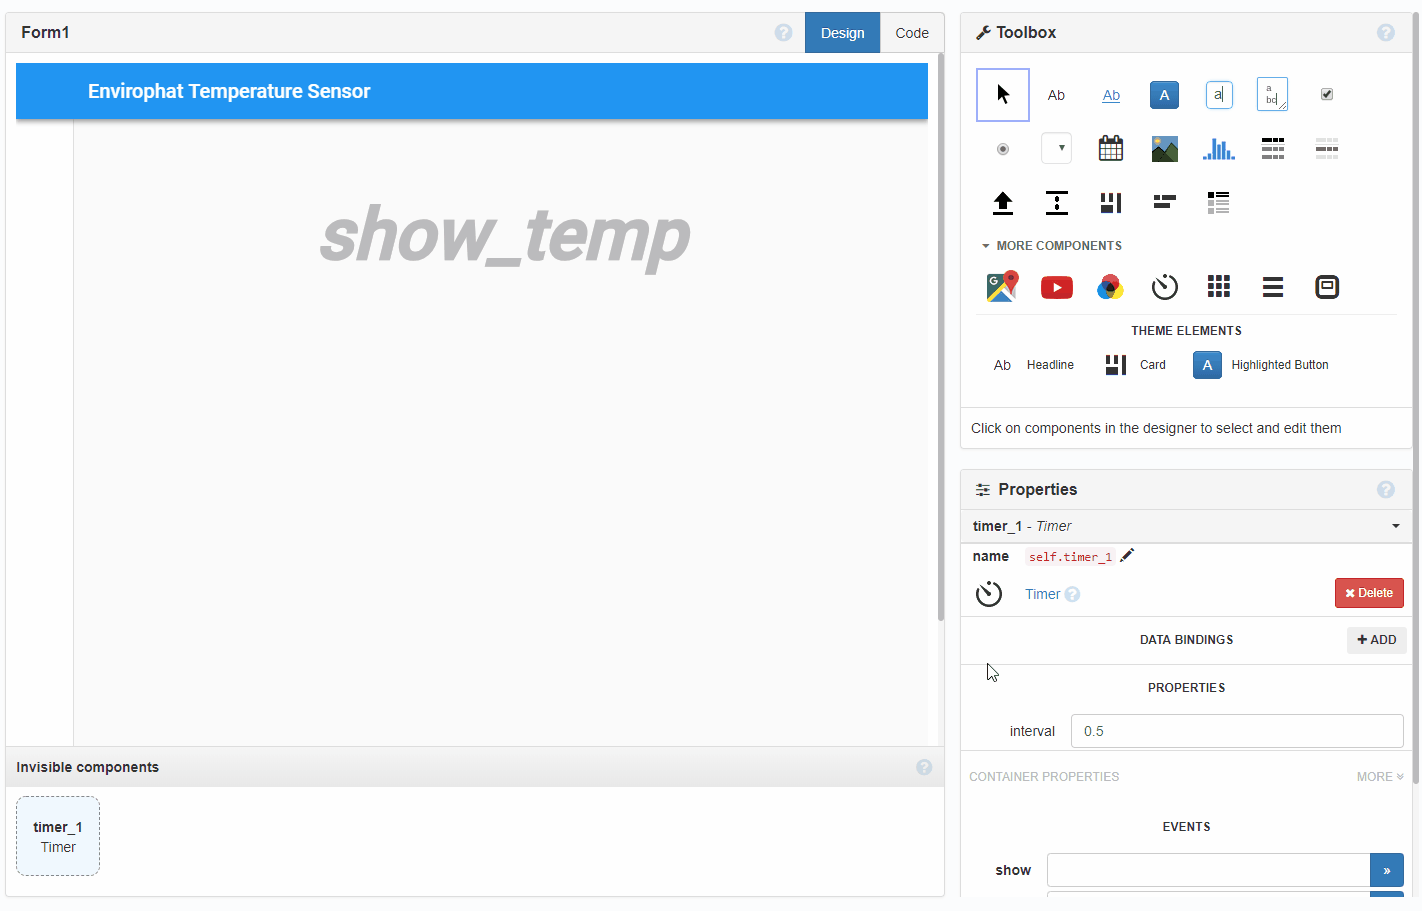
Now we come to the Python bit! We need to write some code in the app. Code that will run a function on our Raspberry Pi. To do this we double left click on timer_1 at the bottom of the layout.
The code which shall be written will be inside the function timer_1_tick and it works as follows. We create an object called temperature which handles a server call to our Raspberry Pi. This calls a function on the Pi called enviro_temp.
temperature = anvil.server.call('enviro_temp')The output of calling the enviro_temp function is that show_temp our large piece of text in the layout will see its text property be updated with the temperature.
self.show_temp.text = temperatureLastly we enter a pass to end the function.
pass
The last step in this part of the process, and in the Anvil app for now, is to configure the uplink, which enables our Pi to talk directly to the app. For this we need to click on the Cog icon in the App Browser on the left of the screen. Click on the green ‘Enable the Anvil Server Uplink for this app’ button and you will see a rather long API key.
Make a note of this key!!
Writing code on the Raspberry Pi
With that completed, we now move on to our Raspberry Pi. Ensure that your Pi is powered up with your keyboard, mouse, screen and Internet-connected. Boot to the desktop and open a new terminal window, the icon for which is found at the top of the screen.
In the terminal we shall install the uplink software library. Type the following.
$ pip3 install anvil-uplinkAfter a few moments the uplink software library will be installed and we can safely close the terminal.
To start writing the code we need to open the Python 3 editor, found in the Programming menu. When the application opens, click on File >> New and when the new window opens, click on File >> Save call the file anvil-temp.py and click ok. Remember to save often!
We start the code with two imports, the first import the anvil server library, used to communicate with the app. The second import is for our Enviro pHAT, specifically the weather function used to get the temperature data.
import anvil.server
from envirophat import weather
Next, we use a decorator, a function that takes another function and extends the behavior of the latter function without explicitly modifying it. And use this decorator to tell the Anvil library where the function to call is located.
@anvil.server.callableTalking of functions, our app makes a call to a function called enviro_temp every half second. So we need to write that function. Functions are defined and that is the first step.
def enviro_temp():Inside the function, our code is indented four space, or one press of the TAB key. This identifies that the code belongs in the function. We create a variable called temp and in there we store the temperature data, retrieved using the weather.temperature() function of the envirophat library. But around this we see round() and this is a helpful tool to round our temperature data down to something more human-readable, well unless you need precision! In this case the round() function will round our temperature down to one decimal place. Enough for our project.
temp = round(weather.temperature(),1)Then we convert the temperature data in to a string, before connecting the celsius symbol.
temp = str(temp)+"C"The last three lines in the function will return the temperature data, necessary for our app to pick this up and display it. Then print the temp to the Python shell on our Pi, for debug. Lastly, the function passes before exiting.
    return temp
    print(temp)
    pass
Our final two lines of code!!!
To connect to the app, we need to call the server.connect function, and pass it the long API key that you hopefully wrote down earlier. Then we instruct the code to wait forever, in place of running a loop or waiting for an event. This will keep the code running on the Pi.
anvil.server.connect("SUPERSECRETAPIKEY”)
anvil.server.wait_forever()
Save the code and click on Run >> Run Module to start.
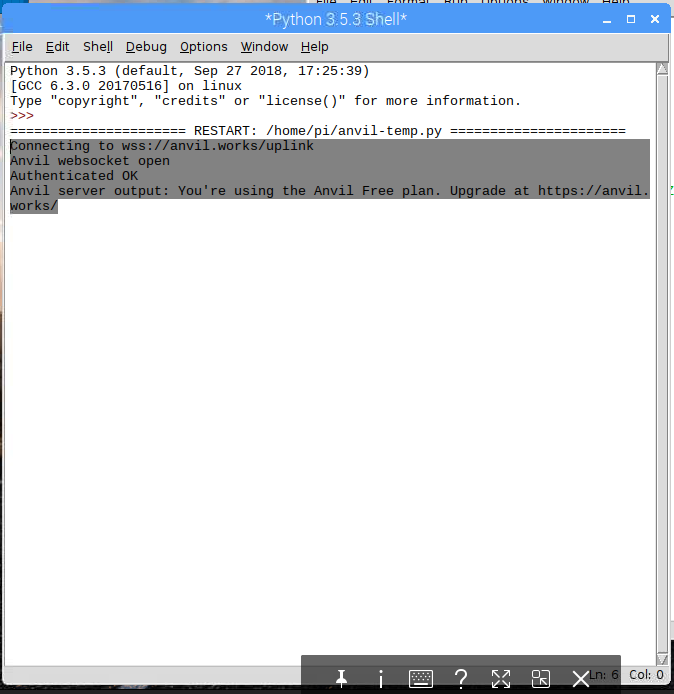
You should see that the code is running an authenticated in the Python shell. But it is not running yet!
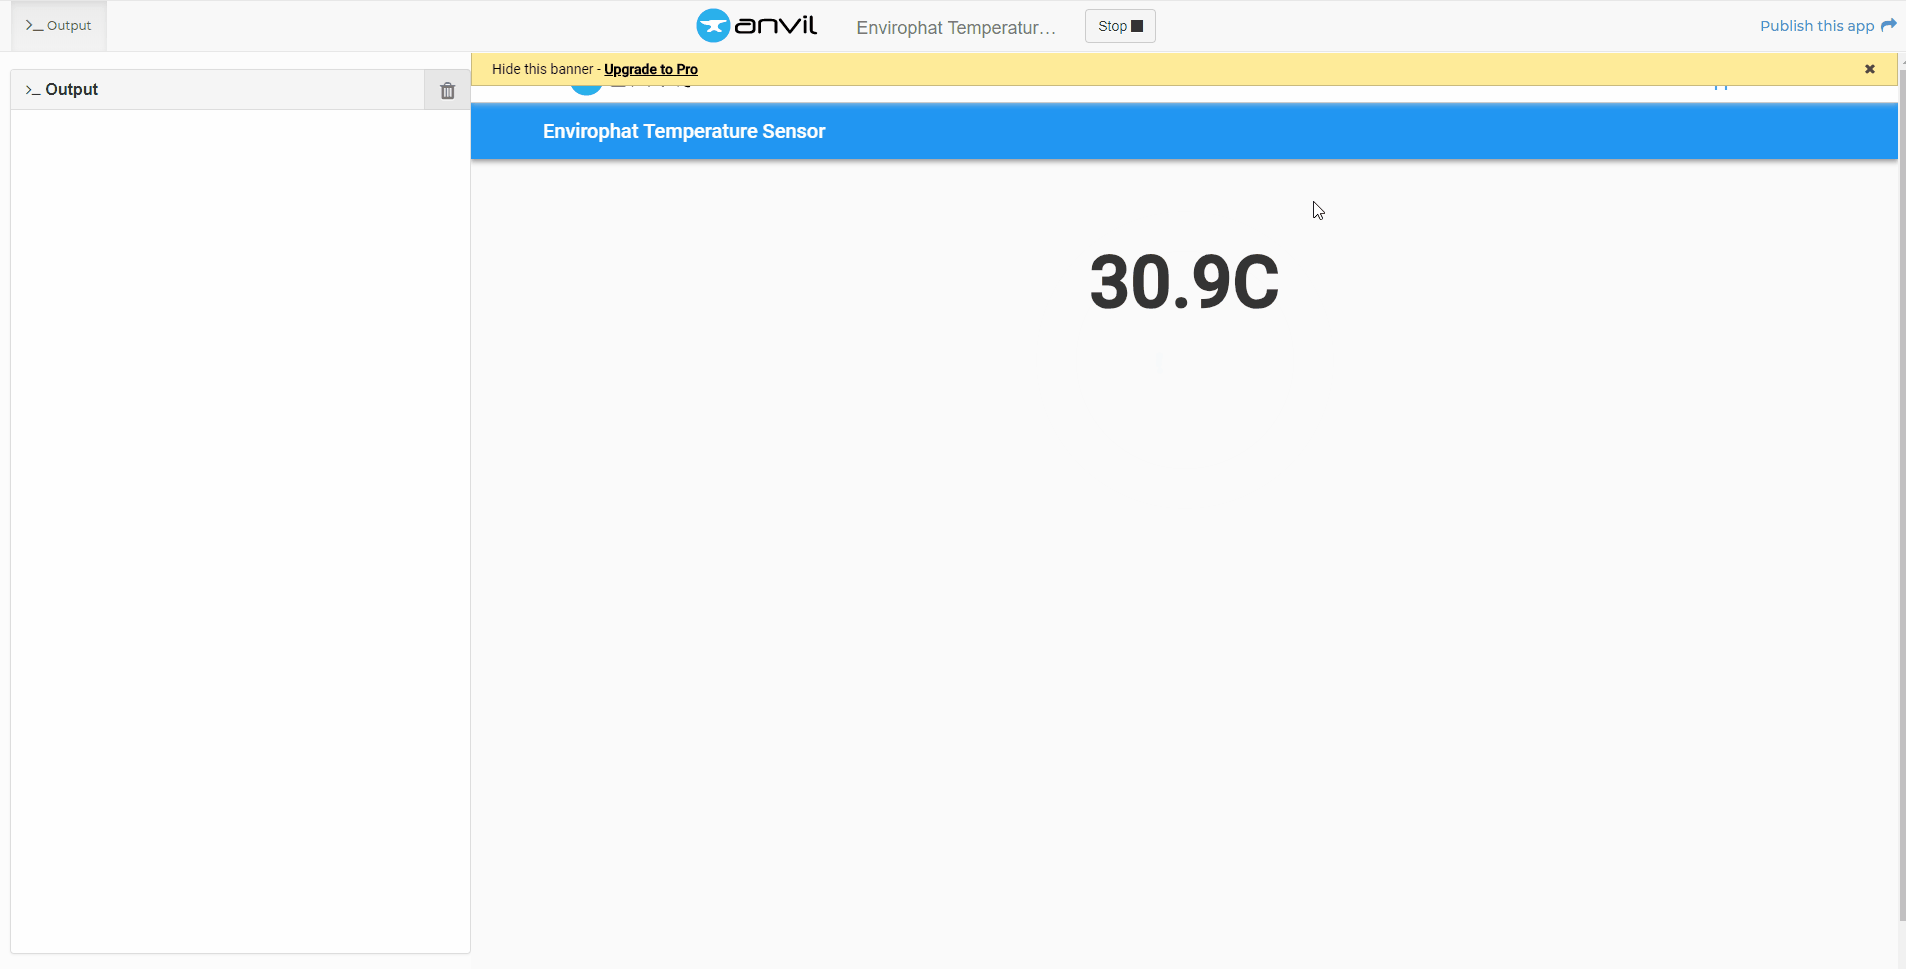
Head back to the Anvil app, and click on Run located at the top of the screen. You should see the temperature data being updated with a 0.5-second delay. We now have live data from a remote device displayed in a web app, all using Python!!
But wait! We can take this a step further, and publish the app. In the top right of the screen will be Publish this app and from there we can have a private link, which we can share with our work colleagues.
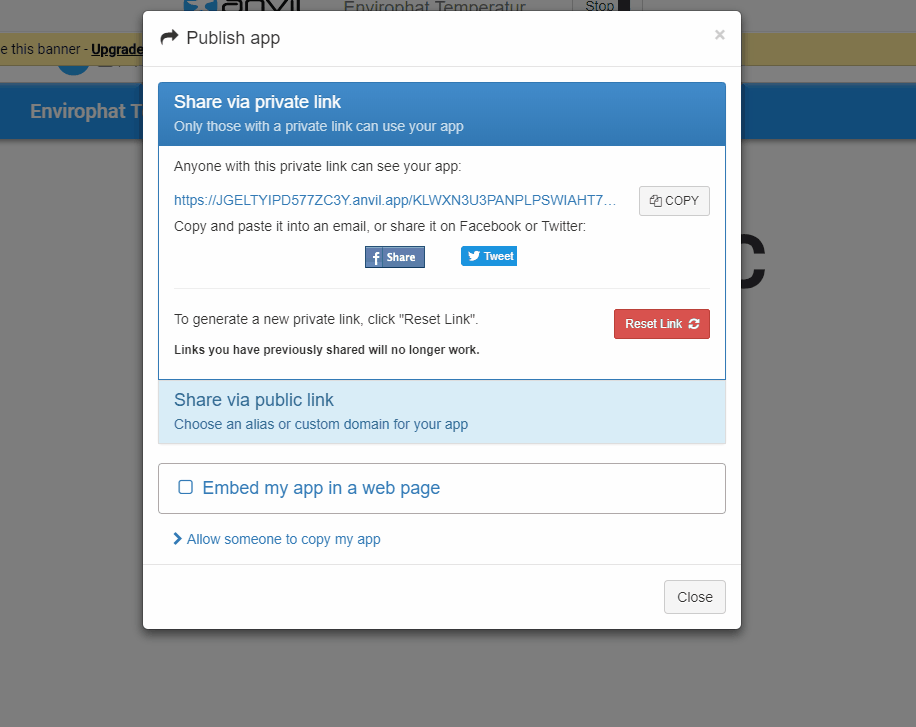
Or we can publish a public app, with an easy to remember URL. This can then be widely shared across social media.
So there we have it, our first steps with that proves to be a powerful and easy to use Python web API. Now our projects can be anywhere in the world, sending data to a single web page!

Les Pounder loves hacking and tinkering with Arduino, Raspberry Pi and new technologies. He passes on his skills and discoveries to Electromaker readers via tutorials and reviews.


Leave your feedback...