
Make a Custom Dashboard with Smashing.io
Raspberry Pi boards are incredibly useful and versatile devices. It’s suitable for a smattering of projects, from retro gaming and servers to voice assistants. Creating a custom dashboard with Smashing.io is one simple but ultra-functional means to make use of your Raspberry Pi.
What is Smashing.io?
Smashing.io is a fork of Dashing. In 2016, Dashing was discontinued. Although it’s no longer actively maintained, Dashing is perfectly usable. However, the Smashing fork provides essentially the same feature set albeit with regular updates.
It’s a Sinatra-based framework which allows the user to build gorgeous dashboards. These dashboards feature various displays. 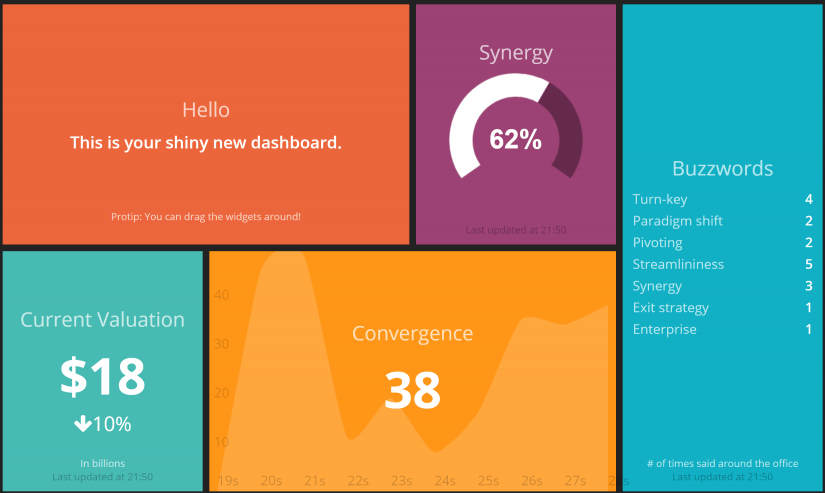
What You’ll Need to Install Smashing on the Raspberry Pi
Before you begin, you’ll need a few items. Most notably, you’ll need a Raspberry Pi. Since Smashing is pretty lightweight, a Raspberry Pi Zero or Raspberry Pi 2 should be suitable. Nevertheless, it’s never a poor decision to opt for a Raspberry Pi 4 for its performance gains.
Next, you’ll require a microSD card 8 GB or greater in capacity. Raspbian, a Debian-based operating system specifically designed for the Pi is a top choice, but any Linux OS compatible with the Raspberry Pi should suffice. Since Smashing is an Internet-based program, you’ll need an active Internet connection either from Ethernet or Wi-Fi.
Because Smashing is a dashboard, you’ll also need an HDMI cable and some sort of monitor or television as a screen. As a bonus, consider mounting your panel using a vesa mount or possibly adding a frame around it for aesthetics.
- Raspberry Pi
- 8 GB or larger microSD
- Linux OS (Raspbian or another Debian-based distro recommended)
- Internet connection
- Monitor/TV
- HDMI cable
- Vesa mount (optional)
- Frame (optional)
- Keyboard/mouse
- Case
- Power Supply
Make a Custom Dashboard with Smashing.io
Learn all about how to install Smashing, from prerequisites to the main installation and first set up.
Before installing Smashing.io, there are a few prerequisites. Smashing needs Ruby 1.9.9 or newer. Raspbian users may have Ruby pre-installed. To check your version of Ruby, run:
ruby -v
You’ll also need NodeJS. To install Ruby and NodeJS, enter:
sudo apt-get update
sudo apt-get install ruby ruby-dev build-essential nodejs
Install Smashing.io
Begin by installing the Gem bundler:
sudo gem install bundler
This installs the Gem bundler. After that, install Smashing:
sudo gem install smashing
Once that’s completed, Smashing is installed. Now, make a new directory called smashing-dashboard and navigate into that directory:
mkdir ~/smashing-dashboards && cd ~/smashing-dashboards
smashing new my_sample_dashboard
cd my_sample_dashboard
Next, edit the Gemfile in this project folder and execute:
bundle install
With this complete, Smashing is properly installed and ready for use.
Start Smashing
Like many software options, Smashing is accessible via a browser. To run Smashing.io, open a command line and run:
smashing start
Then, you should be able to see your dashboard. It’s available at http://localhost:3030 or from outside of your home network at http://[DNS SERVER NAME]:3030
Initial Setup
As it’s first configured, the default dashboard is arranged alphabetically. But you may override this layout by altering the Sinatra settings in :default_dashboard. You can access this via the config.ru in your Smashing app directory:
configure do
set :auth_token, 'AUTH_TOKEN'
set :default_dashboard, 'my_favourite_dashboard' #<==== set default dashboard like this
helpers do
def protected!
redirect('/auth/g') unless session[:user_id]
end
Adding Widgets
Smashing is a beautiful dashboard comprised of widgets. There are loads of widgets to pick from.
Analog Clock
The first widget I tried was the Analog Clock. As the name suggests, it’s an analog clock which displays the current time. Open up four Smashing project file an ERB. Then, add the following lines of code:
<li data-row="1" data-col="1" data-sizex="1" data-sizey="1">
    <div data-view="Myclock"></div>
</li>
Disqus Comment Count Widget

Image source: Squirrel Hacker
This is a super handy widget which displays your Disqus comment count. You can change the comment icon as well as color background. In the dashboard.erb file, add:
<li data-row="1" data-col="1" data-sizex="1" data-sizey="1">
  <div data-id="disqus_comments" data-view="Number" data-title="Comments" data-moreinfo="This Month" style="background-color:#427EB4;"></div>
  <i class="icon-comments icon-background"></i>
</li>
Twitch Widget

Image source: GitHub
Popular video game live streaming platform Twitch features a Smashing widget. FIrst, make a folder called twitch in your widgets directory. Then, add twitch.html and twitch.coffee to the Twitch folder.
After that, add the HTML to your dashboard.erb file:
<li data-row="1" data-col="1" data-sizex="3" data-sizey="2">
  <div data-id="twitch" data-view="Twitch"></div>
</li>
If you want to switch channels, open a terminal and run:
curl -d '{ "auth_token": "YOUR_AUTH_TOKEN", "channel": "CHANNELNAME" }' \http://host:3030/widgets/twitch
But replace the various pieces with your specific token and channel name.
Sonos Widget
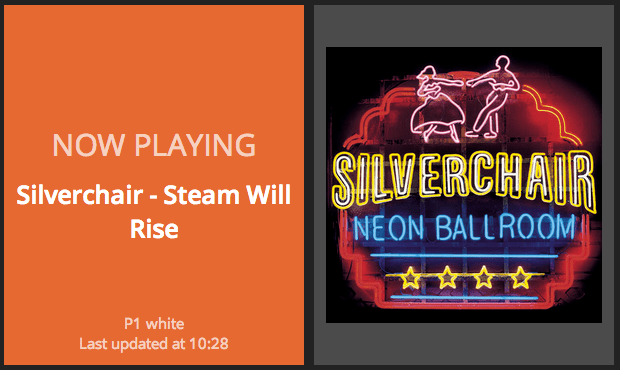
Image source: GitHub
If you’re a music junkie, you need the Sonos widget. This shows Now Playing information as well as album artwork. First, add the dependencies. You’ll need to add these lines to your gemfile:
require 'rubygems'
require 'sonos'
After that, put sonos.rb in /jobs. Next, add the following lines to your Smashing ERB file:
<li data-row="1" data-col="1" data-sizex="1" data-sizey="1">
  <div data-id="nowplaying" data-view="Text" data-title="NOW PLAYING" data-text="Artist - Track"></div>
</li>

<li data-row="1" data-col="1" data-sizex="1" data-sizey="1">
  <div data-id="albumart" data-view="Image" data-title="Album Name"></div>
</li>
If you want to switch channels, open a terminal and run:
curl -d '{ "auth_token": "YOUR_AUTH_TOKEN", "channel": "CHANNELNAME" }' \http://host:3030/widgets/twitch
Remeber to replace the various pieces with your specific token and channel name.
Make a Custom Dashboard with Smashing.io: Final Thoughts
Smashing is an easy means to spin up a beautiful dashboard full of information. Widgets include the likes of Fitbit, daily Dilbert comics, CircleCI build project status widgets, and even Chuck Norris facts generated from the Internet Chuck Norris database. Because why not. Since Smashing is a low system-resource bit of software, it doesn’t require much power and therefore may be used on even a Raspberry Pi Zero board.
There are loads of widget options to choose from. In fact, installation of Smashing is so simple that you’ll spend most of your time in post-install setup adding or configuring widgets. Notably, Dashing is still functional though it’s not maintained. Still, it’s pretty similar to Smashing and still usable.
Your turn: What Raspberry Pi projects do you recommend?

Moe Long is an editor, writer, and tech buff with a particular appreciation for Linux, Raspberry Pis, and retro gaming. Writing online since 2013, Moe has bylines at MakeUseOf, TechBeacon, DZone, SmartHomeBeginner, DEV.to, DVD Netflix, and Electropages. You can read his writings on film and pop culture at Cup of Moe, check out his tech reviews, guides, and tutorials at Tech Up Your Life, and hear his thoughts on movies on the Celluloid Fiends podcast. Aside from writing and editing, Moe has an online course, the Beginner's Guide to Affiliate Blogging From Scratch. When he's not hammering away at his keyboard, he enjoys running, reading, watching cinema, listening to vinyl, and playing with his dog Sebastian.


Leave your feedback...