





HUSKYLENS 2 Plus vs HUSKYLENS 2: Are the Add-Ons Worth It?
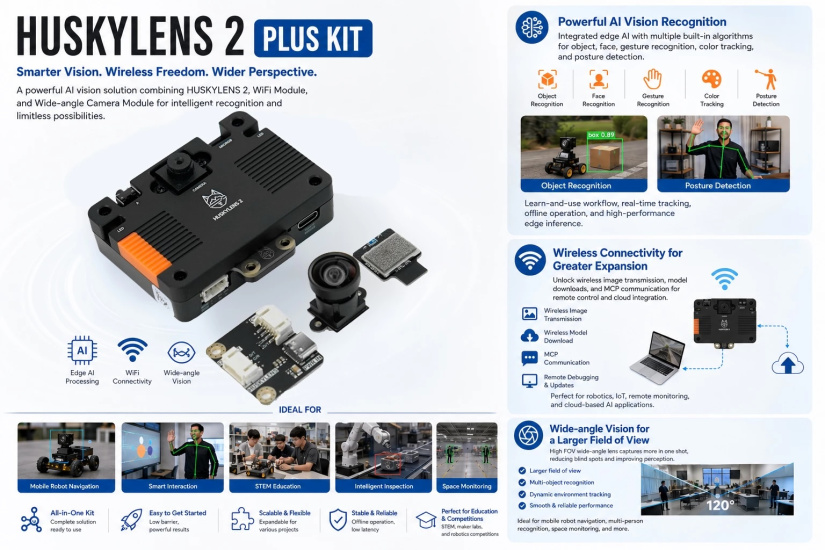
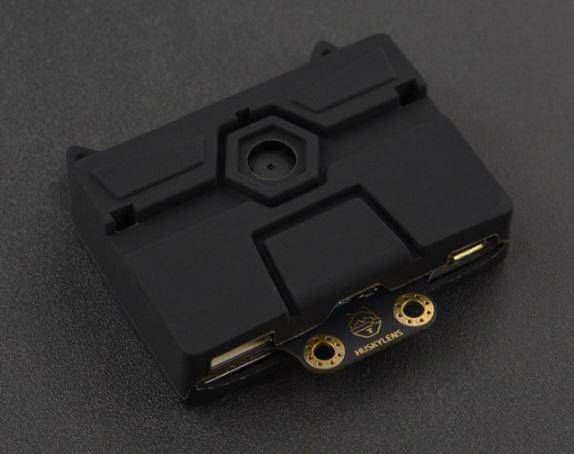
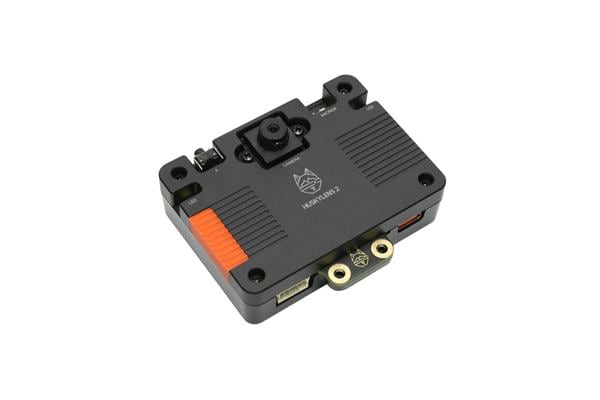
The DFRobot Gravity HUSKYLENS 2 Plus Kit is a three-part edge AI vision package for robotics, STEM education, interactive installations, and embedded prototyping. Sold as SKU KIT0222, it combines the standard HUSKYLENS 2 sensor with its plug-in 2.4 GHz Wi-Fi 6 module and a replaceable 116.6-degree wide-angle camera.
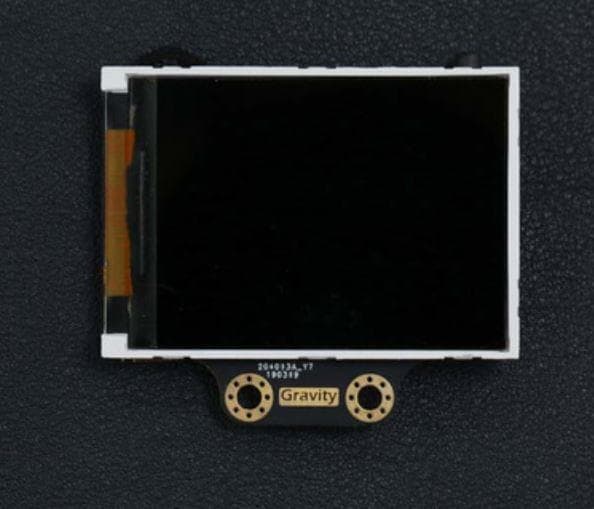
The main sensor handles computer vision locally using a Kendryte K230 processor and a collection of built-in recognition functions. Beginners can select and configure functions through the 2.4-inch touchscreen, while more experienced developers can retrieve results through I2C or UART, connect the device to controllers such as Arduino and Raspberry Pi, or deploy custom-trained models.
The main purchasing question is whether your project benefits from both Plus Kit additions. The Wi-Fi module is useful for wireless video streaming, model downloads, and Model Context Protocol communication. The wide-angle camera captures more of a scene, which can help mobile robots, classrooms, and multi-person installations. If your project will remain wired or needs a tighter view of distant targets, the standard HUSKYLENS 2 may be sufficient.
What is included in the HUSKYLENS 2 Plus Kit?
The Plus Kit is a bundle rather than a different version of the main processor. The HUSKYLENS 2 in the kit is the same core vision sensor sold separately as SKU SEN0638. The remaining components expand its networking and camera coverage.
| Component | Purpose | Included accessories |
|---|---|---|
| HUSKYLENS 2 | Provides the K230 processor, camera, touchscreen, storage, built-in AI functions, audio, lighting, USB-C, and Gravity I2C/UART interface. | Mounting and raised brackets, six M3 screws, six M3 nuts, a 30 cm Gravity cable, a 20 cm PH2.0 cable, and a power adapter board. |
| HUSKYLENS 2 Wi-Fi module | Adds 2.4 GHz Wi-Fi 6 for supported wireless streaming, model-download, and MCP workflows. | One slot-in USB Wi-Fi module. |
| HUSKYLENS 2 wide-angle camera | Replaces the standard camera to provide a 116.6-degree diagonal field of view. | One camera module and a small Phillips screwdriver. |
DFRobot publishes the complete shipping list on the KIT0222 product page. The package provides the parts needed to mount the sensor and swap the camera, but a host controller, controller-specific cable, robot chassis, motors, and other project hardware may still be required.
HUSKYLENS 2 hardware and 6 TOPS edge AI
At the center of HUSKYLENS 2 is the Kendryte K230, a dual-core processor running at up to 1.6 GHz. DFRobot states that the platform provides 6 TOPS of AI computing power. TOPS means trillions of operations per second, and it describes the theoretical throughput of the AI accelerator under supported workloads.
The figure indicates that the K230 can handle more demanding neural-network inference than the K210 platform in the original HUSKYLENS. It does not guarantee a particular frame rate, detection accuracy, latency, or number of simultaneous models. Real results depend on the selected function, input resolution, model design, firmware, thresholds, lighting, target size, and other processing taking place on the device.
| Specification | HUSKYLENS 2 detail |
|---|---|
| Processor | Kendryte K230 dual-core processor, up to 1.6 GHz |
| Manufacturer-stated AI throughput | 6 TOPS |
| Memory | 1 GB. The current DFRobot product page says LPDDR4, while the KIT0222 wiki says DDR4. LPDDR4 is used here because it is the more specific current product-page description, but the documentation discrepancy should be confirmed with DFRobot for design-critical use. |
| Internal storage | 8 GB eMMC, plus a TF card slot for expansion |
| Standard image sensor | GC2093, 2 MP, 1/2.9-inch sensor, rated by DFRobot at up to 60 fps |
| Display | 2.4-inch, 640 x 480 full-lamination IPS capacitive touchscreen |
| Interfaces | USB-C, Gravity I2C/UART, TF card slot, and slot-in Wi-Fi module interface |
| Other hardware | Microphone, 1 W speaker, two LED fill lights, RGB indicator, and function button |
| Operating voltage | 3.3 to 5 V |
| Power consumption | Manufacturer-stated 1.5 to 3 W |
| Main unit dimensions | 70 x 58 x 19 mm |
| Main unit weight | 90 g |
Built-in AI functions and touchscreen workflow
DFRobot describes HUSKYLENS 2 as having more than 20 built-in AI models and functions. The exact set can change with firmware, so developers should check the current HUSKYLENS 2 function guide and update the device before building around a particular mode.
| Function group | Documented examples | Potential projects |
|---|---|---|
| Objects and scenes | Object recognition, object tracking, object classification, self-learning classification, and instance segmentation | Sorting demonstrators, tracking robots, constrained object classifiers, and inspection prototypes |
| People and movement | Face recognition, facial orientation, emotion recognition, eye gaze, hand key points, pose recognition, and fall detection | Gesture control, interactive art, classroom demonstrations, and pose-responsive interfaces |
| Navigation and control | Line tracking, color recognition, object tracking, and tag recognition | Line-following robots, color-based sorting, AprilTag navigation, and pan-and-tilt rigs |
| Text and codes | OCR, license-plate recognition, QR code recognition, and barcode recognition | Inventory demonstrations, labeled workstations, educational readers, and tag-driven robot behavior |
| Media and connectivity | Camera, video recording, wired or wireless video streaming, model deployment, and MCP service | Remote demonstrations, visual dashboards, model testing, and LLM-assisted experiments |
A beginner can select a built-in function, aim the camera, adjust its threshold, and inspect results directly on the touchscreen without programming a host controller. Some modes also support teaching an object, color, tag, face, or class through the device interface.
This on-device learning is not the same as training a new neural network. It generally stores target examples or identifiers for use with an existing function. Custom model deployment involves preparing a dataset, training a compatible model on another computer or service, converting it for the K230 environment, and copying or deploying the resulting files to HUSKYLENS 2.
Built-in recognition should be treated as a development aid rather than an infallible judgment. DFRobot notes, for example, that its general object-recognition function uses 80 classes from the COCO dataset. Confidence and classification can change when real objects differ from the training data.
What the Wi-Fi 6 module adds
The Plus Kit includes DFRobot's TEL0191 slot-in Wi-Fi module. It supports Wi-Fi 6 on the 2.4 GHz band, with 20 or 40 MHz channel bandwidth and a manufacturer-stated maximum rate of 286.8 Mbps. Wi-Fi 6 does not automatically mean 5 GHz support, and this module is specifically documented as a 2.4 GHz device.
- Wireless WebRTC video streaming: HUSKYLENS 2 can display a local network address that is opened in a compatible browser to view the stream.
- Wireless model downloads: compatible model assets can be downloaded without maintaining a wired computer connection.
- MCP communication: the sensor can expose supported camera tools through a Model Context Protocol server for use with a compatible client and language model.
- Network-based experimentation: classrooms and mobile-robot projects can inspect camera output without keeping the sensor tethered to a computer.
MCP does not turn the camera into an autonomous general-purpose agent. DFRobot's documented workflow requires compatible firmware, the Wi-Fi module, a local network, an MCP client such as Cherry Studio, and credentials for the selected language-model provider. The current guide requires HUSKYLENS 2 system version 1.1.6 or later and provides the MCP endpoint as a local network URL.
Wireless features also add security responsibilities. Avoid exposing the device directly to the public internet, protect network credentials and API keys, and consider what images or recordings might be visible to other users on the network. Where people appear in a stream, obtain appropriate consent and define how images are stored or deleted.
What the 116.6-degree wide-angle camera adds
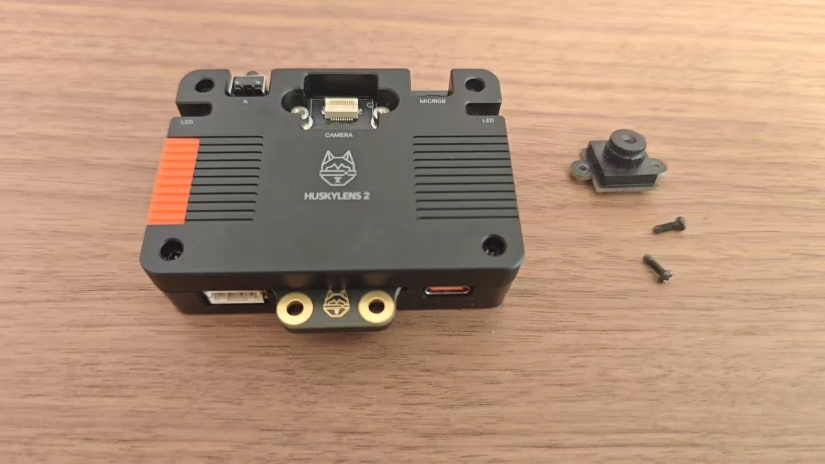
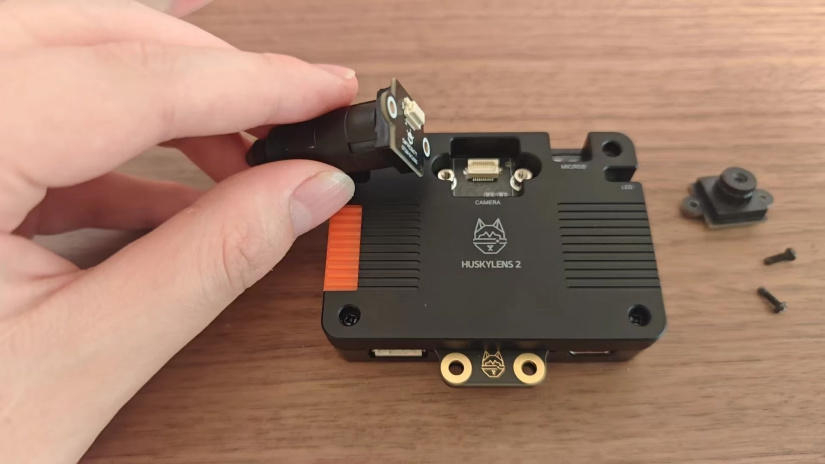
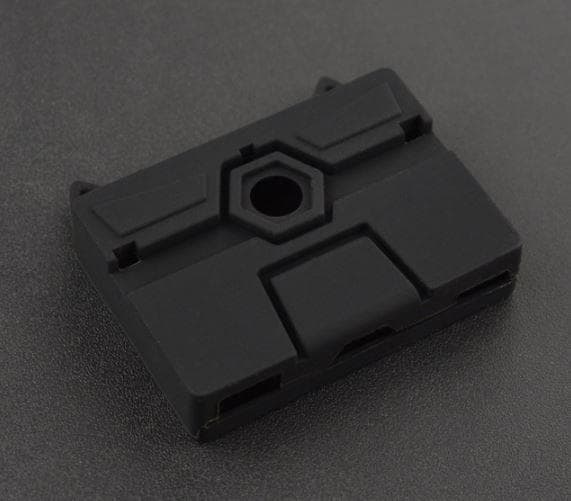
The included camera replaces the original HUSKYLENS 2 camera module. Its wider lens allows more of a nearby scene to fit into one frame, which can be helpful when a robot needs a broad forward view or an interactive installation must respond to several people.
| Camera characteristic | Documented specification | Practical effect |
|---|---|---|
| Diagonal field of view | 116.6 degrees | The corner-to-corner scene coverage is much broader than a typical narrow camera view. |
| Horizontal field of view | 107.6 degrees | A mobile robot can see targets farther to its left and right without turning the camera as often. |
| Vertical field of view | 72.6 degrees | Mounting height and tilt remain important, but the camera includes more of the floor and upper scene. |
| Effective focal length | 2.02 mm | Supports a broad view at relatively short working distances. |
| Stated effective capture distance | Approximately 0.1 to 1.5 m | Best suited to nearby robots, people, work areas, and tabletop demonstrations. |
A wider field of view does not automatically improve recognition accuracy. The same target occupies fewer pixels when more of the scene is included, so small or distant objects may become harder to classify. Wide-angle lenses can also introduce stronger perspective effects and distortion near the frame edges.
Projects should test camera height, tilt, lighting, target size, and working distance with the actual model being used. A narrower camera may be a better choice when the target is distant, fine detail matters, or surrounding objects create distractions.
DFRobot's camera installation guide instructs users to power off HUSKYLENS 2, remove the two camera screws, align the white connector, insert the replacement module, and tighten the screws. Loose screws can create poor electrical contact and may damage the camera module.
Connecting HUSKYLENS 2 to Arduino and other controllers
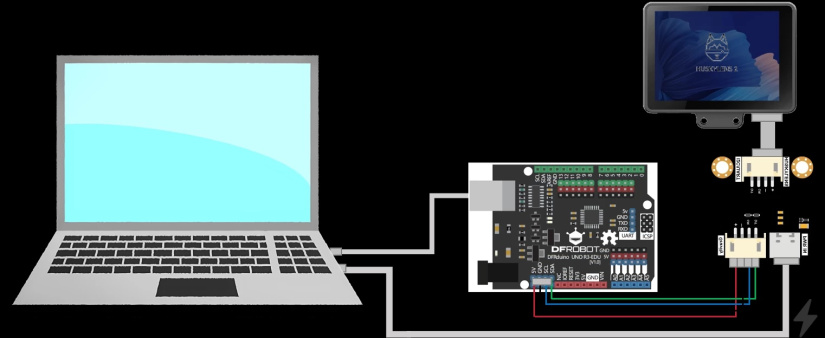
The touchscreen is useful for configuring and testing recognition, but a connected controller is what turns those results into physical behavior. A controller can read an object ID, name, confidence value, bounding-box center, width, or height and use that data to drive motors, servos, LEDs, displays, or network messages.
| Controller | Documented tooling | Practical notes |
|---|---|---|
| Arduino-compatible boards | Arduino IDE with the DFRobot_HuskylensV2 library, or Mind+ upload mode | Suitable for reading basic recognition results and controlling actuators. Confirm the board's SDA and SCL pins or hardware serial port. |
| ESP32 | Arduino IDE and the V2 library | Provides more memory and flexible I2C or hardware UART options. Pin assignments vary between ESP32 boards. |
| Raspberry Pi | Python workflow and DFRobot's Raspberry Pi library resources | Useful when results need additional processing, logging, dashboards, or Linux software integration. |
| micro:bit | MakeCode or Mind+ upload mode | Provides an accessible classroom workflow, but programs should remain mindful of controller memory and available result fields. |
| UNIHIKER K10 | Arduino IDE or Mind+ upload mode | DFRobot documents access to basic data plus richer feature information such as face, hand, and pose coordinates. |
| UNIHIKER M10 | Python or graphical programming in Mind+ Python mode | Offers a higher-memory workflow for extended landmark and key-point data. |
DFRobot's controller compatibility documentation distinguishes basic recognition data from extended model-specific data. Basic data can include ID, confidence, object name or recognition content, center coordinates, width, and height. More capable controllers may also retrieve facial landmarks, 21 hand key points, or 17 body key points.
I2C versus UART
The Gravity connector supports I2C and UART, but the active protocol must match the controller code. HUSKYLENS 2 defaults to I2C at address 0x50. Its settings menu also offers UART at 9600 or 115200 baud. The connector indicator is blue in I2C mode and green in UART mode.
| Consideration | I2C | UART |
|---|---|---|
| Wiring | Power, ground, SDA, and SCL | Power, ground, controller TX to sensor RX, and controller RX to sensor TX |
| Default setting | Yes, address 0x50 | No, select 9600 or 115200 baud in system settings |
| Best fit | Shared sensor buses, Arduino-style prototypes, and controllers with established I2C support | Point-to-point communication and controllers with a spare hardware serial interface |
| Common setup fault | Wrong SDA or SCL pins, missing ground, unstable power, or a misleading scan caused by faulty wiring | Crossed or uncrossed TX/RX lines, mismatched baud rate, or using a serial port needed for USB debugging |
DFRobot recommends using the supplied power adapter board when connecting HUSKYLENS 2 to common controllers. The sensor can consume up to a manufacturer-stated 3 W, so relying on a marginal controller rail can cause resets or intermittent communication.
Arduino I2C object-recognition example
This short example is based on DFRobot's current V2 library API. It uses an Arduino-compatible board over I2C and selects the built-in object-recognition model. Before uploading it, install DFRobot_HuskylensV2, set HUSKYLENS 2 to I2C mode, connect the correct SDA and SCL pins, provide stable power, and join the controller and sensor grounds.
#include <Wire.h>
#include "DFRobot_HuskylensV2.h"

HuskylensV2 huskylens;

void setup() {
  Serial.begin(115200);
  Wire.begin();

  if (!huskylens.begin(Wire)) {
    Serial.println("HUSKYLENS 2 not detected. Check power, wiring, and I2C mode.");
    while (true) {
      delay(1000);
    }
  }

  if (!huskylens.switchAlgorithm(ALGORITHM_OBJECT_RECOGNITION)) {
    Serial.println("Could not select object recognition.");
    while (true) {
      delay(1000);
    }
  }
}

void loop() {
  int8_t status = huskylens.getResult(ALGORITHM_OBJECT_RECOGNITION);

  if (status != 0 || !huskylens.available(ALGORITHM_OBJECT_RECOGNITION)) {
    delay(100);
    return;
  }

  Result *result =
      huskylens.getCachedCenterResult(ALGORITHM_OBJECT_RECOGNITION);

  if (result == NULL) {
    delay(100);
    return;
  }

  Serial.print("Object ID: ");
  Serial.println(RET_ITEM_NUM(result, Result, ID));

  Serial.print("Center X: ");
  Serial.println(RET_ITEM_NUM(result, Result, xCenter));

  Serial.print("Center Y: ");
  Serial.println(RET_ITEM_NUM(result, Result, yCenter));

  delay(200);
}
The example deliberately reads results without driving a motor. Inspecting the raw values first makes it easier to identify false detections and coordinate variation before adding actuator logic. For a tracking servo, add a center deadband, apply a moving average or median filter, limit the update rate, and preserve the target ID between frames to reduce hunting.
Custom model training and deployment
HUSKYLENS 2 supports custom-trained model deployment in addition to its built-in functions. DFRobot documents three broad routes: server-assisted no-code training in Mind+, local Mind+ conversion and deployment, and Python-based YOLO training.
- Mind+ server workflow: train through the Mind+ AI tool on an internet-connected computer, then deploy to HUSKYLENS 2.
- Local conversion workflow: train in Mind+, prepare the local deployment environment, convert the model, and transfer it to the device.
- Python and YOLO workflow: prepare and annotate a dataset, train a compatible YOLO model, convert it for the HUSKYLENS 2 environment, and deploy it.
DFRobot specifically documents deployment of a trained YOLOv8n ONNX model, but compatibility should be checked against the current firmware and conversion tools before investing time in a dataset. The sensor should be updated to the latest supported firmware before following the custom model deployment guide.
Custom models are most useful for constrained tasks that built-in general models cannot distinguish, such as separating several component types or identifying a limited set of classroom objects. The quality of the dataset remains critical. Images should represent the intended lighting, camera position, object scale, backgrounds, and occlusions. Deployment does not correct weak labels or an unrepresentative dataset.
Practical robotics, STEM, and AIoT projects
The kit is best suited to prototypes where a controller needs useful visual results without building an entire Linux vision stack from scratch.
- Wide-angle mobile robot: recognize objects or tags across more of the robot's forward view while an ESP32 or Arduino handles motor control.
- Object-sorting demonstrator: identify selected object classes, then send center coordinates and IDs to a servo-driven sorting mechanism.
- Gesture-controlled robot: interpret documented hand or pose results and translate them into limited, clearly defined robot commands.
- Line follower with scene context: combine line tracking with an external controller that also responds to tags, colors, or stopping zones.
- Classroom interaction station: use pose, gesture, color, or QR modes to trigger lessons, animations, or physical outputs.
- Tag-based inventory demonstrator: recognize QR codes, barcodes, or AprilTags and send results to a local Raspberry Pi database.
- Interactive art installation: alter sound, lighting, or motion in response to pose, gaze direction, gesture, or dominant colors.
- Remote visual demonstration: stream the camera view over a controlled local network while retrieving recognition results through a wired controller.
- Custom parts classifier: deploy a model trained on a small, carefully photographed set of components or tools.
- Robotics competition perception module: use local object, color, line, or tag recognition, provided the rules allow the hardware and the team validates behavior under competition lighting.
For another introduction to the platform, read Electromaker's guide to HUSKYLENS 2 for makers and classrooms.
HUSKYLENS 2 Plus Kit versus standard HUSKYLENS 2
The Plus Kit does not add a faster processor or a different touchscreen. Its value comes from bundling two optional modules that address specific field-of-view and networking requirements.
| Feature | Standard HUSKYLENS 2 | HUSKYLENS 2 Plus Kit |
|---|---|---|
| K230 processor and built-in AI | Included | Included, identical core sensor |
| Touchscreen operation | Included | Included |
| I2C and UART integration | Included | Included |
| 2.4 GHz Wi-Fi 6 module | Optional purchase | Included |
| 116.6-degree wide-angle camera | Optional replacement | Included with installation screwdriver |
| Best fit | Wired projects, tighter camera framing, or developers who want to select accessories separately | Projects that need wireless workflows and broad short-range scene coverage from the start |
Choose the Plus Kit when you expect to use both modules. Choose the standard sensor when the project remains wired, needs the original camera view, or requires only one of the two add-ons.
How it compares with other vision platforms
HUSKYLENS 2 occupies a middle ground between basic microcontroller camera boards and fully configurable Linux vision systems. It prioritizes built-in functions and an approachable interface over complete software-stack control.
| Platform | Strengths | Choose it when |
|---|---|---|
| HUSKYLENS 2 Plus Kit | Touchscreen, built-in functions, K230 acceleration, controller integration, Wi-Fi module, and wide-angle camera | You want to reach a working vision prototype quickly and need both bundled add-ons. |
| Original HUSKYLENS | Simpler K210 platform, established beginner projects, and lower-complexity recognition tasks | A project is already built around the original library and does not need the newer functions, custom deployment, or wireless workflows. |
| OpenMV Cam | Scriptable vision environment and deeper control over image-processing code | You want to write and tune the camera-side vision pipeline rather than selecting mainly prebuilt functions. |
| ESP32 camera board | Low cost, compact hardware, Wi-Fi, and direct control over embedded firmware | The vision workload is lightweight and you are willing to build more of the capture, inference, and interface stack yourself. |
| Raspberry Pi camera and AI accelerator | Linux software flexibility, higher-resolution camera choices, extensive libraries, and broader model ecosystems | You need deeper software access, more storage and networking options, or integration with a larger Linux application. |
Electromaker's guides to training models with an ESP32 camera and using the Raspberry Pi AI Camera illustrate two more configurable alternatives.
Limitations, privacy, and responsible use
Computer-vision output should be treated as a probabilistic measurement. Lighting changes, motion blur, occlusion, reflections, unusual camera angles, small targets, lens distortion, and unsuitable training data can all produce false positives or missed detections.
- Test under the same lighting and mounting conditions expected in the finished project.
- Record raw confidence and coordinate values before deciding thresholds.
- Use temporal filtering, target-ID continuity, and controller-side validation where appropriate.
- Do not use a single recognition result as the sole control for dangerous machinery.
- Do not treat face, emotion, gaze, pose, license-plate, or fall-detection output as proof of identity, intent, health, or safety.
- Obtain consent when capturing identifiable people and define retention rules for stored images or video.
- Protect Wi-Fi credentials, API keys, local streaming endpoints, and saved media.
- Validate accuracy, bias, security, regulatory requirements, and failure behavior before considering any production deployment.
Setup checklist and troubleshooting
Most controller problems can be narrowed down by verifying the product generation, protocol, wiring, power, and software before adding motors or application logic.
- Confirm that the device is HUSKYLENS 2 rather than the original HUSKYLENS.
- Update HUSKYLENS 2 firmware if the required function is missing, and back up files because DFRobot warns that firmware burning erases the device storage.
- Install or update the DFRobot_HuskylensV2 library. Do not use examples written only for the original HUSKYLENS library.
- Select I2C, UART 9600, or UART 115200 in the HUSKYLENS 2 system settings.
- Check the connector indicator. Blue means I2C and green means UART.
- Verify stable power, common ground, cable orientation, and controller-specific SDA, SCL, TX, and RX pins.
- For I2C, run a complete scan and expect the default address 0x50. A scan that reports every address usually indicates a bus or wiring fault rather than many valid devices.
- Run a minimal official example and inspect raw data before adding servo, motor, dashboard, or network code.
- If a servo hunts around a target, add a deadband, filtering, target-ID checks, and a controlled update interval.
- For Wi-Fi failures, confirm the network is 2.4 GHz, recheck the password, move closer to the access point, and review whether the network permits new devices.
An Arduino forum troubleshooting thread shows how misleading I2C scan results can complicate diagnosis. The user later reported success after changing controllers, but that single report does not establish a general Arduino UNO R4 compatibility defect.
Who should buy the HUSKYLENS 2 Plus Kit?
The bundle is most compelling when broader scene coverage and wireless development are both part of the project plan.
- Choose the Plus Kit for: wide-angle mobile robots, multi-person classroom activities, wireless video demonstrations, MCP experiments, AIoT prototypes, maker labs, and competition teams that expect to use both accessories.
- Choose standard HUSKYLENS 2 for: wired Arduino or Raspberry Pi projects, tighter target framing, and projects that need only one optional module.
- Consider OpenMV or an ESP32 camera for: lower-cost or more scriptable embedded vision where you are comfortable building more of the software.
- Consider a Raspberry Pi vision system for: higher-resolution cameras, broader Linux software access, complex local applications, or a larger model ecosystem.
The Plus Kit does not make every HUSKYLENS 2 project better. Its value depends on whether the 2.4 GHz Wi-Fi workflows and 116.6-degree field of view solve actual design requirements.
Documentation and developer resources
Use the current official resources when checking firmware, wiring, model compatibility, or API behavior.
- HUSKYLENS 2 Plus Kit product page and specifications
- KIT0222 Plus Kit wiki
- Wide-angle camera installation guide
- HUSKYLENS 2 firmware, functions, and controller documentation
- HUSKYLENS 2 Wi-Fi module wiki
- Official DFRobot_HuskylensV2 Arduino library and API
- Custom-trained model deployment guide
- HUSKYLENS 2 MCP setup guide
Frequently asked questions
These answers summarize the main points developers should check before choosing or integrating the kit.
What is included in the HUSKYLENS 2 Plus Kit?
The KIT0222 bundle includes the HUSKYLENS 2 sensor, a slot-in 2.4 GHz Wi-Fi 6 module, a 116.6-degree wide-angle camera, mounting hardware, cables, a power adapter board, and a camera-installation screwdriver.
How is the Plus Kit different from standard HUSKYLENS 2?
The main sensor and processing hardware are the same. The Plus Kit adds the Wi-Fi module and wide-angle camera. It is most useful when a project needs both wireless workflows and broader short-range scene coverage.
Does HUSKYLENS 2 work without the cloud?
Its built-in vision functions run locally on the K230 platform. Internet or network connectivity is needed for particular workflows such as server-assisted training, wireless downloads, remote streaming, or cloud-hosted language models used with MCP.
Does the Wi-Fi 6 module support 5 GHz?
No. DFRobot specifies the included module as 2.4 GHz Wi-Fi 6. Wi-Fi 6 describes the wireless standard and does not guarantee support for both frequency bands.
Can HUSKYLENS 2 run custom models?
Yes. DFRobot documents Mind+ no-code training, local conversion, and Python-based YOLO workflows. Model and format compatibility must be checked against the current firmware and deployment tools.
Does HUSKYLENS 2 work with Arduino and Raspberry Pi?
Yes. DFRobot provides V2 library resources and examples for Arduino-compatible boards and Python resources for Raspberry Pi. It also documents workflows for ESP32, micro:bit, UNIHIKER K10, and UNIHIKER M10.
Does the wide-angle camera improve recognition accuracy?
Not automatically. It captures a wider scene, but each target may occupy fewer pixels and the lens may introduce stronger edge distortion. Recognition depends on target scale, position, lighting, model suitability, and thresholds.
Should I buy the Plus Kit or standard HUSKYLENS 2?
Choose the Plus Kit if you expect to use both wireless features and the wide-angle camera. Choose standard HUSKYLENS 2 if the project will remain wired, needs tighter framing, or requires only one optional accessory.

Residing on the south coast of England, Rich has spent the last few years building Electomaker.io from the ground up. He is usually found behind a laptop coordinating the rest of the EM team and occasionally finding time to contribute articles to the blog. When not tapping away at a laptop, he can be found either paddleboarding, at the beach, playing golf (badly), or camping with his family.










Leave your feedback...