
Robot Arms For Accessibility

Made by donutsorelse / 3D Printing / Home Automation / Productivity / Robotics / IoT
About the project
Revamping a robot arm design & writing fresh, multiplatform code to give it as much functionality as possible for use in disabled travel.
Project info
Difficulty: Difficult
Platforms: Microsoft, SparkFun, Espressif
Estimated time: 1 day
License: GNU General Public License, version 3 or later (GPL3+)
Items used in this project
Hardware components

Software apps and online services
Story
The idea of this project is inspired by the Travel challenge of the Build2gether contest. It seems there are missing accommodations with handicapped accessibility, so my thinking is that with an easy to use way to extend well past the range an individual in a wheelchair would normally have, we can drastically reduce the inconveniences these individuals experience. A couple of examples in the Discord involved the bathroom and, whether it's soap or paper towels, the robot arm should be able to easily grab what's needed and pass it to the user.
That said, what we're doing is ensuring we have plenty of ways to utilize a robot arm, so this one can be just fun for anyone. Whether you're looking to arm wrestle your Arduino or need a ceiling mounted candy dispenser that can drop candy in your mouth by voice command (I may or may not have considered this), you should be all set to create it by following along.
The BackstoryRealizing that something like a robot arm would be helpful brought me back to a project I had started years ago, before I knew much about electronics at all. I knew I wanted to learn how to make gadgets and gismos, when all the sudden a Kickstarter popped up for an inexpensive, Arduino-driven robot arm. Needless to say, I backed it and found myself unable to get it working in every way - code, hardware, etc. I assumed that it didn't work because I had no idea what I was doing, but a couple years later, I revisited it to find that the hardware did indeed just not work (I probably got unlucky), the company no longer existed, and the android app still crashed on launch. To be clear, this is for context, not to flame this company - with Kickstarter they could have just as easily not followed through at all, but instead they did provide some working servos as well as what I think is overall a very nice set of 3d models to work with as a starting point. While disappointing for it to not work, it's reasonable that if they're not making money with the product, that they have moved on and don't support it anymore.
As someone who is hot garbage at 3d modeling (me), this provides an excellent starting place for the goals of this project. In short, I'm using this LittleArm V3 setup because their 3D models are a good starting place. We don't need a little arm, though. We need a practically sized arm that can be utilized in a real life situation, so we're upscaling it and adjusting everything to accommodate more powerful servos.
Upgrading the arm in size, strength, and adding a ton of additional functionality

Upgrading the arm in size, strength, and adding a ton of additional functionality
I do want to emphasize, though, that this is not simply a matter of upscaling an existing robot and calling it a day. Instead of having a team iterating a 4th generation of the arm, it's just me stumbling through Blender to update the model to work correctly with different servos and setups and, more notably, I completely rewrote all the code for entirely. While this is written with the Little Arm's setup in mind, it boils down to different ways to control servos in a manner that suits robot arms, which can be easily translated to other designs. Plus we added a lot of other bells and whistles, as well as an enhancement I think is critical for this project, which I'll get to shortly.
3D ModelingAs hopefully anyone that follows my projects can vouch, I typically share everything I can realistically share, whether that's code or 3d models, etc. Even though I've modified all of these models, they are based on a paid, unshared model from someone else. As such, I don't think that I'm allowed to share them, so we'll instead briefly go through the setup. I will, however, share the base add-on since I created that one from scratch.
There is a base platform, which is essentially a shoulder socket. There is also open space which is used for support as well as a place to house the electronics. In my design for the base add-on, there is an opening in each corner so that a screwdriver can fit through. This gives some options for attaching both to a surface that allows for it, bolting them together, or just leaves a space for a zip tie or whatever else may fit the situation.
The upper arm holds the shoulder and elbow servos. This, I cut in half and added a slot for an actuator to go through. The base of the actuator is bolted into the shoulder side, and the extendable part slides through and the extendable part is bolted into the elbow side.
The final part is the gripper. This is the one model I only changed in terms of sizing, and I think the model is pretty clever. It uses a small piece of metal to bend that's attached to the gripper's servo to move the gripper back and forth. Conveniently, I upscaled everything by 60%, and at this stage a coat hanger wire fits perfectly. I was thinking I'd try it as a temporary solution and find something else, but for anyone following along with these specific sets of models - the coat hanger is the way to go. It fits perfectly and is just mailable enough to get in place while also being rigid enough to do exactly what you need it to do.
Assembly!In regard to the arm itself, the joints connect via a section with a half-sphere on one side and a servo on the other. The servo horn slots into one side, and the half sphere slides into place on the other to form a nice, moveable joint. The base is connected by the servo itself. Break down a coat hanger to size and fold it into place such that it can go through the hole in the servo horn on one side and go through the hole for the gripper on the other side. At a scale of 160, the coat hanger will fit perfectly.
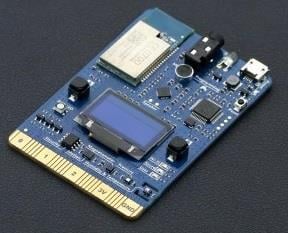
There are a lot of electronics to discuss, but it's definitely worth it to have all the extra functionality. The ESP32's are pretty particular about pin usage, but I've listed out all the pins I used below, so if you use those everything will work correctly. There are 4 servos, which control the base, shoulder, elbow, and grip of the arm. In my setup, I'm using 20kg servos, so these get connected to external power and a shared ground that then leads back to the microcontroller's GND. The easiest way to setup the buttons is with a mini breadboard, also with a shared grounding. The joystick can be powered with the VIN of the microcontroller, and the rest of the pins are listed below. The linear actuator requires external power, so for this I utilized an L298N. Power the L298N and create another common ground. Connect the actuator's wires to the OUT1 and OUT2 slots. Connect the L298N's IN1 and IN2 to the ESP32 pins (25 and 26 in our case). If the actuator extends/retracts backward, it's very easy to switch this around in the code or by flipping these wire connections.
Here's a full pinout of the setup:
Servo Motors:
- Servo 1 (Base): Pin 5
- Servo 2 (Shoulder): Pin 27
- Servo 3 (Elbow): Pin 21
- Servo 4 (Grip): Pin 18
Button Pins:
- Button 1: Pin 4
- Button 2: Pin 14
- Button 3: Pin 13
- Button 4: Pin 12
Joystick:
- Joystick X Axis: Pin 33
- Joystick Y Axis: Pin 32
- Joystick Button: Pin 23
- Joystick VCC: VIN
ESP32 to L298N:
- ESP32 Pin 25 (Actuator Extend) → L298N IN1
- ESP32 Pin 26 (Actuator Retract) → L298N IN2
- ESP32 GND → L298N GND (Common ground)
L298N to Linear Actuator:
- L298N OUT1 → Linear Actuator Red wire
- L298N OUT2 → Linear Actuator Black wire
Power Supply:
- External Power Supply (+V) → L298N +12V or appropriate voltage input (depends on actuator specifications)
- External Power Supply GND → L298N GND
- Power Supply:External Power Supply (+V) → L298N +12V or appropriate voltage input (depends on actuator specifications)External Power Supply GND → L298N GND
I went with the ESP32 partly because it's easy to use with Wi-Fi, but also because it can handle more code than some of the other Arduinos. There's a lot going on in the code, since I wanted to provide as much functionality in the device as possible. I did rewrite it to use an array of servos to reduce the number of lines of code for those using other devices, however.
The starting point is controlling the 4 servos. We determine the numerical range on the servos that correlate with the back and forth arm movement we want. I did this by setting the servos to 90 degrees and then adding the servo horn to each. Then I ran a quick test to verify that the positioning was correct. The function handleMove takes the directional input and moves the relevant servo(s). It uses a string because we're also taking these same commands from a python program over WiFi, which we'll get to in a minute, and for added readability.
There are 4 buttons. It'd be easy to tweak what each button does at this point, but in my setup the first one toggles the grip. Pressing the joystick also does this, but since it can be a bit tricky to do that without also moving the joystick, I added a separate button for it. I added a highly optional function called preplannedMovement, which has 2 parts to it. The servo goes from its rest position to forward with an open hand. The idea is that then the user can tweak the positioning and/or extend the actuator and press the button for preplannedMovement again and it will grab the item in front of it, deliver it to the user, and go back to its rest position. The 3rd and 4th buttons move the actuator in an out to extend or retract the robot arm.
The joystick moves the arm forward, back, and side to side as well as toggle the grip.
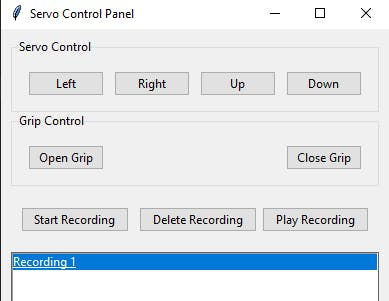
Python Code:For on the go control, it makes sense for a person to be right there controlling the arm. At home, however, it could easily be setup somewhere in a long term capacity and perform tasks that are out of reach or inconvenient for the user from anywhere. Since these may be repeatable tasks, we can record the robots movements and play them back such that, later on, we can just hit "play" and the robot arm will do whatever you've setup. This could be anything from starting the water boiling first thing in the morning, turning on a fan, or reaching into a bag of dog treats and dropping one down. Otherwise, it has all the same functionality as with the direct controls, where you can move the arm, open close the grip, etc.
This code is all included in the project as well.
ConclusionAt this point we have a fully working robot arm that can be used with intuitive joystick and button controls anywhere. We also have controls that can run via a python app to control the arm anywhere with WiFi for any number of uses - it could easily be leveraged for autonomous uses as well with the recorded playback feature. Either way, whether you're disabled and need a good solution for getting a hold of things that are out of reach, or you just think robot arms are cool and want something to throw a cat toy from across the house, hopefully you enjoyed. Have a good one.
Code
Credits
Related products


Leave your feedback...