
Custom IoT Solutions - Create an HTTP Post System
Previously, we looked at HTTP vs. MQTT for IoT devices and came to the conclusion that MQTT is the best method for our custom Internet of Things (IoT) application. However, in this project we will first cover a simple HTTP POST system to introduce how to connect an ESP32 to a website and submit data to a PHP page that will act as our receiver for IoT devices.
Custom IoT Solutions Part 1 - Intro to the Internet of Things
Custom IoT Solutions Part 2 - ESP32 vs ESP8266
Custom IoT Solutions Part 3 - HTTP vs MQTT
Custom IoT Solutions Part 4 - Create an HTTP Post System
Custom IoT Part 5 - How to Make HTTP GET Requests
What is HTTP?

Before we can begin using HTTP, we first need to know what it is and how it works. HTTP is an acronym that stands for HyperText Transfer Protocol and is the main communication method that drives almost all websites around the world. If you look at the beginning of many website URLs, you’ll see either HTTP or HTTPS, the secure version of HTTP, at the beginning. The first, and most important, fact of HTTP is that everything is sent as text and not binary which means that any data representing numbers is converted into its text form. For example, a single binary byte can represent numbers between 0 and 255 but if the number 255 (0xFF in hexadecimal) was to be sent it would require a minimum of three bytes as it would be sent as three characters; 2, 5, and 5.
The best way to think about the physical connection between a client and server is as if it was a serial terminal. A connection to an HTTP server is made and from there the client can send a stream of text. The server reads this text, interprets the data, and then creates a response. The response itself is also text and this is streamed back to the client for interpretation. A browser would interpret the data as a webpage but in our case the client (which is our IoT device) will interpret the data as a response command.
HTTP Structure
As this project will be concerned with sending data from an IoT device to a custom website, we will be using the POST command. This command is used by a client device to submit data to a server but for the POST command to work correctly we also need to include some extra metadata that will help the server to understand what it is we are sending. This metadata will include what format the data we are sending is (in this case, URL encoded), the data length, and the version of HTTP we will be using. So, what will our header message look like and what does each part do?
POST /page.php HTTP/1.0
Host: WEBSITE OR IP ADDRESS
Content-Type: application/x-www-form-urlencoded
Content-Length: LENGTH_AS_NUMBER

DATA_TO_SEND
First Line – POST /page.php HTTP/1.0
The first line in the message includes the POST command that tells the server we are going to be submitting data. After the command is the page on that server that will be receiving our data and in this case the page would be page.php. The last part of this line indicates what version of HTTP is being used and, in this case,, we will be using HTTP V1.0.
Second Line – Host: WEBSITE OR IP ADDRESS
The second line indicates the host that we are trying to access and is either the website name (with the www prefix) or the IP address. For example, if we were to submit data to Google then this line could be www.google.com or the IP address.
Third Line – Content-Type: application/x-www-form-urlencoded
The third line of the header indicates to the server what type of data is being sent. This can be a wide range of different values but in this case, we are sending all data as URL encoded. While this may seem confusing, it simply means that we can use PHP commands on the page being accessed to receive the incoming data from the IoT device (this will be clarified later).
Fourth Line – Content-Length: LENGTH_AS_NUMBER
The fourth line tells the server how many characters long the data being to the server is. For example, if the data from our IoT device was “Hello,” then the content length value would be 5. Note that this number is in text form and not binary. meaning that this entry is a string.
Fifth Line – Empty Line
This line is critical to the message and must be sent for the server to properly read the data that comes after. The line is empty BUT includes a carriage return line feed pair (in hex this is 0x0D 0x0A) and is one of the core reasons why binary values are never sent over HTTP in plaintext messages. When dealing with this in C on the ESP32, we only need to use the println() function to achieve this.
Sixth Line – Data
This line is the data that we are sending to the server in text form. The length of this message MUST match the value provided by the content-length line and the data line is not terminated with any special characters.
Response Message
When our IoT device sends data to a server using the POST command, it will receive a message back from the server before the server closes the connection. This message will contain metadata about the server including current time, server type, and the language of the data being returned. But for our IoT device we are mostly concerned with the response code. There are many response codes and most people who have used the Internet will have seen these at least once in their life! Ever had that dreaded 404 page not found? Or how about the 500 error code? These are HTTP response codes and indicate if a message was successfully executed or if there was a problem. This example will not look at the received data and will simply ignore it but can be useful if creating a function that needs to handle error situations. This example will, however, look at the last section of the message to see if the server has completed its message and this is indicated with two carriage return line feeds.
Message Structure
Sending data to a PHP page using the POST command requires it to have a specific format. In our case, we are using the URL encoding format which means that we send the PHP page a string of text that includes variable names and their values. In this example, we will send a fake temperature reading of 10 degrees and is done by sending the following text as our message:
temperature=10
When received by the PHP code it will create a special POST array that allows us to access the value of the temperature (this will be looked at after the client code).
Client Code
Now that we understand how data is sent to a HTTP server and what to receive afterward its time to look at the code that will be executed on our ESP32 using the Arduino IDE.
#include <WiFi.h>

// Wi-Fi details here
const char* ssid     = "Bird-Net";
const char* password = "06426705";

// Website that we will connect to here
const char* host = "mycustomiotplatform.atwebpages.com";
const int httpPort = 80;

// Some variable declarations here
String message;
String serverMessage;
unsigned char tempBuffer[256];

// Setup function
void setup()
{
  Serial.begin(115200);
  delay(10);

  // We start by connecting to a WiFi network
  WiFi.begin(ssid, password);

  while (WiFi.status() != WL_CONNECTED) {
    delay(500);
    Serial.print(".");
  }
}


// Main loop code
void loop()
{
  // Use WiFiClient class to create TCP connections
  WiFiClient client;

  // Prevent too many data sends!
  delay(2000);

  // Attempt to connect to the HTTP server
  if (!client.connect(host, httpPort)) {
    Serial.println("connection failed");
    return;
  }

  // Create a message to send to the server
  message = "temperature=10";

  // Now that we are connected, lets make the HTTP header message
  client.println("POST /page.php HTTP/1.0");
  client.println("Host: " + (String)host);
  client.println("Content-Type: application/x-www-form-urlencoded");
  client.println("Content-Length: " + (String)message.length());
  client.println();
  client.print(message);

  // Now wait for the response
  serverMessage = "";

  while (serverMessage.indexOf("\r\n\r\n") == -1)
  {

    // Clear the buffer and ensure it is full of zeros
    memset(tempBuffer, 0, sizeof(tempBuffer));

    // Read data into a tempoary buffer
    client.read(tempBuffer, sizeof(tempBuffer));

    // Transfer the contents of the buffer into our string
    serverMessage += (char*)tempBuffer;
  }

  // Print the string to the console to show what we received
  Serial.println(serverMessage);
}
Server Code
The server-side code is a simple PHP page that is accessed by the client and data submitted to it. Before we look at how it works let’s first look at this code to appreciate its simplicity.
<?php
	// Extract data from the IoT device message
	$temperatureReading = $_POST["temperature"];

	// Get data the data was sent
	$time = date('m/d/Y h:i:s a', time());

	// Append the received data into a text file on the server
	file_put_contents('iot/temperature.txt', strval($time) . ':' . $temperatureReading . "\n", FILE_APPEND);
?>
The first line of code in the PHP script takes the value of the temperature reading by accessing the special POST array that includes all posted data by the IoT device. The second line of code gets the current time of the server and is important as we want to record what time values were sent to the server by the IoT device. The third line appends the current time to the temperature reading and saves this to a text file. Note that this is a file append and will merge data to the end of the file instead of overwriting the whole thing. This way, we can keep a log of all data that has been submitted historically.
Putting It All Together
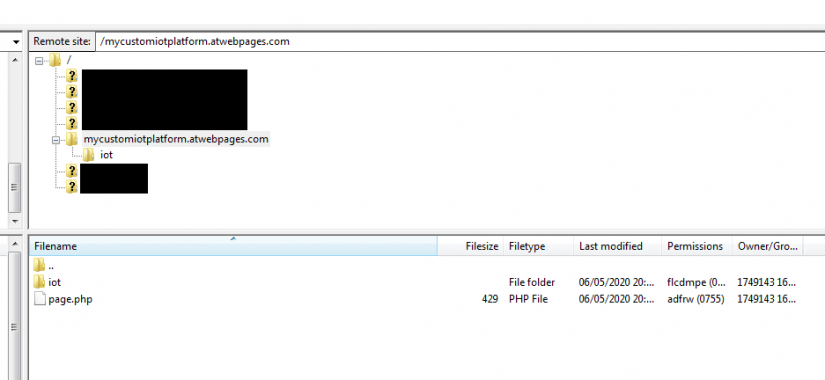
To get this example to work you will need to use the Arduino IDE with the ESP32 and flash the program to it. Make sure that you change the Wi-Fi credentials to match your Wi-Fi networks and also be sure to change the host to your own private website which can be hosted by most free domains. The PHP script needs to be saved to a file called page.php and this must be in the top-most directory of your website:
The system created here now allows us to send data to a PHP server from any number of devices around the world simultaneously. However, this communication is only one way and lacks many important features such as usernames and passwords. Thus, in the next maker project, we will learn how to make GET requests to receive stored data so that we can create a more complete IoT server using HTTP.

Robin Mitchell is an electronic engineer who has been involved in electronics since the age of 13. After completing a BEng at the University of Warwick, Robin moved into the field of online content creation developing articles, news pieces, and projects aimed at professionals and makers alike. Currently, Robin runs a small electronics business, MitchElectronics, which produces educational kits and resources.


Leave your feedback...