
Custom IoT - MQTT Framework
In the previous project, we discussed how our MQTT-like server will operate, as well as listing the commands it will utilize. In this project, we will create the framework for our MakerMQTT system for both ESP32 clients and a Python Server.
Custom IoT Solutions - Intro to the Internet of Things
Custom IoT Solutions - ESP32 vs ESP8266
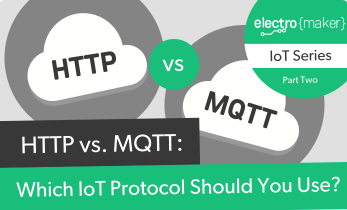
Custom IoT Solutions - HTTP vs MQTT
Custom IoT Solutions - Create an HTTP Post System
Custom IoT Solutions - How to Make HTTP GET Requests
Custom IoT Solutions Part 6 - MQTT Overview
What Will Our Code do Today?
Before we look at the framework code, it is important to understand what our code will be capable of at the end of this part. Because creating such servers is a complex task, we will break up the construction into three different parts. This part will create a framework that will allow clients to connect to a Python server and have the server send periodic keep-alive messages. If the client disconnects and the server does not get a response from the connected client, then the server will drop the connection and free up resources. No commands such as publishing or subscribing will be implemented in this part but will be covered next time (however, the basic framework allows for them to be easily added).
Note – Since this server does not implement true MQTT we will instead refer to it as MakerMQTT. While MQTT has its own advantages, as well as being established, ours is not only far simpler in operation but arguably easier to implement and understand. It is also ideal for those who want to see the core code in action and be able to make alterations with ease.
Server Structure
The MakerMQTT server is coded in Python for multiple reasons including its cross-platform nature and ease of use with sockets. A cross-platform application allows us to run the server on almost any supported platform including Windows, macOS, and Linux. This also presents the possibility of running our own private Internet of Things (IoT) platform on a Raspberry Pi which not only offloads work from a main computer, but can also allow for an IoT server to be hidden away connected via Ethernet. While most languages can work with sockets, Python is arguably one of the easiest next to Visual Basic .NET (VB.net) requiring a few lines of code to initialize/configure, and a few functions for reading and writing. Python’s ease of use also extends into serial ports, general-purpose input/output (GPIO) access, and even graphics, when used with libraries such as PyGame, and this allows for easy expansion in the future.
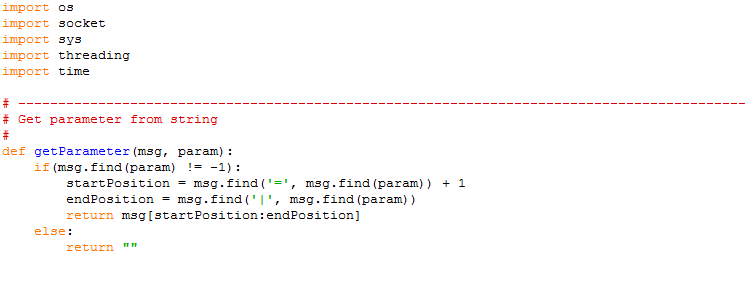
The server code all fits onto a single file being 150 lines long (this includes plenty of white space). The first few lines of code import the needed libraries, including sockets, time, and threading. The next block of code after this is a simple function that allows us to extract the value of a parameter in a message string. Our messages are split into sections using the | character, and the = sign indicates the value of a parameter. For example, the message |START|COMMAND=SUB|END| has the command parameter whose value is SUB.
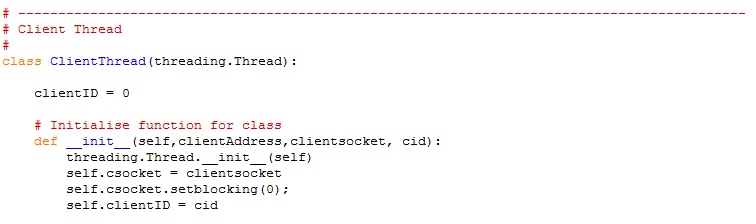
The next block of code is the client class and this is what handles each client connected to our server. When a new client connects to our server, it is assigned to a unique thread that runs this class as its own program. This allows our server to handle simultaneous connections while keeping each connection isolated from each other.
The class initializer function takes the address of the client, the socket it is connected to, and an ID to assign to the device. The ID is not important but included to make the debugging process easier (we can display messages onto the terminal that include the ID, so we know what each client thread is doing).
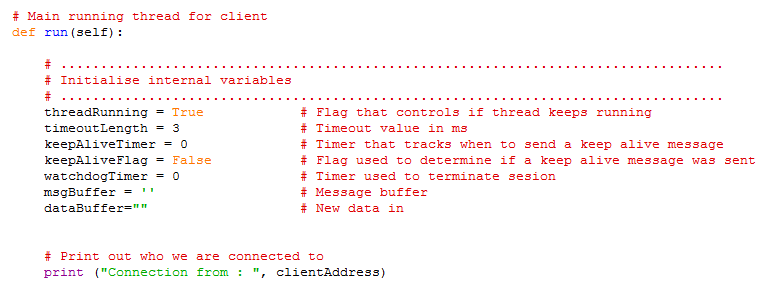
The next function inside the client class is the run() function, and this is the main loop that is executed when the client thread is started. The first pieces of code executed in this function initialize the client object to ensure that variables are correctly set. These variables include a flag that determines if the thread requires terminating, a watchdog counter, and message buffers.
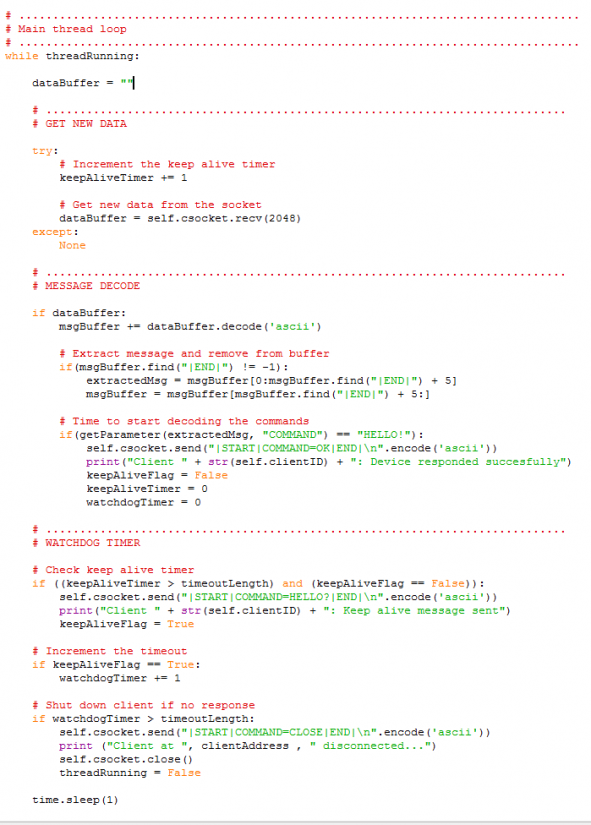
Once initialization is done, the run function proceeds to execute the main loop that runs until threadRunning is set to False. This loop performs multiple actions in the following order
- Check for new data
- Decode any new data coming in
- Perform the watchdog checks to see if the device is still connected
Checking for data is done using a try/except block because the socket that receives data from the client is set to not be blocking. This means that, if there is no data present, then reading data will return an error, and thus we catch this error using a try/except block. Because the data buffer is cleared before this block, a fail read will result in the message decode block not being executed.
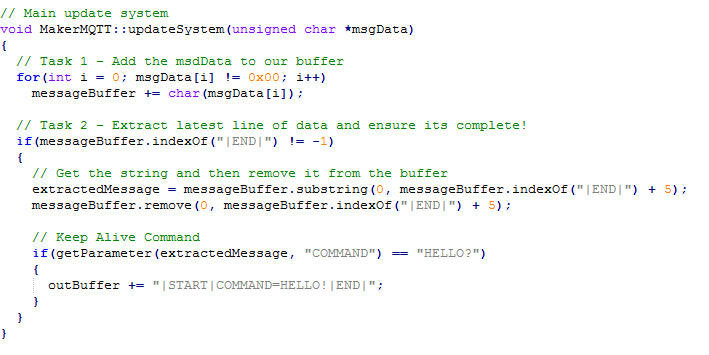
The message decode section first takes the newly arrived data from the buffer and adds it to the message buffer. However, data coming is in binary format and thus needs to be converted to ASCII using the .decode() function. Once this data has been added to the message buffer, we need to check to see if |END| is present in the message. If it is, then we know that a message has arrived in its complete form and can be worked upon. So, once END is detected, we extract the complete message from the message buffer and remove it from the message buffer. This is done so that we can send multiple commands and ensure that all are executed.
Example:
|START|COMMAND=HELLO!|END||START|COMMAND=SUB|END|    becomes…


|START|COMMAND=SUB|END|    < Now stored in the message buffer

|START|COMMAND=HELLO!|END| < Now stored in extractedMessage to be operated on
Once the message has been extracted, it is decoded using the getParameter function. The only command that we are implementing is the keepalive routine, and so we check for the “HELLO!” response. If this is detected, we send back the confirmation message as an ASCII string while also resetting the watchdog timer and keepalive timer.
The last section of code in the main client loop handles the watchdog mechanism. Each iteration of the loop is one second (done by adding time.sleep(1) at the end of the loop), and on each iteration, the keepalive counter is incremented. This value is reset when a valid message is sent to the server, and if no messages are detected after a defined timeout length (in this case, three seconds), then the server sends a keepalive message to the client. If the client does not respond to this message in three seconds, then the thread closes the connection and terminates.
The last lines of code in the server define the IP address of the server (WHICH YOU HAVE TO CHANGE TO THE IP OF YOUR SYSTEM), open a port for devices to connect to and run an infinite loop that listens for incoming devices.
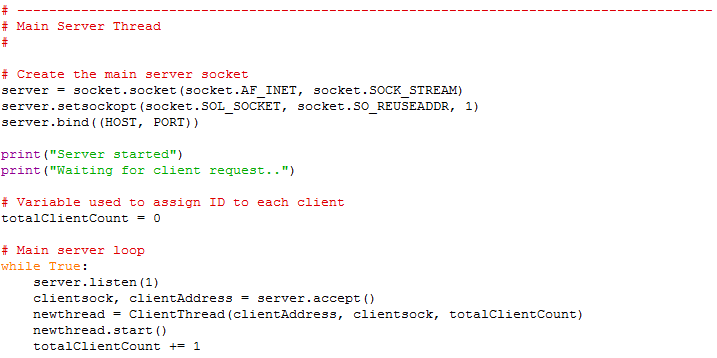
To summarize:
- Client connects to a global port
- Server accepts the connection and creates a new client object passing the address of the device
- The server then creates a new thread using the just created client object
- The server starts the thread which runs the run() function automatically
Client Structure
The client is structured in a very similar fashion to the server but is instead written in C++ for use with the ESP32. While not all the code will be explained a few key areas will be looked at. The first is that, unlike the server, the client code is stored in three files; the main project itself, MakerMQTT.cpp, and MakerMQTT.h. The main project file includes identical code to the HTML examples with the same Wi-Fi connection and server setup. However, unlike the HTML examples, our code makes one server connection request at the start, and this connection is never closed (remember, MakerMQTT is always connected).
While the MakerMQTT class could handle all operations internally, we will instead have the class only operate on string messages in and out and instead have the main loop handle incoming and outgoing socket messages. Thus, our main loop of code is required to pass received data to the MakerMQTT class and is also required to transmit data to the server on behalf of the MakerMQTT class. The first two blocks of code in the main loop clear the data buffer while the second reads all data waiting in the socket buffer. This message is then passed to the MakerMQTT client object (called clientEngine) which causes the MakerMQTT client to process the message and perform all needed operations. Once completed, we check to see if the MakerMQTT client object wants to send data back to the server (such as a keepalive response), and if so, read the data that needs to be sent and send it to the server.
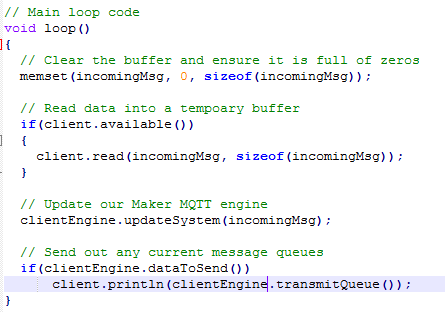
The internal structure of the MakerMQTT object is fairly simple, with the most important function being updateSystem(unsigned char *msgData). The first task this function executes is to copy the incoming data from the server into its message buffer. The second task is to check for an END parameter in the message, which indicates a complete message in the message buffer. The third task is to extract this message, just like the server, and then respond appropriately. You may notice that outgoing messages are added to a string; this is the string that is returned by the transmitQueue() function back in the main loop. When this function is called, it will clear the outBuffer that stores the outgoing messages.
Conclusion
When the server is started, and a client initiated, the client will connect to the server and retain the connection by sending back responses to the servers keepalive message requests. While there is no subscribing or publishing, they are easy to add and will be covered in the next part of this custom IoT series!

Robin Mitchell is an electronic engineer who has been involved in electronics since the age of 13. After completing a BEng at the University of Warwick, Robin moved into the field of online content creation developing articles, news pieces, and projects aimed at professionals and makers alike. Currently, Robin runs a small electronics business, MitchElectronics, which produces educational kits and resources.


Leave your feedback...