
Custom IoT Solutions - How to Make HTTP GET Requests
In the last maker project, we learned how to use HTTP on an ESP32 microcontroller to send data to a PHP site. In this maker project, we will learn how to make HTTP GET requests, get the latest value of a variable, and create a more advanced variable-saving technique that allows for saving to any variable we want to.
Custom IoT Solutions Part 1 - Intro to the Internet of Things
Custom IoT Solutions Part 2 - ESP32 vs ESP8266
Custom IoT Solutions Part 3 - HTTP vs MQTT
Custom IoT Solutions Part 4 - Create an HTTP Post System
Custom IoT Part 5 - How to Make HTTP GET Requests
Current Limitations
The last project that we created allowed us to store data to a PHP site using an ESP32. However, this had some limitations with the first, and most obvious, being that we hardcoded what variable the submitted data was being saved to. Therefore, it would be more appropriate if instead of simply saving all incoming data to the same variable (in the previous case, temperature), we instead define what variable we are saving to first and then the value of that data. The other limitation with the previous example was that it only allows for storage of data and not the obtaining of data. Therefore, this project will also implement return values from a POST request as well as look at the HTTP GET request so that we can retrieve the contents of a webpage. The code in this example will also be cleaned up and will use functions to allow the easy access of variables from the PHP server. Thus, instead of having all code defined in the main loop of code we will instead have functions that will handle the HTTP requests outside of the main loop and return back data.
What is HTTP GET?
As previously discussed, HTTP is the acronym for HyperText Transfer Protocol and is the protocol that drives all web-based Internet activity. However, while its main focus is for websites, it can easily be adapted for use in Internet of Things (IoT) devices as a method for both sending and receiving data from a sever. But how does an HTTP GET message look and how does it differ from HTTP POST messages? To answer this question, let’s take a look at an HTTP GET message!
GET /page.html HTTP/1.0
Host: <SITE DOMAIN>
GET /page.html HTTP/1.0
The first line is almost identical to the POST message with the only difference being the GET instead of the POST command. Ensure that the page.html is replaced with the page that you are intending to access. The end of this line is terminated with a carriage return/line feed pair (0x0A, 0x0D).
Host: <SITE DOMAIN>
The first line is almost identical to the POST message with the only difference being the GET instead of the POST command. Ensure that the page.html is replaced with the page that you are intending to access. The end of this line is terminated with a carriage return/line feed pair (0x0A, 0x0D). Host: The second line is the same as that found in the HTTP POST message and simply defines the site that is being accessed. For example, if the request was for Google then this line would be Host: www.google.com. Again, this line is terminated with a carriage return/line feed pair (0x0A, 0x0D).
Empty Line
The third line is empty and only contains a carriage return/line feed pair (0x0A, 0x0D). This is crucial and terminates the end of the whole HTTP GET message thus informing the server that the message is complete and ready to be processed.
HTTP Response
So now that we know how to send a GET request we need to understand what a response looks like and how to process it.
HTTP/1.0 200 OK
Date: Mon, 11 May 2020 19:12:54 GMT
Server: Apache
Content-Type: text/html; charset=UTF-8
Content-Length: 2

10
HTTP/1.0 200 OK
The first line indicates the HTTP version being used by the server as well as the response code from the server. As discussed previously, the response code tells us if the response was successful or if it was not and why. For example, if the code is 200 then the response worked and the data was successfully found. If the code was 404 then the page that we are trying to access does not exist. And if the code was 500 then the server hit an internal error that it cannot report back on. This line is terminated with a carriage return/line feed pair (0x0A, 0x0D).
Next Two Lines(Date and Server Type)
The next two lines are metadata that include the type of server and the current date. The server type will most likely never be useful information but the date can be handy in IoT applications that don’t include an RTC and want to synchronize their time to a server. Both of the lines are terminated with carriage return/line feed pairs (0x0A, 0x0D).
Content-Type: text/html; charset=UTF-8
This line informs our connected device what format the returned data is. In this case (and ours), the returned data type was text/HTML. HTML is combined into this definition because HTML is text and thus it is simpler than the two are combined. We can ignore this line as we already know the data from a variable will be in text format. This line is terminated with a carriage return/line feed pair (0x0A, 0x0D).
Content-Length: 2
This line indicates the length of the response from the server after the header message. This line is terminated with a carriage return/line feed pair (0x0D, 0x0A);
Empty Line
The empty line only contains a carriage return/line feed pair (0x0A, 0x0D). This is crucial and indicates to our device where the message header ends and where the data begins.
Data
Anything after the empty line is data and in this case, is data sent using the chunked method. Therefore, the first data to be received is the number of characters long that the data is and then the next line is the data itself. Note that while this server uses the chunked method for data transmission the data will unlikely be chunked and thus will ignore it.
New PHP Server Code
Now that we understand how HTTP headers look for the GET message, it's time to change the code on our server so that we may implement this new feature. We will also be changing the code so that devices inform the server what variable they want to save to and the data value for that variable.
<?php
// Handle POST requests
if ($_SERVER['REQUEST_METHOD'] === 'POST')
{
// Get the variable and data that we are saving to as well as the command
$variable = $_POST["variable"];
$data = $_POST["data"];
$command = $_POST["command"];
// Read Command - Get the latest value of a variable
if($command == "READ")
{
// Get the variable that is being requested
$variable = $_POST["variable"];
// Create the file name that we will save the data to
$fname = 'iot/' . $variable . '.txt';
// Read all lines from the variable file
$lines = file($fname, FILE_IGNORE_NEW_LINES);
// Get the total number of lines in that file
$numberOfLines = count($lines);
// Obtain the last line in the file
$latestEntry = $lines[$numberOfLines - 1];
// Split that entry into its date and variable
$strSplit = explode(">", $latestEntry);
// Send the data back to the device
echo($strSplit[1]);
}
// Write Command - Write a value to a variable
if($command == "WRITE")
{
// Create the file name that we will save the data to
$fname = 'iot/' . $variable . '.txt';
// Get data the data was sent
$time = date('m/d/Y h:i:s a', time());
// Append the received data into a text file on the server
// Note that we are now using the '>' symbol as it will make parsing simpler later ;)
file_put_contents($fname, strval($time) . '>' . $data . "\n", FILE_APPEND);
echo("WRITE OK");
}
}
// Handle GET requests
else
{
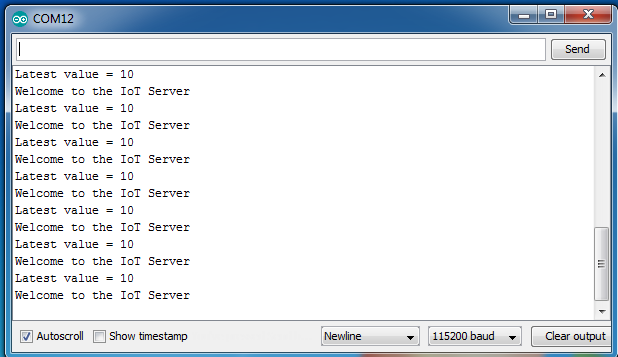
echo("Welcome to the IoT Server");
}
?>
New ESP32 Code
The code for the ESP32 has been changed to include three new functions; readData, writeData, and getPage.
- String readData(String variableName)
- This will return the latest value of the variable passed to the function
- void writeData(String variableName, String variableData)
- This will save the variableData to variableName on the server
- String getPage(String pageName)
- This will return the contents of a webpage
#include <WiFi.h>

// Wi-Fi details here
const char* ssid     = "Spock-Net";
const char* password = "06426705";

// Website that we will connect to here
const char* host = "mycustomiotplatform.atwebpages.com";
const int httpPort = 80;

// Some variable declarations here
String message;
String serverMessage;
unsigned char tempBuffer[256];

// Functions for website communication
String readData(String variableName);
void writeData(String variableName, String variableData);
String getPage(String pageName);

// Use WiFiClient class to create TCP connections
WiFiClient client;


// Setup function
void setup()
{
  Serial.begin(115200);
  delay(10);

  // We start by connecting to a WiFi network
  WiFi.begin(ssid, password);

  while (WiFi.status() != WL_CONNECTED) {
    delay(500);
    Serial.print(".");
  }
}


// Main loop code
void loop()
{
  // Prevent too many data sends!
  delay(2000);
  writeData("temperature", "10");
  delay(2000);
  Serial.println("Latest value = " + readData("temperature"));
  delay(2000);
  Serial.println(getPage("page.php"));
}


// **********************************************************************************
// Read data to our HTTP IoT Server
// Takes a single variable name, returns the current value
String readData(String variableName)
{
    // Attempt to connect to the HTTP server
  if (!client.connect(host, httpPort)) {
    Serial.println("connection failed");
    return "";
  }

  // Create a message to send to the server
  message = "command=READ&variable=" + variableName;

  // Now that we are connected, lets make the HTTP header message
  client.println("POST /page.php HTTP/1.0");
  client.println("Host: " + (String)host);
  client.println("Content-Type: application/x-www-form-urlencoded");
  client.println("Content-Length: " + (String)message.length());
  client.println();
  client.print(message);

  // Now wait for the response
  serverMessage = "";

  while (serverMessage.indexOf("\r\n\r\n") == -1)
  {
    // Clear the buffer and ensure it is full of zeros
    memset(tempBuffer, 0, sizeof(tempBuffer));

    // Read data into a tempoary buffer
    client.read(tempBuffer, sizeof(tempBuffer));

    // Transfer the contents of the buffer into our string
    serverMessage += (char*)tempBuffer;
  }

  // Find where the header message ends
  int dataPointer = serverMessage.indexOf("\r\n\r\n") + 4;

  // Return the string from that point on
  return serverMessage.substring(dataPointer);
}


// **********************************************************************************
// Write data to our HTTP IoT Server
// Takes a variable name and data
void writeData(String variableName, String variableData)
{
  // Attempt to connect to the HTTP server
  if (!client.connect(host, httpPort)) {
    Serial.println("connection failed");
    return;
  }

  // Create a message to send to the server
  message = "command=WRITE&variable=" + variableName + "&data=" + variableData;

  // Now that we are connected, lets make the HTTP header message
  client.println("POST /page.php HTTP/1.0");
  client.println("Host: " + (String)host);
  client.println("Content-Type: application/x-www-form-urlencoded");
  client.println("Content-Length: " + (String)message.length());
  client.println();
  client.print(message);

  // Now wait for the response
  serverMessage = "";

  while (serverMessage.indexOf("\r\n\r\n") == -1)
  {
    // Clear the buffer and ensure it is full of zeros
    memset(tempBuffer, 0, sizeof(tempBuffer));

    // Read data into a tempoary buffer
    client.read(tempBuffer, sizeof(tempBuffer));

    // Transfer the contents of the buffer into our string
    serverMessage += (char*)tempBuffer;
  }
}


// **********************************************************************************
// Get page from our HTTP IoT Server
// Asks for the page that you want to get
String getPage(String pageName)
{
    // Attempt to connect to the HTTP server
  if (!client.connect(host, httpPort)) {
    Serial.println("connection failed");
    return "";
  }

  // Now that we are connected, lets make the HTTP header message
  client.println("GET /" + pageName + " HTTP/1.0");
  client.println("Host: " + (String)host);
  client.println();

  // Now wait for the response
  serverMessage = "";

  while (serverMessage.indexOf("\r\n\r\n") == -1)
  {
    // Clear the buffer and ensure it is full of zeros
    memset(tempBuffer, 0, sizeof(tempBuffer));

    // Read data into a tempoary buffer
    client.read(tempBuffer, sizeof(tempBuffer));

    // Transfer the contents of the buffer into our string
    serverMessage += (char*)tempBuffer;
  }

  // Find where the header message ends
  int dataPointer = serverMessage.indexOf("\r\n\r\n") + 4;

  // Return the string from that point on
  return serverMessage.substring(dataPointer);
}
How to Create an HTTP GET Example - Final Thoughts
This example demonstrates a functioning IoT system that allows for an ESP32 to communicate with a PHP server where variables can be saved and retrieved. This example could be continued with the use of security, dashboards, and com channels, but as discussed in a previous article, we will be looking towards a hybrid version of MQTT that will allow us to have always-on connections with cross-device communication and instant updates. But this example demonstrates how HTTP can be used for other things and not just for the transmission of hosted webpages from a server to a client.

Robin Mitchell is an electronic engineer who has been involved in electronics since the age of 13. After completing a BEng at the University of Warwick, Robin moved into the field of online content creation developing articles, news pieces, and projects aimed at professionals and makers alike. Currently, Robin runs a small electronics business, MitchElectronics, which produces educational kits and resources.


Leave your feedback...