

Zelda Song Player

Made by electrouser881 / Art / Games & Gaming / Kids & Family / Music / Retro Tech
About the project
Assemble an Arduino Uno-based device to recreate an N64 controller to play the first six songs from the Legend of Zelda: Ocarina of Time!
Project info
Difficulty: Easy
Estimated time: 1 hour
Items used in this project
Hardware components


Story
In this tutorial, I'll be showing you how to assemble an Arduino Uno-based device to recreate a Nintendo 64 controller to play the first six songs from the Legend of Zelda: Ocarina of Time. It can play Zelda's Lullaby, Saria's Song, the Song of Time, the Song of Storms, the Sun's Song, and Epona's Song. Watch the video for a tutorial and demonstration of the songs.
Links for Parts:
GitHub Link: https://github.com/mitomon/MitosArduinoScripts/tre...
Step 1: Getting the Speaker Ready
To use the speaker without any jumper wires, we will be modifying the speaker pins. Using a needle, lift the tab holding the power(red) and data(green) wires and swap their positions. This is done to be able to interface with the Arduino's ICSP pins. The second group of pins is the one we will be using as it connects to data pin 11, but more on that later.
;;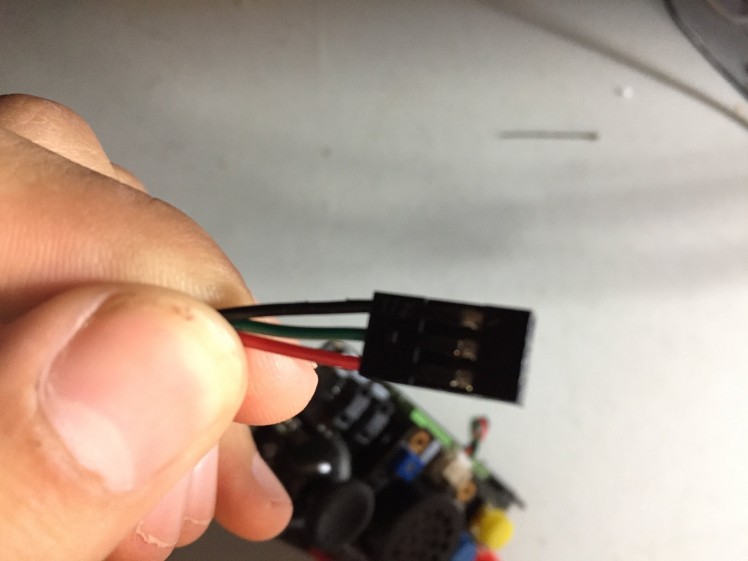 1 / 3 • Speaker Module Pin Header
Step 2: Assemble Device
With your speaker now modified and ready to perform the task at hand, we can assemble the song player. Thread the speaker cable through the Arduino and Input Shield before putting the two together. This will reduce the amount of extra wire hanging out of the device. Now connect the speaker to the second row of ICSP pins with the red wire being closer to the yellow button than the black wire. Attached you will find a schematic of the Input Shield itself if you need help lining up the power, data, and ground wires. Alternatively, watch the video.
Now simply flip the device over, add some tape, and stick it to a rechargeable battery/ power bank like the ones used to charge phones. You can also just plug it in to your computer. Once this is done, upload the code in the next section.
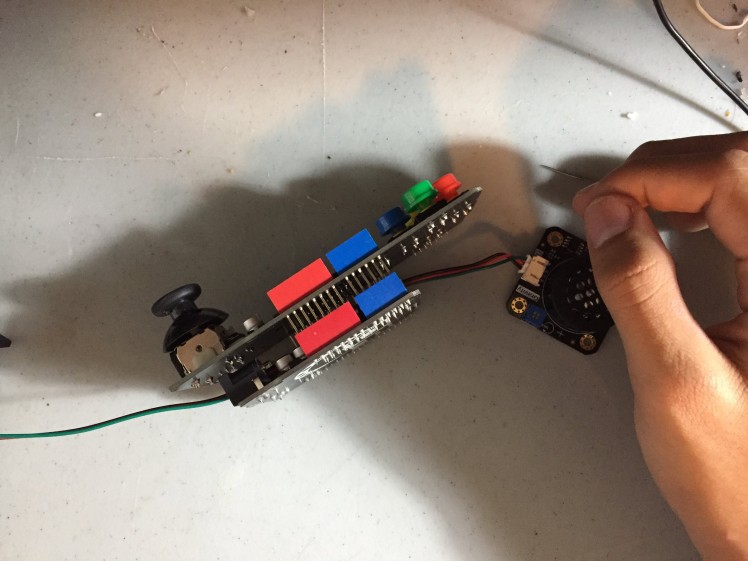 1 / 7 • Threading the Speaker Module Cable Through the Assembly
Step 3: Uploading the Code
Upload the code from https://github.com/mitomon/MitosArduinoScripts/tre... to your Arduino. You can either make a new file in the Arduino IDE and copy and paste the code from zeldaSongPlayer.ino and do the same for pitches.h, or download the files themselves and import into Arduino IDE. Note that you will need both files for it to work.
The controls are simple with only 5 buttons being used. We use the four keypad buttons as the yellow buttons in the original N64 controller and the joystick button as the blue A button. Originally, I thought of using a mini push button for A, but decided to use the button on the joystick because I wouldn't need any jumper wires and it was more ergonomic. You can play the songs exactly like in the game; if you press a key incorrectly, it will also give that error tone like in the game.
I'm working on adding the rest of the songs and maybe a Scarecrow option, but for now, I'm alright with my new musical toy.
Special Thanks to DFRobot
I'd like to thank DFRobot for sponsoring this project. If you hadn't noticed, this project can be built using parts from a single source. The delivery was quick and the parts themselves, as you can see from this project, are very versatile. Once again, check out the links in the intro or go to their store directly here.
Code
Credits
Related products


Leave your feedback...