
Wifi Motion Sensor With Email Notifications Battery Powered
Made by THINGS ON EDGE / Home Automation / Security / Sensors / IoT
About the project
In this project we are going to build WiFi PIR Sensor with email notification powered on a battery; without coding.
Project info
Difficulty: Easy
Platforms: IFTTT, Things On Edge, Espressif
Estimated time: 1 hour
License: GNU General Public License, version 3 or later (GPL3+)
Items used in this project
Hardware components

Story
This project demonstrates how to build a battery powered Wi-Fi Motion Sensor with Email notifications. Every time the sensor detects movements it sends you email notifications. As we are going to use IFTTT you can easily change email notification to something else e.g. push notifications on your phone.
This instruction comprises with the following steps:
- Explaining project using Fritzing schematics
- Assembly
- Setting-up IFTTT and email service
- Configuring IoT module
- Connecting IoT module to the internet
Project
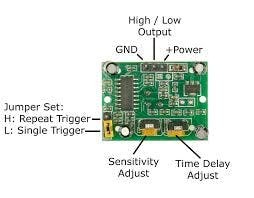
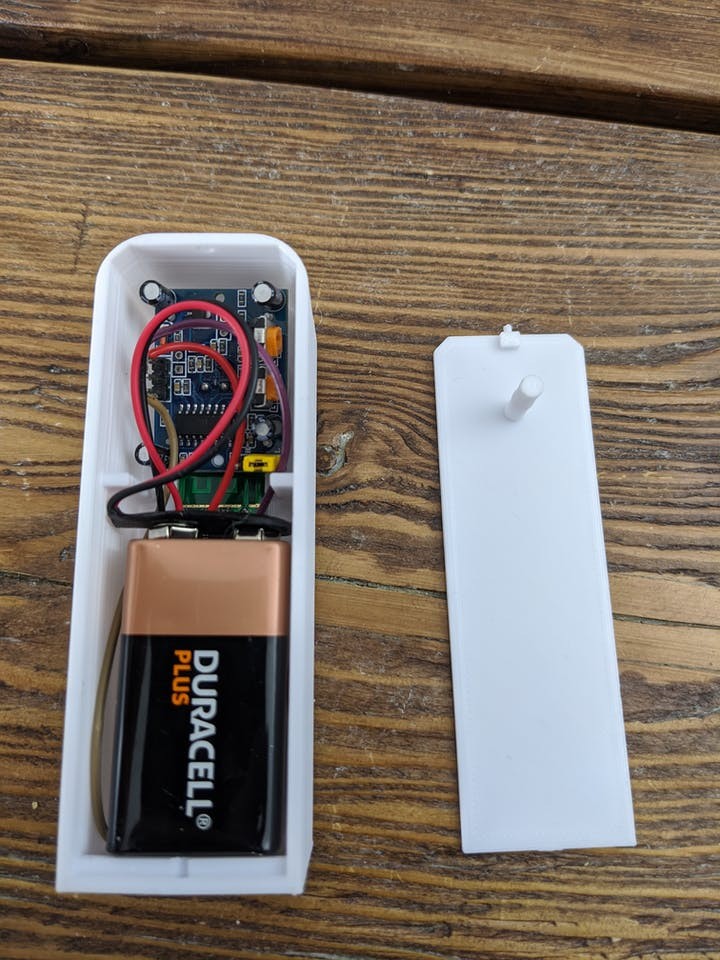
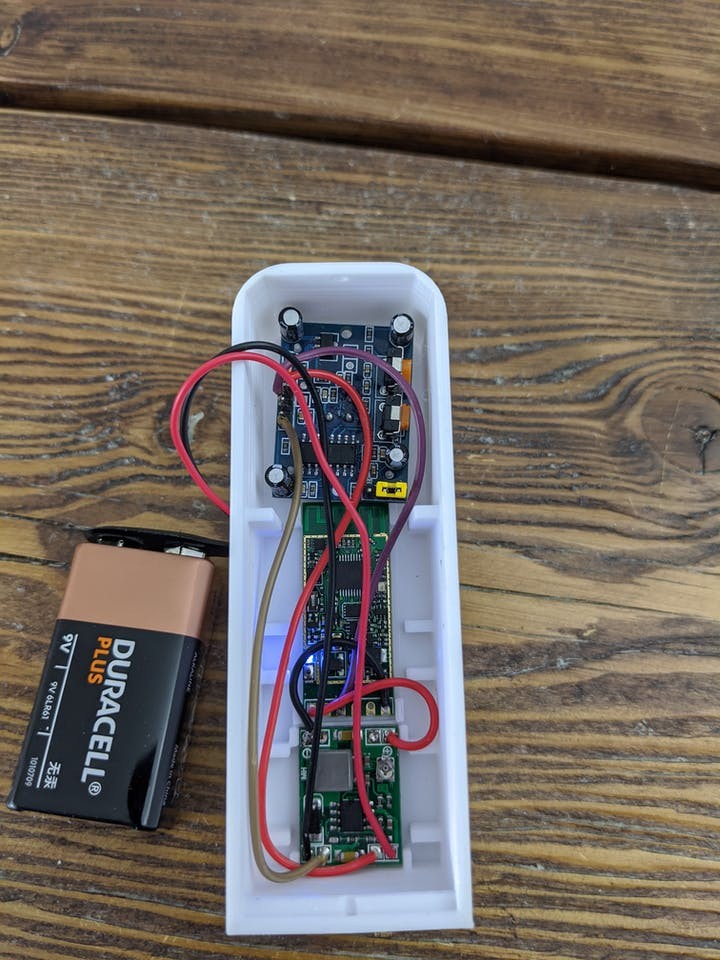
In this project we use the PIR sensor module (HC-SR501). The module detects motions and sets the OUT pin HI for selected duration (explained in more details further in the blog). This wakes up the Cricket module, which sends notification to IFTTT webhook and then IFTTT converts it into an email.
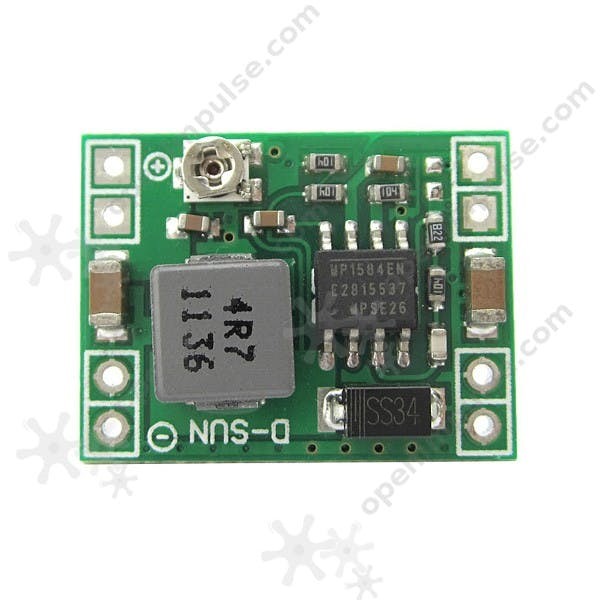
The PIR module operating voltage is 4.5-20V and we have chosen a 9V battery to power-up this sensor. However we also want to use the IOT Cricket Wi-Fi module which operates between 1V and 3.5V. We cannot connect this battery directly to the module. We need to add a step down regulator DC-DC to lower down the voltage otherwise we damage the board.

We choose the step-down MP1584EN module of which output voltage can be adjusted between 0.9V and 20V. We have to make sure the output voltage is set correctly to avoid damage. The module has a potentiometer to regulate output voltage. This should be adjusted to provide 3.3V using a multimeter.
The motion sensor also has 2x potentiometers to regulate sensitivity and duration of the output signal. The cricket module wakes-up by providing a high signal on WAKE_UP pin, then it sends the notification to the cloud/IFTTT and powers itself down to wait for another wake_up signal. The entire process takes approx. 5 seconds. The duration for the motion sensor can be adjusted between 3s and 1 minute. We need to set this to minimum to avoid multiple notifications on a single movement detection.
The potentiometer should be turned to maxim anticlockwise. This sets the output signal to last approx 3 seconds.

Let's follow the schematics below to connect all components together, it can be done using breadboard but eventually this will be turned into a standalone product with 3D printed enclosure.

After assembly the circuits should work as expected, any movements detected should wake-up the Cricket board, this is indicated by LED blinking.
Setting-up IFTTT and email service
Steps to follow:
- Go to: https://ifttt.com/
- Login or register
- Click Create from User / Account menu (top right corner)
- Click + to create new source event
- Select Webhooks service
- Click Continue
- Click Receive a web request (on the left hand side)
- Create event name e.g. pir_sensor
- The source event should be set-up now, click + after Then event
- Search email service
- Change subject and body of the email accordingly
- Click Finish
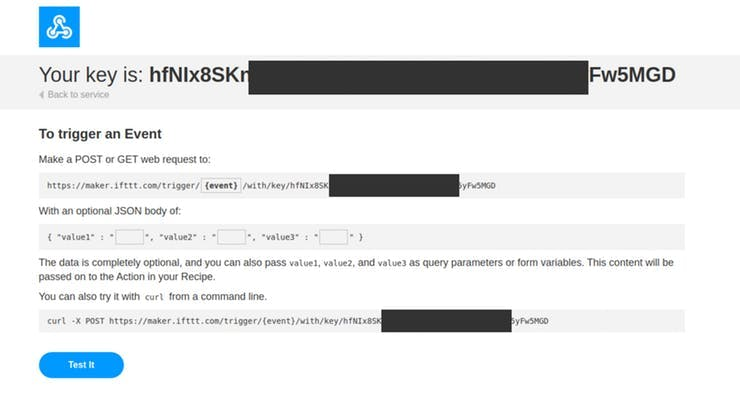
Nearly done, we need to get a HTTP address to which we can post events from the Cricket module.
Search for Webhooks service and click on the document in the right up corner.

Next copy web links under "Make a POST or GET web request to:" you will need it later.
Connect to Wi-Fi network
In a few steps you will connect your device to the internet over your Wi-Fi network. All you need to do is to activate Cricket's private Wi-Fi hotspot and then open a private web page to pass your Wi-Fi network credentials. Please follow the steps below:
- Press and hold a button on the module for 5 seconds until the LED is constantly lit.
- Once the LED is constantly lit Cricket opens a private Wi-Fi hotspot. Connect from either a laptop or smartphone to the hot spot with the following credentials:SSID: toe_deviceNo password is required
Select "toe_device" network

Select "toe_device" network
- Once connected, open a private web page: http://192.168.4.1/index.html
- NOTE:make sure LED is still ON! If is OFF repeat the steps from the beginning
Enter your WiFi credentials

Enter your WiFi credentials
- Now you can pass your Wi-Fi network credentials and click CONNECT. If you pass the correct SSID and Password then after a few seconds the device should report is online and the LED will be OFF.
Our device is live and connected to the internet!
Configure Wi-Fi Cricket module
In a few steps you will connect your device to the internet over your Wi-Fi network. All you need to do is to activate Cricket's private Wi-Fi hotspot and then open a private web page to pass your Wi-Fi network credentials. Please follow the steps below:
For our Wi-Fi Motion Sensor device we want to configure Cricket to send HTTP Post Requests to the IFTTT / Webhooks when it wakes up on IO1: WAKE_UP pin. The IOT Cricket module wakes up when IO1 receives a high signal from the PIR sensor module.
Now we can configure the device.
Set the following configuration:
- RTC: OFF
- IO2: OFF
- IO3: OFF
- Battery monitor: OFF
- Force updates on - IO1 Wake Up: On
- Force updates on - RTC Wake Up: OFF
- Post Events: see below
Copy / paste the link we copied from Webhooks in io1_wakeup and leave data empty.
Just two more steps:
- replace https to http
- replace event to pir_sensor
The link should look like below:
http://maker.ifttt.com/trigger/pir_sensor/with/key/hfNIx8SKn_xxxxxxxxxxxxxxxxxxxxxx_YW3xx5yFw5MGD
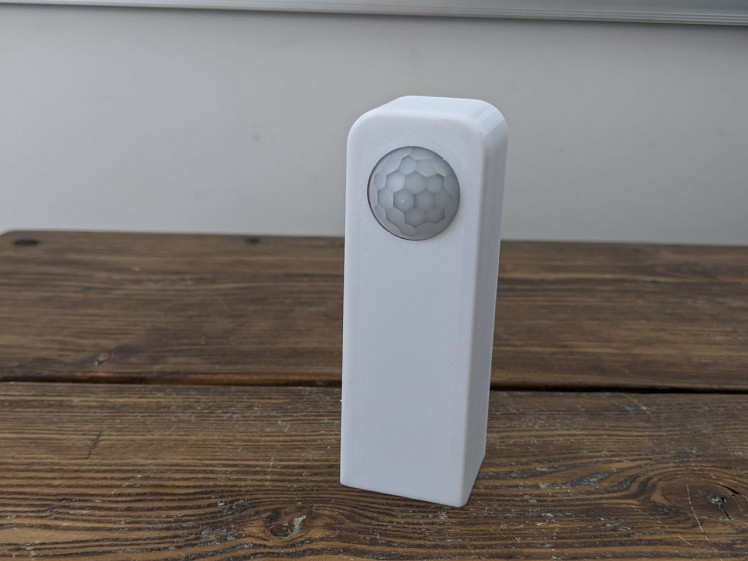
Print 3D case (OPTIONAL)
If you have access to 3D printer you can print attached stl files and en-up with really nice device ready to be used and less looking like prototype.
Now we can test the device.

More information
You can find more information:
- About Cricket module from ThingsOnEdge page
- More technical information can be found here: https://thingsonedge.com/documentation
Video with instruction :
Feedback
Thank you for taking your time! If you enjoyed building this moisture sensor we would really appreciate if you could spread the word. If you have any feedback or suggestions how to improve, we are happy to hear them.
Many thanks & Enjoy!
CAD, enclosures and custom parts
Credits
THINGS ON EDGE
Things On Edge provides plug and play, ultra-low power Wi-Fi modules, which can run directly on AAA batteries for years. Designed for makers at all skill levels from advanced to those who just start building IoT devices.
Leave your feedback...