
Ultra Low Power Wifi Home Automation System
Made by THINGS ON EDGE / Environmental Sensing / Home Automation / Security / Sensors / IoT
About the project
In a few steps we build a basic ultra low power WiFi home automation system by using Raspberry Pi, IOT Cricket module(s) and MQTT protocol
Project info
Difficulty: Easy
Platforms: Raspberry Pi, Things On Edge, MQTT
Estimated time: 1 hour
License: GNU General Public License, version 3 or later (GPL3+)
Items used in this project
Hardware components


Story
In this project we show how you can build a basic local home automation system in a few steps. We are going to use a Raspberry Pi which will act as a central WiFi device. Whereas for end nodes we are going to use IOT Cricket to make a battery powered WiFi devices e.g. temperature sensor and connect it to the RPi without writing a single line of code.
Our system is going to be based on MQTT communication protocol, which is hugely adopted in most home automation systems. To set it up we choose Mosquitto MQTT broker (server) and install it on Raspberry Pi (our central hub).
IOT Cricket also comes with HTTP(S) and MQTT protocols support. We configure it to use MQTT to communicate directly to our RPi MQTT broker.
This project can be realised by makers at all skill levels. It may require some basic soldering however it doesn't require any coding or programming. In the end of this project you will get a solid idea how you can easily build your own system and quickly extend by adding your own IOT end nodes to the system.
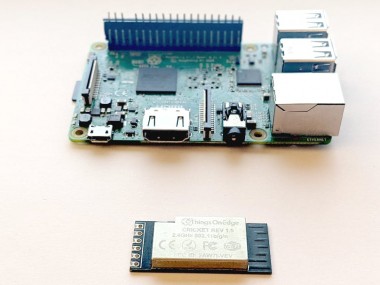
Prerequisites- Raspberry Pi(we used ver. 3 for this project)
- IOT Cricket WiFi module
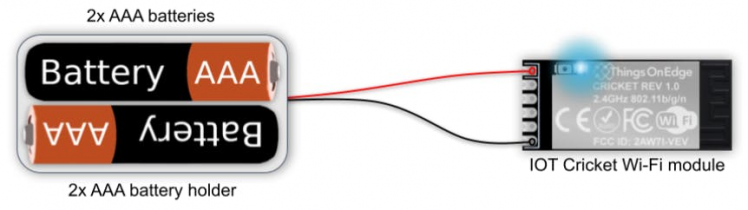
- 2xAAA battery holder
- 2xAAA batteries
The MQTT protocol provides a lightweight method of carrying out messaging using a publish/subscribe model. This makes it suitable for Internet of Things messaging such as low power sensors or mobile devices such as phones, embedded computers or microcontrollers. (source: mosquitto.org)
We can use as many devices as we want to subscribe to topics and listen for messages to arrive. If some device(s) publish a message on that topic then all devices, which are subscribed to the topic, receive that message instantaneously.
The topic can be any arbitrary string usually concatenated with / characters to allow to build hierarchical topics.
The most typical use of MQTT is to have a one central server to which devices can subscribe and publish messages. It facilitates all communication between devices connected to that server. In this project we will use RPi to act as our central MQTT broker and all other devices will be sending messages via this broker.
The best way to learn about it, is obviously by doing it by ourselves. There are plenty of resources available on the internet on MQTT. However, for this project you should be okay with a basic introduction, which we provided above.
Installing MQTT broker on Raspberry PiFor this project we use an open source Mosquitto MQTT broker. It is lightweight and is suitable for use on all devices from low power single board computers to full servers.
Before we start installing, it's a good practice to update the system components first:
$ sudo apt-get update$ sudo apt-get upgradeInstall Mosquitto broker. Open a terminal and type the following command:
$ sudo apt-get install mosquitto -yConfigure Mosquitto broker. Edit config file:
$ sudo vi /etc/mosquitto/mosquitto.confand add the following lines at the top:
port 1883allow_anonymous trueRestart RPi to apply changes:
$ sudo rebootThat's it! Our MQTT broker is up and running now!
NOTE: for the sake of simplicity of this project we are not creating accounts. So anyone within our local network can connect to this MQTT broker without credentials. If you want to add user authentication and make it more secure, there are plenty of tutorials on the internet how to do it.
Now, we just need to obtain IP address so we can send messages to our Mosquitto broker from other devices in the network:
Obtain IP address:
$ hostname -Iyour_RPi_IP_address (e.g. 192.168.1.10)
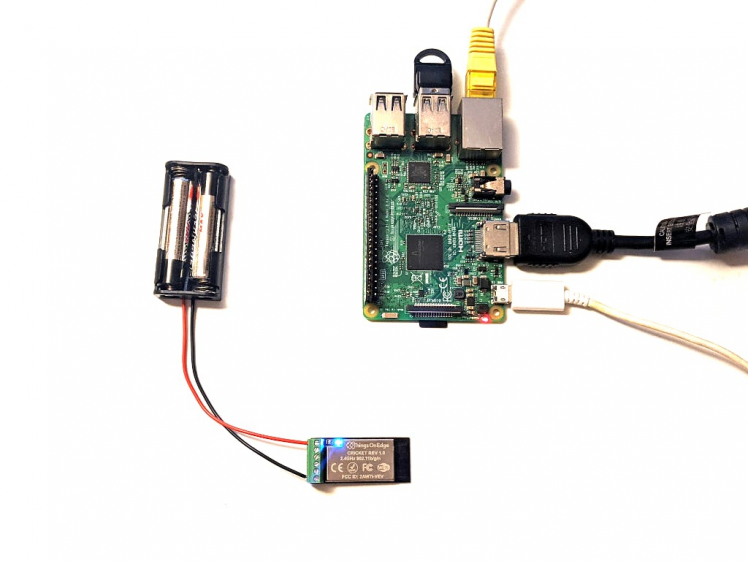
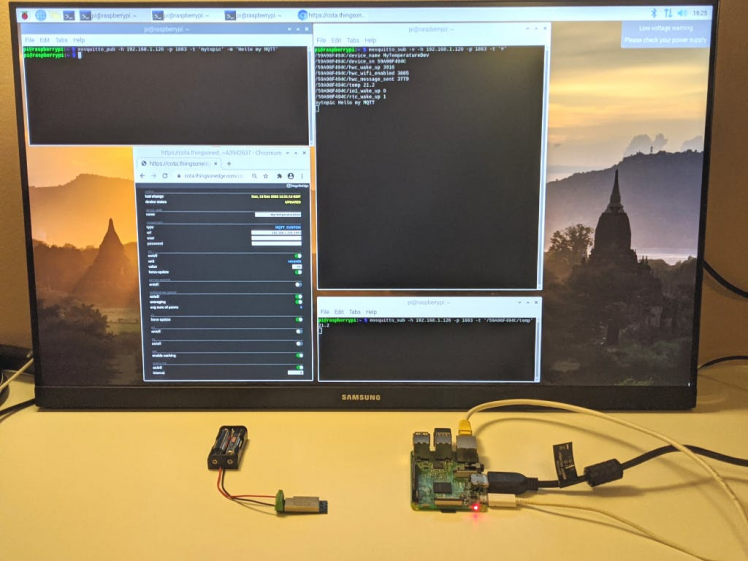
Connect IOT Cricket to RaspberryPi over MQTTIn this project we use the IOT Cricket WiFi module for a simple sensor to report a temperature every 30 seconds to our system. It will run on a battery so we can stick it anywhere at home or a garden. Later you can use IOT Cricket to build various battery powered sensors, alarms, buttons, switches and connect them too to our RPi MQTT broker out of the box.
In the first step connect batteries to Cricket.
Cricket comes with a built-in temperature sensor. We just need to configure it to send temperature value to our MQTT broker by setting the RPi IP address.
In order to do that open Cricket's configuration panel (see the steps here) and apply the following settings (as shown on the image below, please adjust IP address in "url" box to your RPi)
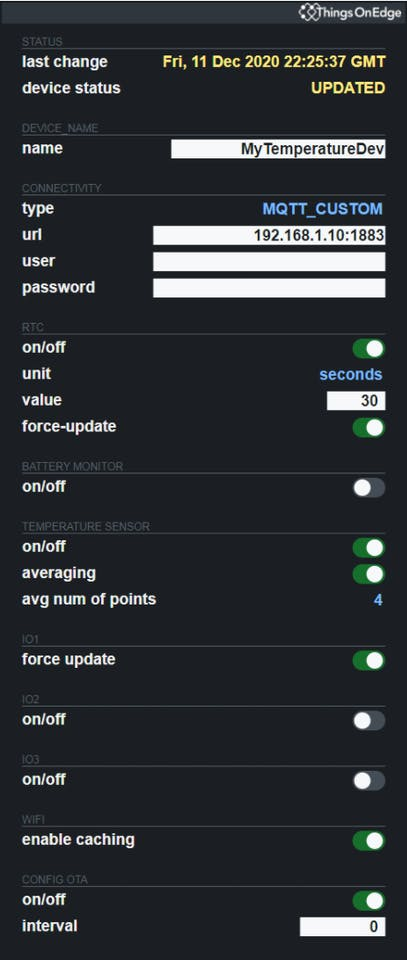
Now we can exit from the configuration mode.
The device is ready! Cricket is already sending data to our MQTT broker every 30 seconds.
Inspect MQTT messagesTo view / receive messages sent to our MQTT broker we can use various tools.
The easiest one might be a command line tool mosquitto_sub. We can install it either on any computer in our network or on our RPi with this command:
$ sudo apt-get install mosquitto-clients -yNow we can execute the following command to listen to ALL topics and messages send via our MQTT broker:
$ mosquitto_sub -v -h your_RPi_IP_address -p 1883 -t '#'.../59A98F494C/device_name MyTemperatureDev/59A98F494C/device_sn 59A98F494C/59A98F494C/hwc_wake_up 3794/59A98F494C/hwc_wifi_enabled 3763/59A98F494C/hwc_message_sent 3664/59A98F494C/temp 26.0/59A98F494C/io1_wake_up 0/59A98F494C/rtc_wake_up 1...The above is an output example of what IOT Cricket sends to our broker. Among the other data we can see there is a temperature: /59A98F494C/temp 26.0
The beauty of MQTT is that it allows us to subscribe to only topics which we are interested in. If we want to receive just a temperature, we can subscribe to /59A98F494C/temp topic by using the following command:
$ mosquitto_sub -h your_RPi_IP_address -t '/59A98F494C/temp'...26.126.527.227.6...

We have shown in this project an essential hardware and software to start building low power, energy efficient, home automation systems based on WiFi. MQTT is the essence to build upon for more sophisticated systems.
The ecosystem of software and services which can be integrated with MQTT is HUGE! There are a lot of great systems such as Home Assistant, Node RED, Grafana, etc. to let you come up with a great user experience of your own system. Not only can we do a simple print outs of a temperature, but we can have great dashboards visualising the data and managing your devices.
Now as we have this basic system infrastructure in place, the sky is our limit of what other WiFi devices we can build using IOT Cricket modules and add to our home automation system.
Thanks for getting up to here. We hope you enjoyed this tutorial!
Things On Edge team
Credits
THINGS ON EDGE
Things On Edge provides plug and play, ultra-low power Wi-Fi modules, which can run directly on AAA batteries for years. Designed for makers at all skill levels from advanced to those who just start building IoT devices.
Related products


Leave your feedback...