

The Pibadge

Made by 314Reactor / Communication / Home Automation / Notifications / Voice / Wearables
About the project
Device inspired by the Combadge from Star Trek that can turn on computers using speech commands.
Project info
Difficulty: Moderate
Platforms: Adafruit, Raspberry Pi, Pimoroni
Estimated time: 5 hours
License: GNU General Public License, version 3 or later (GPL3+)
Items used in this project
Hardware components


View all
Story
Key Goals:
- Make a wearable device that vaguely resembles a Combadge from Star Trek
- Make it be able to respond to voice commands and perform actions – such as turn on a PC
- Ensure that additional functionality can be added via drag and dropping in Python modules

Set a course for the Devron system.
Now I love Star Trek, if you hadn’t already guessed – I’ve always wanted to make something like one of the Combadges from the show, but as with many things you’ll see on my site; I’ve had many dreams I’ve not been able to bring to life until now. So I set forth with some searches online and found the parts and software I needed to try and make one:

No problem, here is how you build one.
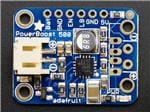
First things first, we need to solder up the Raspberry Pi to the Powerboost 500c, using the following diagram as a reference to what is the positive/negative pins:

Then solder a switch onto the Powerboost like so.

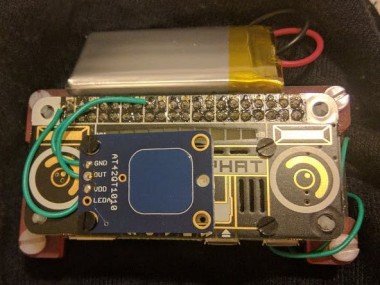
Then solder on the 40 pin header onto the Pi.
Assemble the Pibow case around the Pi – the layers will have numbers on them so should be easy enough – for this case there is a layer that needs snipping if you want to be able to remove/insert the SD card with the case assembled and also I put in a small screw on the final plate facing outwards. This is for the Powerboost 500c that will be going on the back later:

Grab the touch sensor button and wire it up as per the instructions on Adafruit (soldering onto the pins on the Speaker pHAT) and then hook it up to the Speaker pHAT as below, using nylon screws:

At this point you can put on the Speaker pHAT – with some nylon separators:

Put a nut/spacer on the small nylon screw and then put the Powerboost on and put another nut on and tighten it, you can then snip off the excess length of the screw if you used one like I did. I also put in some blu-tak on the back of the Powerboost to further help keep it held on, you can also use Sugru for this for a more permanent solution:

Next up is the plug in the LiPo battery – I plugged it in and based it on the top, again with some blu-tak to hold it on, I will most likely add a more permanent solution later.

Next up I put the Badge onto my Starfleet uniform looking hoody, basically screwing it on through the thread of the hoody (I intend to buy a pin or something to make this a little better in future):


This rounds off the hardware section.

“Even the Pies?” “…Especially the Pies”
and put in an SD Card configured with PiBakery – setup to your WiFi, enable VNC – like this:

Chuck it and and boot the Pi up, wait for the OS to get itself set up.
Then download the software for the Speaker pHAT – here.
Plug in the OTG shim into the USB Microphone and then into the Pi itself and follow the instructions for setup/use detailed here.
Install etherwake and other stuff with:
- sudo apt install etherwake mplayer mongodb
- pip install wit
- sudo python -m pip install pymongo==3.4.0
Etherwake is the software that will enable the Badge to boot up computers over the network, mplayer is what is used for playing audio and mongodb is for the chatbot I’ve included in this project and for any further modules that may go in later.
You’ll also need to sign up for an API key at wit.ai and insert this key into the code.
Now grab the code/config from here – then remote into the Pi with VNC and make a folder called ‘PiBadge’ in the home folder then transfer the zip file over and extract the contents you your ‘/home/pi’ folder.
Next up open crontab with:
- crontab -e
and add the line:
- @reboot python /home/pi/PiBadge/PiComm.py &
This will launch the code on boot. As for what the code does…

Fully functional.
The main file PiComm.py is the main file which has the main loop for waiting for a touch button press, which then plays the Combadge sound from Star Trek and opens the listening loop for activating a module under the ‘CommModules’ folder.
The __init__.py file in the modules folder is there to show that the folder contains packages that can be imported and the code within it will go through what modules can be imported and import them all at runtime of the main code.
The main code then goes through these modules and appends them to a list of names of modules, when the speech to text analysis is done it passes the results to the query function which compares the words inputted to pre-defined words in the modules to see if any match; if they do it runs that modules main code.
This is essentially how Jasper works with dynamically being able to add modules to its functionality without having to change any code in the main program itself – so credits to them as I have essentially re-engineered their methods for my use here.
The modules themselves are comprised of 2 main things in order to get them to work:
- The ‘spark’ function – contains the main code of the module to run
- The ‘isValid’ function – contains the words required to activate the module (returns true or false to the main code)

Make it so.
Next up you want to edit the ‘macs.txt’ file under ‘/home/pi/PiBadge/CommModules’ replacing the ‘computer’ and ‘<macs>’ parts with the name of the computer you want the module to respond to and the corresponding MAC address of the PC you want to switch on with that name.
Like so:
computer_1,00:00:00:00:00:00
Now you can reboot and be ready to rumble with some voice controlled wake on LAN action!
Simply say the word ‘wake’ and the name of the computer you want to wake and it should work; provided you have setup WoL on the PC you are trying to wake – for some instructions of that look here.
You can also activate the chatbot with the keywords ‘chat’ or ‘talk’ – to see functionality of my bot check out my prior project: The Raspbinator.
If you use the bot it will at first start to spout your own responses back and not generally be too impressive, it needs to be ‘trained’ a bit with inputs and responses before it starts to work properly.
And finally, you can exit the chatbot with the words, ‘exit’ or ‘bye’ and ‘shutdown’ in the main loop to shut the PiBadge down.

KHAAAAAAAAAAAAAAN
Here’s a video of the PiBadge in action, waking a computer and also me goofing about pretending I’m on the Enterprise and a blooper at the end:
I’m quite happy with how this project went – I learned a lot about Python modules and this leaves the project open for further work and additions; such as Home Automation/Alexa etc.
At some point I also need to add in an exception for if wit.ai is unavailable/hasn’t responded.
The modular nature means new functionality can be as easy as following the basic layout of a module as above, adding in some functionality and drag/dropping it in using an SFTP client such as WinSCP or using Linux command line to SFTP the file over.
As usual feel free to let me know of any code improvements or ideas for future modules and of course try it out yourself (hopefully someone can make something more aesthetically pleasing/accurate).
See you next time…
![]()
Code
Credits
Related products


Leave your feedback...