

Smart City Environmental Monitoring

Made by taifur / 3D Printing / Environmental Sensing / Sustainability / Weather / IoT
About the project
An NB-IoT based environmental monitoring device for smart city applications.
Project info
Difficulty: Difficult
Platforms: Amazon Alexa, Amazon Web Services, MQTT, Nordic Semiconductor
Estimated time: 3 days
License: GNU General Public License, version 3 or later (GPL3+)
Items used in this project
Hardware components

Story
Introduction
My city Dhaka (capital of Bangladesh) is one of the world's largest cities, with a population of 18.89 million people in the Greater Dhaka Area. It is also the 4th most densely populated city in the world.
Sorry to say that Dhaka has been ranked highest in the US Air Quality Index (AQI), for having the worst level of air pollution in the world. Noise also always goes far beyond the permissible level. Sound pollution has reached the highest 120-130 decibels (dB) at many points of the city -- almost double the permissible level.
The Plan
To save the city it is very high time to take the necessary steps. Creating public awareness is the first one of the steps. For creating public awareness we need real-time data on the noise we are creating every day. If everyone can see the noise level and air quality in real-time it will create mental pressure for taking steps against the pollution. The researcher will also be benefited from this open-source real-time data.
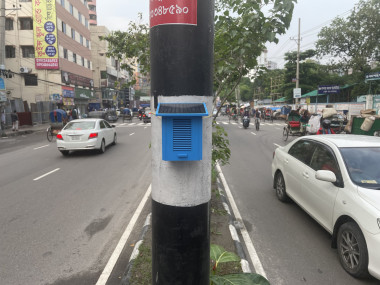
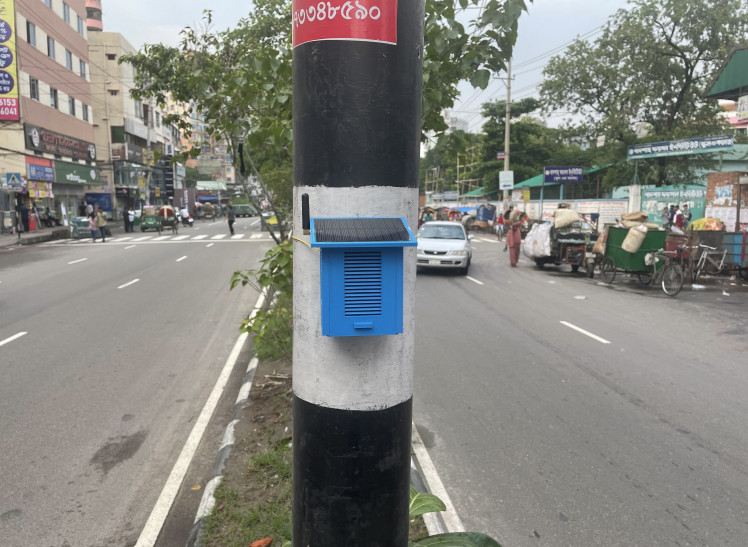
From the thinking, I designed an open-source real-time city pollution monitoring device that monitors noise level, air quality, temperature, and humidity and sends the data to the AWS Cloud. I used NB-IoT for data transmission because the availability of wifi is very limited in the city. The device gets power from a solar panel.
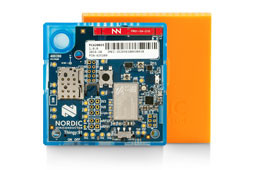
I tried to keep it very simple so that anybody can make his own device. So I used Nordic Thingy:91 Multi-sensor cellular IoT Prototyping Kit. It has all the necessary sensors built-in with NB-IoT support and a li-ion battery.
Thingy:91 in Brief
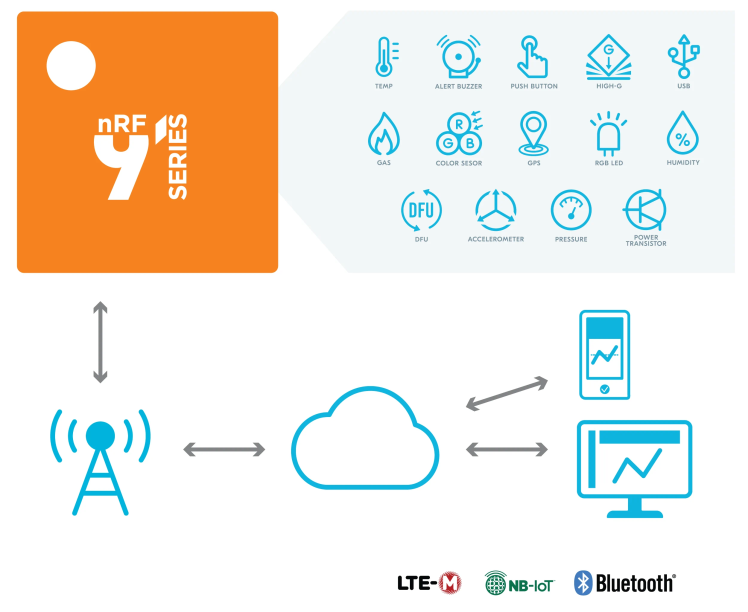
The Nordic Thingy:91 is an easy-to-use battery-operated prototyping platform for cellular IoT using LTE-M, NB-IoT, and GNSS. It is ideal for creating Proof-of-Concept (PoC), demos, and initial prototypes in your IoT development phase.
Thingy:91 is built around the nRF9160 SiP and is certified for a broad range of LTE bands globally, meaning the Nordic Thingy:91 can be used just about anywhere in the world. Cellular communication can be interleaved elegantly with GNSS positioning acquisition making it perfect for sophisticated asset-tracking product ideas. The kit comes preloaded with a sophisticated asset tracking application.
The kit is packed with a multitude of sensors for motion, impact, air quality, and much more. The nRF Connect SDK supports Thingy:91 and there are examples for all sensors and connectivity functionality.
There is an nRF52840 multiprotocol SoC on the Thingy:91. This offers the option of adding Bluetooth Low Energy connectivity to your project ideas.
Key Features:
- Supports LTE-M, NB-IoT, and GPS
- Supports Bluetooth LE and NFC
- User-programmable button and RGB LEDs
- Environmental sensor for temperature, humidity, air quality, and air pressure
- Color and light sensor
- High-g and low-power accelerometers
- Rechargeable Li-Po battery with 1440 mAh capacity
- Bundled with an eSIM card from iBasis preloaded with 10MB
Project Overview
The goal of the project is to monitor the outdoor environmental data (temperature, humidity, air quality) of a city. Thingy:91 has all the necessary sensors built-in for the project. As the device will place outside NB-IoT cellular data will be used to upload and record data to the cloud. For my project, I will use AWS cloud services to store, monitor, and visualize the data.
The device will upload data to the cloud using the MQTT protocol. AWS IoT Core is the MQTT broker and receives the data from the device. To use the MQTT data from the IoT core by other AWS services we need to create an IoT rule. I will create two IoT Rule for my project. One rule will be used to store the sensor data in the DynamoDB table that will be used by Alexa. Another rule will be used to forward the data to IoT Analytics to make a dataset that will be used to make a dashboard using QuickSight.
Users will be able to know the sensor data by the dashboard or by asking Alexa. I will develop a custom Alexa skill to know all the sensor data by asking Alexa. AWS Lambda will be used to provide the sensor data from DynamoDB to Alexa.
Thingy:91 has an internal Li-ion battery. As we are going to place the device outside and remote location we will use a solar panel to charge the battery.
AWS Cloud Configuration
Devices connected to AWS IoT are represented by thing objects in the AWS IoT registry. A thing object represents a specific device or logical entity. It can be a physical device or sensor (for example, air quality monitoring device in our case). We will create a thing in AWS IoT, but before that, it is better to create a policy that allows our device to connect and send messages to AWS IoT.
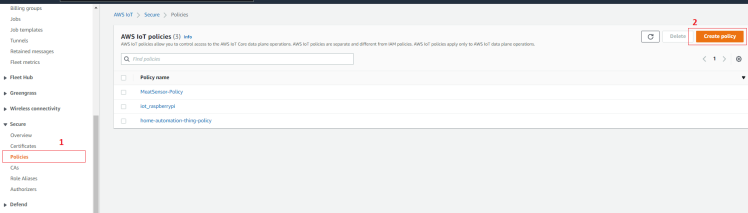
Step 1: Creating AWS IoT Policy
i. Go to the AWS IoT console and from the left menu, choose Secure, and then choose Policies. On the You don't have a policy yet page, choose Create policy.
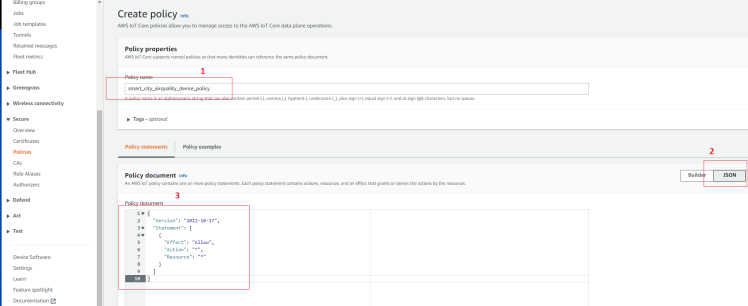
ii. In the Policy properties section, in the Policy name field, enter a name for the policy (for example, smart_city_airquality_policy).
iii. In the Policy document section, click on JSON and paste the following JSON code into the editor.
- {
- "Version": "2012-10-17",
- "Statement": [
- {
- "Effect": "Allow",
- "Action": "*",
- "Resource": "*"
- }
- ]
- }
The following image will show the process.
iv. After you've entered the information for your policy, choose Create.
Step 2: Creating AWS IoT Thing
i. In the AWS IoT console, in the left menu, choose Manage, then choose Things.
ii. On the Things page, choose Create things.
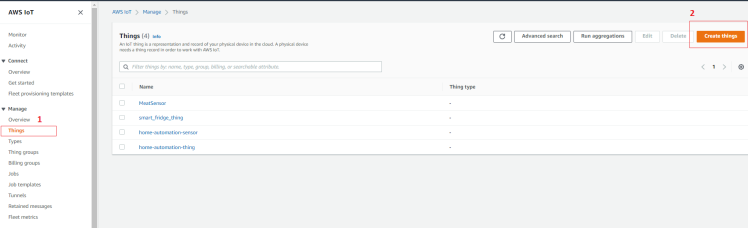
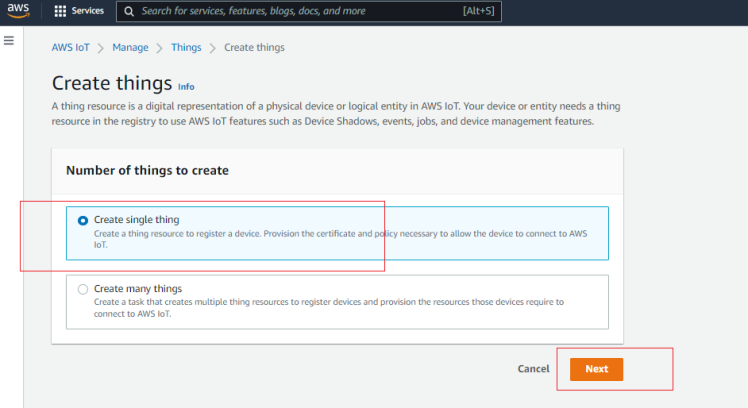
iii. On the Create things page, choose Create a single thing, then choose Next.
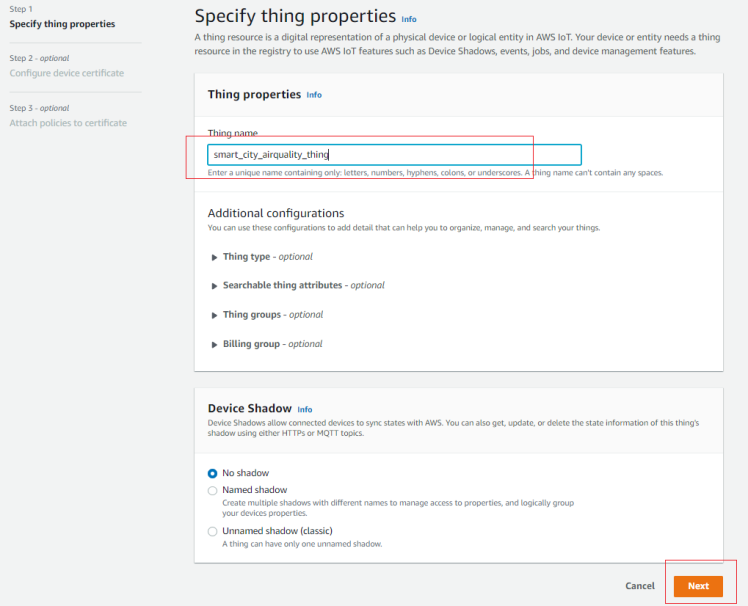
iv. On the Specify thing properties page, for Thing name, enter a name for your thing, such as smart_city_airquality_thing.
v. Keep the rest of the fields on this page empty. Choose Next.
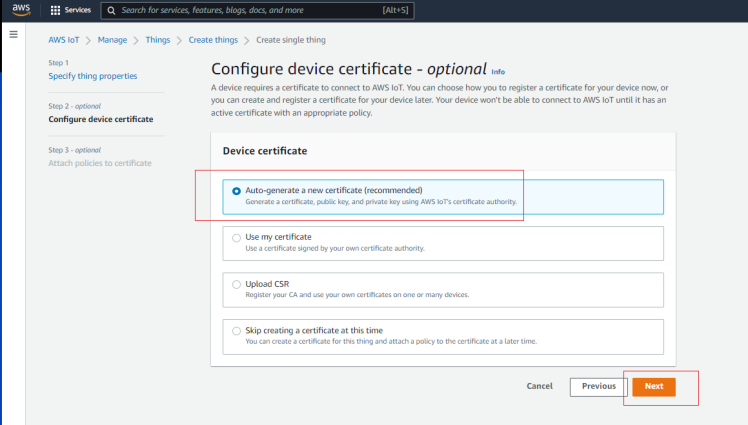
vi. On the Configure device certificate - optional page, choose Auto-generate a new certificate (recommended). Choose Next.
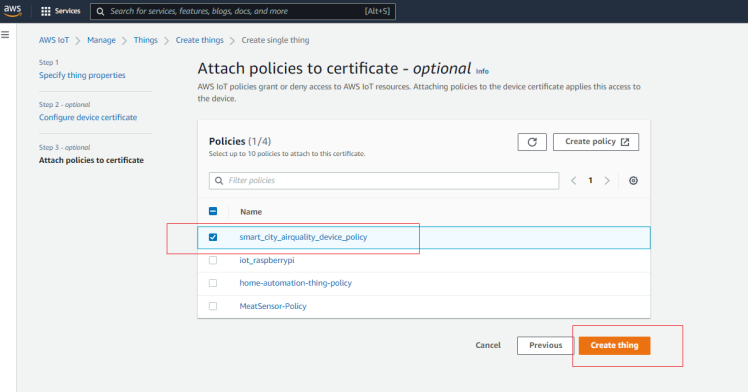
vii. On the Attach policies to certificate - optional page, select the policy you just created in the previous section. In that section, the policy was named, smart_city_airquality_devie_policy. Choose Create thing.
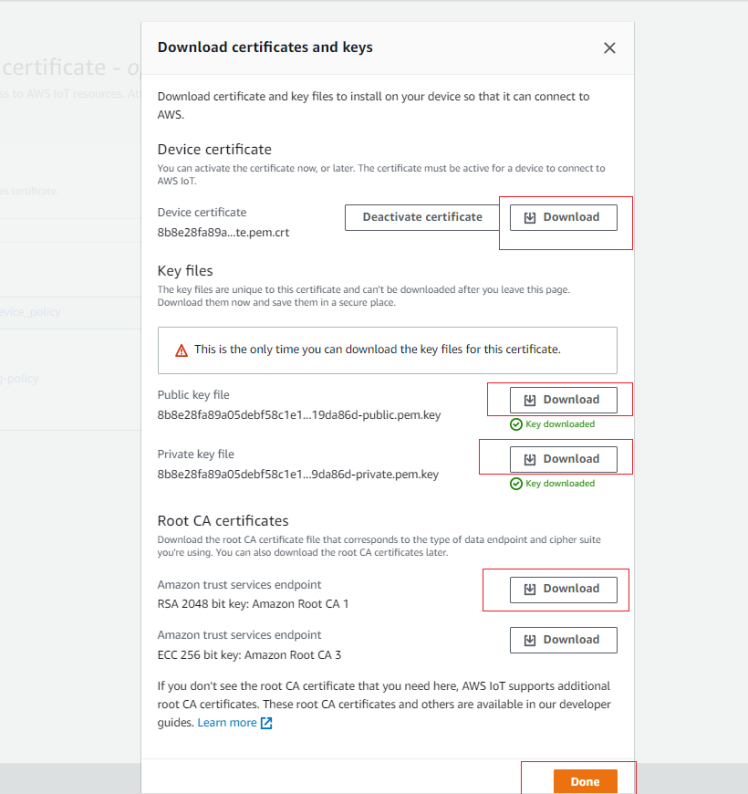
viii. On the Download certificates and keys page: Download each of the certificate and key files and save them for later. You'll need to install these files on your thingy:91 device.
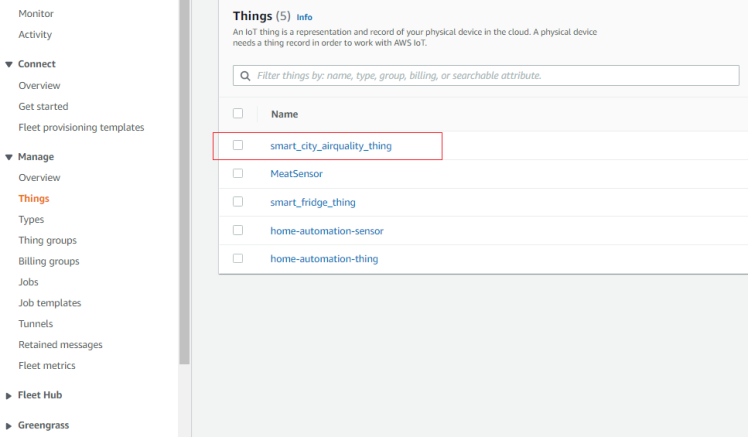
ix. Choose Done. After you complete this procedure, you should see the new thing object in your list of things.
Creating AWS IoT rules
AWS IoT rules send data from your devices to other AWS services. They listen for specific MQTT messages, format the data in the message payloads, and send the result to other AWS services. We will create two IoT rules here. One is for sending MQTT data to AWS DynamoDB that will be used by Alexa through an AWS Lambda function. Another rule is for sending the data to AWS IoT Analytics to create a dataset that will be used to create a dashboard to visualize the data graphically.
Step 3: Creating a DynamoDB table
In this step, you'll create a DynamoDB table with to record the data from the air quality monitoring devices.
i. Open the DynamoDB console, and then choose Create table.
ii. In Table name, enter the table name: smart_city_airquality_data_table.
iii. In Primary key, enter sensor_data, and in the option list next to the field, choose String.
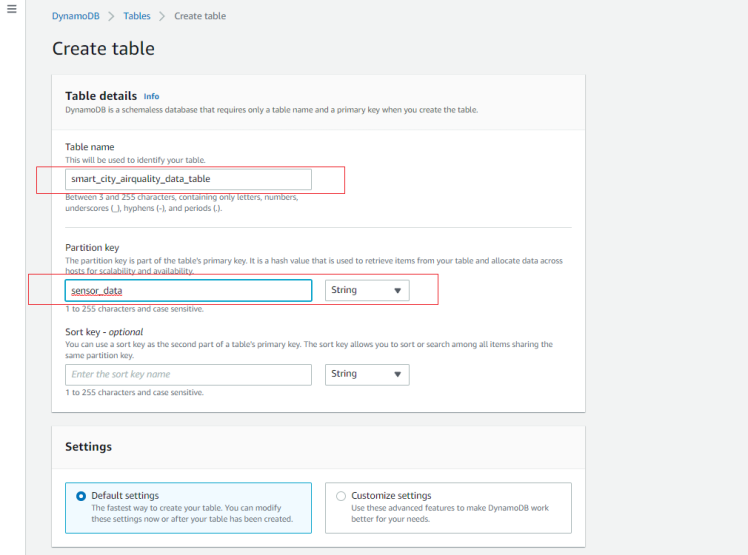
iv. At the bottom of the page, choose Create.
Step 4: Creating an AWS IoT rule to send data to the DynamoDB table
To create the AWS IoT rule to send data to the DynamoDB table
i. Open the Rules hub of the AWS IoT console.
ii. To start creating your new rule in Rules, choose Create.
iii. In Name, enter the rule's name, airquality_data_dd.
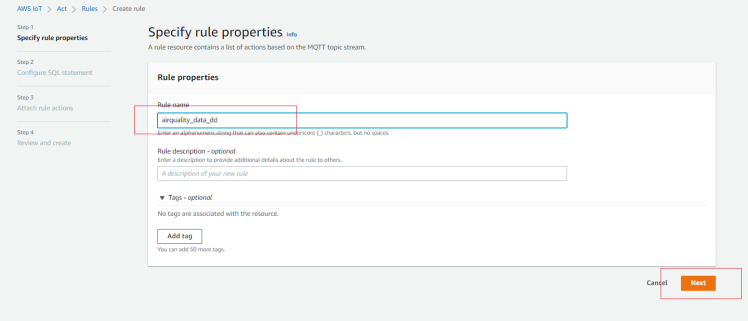
iv. Click Next and In Rule query statement of Create a rule: enter the following statement
- SELECT temperature, humidity, air_quality FROM 'smart/city/air/quality/device'
It will take temperature, humidity, and air_quality value form 'smart/city/air/quality/device' topic.
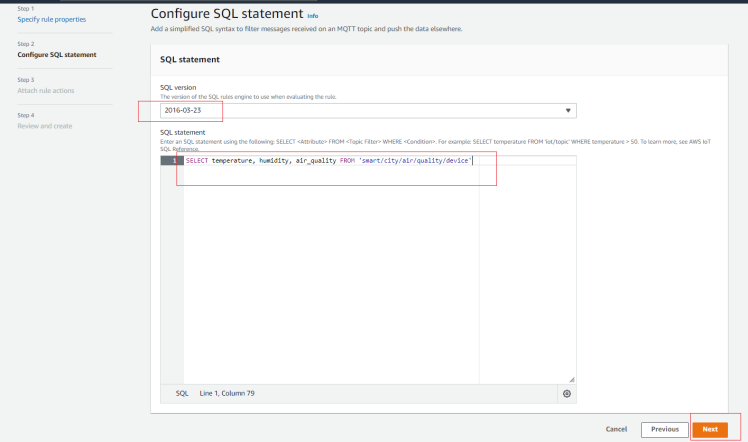
v. Click next to go to Rule actions page
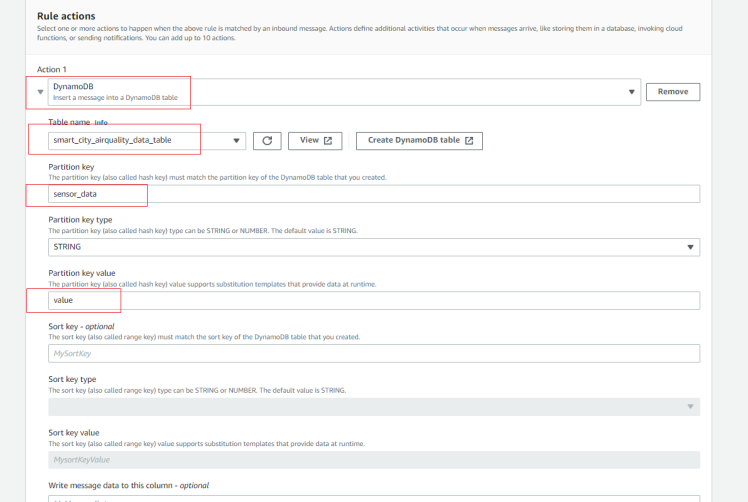
vi. From Action 1 choose DynamoDB
vii. From the table name choose the DynamoDB table we created earlier.
viii. In the partition Key box write sensor_data
ix. In the partition key value write value.
x. In Create a new role, enter smart_city_db_role, and choose Create role.
xi. Click Next to review.
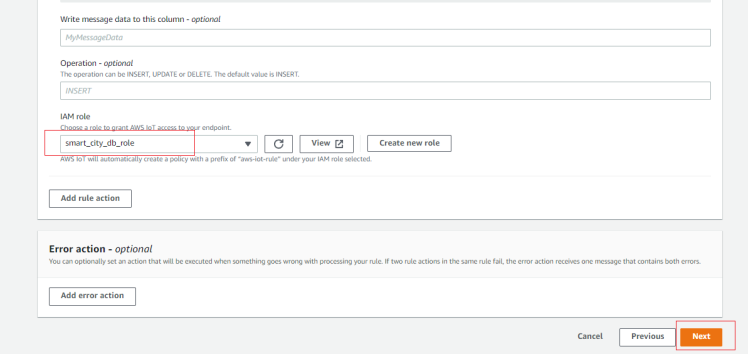
xii. Click Create to create the rule.
Step 5: Creating a rule for sending MQTT data to AWS IoT Analytics channel
i. Following the same procedure in the previous step create a new rule as airquality_data_analytics
ii. In the SQL statement put the following statement:
- SELECT timestamp() as time, temperature, humidity, air_quality FROM 'smart/city/air/quality/device'
iii. Choose IoT Analytics for Action 1 and configure it as the following figure:
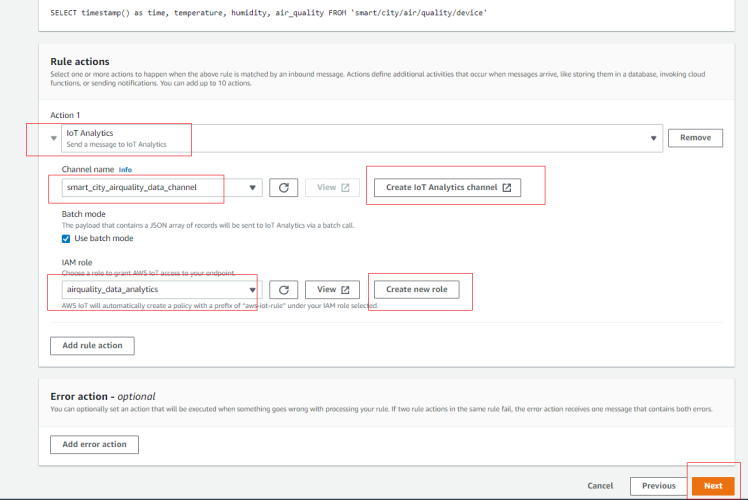
iv. Review and Create
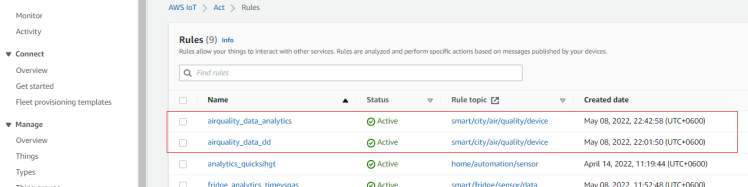
v. You will find two newly created rules in the rules section
Developing Firmware for Thingy:91
Step 6: Programming the certificates to the onboard modem of the nRF9160-based kit
i. Download nRF Connect for Desktop
ii. Update the modem firmware on the on-board modem of the nRF9160-based kit to the latest version by following the steps in Updating the modem firmware.
iii. Build and program the nRF9160: AT Client sample to the nRF9160-based kit as explained in Building and programming an application.
iv. Launch the LTE Link Monitor application, which is implemented as part of nRF Connect for Desktop.
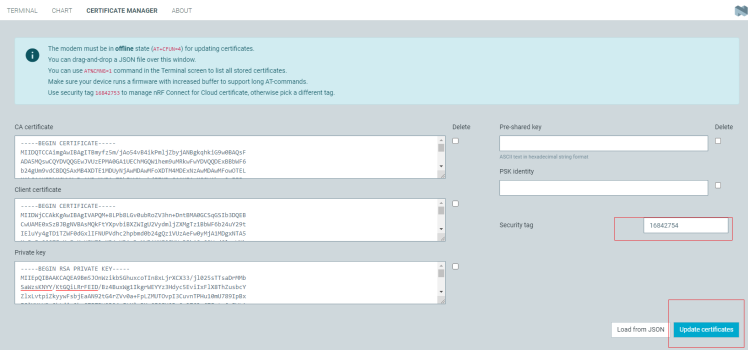
v. Click Certificate manager located at the top right corner.
vi. Copy and paste the certificates downloaded earlier from the AWS IoT console into the respective entries (CA certificate, Client certificate, Private key). You can use Notepad++ to open the files.
vii. Select a desired security tag and click on Update certificates.
Step 7: Configuring the required library options
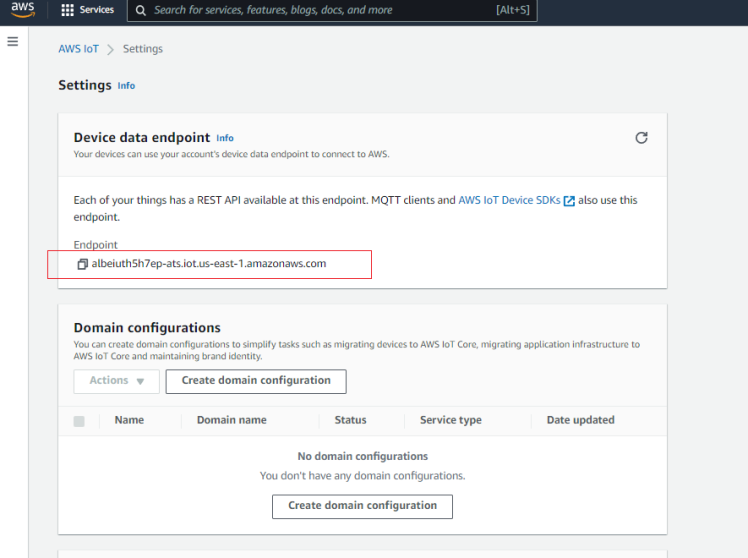
i. In the AWS IoT console, navigate to IoT core > Settings. Find the Endpoint address and set the configurable option CONFIG_AWS_IOT_BROKER_HOST_NAME to this address string.
ii. Set the option CONFIG_AWS_IOT_CLIENT_ID_STATIC to the name of the thing created during the aforementioned steps.
iii. Set the security tag configuration CONFIG_AWS_IOT_SEC_TAG to the security tag, chosen while Programming the certificates to the on-board modem of the nRF9160-based kit.

Step 8: Uploading the Program to Thingy:91
Compile and upload the program to thingy:91 and observe whether the data is receiving to AWS IoT or not. The mon code is attached to the code section.
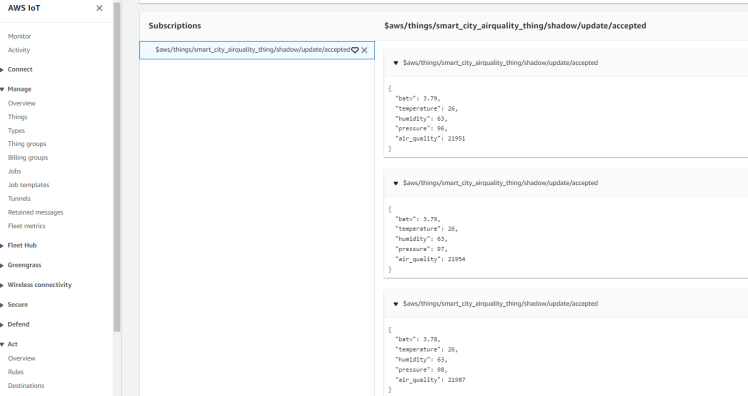
To test the MQTT data communication go to the AWS IoT -> Test -> MQTT test client and subscribe the following topic:
- $aws/things/smart_city_airquality_thing/shadow/update/accepted
You will get the following message:
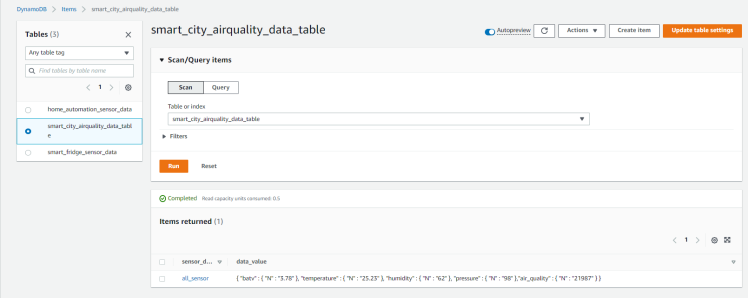
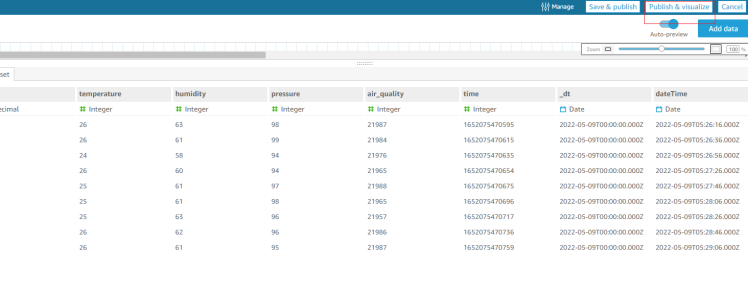
Check the DynamoDB table either data is successfully put into the table or not. If everything goes well you will see the following data in the table.
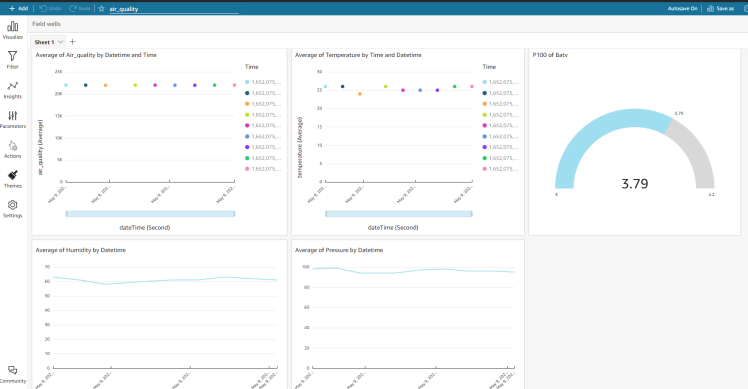
Step 9: Creating the dashboard using QuickSight
We created a rule to forward MQTT data to IoT Analytics. IoT analytics will automatically create a dataset from the MQTT data. We will use that dataset to create a dashboard using AWS QuickSight.
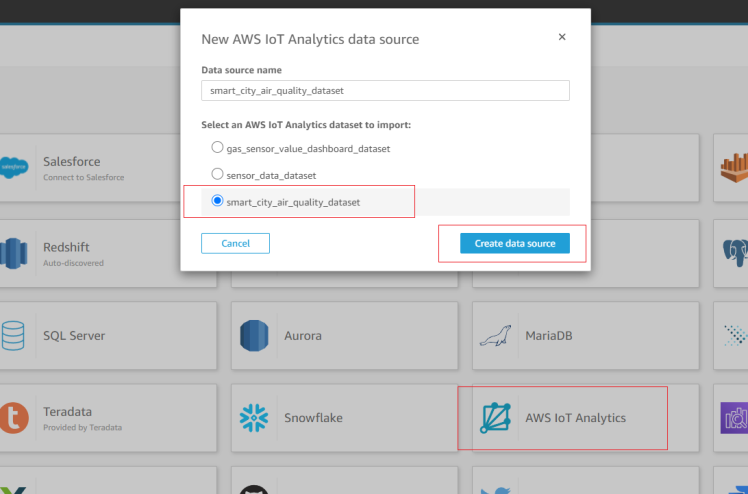
i. Go to AWS QuickSight and click on New dataset from the top right corner.
ii. Click on AWS IoT Analytics and choose the right dataset
iii. Click on Edit/preview data
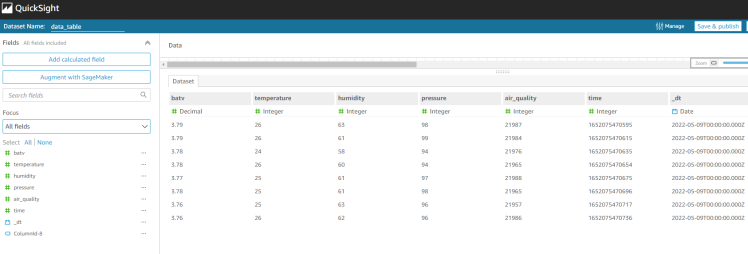
iv. Calculate DateTime field from the timestamp and click on Publish & Visualized
v. Finally design the dashboard using different visual types.
Step 10: Hardware Connection and Setup
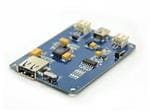
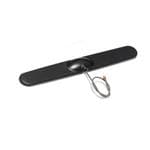
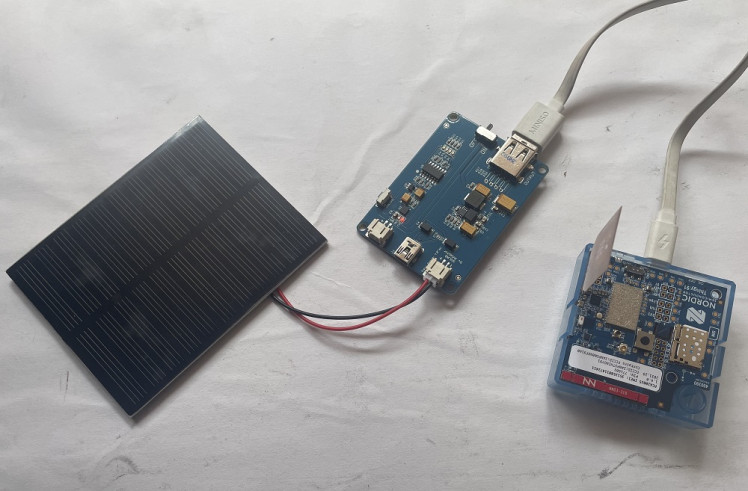
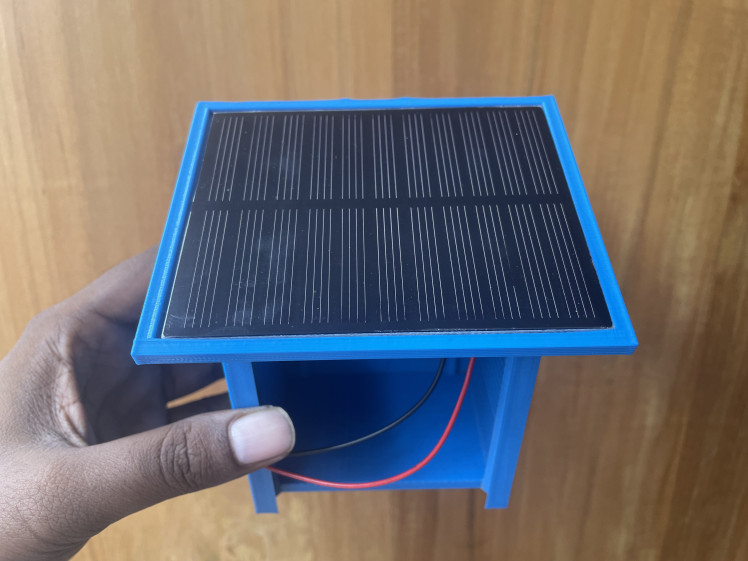
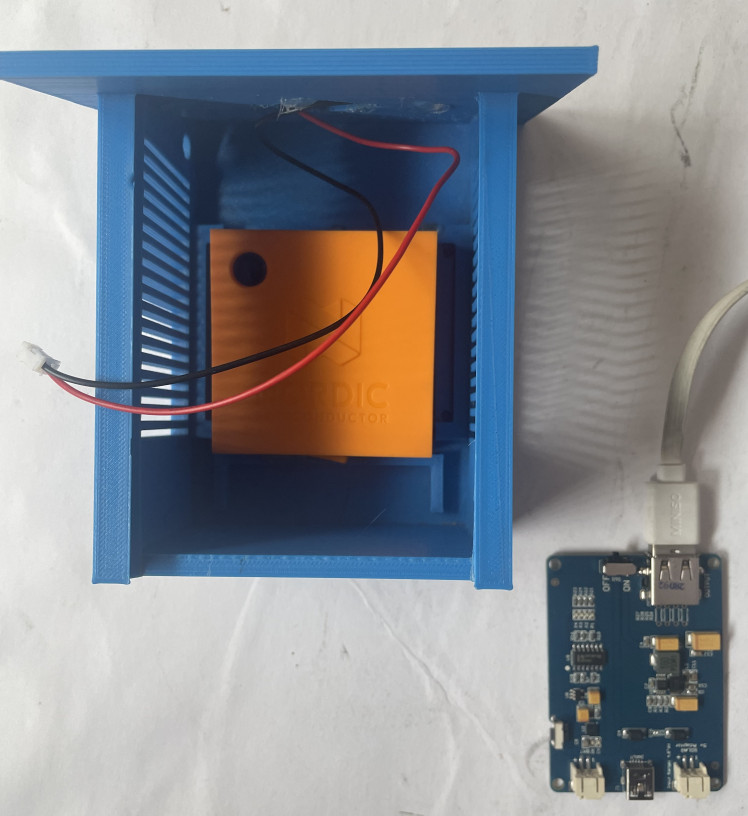
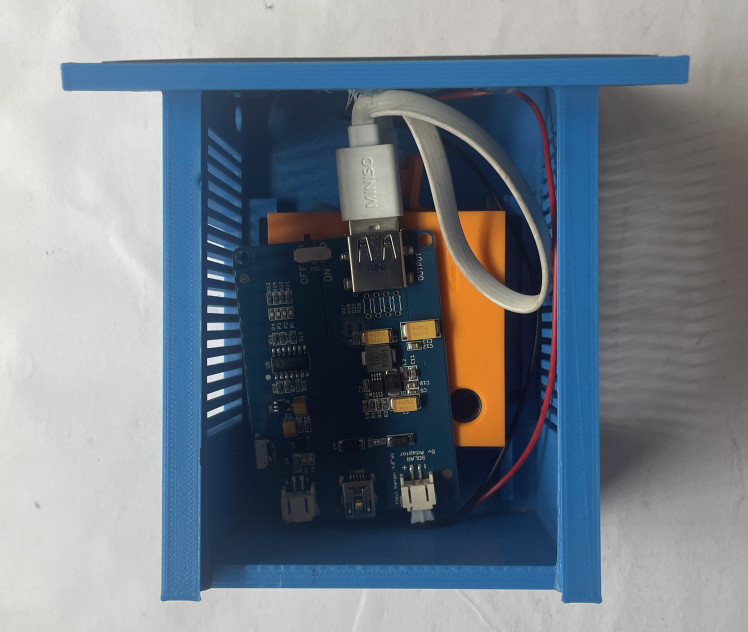
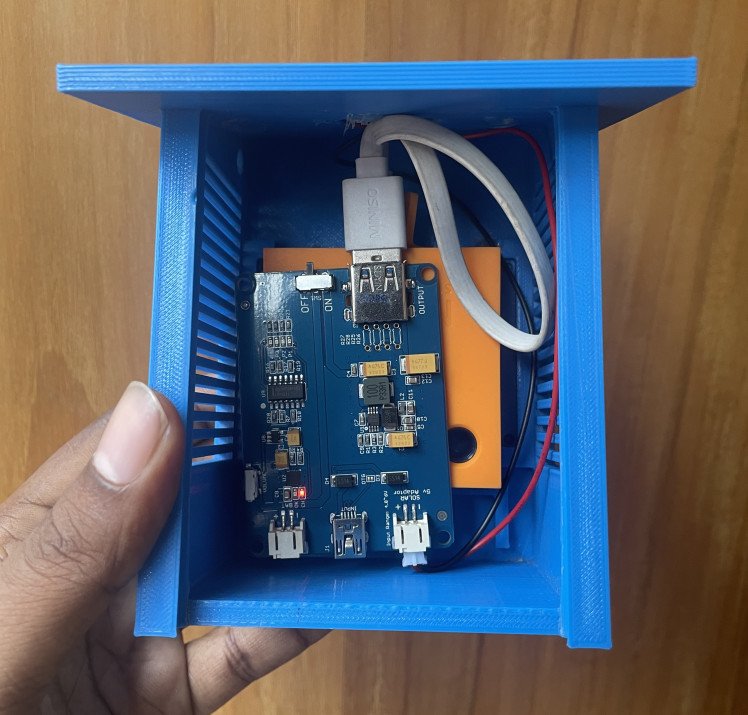
The hardware component for the project is Thingy:91 kit. It contains all the required sensors, cellular data connection, battery, and microcontroller. As it is a remote monitoring device, it will be placed in a remote place and for charging the battery solar panel is the best option. But we can not directly connect the solar panel to the thingy:91 board. We need to use a solar charge controller with a 5V output. For this purpose, I used a Seeedstudio 1 W solar panel and lipo rider pro solar charge controller. This charge controller has a 5V out that can be directly connected to the thingy:91 board with a micro USB cable. The following image shows the connection among all the components.
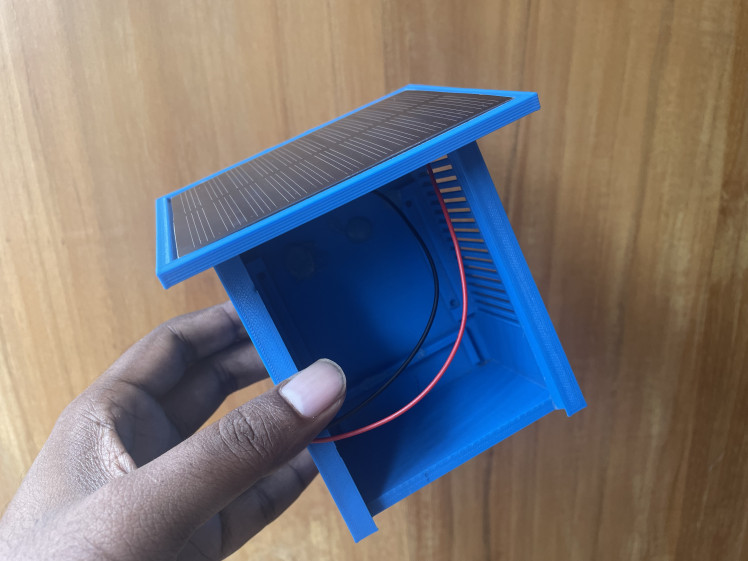
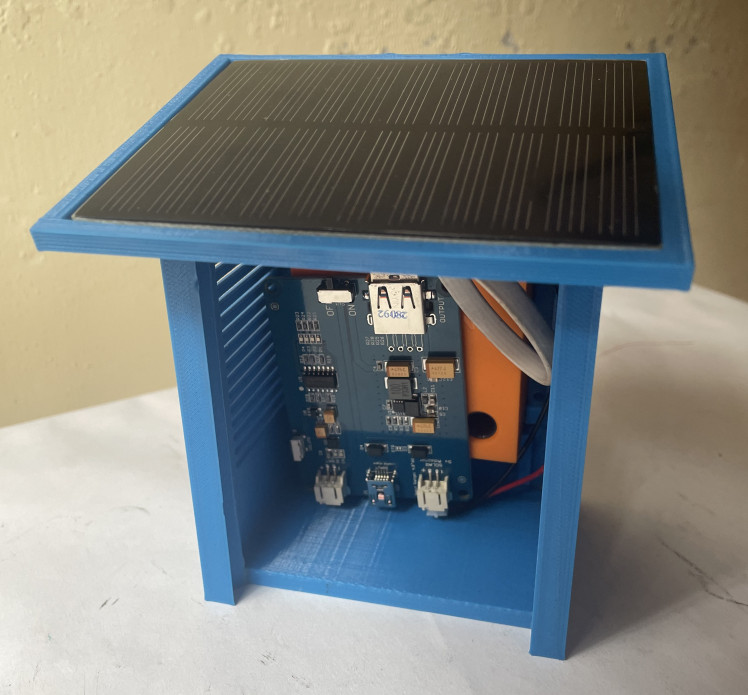
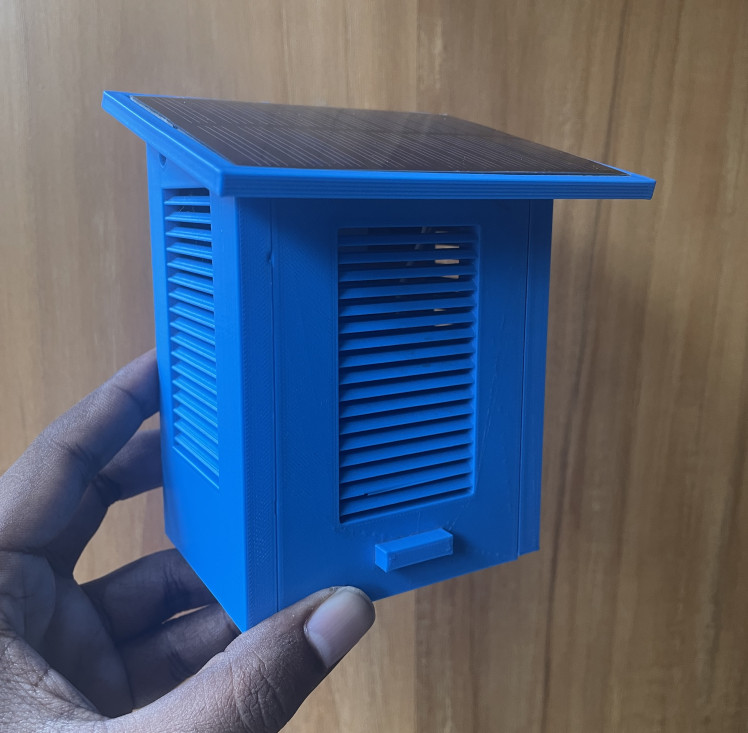
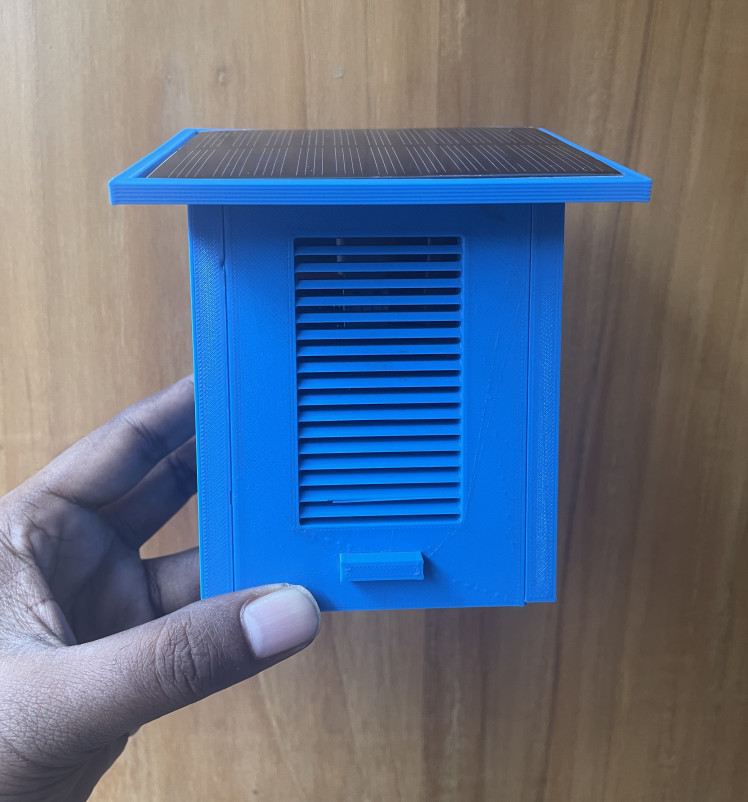
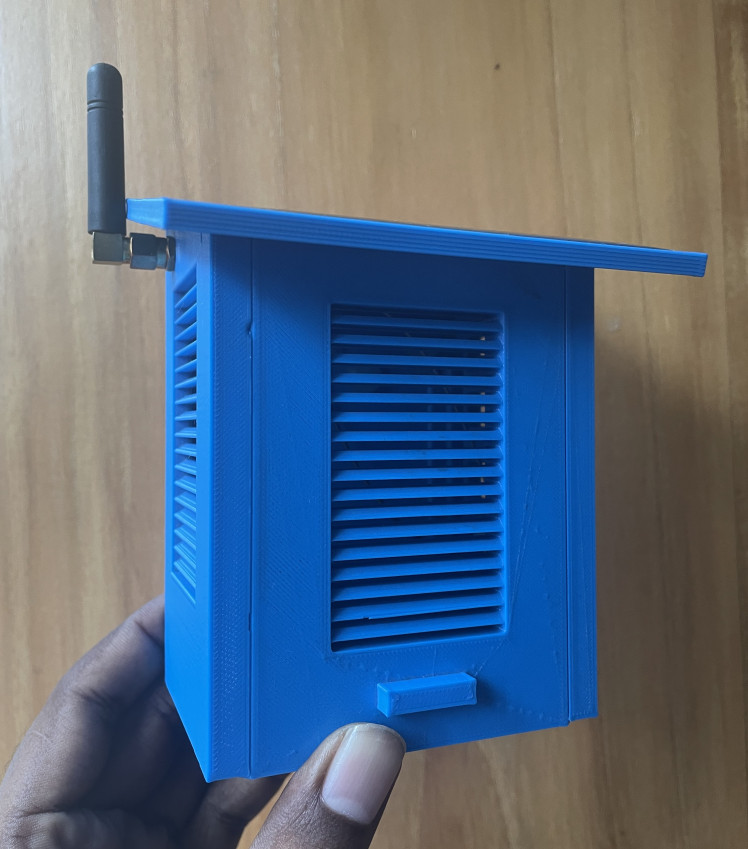
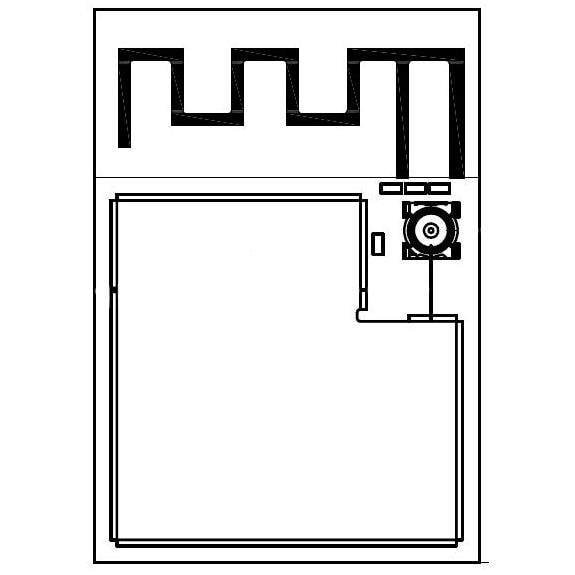
After connecting all the components we need to place it inside a weather-protected case. I placed the components inside a 3D printed case keeping the solar int the top of the box. The 3D STL file is attached in the attachment section.


Leave your feedback...