
Recognizing Mnist-based Handwritten Digits On M5stack Core2

Made by vilaksh01 / Artificial intelligence / Home Automation / Productivity / Sensors / IoT
About the project
Learn how to quickly develop a TinyML model to recognize drawn digits on touch interfaces with low-power MCUs.
Project info
Difficulty: Easy
Platforms: Arduino, M5Stack, Neuton Tiny ML
Estimated time: 1 hour
License: MIT license (MIT)
Items used in this project
Hardware components

Software apps and online services
Story
In my previous experiment, I had great fun adding handmade drawing gestures for our M5Stack Touch Screen device. Check it out if interested: https://www.hackster.io/vilaksh01/handmade-drawing-recognition-interface-as-from-my-smartphone-c9895d
Now I decided to try and see if we can achieve the same for handwritten digit recognition similar to MNIST and configure interaction with a touch interface.
The MNIST database contains handwritten digits from 0 to 9 (60, 000 training images and 10, 000 testing images) for computer vision and machine learning projects.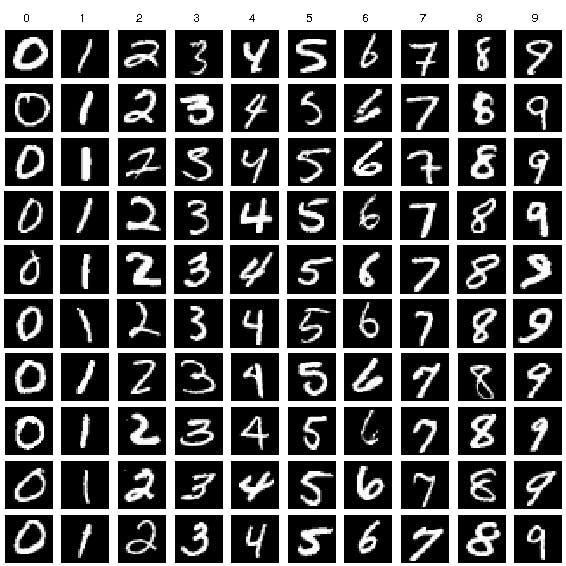
MNIST is often used to solve computer vision tasks since it enables researchers to quickly check and prototype their algorithms, but I will solve this task differently using machine learning.
Most machine learning libraries (e.g. scikit-learn) and deep learning frameworks (e.g. Tensorflow, Pytorch) provide helper functions and convenient examples that use MNIST out of the box. In this project, I’ll show an easy way how to build a TinyML model with Neuton NN Framework for recognizing handwritten digits on a touch interface with simple MCUs.
Let’s get it started!
? Step 1: Making the datasetLike any machine learning algorithm, my network needed examples (drawing gestures) to learn from. To make the data as realistic as possible, I wrote a data collection code for inputting and maintaining a dataset of gestures on the same touch screen where the network would eventually be used.
To understand the dataset collection, we will need some knowledge of pixels. In simple terms, a pixel can be identified by a pair of integers providing the column number and the row number. In our case, we are using M5Stack Core2 which has a TFT 2" Touchscreen with a resolution of 320 X 240 pixels.
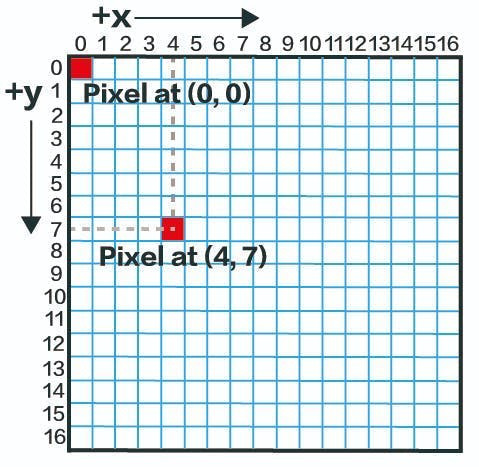
⭐ Converting touch points on the TFT Touch screen to images then rasterizing would be complex to understand and do on our MCU, so I took another approach. Since Neural Networks are very excellent at pattern recognition, why not feed pixel locations per drawn sample and see how it performs? That’s the power of Machine Learning in action when you want to skip the implementation of your own algorithms on your data :)
The image below vividly demonstrates how it works. The code for the data collection is available in the code section.

The buffer size is fixed to 255 since I found out that at any point in time the number of touched pixels while drawing digits or symbols never exceeded 255 in total.
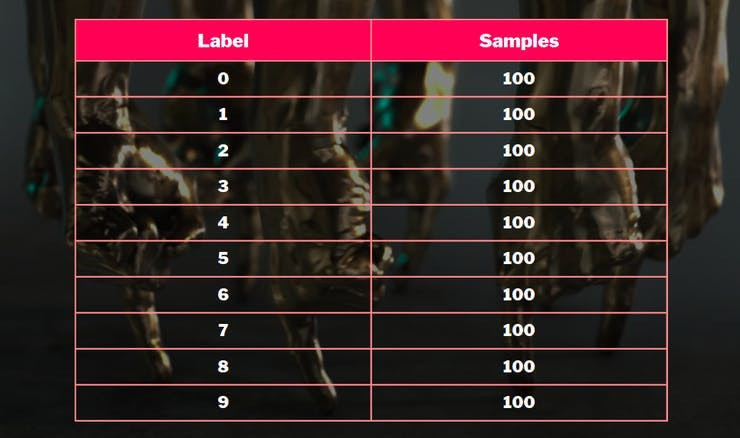
I collected 100 samples for each gesture [1, 2, 3, 4,5,6,7,8,9,0]. Once your dataset is collected, it will look like this:
The collected dataset is similar to MNIST, and we have almost the same model accuracy on the dataset of smaller size and our model is very compact. The models for the same cases in the examples below have hundreds of thousands to millions of coefficients, which makes them undeployable on MCUs:
- https://www.kaggle.com/code/dkurbatovv/digit-recognizer-0-998
- https://www.kaggle.com/code/kimchanyoung/mnist-classifier-baseline-for-starter-99-4
To train my model, I use the Neuton TinyML platform because it eliminates the need to set parameters for the NN architecture or apply any compression techniques.
I used to leverage TF in some of my previous projects, but now I switched to Neuton since it’s free and doesn’t require a lot of iterations. It’s enough to upload a CSV dataset to get a very compact model, ready for deployment on low-power MCUs without additional compression.
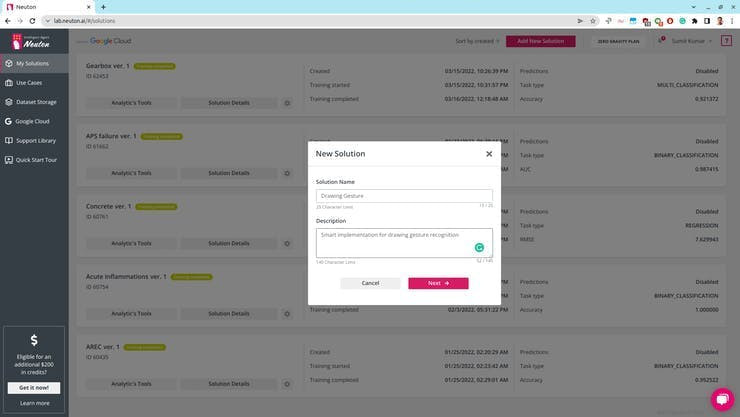
First, I create a new solution on the Neuton Platform (https://neuton.ai) and upload my dataset.
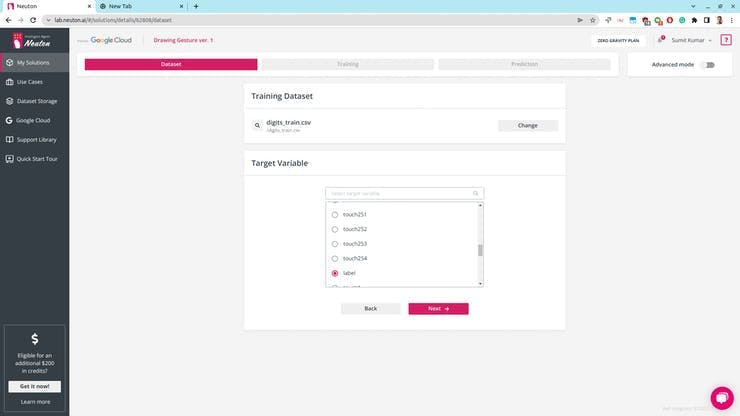
I select the target variable. In our case, it is the label.
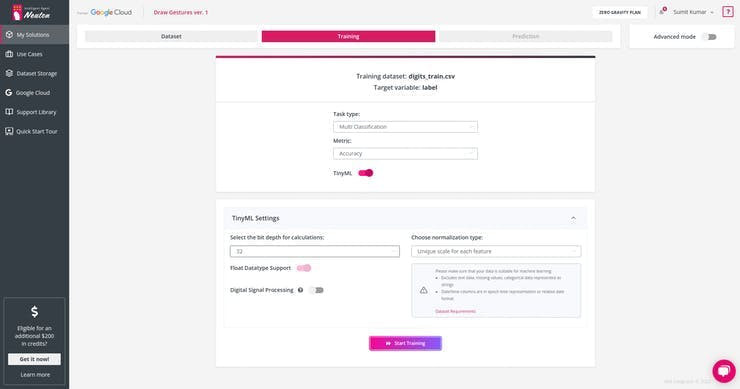
Next, I set the TinyML model training parameters as shown below and start the training.
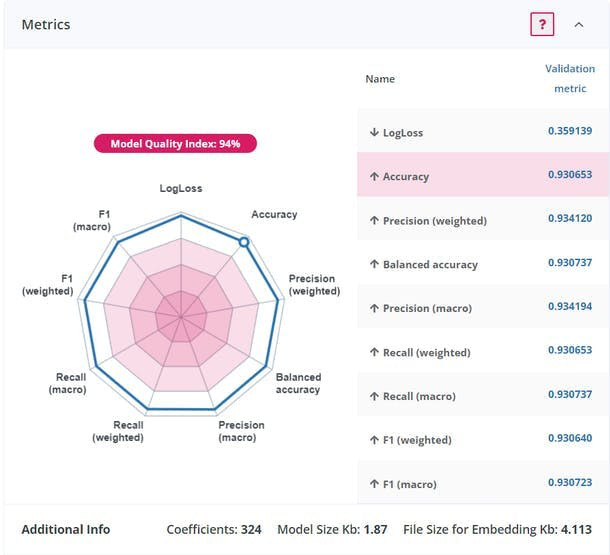
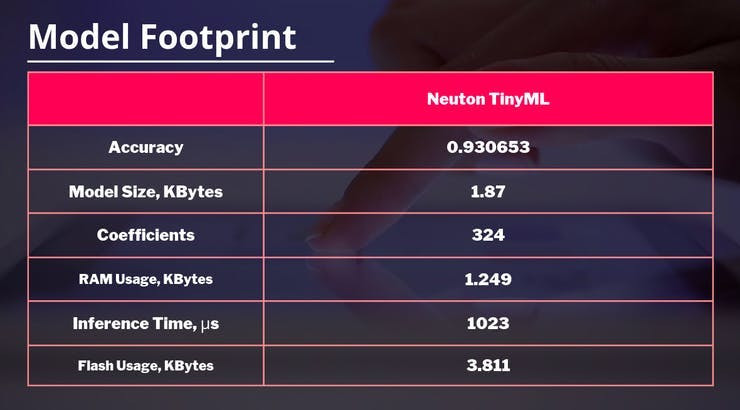
Once the training is complete, you can check the analytics below and model accuracy. In my case, accuracy was about 93.0653%.With only 324 coefficients and only 4.113 KB embedding size, that's really freaking awesome!
And finally, I download the model for embedding into the M5Stack Core2 device.
After the model is downloaded, I extract it and put the model in the same folder where the main Arduino code file is located.
.
├── DigitRecognition.ino
├── model
│   └── model.h
├── neuton.c
├── neuton.h
├── README.md
├── StatFunctions.c
└── StatFunctions.h
The important functions here are, neuton_model_set_inputs – to set input values, neuton_model_run_inference – to make predictions. Check the full source code in the code section.
// counter threshold ensures that the buffer is not empty or any accidental screen touch/taps
if (neuton_model_set_inputs(inputBuff) == 0 && counter > 5)
{
uint16_t index;
float* outputs;
if (neuton_model_run_inference(&index, &outputs) == 0)
{
// code for handling prediction result
// Serial.println("Prediction: " + String(index));
if (index == 0)
{
Serial.println("0");
}
if (index == 1)
{
Serial.println("1");
}
if (index == 2)
{
Serial.println("2");
}
if (index == 3)
{
Serial.println("3");
}
if (index == 4)
{
Serial.println("4");
}
if (index == 5)
{
Serial.println("5");
}
if (index == 6)
{
Serial.println("6");
}
if (index == 7)
{
Serial.println("7");
}
if (index == 8)
{
Serial.println("8");
}
if (index == 9)
{
Serial.println("9");
}
}
}
counter = 0;
prev = 0;
neuton_model_reset_inputs();
free(inputBuff); // free the memory
inputBuff = (float*) calloc(touchBufferSize, sizeof(float));
if (!inputBuff)
{
Serial.println("Failed to allocate memory");
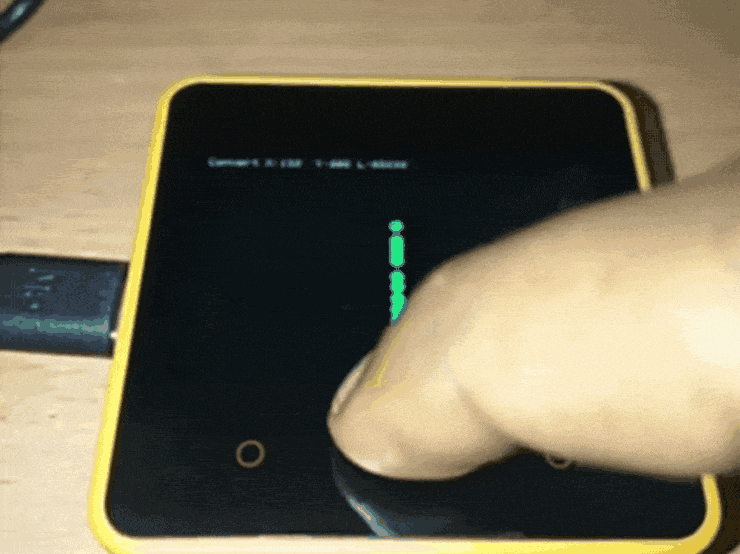
}See how the model works on the device:

This tutorial clearly explains how to use the TinyML capabilities on MCU when traditional algorithms are too slow or produce huge models that can’t be deployed to low-power MCUs.
Please share your feedback, especially if you decide to repeat this experiment yourself, in the comments below :)
Schematics, diagrams and documents
Code
Credits
Related products


Leave your feedback...