
Iot Pool Monitoring With Thingsboard

Made by ufire / Environmental Sensing / Home Automation / Notifications / Sensors / IoT
About the project
This project will show how to monitor pH, ORP, and temperature of a pool or spa and upload the data to ThingsBoard.io's visualization and storage service.
Project info
Items used in this project
Hardware components


Story
Step 1: Things You'll Need
- Any ESP32 development board. This one seems reasonable, but any will work.
- An ISE Probe Interface board and a pH probe. You can get them both at ufire.co.
- An ISE Probe Interface board and a ORP probe also from ufire.co.
- You can save 10% off of both probes by joining the GroupGets campaign.
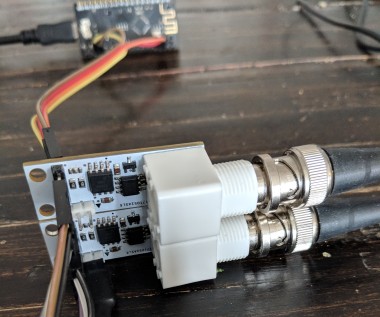
- An I2C Sensor Isolator to keep the pH and ORP probes electrically isolated. Without it, you'll get drastically offset pH measurements.
- Some odds and ends like wires and USB cables.
Step 2: The Software
- I will assume you are familiar with Arduino, the Arduino IDE, and have it installed already. If not, follow the links.
- Next thing is getting the ESP32 platform installed. For some reason, this hasn't been simplified by the available platform management features the IDE has to offer, so you'll need to go to the github page and follow the appropriate installation instructions.
- Now for the libraries: From in the Arduino IDE, goto Sketch / Include Library / Manage Libraries...
- Search for and install 'ArduinoJson' version 5.13.2.
- Search for and install 'PubSubClient'.
- Search for and install 'ISE Probe Interface'.
Step 3: Configure UFire Devices
Because the uFire devices communicate through I2C, they need unique addresses. The ISE probe we are using to measure pH and ORP are the same, so by default they come with the same address. The address can be changed though, and that is what we will do now.
From the Arduino IDE, go to 'Files / Example / ISE Probe Interface' and select 'Shell'. This is a convenient to use shell-like interface for using and configuring uFire devices. It works best on a simple ATMega device like an Uno, Mini, or Nano. It currently crashes on an ESP32. Upload the sketch to your device, make sure one of the uFire devices is connected and run the following command.
i2c 62
That should have changed the I2C address of the device permanently to 62, or in hex 0x3E. Now you can address both devices with a unique address.
Step 4: Making Connections
The ESP32 we are using has WiFi and BLE interfaces, so that just needs a power supply. You'll probably want a USB cable supplying power, but a battery is another option. Many ESP32s can be bought with battery charging circuitry already on the board.
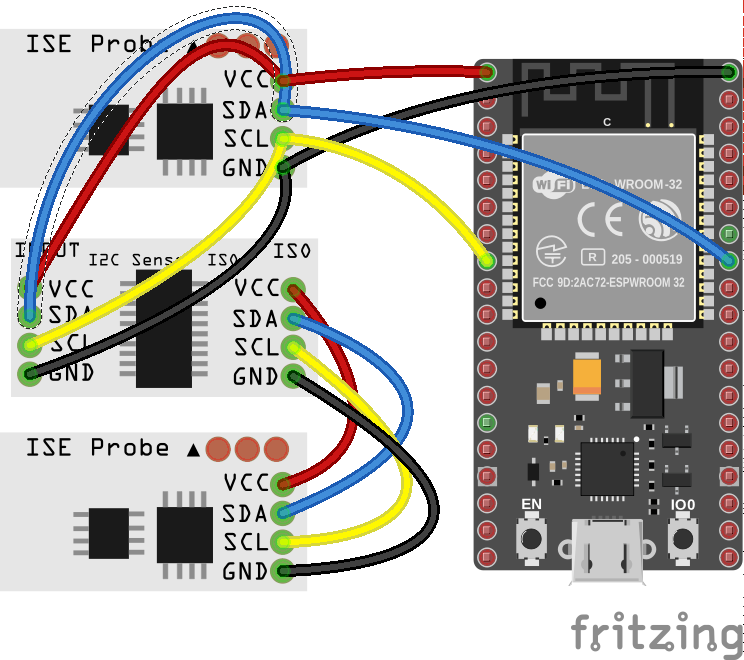
The uFire devices that we will be measuring pH, ORP, and temperature connect to the ESP32 by the I2C bus. With the ESP32, you can choose any two pins for I2C. Both devices will be on the same bus, so the SCL and SDA pins will be the same. If you look at the code (next step), you will see these two lines.
ISE_pH  pH(19, 23);
ISE_ORP ORP(19, 23, 0x3E);
I decided to use pin 19 for SDA and pin 23 for SCL. So Connect the ESP32's 3.3v (or whatever the pin may be called on your particular board) to the first uFire device's 3.3/5v pin, GND to GND, 19 to SDA, and 23 to SCL. Here is where the isolator comes in; connect the uFire device's pins to the isolator board, pin for pin, to the 'INPUT' side. Then connect your second uFire board to the 'ISO' side.
The isolation board is basically just a pass through device, but it isolates the circuits from each other and allows you to take accurate readings.
The pinout on your ESP32 may be different from the picture.
Step 5: Get ThingsBoard Running
ThingsBoard is an online service, that among other things, receives sensor input and visualizes them in the form of charts and graphs. There are several installation options. For this project, it will be using a local installation running on a dedicated computer.
Visit ThingsBoard.io's installation instructions and choose the install the appropriate selection for you.
I installed the Docker image which allowed me to access the installation by going to http://localhost:8080/.
As described here, the default login username and password is tenant@thingsboard.org and tenant.
Step 6: Setup a Device
- Once you login to ThingsBoard, click 'Devices'.
- On the next page, you'll see an orange '+' on the bottom right, click it and the 'Add Device' dialog will appear. Fill in the 'Name' field with whatever you'd like to call our device. Then under 'Device Type', enter 'ESP32', although it could be anything. Click 'Add'.
- Click the newly created device's entry in the list and you'll see quite a bit of information about it. Leave this screen open and go to the next step.
Step 7: Sketch
You can take a look at the source here.
- Copy the files into an Arduino project.
- Edit Watson.h.
- Change ssid and password to your WiFi network information.
- From the previous step's open screen, click 'COPY DEVICE ID' and change the 'char device[]' variable to the copied values. Do the same for 'COPY ACCESS TOKEN' to the 'char token[]' variable.
- Finally, change the 'char server[]' variable to the IP address of the computer running ThingsBoard. Mine was '192.168.2.126'. No 'http', slashes, or anything else, just the IP address.
- Upload it to your ESP32 and take a look at the 'LATEST TELEMETRY' tab. It should show you your rel="nofollow">PCBWay for sponsoring this project. I have used them many times in the past for my projects. They are very easy to use, but the reason I continue to use them is because they have the highest quality silkscreens of all the other PCB makers I've tried.
Schematics, diagrams and documents
Code
Credits
Related products


Leave your feedback...