
Etc100

Made by jucanpo / Communication / Environmental Sensing / Sensors / IoT
About the project
Design and implement a system to request data to a device via TCPIP using AVR-IoT WG developmentr board from Microchip
Project info
Difficulty: Moderate
Platforms: Google, Microchip, Microsoft
Estimated time: 5 hours
License: GNU General Public License, version 3 or later (GPL3+)
Items used in this project

Story
Problem
There are many companies that years ago made an important investment to improve their business in order to be competitive in this technological world acquiring equipment that communicates via Ethernet. Unfortunately some of the companies are not able to change the wire base technology to wireless new world. In today's world, monitor your plant or company and have the data any where at any time is vital in this competitive environment. eTC100 has been created to help those companies that want to go wireless without the necessity to change their existing equipment.
Solution
In order to achieve this challenge, we need a way to communicate in real time data to the cloud and at the same time communicate with legacy equipment via Ethernet, RS232 or RS485. Electromaker.io, Microchip and MikroE make this possible. I want to make a special thanks to Electromaker.io and Microchip for their support.
The project idea is a client - server TCP/IP communication. Also, a Windows Application was created using Visual Studio Microsoft Foundation Classes (MFC) to simulate the legacy equipment, the software is a TCP/IP Server, any client registered or connected will get upon request a temperature data randomly generated in the range of 100 F degrees to 110 F degrees.
eTC100 Hardware
In order to accomplish this challenge we use the following boards:
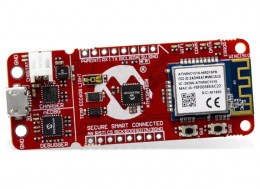
AVR-IoT WG
Microchip and Google have partnered to provide you with an ideal foundation for building your next cloud-connected design. Combining a powerful microcontroller, CryptoAuthentication secure element, and a full certified Wi-Fi network controller these board offer the most simple and efective way to connect embedded applications to Google's Cloud IoT Core platform.
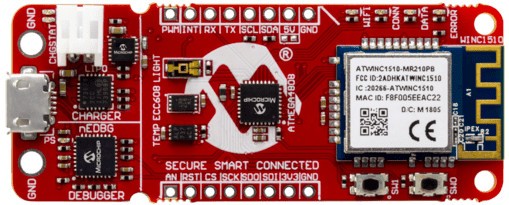
Features:
- ATmega4808 AVR Microcontroller.
- ATECC6808A Secure Element.
- ATWINC1510 Wi-Fi Network Controller.
- MIC33050 Voltage Regulator.
Key Applications:
- Smart Home IoT Sensors and Actuators (lightning, access control, climate control)
- Smart City Industrial Sensors (air quality, traffic forecast)
- Health (blood pressure, heart rate)
- Industry 4.0 Process Control Sensors (level, pressure, temperature, flow)
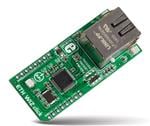
ETH Wiz Click
ETH Wiz click carries W5500, a 48-pin, 10/100 Base-Tx standalone Ethernet controller with hardwired TCP/IP Internet protocol offload engine, along with a standard RJ-45 connector. Wiznet's W5500 module supports TCP, UDP, IPv5, ICMP, ARP, IGMP and PPoE protocols. ETH Wiz click communicates with the target board MCU through mikroBUS (RSTn, SCSn, SCLK, MISO, MOSI and INTn) lines. The board uses a 3.3V power supply.
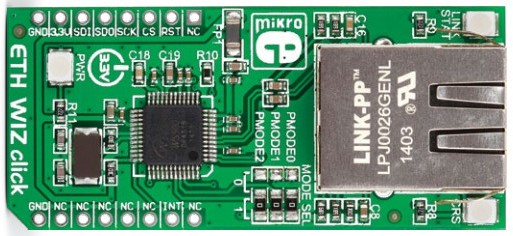
Features:
- High speed network communication.
- 32KB internal memory for Tx and Rx buffers.
- Reduced power consumption is achieved with Wake on LAN and power down modes.
- Automatic handshaking, re transmit on collision and automatic rejection of erroneous packets are also supported.
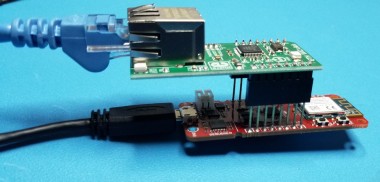
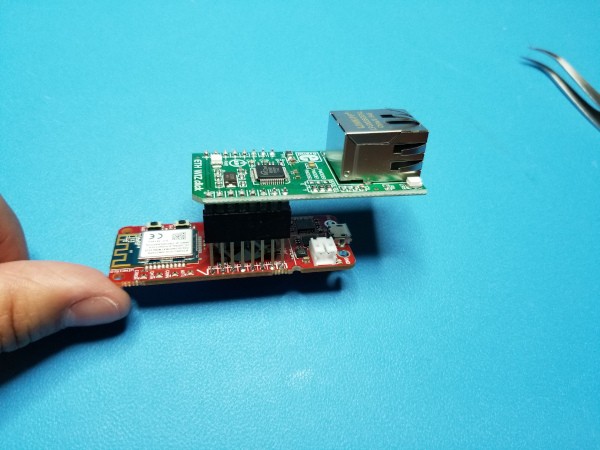
Building the eTC100 device
The first step was to build the device by soldering the stands off into the AVR-IoT WG
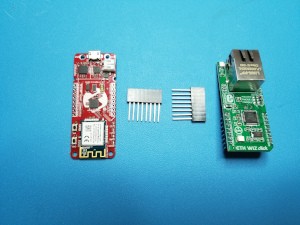
Boards connected
eTC100 Software
Atmel START provides tools to configure your microprocessor and peripherals automatically reducing the effort and risk when bring up your board. Also, provide predefined projects like the AVR-IoT WG Sensor Project where you can download for future improvements. This is a great starting point for many developments.
We will create and download the AVR-IoT WG Sensor project. After compilation, follow the instructions to connect to the cloud. This project will not modify the Google Cloud pubsub and Firebase functionalities, for convenience, I decided to use the Cloud Demo as is. After the AVR-IoT WG Sensor is able to connect to the cloud, the next step is to implement the TCP/IP Client support.
In order to keep the structure a folder called "eth_wiz" was created. Inside two files were created eth_wiz.c and eth_wiz.h.
eth_wiz.c register a function called ETH_WIZ_task into the timer sequencer. This function will be called depending of the timeout set before leave the function. This use to create a socket, connect a socket, send and receive data from the master.
eth_wiz.h defines the enumeration states and the two external functions ETH_Init and ETH_getDataValue.
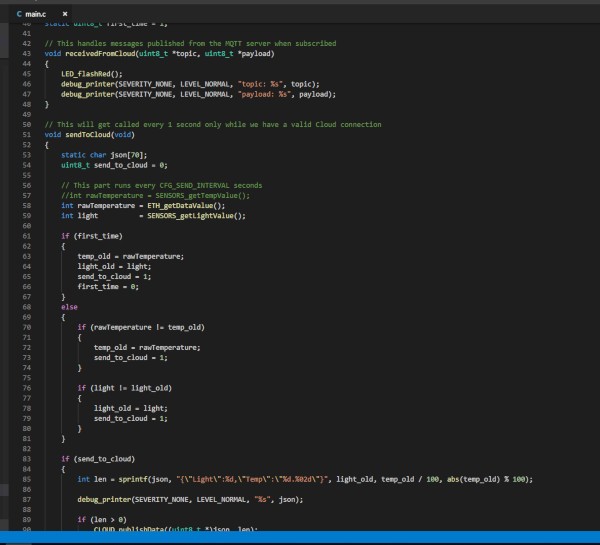
The main.c files was modified to use ETH_getDataValue instead of the SENSOR_getTempValue. In order to avoid repetitive data being send to the cloud, I stored the ETH_data and the light data to compare with the next data, it will only send to the cloud if any of the values change.
Window Tools
A windows application called SIG Peripheral Simulator was created.
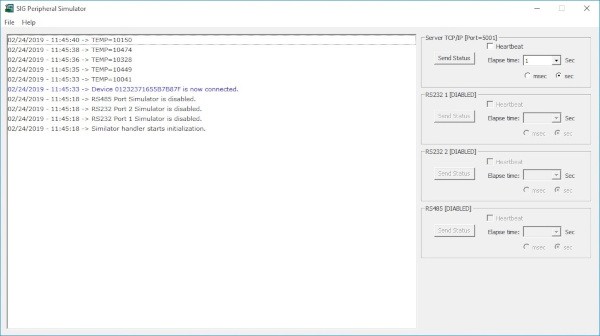
The application is as TCP/IP Server. Also can be connected via RS232 or RS485. For this project RS232 and RS485 were disable. In the left side, there is an area where a message will printed every-time an event occur, for instance, a device is connected, a data is requested.
Results
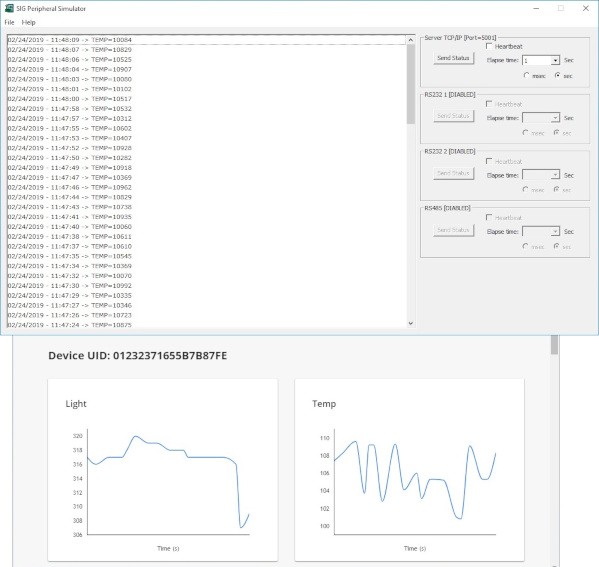
Upon power the eTC100 will try to connect to the SIG Peripheral Simulator as a client, once connected the server application, the tool will display the device ID and the connection time stamp. The eTC100 then will start requesting data every 1 second. At the same time, the eTC100 attempt to connect to the cloud, upon connection a light data and the data coming from the windows application will be send to the cloud only if any of the data change.
The figure below shows the simulator sending temperature data generated randomly, farther down you will see the AVR-IoT WG Google Cloud IoT displaying the light and the temperature received from the eTC100.
Lessons Learned
- I recommend to create the AVR-IoT WG Sensor project and compile as is to avoid bug that might be introduce during the customization. Once you are confident that the source code compiles and work now you can make all the modification or improvements to your needs.
- The AVR-IoT WG interface with the on-board debugger nEDBG via UART, by default the UART baud rate is configured as 9600 bps, I try to increase the speed to 115200 bps. It works however that minor modification disable the capability to store the public key and the device ID into the respective files PUBKEY.txt and CLICK-ME.HTM, thus when double click on CLICK-ME.HTM the web page never connects to the cloud because the file does not have the device id.
Code
Credits
jucanpo
Born in Peru in 1973. Learn first programming language in 1984 Basic for Apple. Since then start programming in Visual Basic, Visual FoxPro. In 1996 start programming in Visual C++ using MFC and then just Windows APIs. In 2002 start programming microprocessor. In 2006 start programming RTOS in microprocessor using Atmel ATmega. In 2009 design a video controller (hardware) and develop its firmware. Also I start programming PIC24 processor to play audio (device for medical uses). In 2016 design a video controller using FPGA (hardware), develop the FPGA bitstream using Altera IPs to interact video IPs and NiosII processor and develop the video controller firmware for NiosII processor. Currently working on design hardware and develop firmware for a IoT device.
Related products

Leave your feedback...