
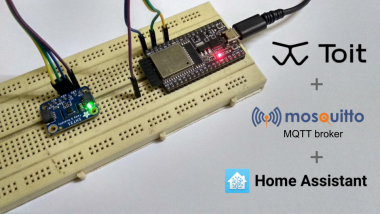
Esp32 And Toit: Integrating Home Assistant Through Mqtt

Made by harshkc03 / Communication / Home Automation / Sensors / Weather / IoT
About the project
An SHT31-D temperature and humidity sensor will send data to Home Assistant through MQTT. We'll also send alerts to a mobile phone through the application.
Project info
Difficulty: Easy
Platforms: Home Assistant, Espressif
Estimated time: 1 hour
License: MIT license (MIT)
Items used in this project
Hardware components


Software apps and online services
Story
In this tutorial, we’ll have a look at how we can create an MQTT sensor for Home Assistant with ESP32 and the Toit platform. Home Assistant is one of the largest open-source platforms for home automation and is very popular for managing things through IoT. Toit on the other hand provides an excellent platform for building and deploying IoT applications with very little effort. Toit recently released the support for MQTT protocol and we’ll be using it to send temperature and humidity values coming from an SHT31-D sensor. The data will then be displayed in Home Assistant in interactive cards with the graphical format. Finally, we’ll also send a high-temperature notification alert through the Home Assistant’s mobile phone app.
Pre-requisites
Gathering the components
Connecting the wires
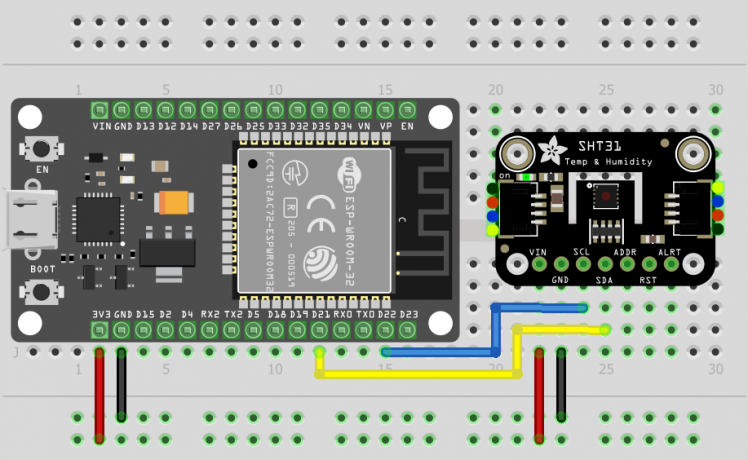
As we are using I2C communication with the sensor, the connection requires only four wires. The general-purpose IO pin 21 on the ESP32 development board is connected to the SHT31-D sensor’s SDA pin and GPIO 22 to SCL pin. The other two wires are 3.3V and GND pins for powering the sensor, although you can use a 5V input power supply too.
Setting up Home Assistant for MQTT
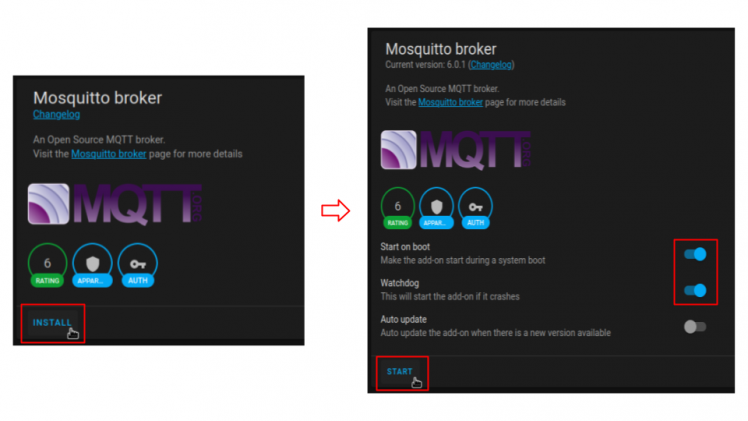
The very first step is to install the Mosquitto MQTT broker. Head over to Supervisor > Add-on store and search for Mosquitto MQTT. After installing, enable the watchdog and start the broker.
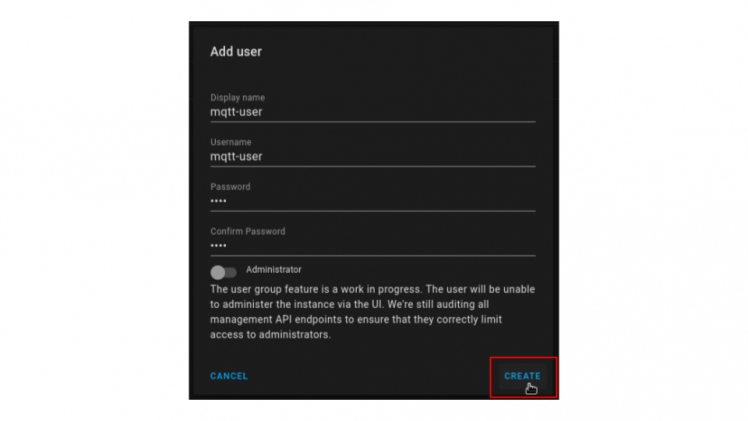
Before configuring the MQTT broker, we will create a new user specifically for MQTT usage. This user will be used to authenticate the broker. You can also link it with other users on your server, but creating a new one is recommended. Head over to Configuration > Users and click on Add user. Type in the credentials and click on create. Lastly, restart your Home Assistant server.
Next, go to Configuration > Integrations and click on “Configure” under Mosquitto broker. Now, click on “RE-CONFIGURE MQTT”. Leave the broker and port to the default values and change the username and password to the one created in the previous step. Go to the next step, leave everything to the default values and click on Submit.

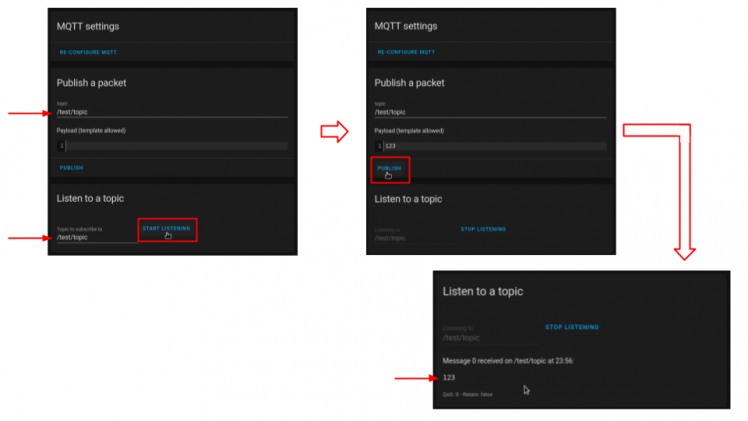
Now to test whether the broker is working properly, add any sample topic in the publish and listening field (make sure the same topic is in both the fields). Click on Start listening. In the Payload field, type in any message and click on Publish. Immediately, the same message should be received and will appear at the bottom. This confirms that our MQTT broker is all set.
Next step is to create an MQTT sensor, which will be done by editing the configuration.yaml file. I have installed the Visual Studio Code integration for doing so, but you can use any other editor as well. Inside the configuration.yaml file, paste the following code at the bottom.
- sensor:
- - platform: mqtt
- name: "Temperature"
- state_topic: "/sensor/sht31"
- unit_of_measurement: "°C"
- value_template: "{{ value_json.temperature }}"
- - platform: mqtt
- name: "Humidity"
- state_topic: "/sensor/sht31"
- unit_of_measurement: "%"
- value_template: "{{ value_json.humidity }}"
The “state_topic” parameter defines the MQTT topic which will be subscribed for getting the data. For this tutorial, we have set the topic name as /sensor/sht31. The temperature and humidity values will be sent in JSON format whose value is then extracted using a value_template. Finally, make sure the file is saved and restart the Home Assistant server.
The final step is to create cards for displaying sensor data. Go to the Overview tab, on the top right corner click on Edit dashboard > Add new card and select the one you like, I will be selecting the “Sensor” card. Now, in the Entity drop-down menu, select Temperature (sensor.temperature) and click on save. Repeat the same for Humidity and close the dashboard editing.
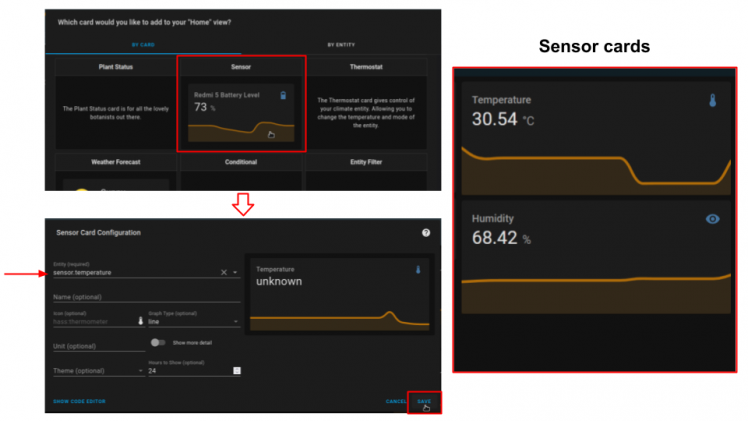
The cards will appear empty for the first time, so don’t worry about that. With this, the Home Assistant part is all set to take in temperature and humidity readings.
Programming and Deploying Applications with Toit
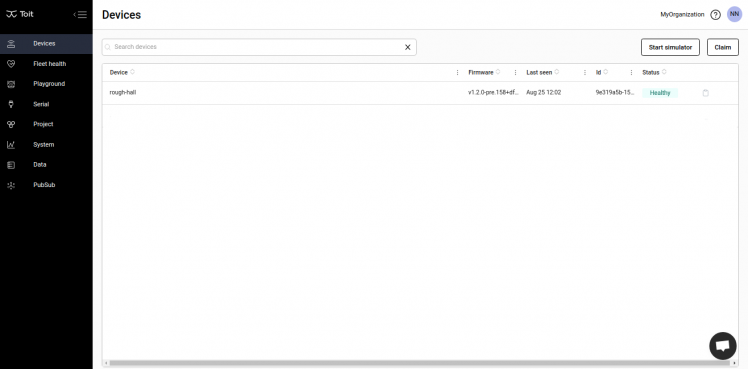
If you’re new to Toit, you can quickly set up your ESP32 device using the Web serial interface. Sign Up on Toit and headover to Web serial interface in Chrome or Edge browser only. Connect the ESP32 to your PC via USB-cable and click on “Let’s start”. Your device should appear in the list of serial ports, so select it. Click on “Provision”, enter the Wi-Fi credentials and wait for the provisioning process to complete. After it’s done, go to the Devices tab and you should see your Device’s name. Make sure the status is Healthy which indicates that your device is connected and ready to use.
Next, you need to install the Toit CLI which will be used for running and deploying apps. It is recommended to install VS code and Toit’s language extension as told in the installation link for hassle-free development. We’ll be using it in this tutorial. With this, Toit is all set and we can begin with programming.
The very first thing would be to install the SHT31-D sensor’s driver and MQTT package from pkg.toit.io. Execute the following commands in the working directory’s terminal:
- toit pkg install github.com/harshkc03/sht31-d_driver
- toit pkg install github.com/toitware/mqtt
The SHT31-D and MQTT packages (or libraries) are now installed locally in the Toit’s working directory. All other packages come bundled with the firmware. Create a new .toit file in the project folder and name it “sht31-mqtt.toit”.
Then import the GPIO and I2C communication libraries for SHT31-D sensor and MQTT and JSON libraries for sending data to Home Assistant.
- // Libraries for SHT31-D sensor
- import i2c
- import gpio
- import sht31_d_driver.sht31
- // Libraries for MQTT
- import net
- import mqtt
- import encoding.json
- import device
Next, we define a few global parameters for MQTT. The Host should be your Home Assistant server’s IP address on the network and the port should be 1883 which we defined while setting up the MQTT broker. The topic name can be as per your choice but should be the same one that we’ve set in the Home Assistant’s MQTT sensor config.
- // Unique MQTT client ID to identify each client that connects to the MQTT broker.
- CLIENT_ID ::= "$device.hardware_id"
- // Home Assistant's Mosquitto MQTT broker
- HOST ::= "192.168.29.211"
- // MQTT port 1883
- PORT ::= 1883
- // MQTT topic name
- TOPIC ::= "/sensor/sht31"
Coming to the main function, we configure the GPIO pins 21 and 22 for I2C communication. SHT31-D has a default address of 0x44, which is also printed on the bottom side of the sensor. After that we set up the MQTT client with the username and password, which we had set in the MQTT broker. The client will connect and we print the same for debugging purposes.
- main:
- // Set up SHT31-D sensor
- bus := i2c.Bus
- --sda=gpio.Pin 21
- --scl=gpio.Pin 22
- device := bus.device sht31.I2C_ADDRESS
- driver := sht31.Driver device
- // Set up MQTT client
- socket := net.open.tcp_connect HOST PORT
- // Connect the Toit MQTT client to the broker
- client := mqtt.Client
- CLIENT_ID
- mqtt.TcpTransport socket
- --username="mqtt-user"
- --password="test"
- // The client is now connected.
- print "Connected to MQTT Broker @ $HOST:$PORT"
Next, we will create a function for publishing the temperature and humidity readings on the MQTT topic. The float readings are limited to two decimal points and the data is published in the JSON format.
- /**
- Function to publish the sensor value on MQTT topic
- */
- publish client/mqtt.Client temp/float hum/float:
- // Publish message to topic
- client.publish
- TOPIC
- json.encode {
- "temperature": "$(%0.2f temp)",
- "humidity": "$(%0.2f hum)"
- }
- print "Published message `$temp` on '$TOPIC'"
Now, inside the main function at the bottom, we create an infinite loop which will publish the sensor readings once every 10 seconds.
- // Publish readings at interval of 10 seconds
- while true:
- publish client driver.read_temperature driver.read_humidity
- sleep --ms=10000
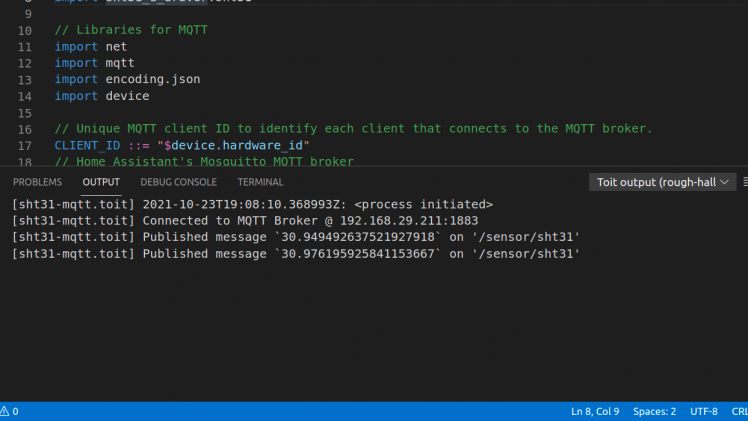
To test whether everything is working properly, run the program by clicking on the run button associated with your device in VS code’s Toit extension.

The output should be like the following and will keep on repeating at an interval of 10 seconds.
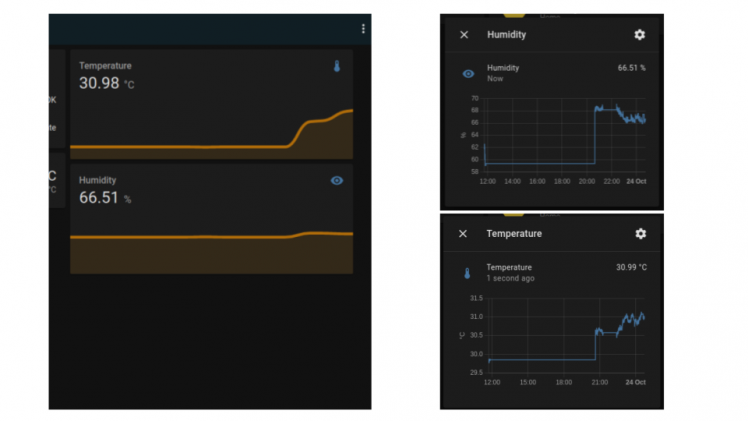
At the same time, the Home Assistant server should’ve received the MQTT message and the Temperature and Humidity values will now appear in the sensor cards.
With everything working as expected, we can now deploy the application. In the working directory, create a .yaml file with the same name as the .toit file. Copy the following lines inside it-
- name: SHT31-D sensor
- entrypoint: sht31-mqtt.toit
Make sure you terminate the run command, which we did in the previous step before deploying the application (Uninstall it under the Apps section in Toit console). Finally, click on the Deploy button associated with your device. If it prompts for opening a .yaml file, select the one which we just created. The output should show that the app was successfully deployed.
All programs used in this tutorial can be found in this Github repository.
Sending high-temperature alerts to mobile phone
The last section explains how you can configure Home Assistant to send alerts using its companion app. This is a completely optional part, so you can skip it if you don't need it.
After downloading the app, the entities of your phone such as battery state, charging state etc. should be visible in the Home Assistant’s UI. Now, to test the mobile notification service, go to Developers Tools > Services and start typing “notification”. The service should appear with your phone’s name (my phone’s name is Redmi 5). Note down the name of your phone as it appears in Home Assistant. In this case, it is mobile_app_redmi_5.

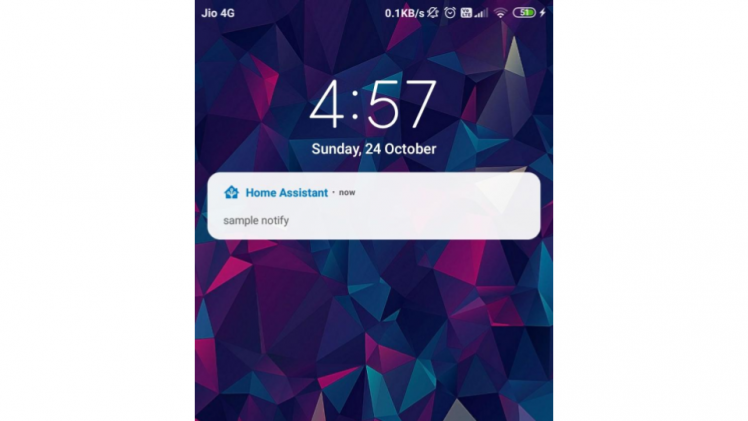
After clicking on it, a list of fields will appear. Type your notification message in the “Message” field and hit the “Call service” button. A notification should appear on your phone.
With this verified, we can now set the automatic alert. Open the configuration.yaml file and copy the following lines into it-
- binary_sensor:
- - platform: template
- sensors:
- high_temp_alert:
- value_template: "{{states.sensor.temperature.state | float > 30.00}}"
- friendly_name: "high_temp_alert"
- alert:
- high_temp:
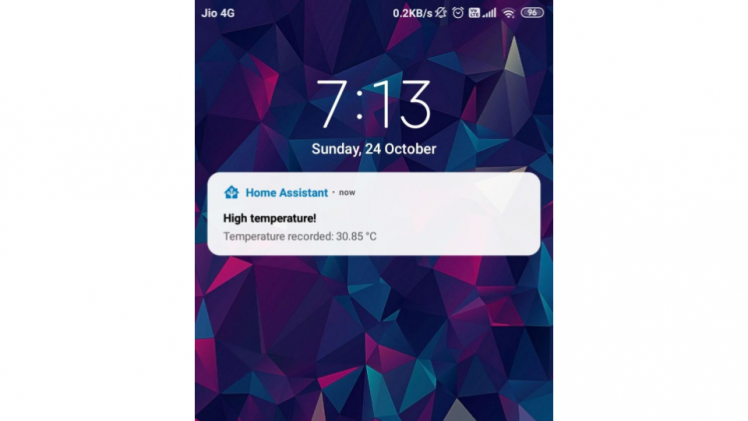
- title: "High temperature!"
- name: "Temperature recorded: {{states.sensor.temperature.state_with_unit}}"
- entity_id: binary_sensor.high_temp_alert
- repeat: 1
- notifiers:
- - mobile_app_redmi_5
The line states.sensor.temperature.state | float > 30.00 defines the temperature threshold, which is 30 degrees in this case. You can change it to your liking. Also, you need to change the last line to your phone’s name which we noted in the previous step. The parameter repeat: 1 defines the time interval in minutes after which the notification will appear again. Finally, save the configuration file and restart your Home Assistant server.
Once restarted, make sure that your ESP32 is running and you should start receiving notifications on your phone if it gets too hot.
Schematics, diagrams and documents
Code
Credits
Related products


Leave your feedback...