
Control Stepper Motor Nema17 - Custom Code In Visuino Pro

Made by Ron / Automotive / Home Automation / Robotics
About the project
In this tutorial we are going to control a stepper motor Nema 17 by using a Custom Code component in Visuino Pro.
Project info
Difficulty: Difficult
Platforms: Arduino, Digilent, Visuino
Estimated time: 1 hour
License: GNU General Public License, version 3 or later (GPL3+)
Items used in this project
Hardware components

Story
Custom Code component in Visuino Pro allows us to add any Arduino code to the Visuino project.
We are going to use external library FlexyStepper in our Custom Code component.
The down side of this library is that that when Flexystepper controls the motor, nothing else on Arduino works
(You can't read sensors control displays or anything else - It takes over the controller) so this library is just an example on how you can include any library or Arduino code into Visuino.
Custom Code component in Visuino Pro is very useful if you need to add some sensor that is not yet supported in Visuino but you already have the code for it, or to just experimenting by adding your own code to the project.
Custom code in Visuino PRO is solving nearly 100% of all the missing functionality in Visuino Standard version.
More about Visuino Pro here
Here are also some very good tutorials on how to use a Custom Code component:
Getting started with the Custom Code component
Step 1: What You Will Need1 / 8

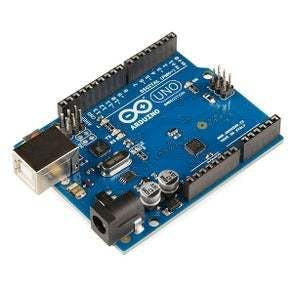

- Arduino UNO (Or any other Arduino)
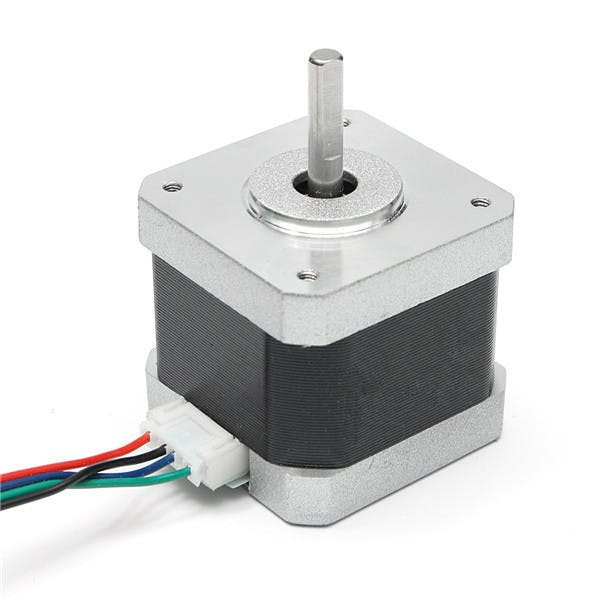
- Stepper motor NEMA 17
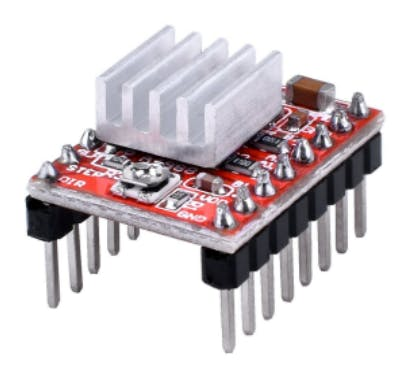
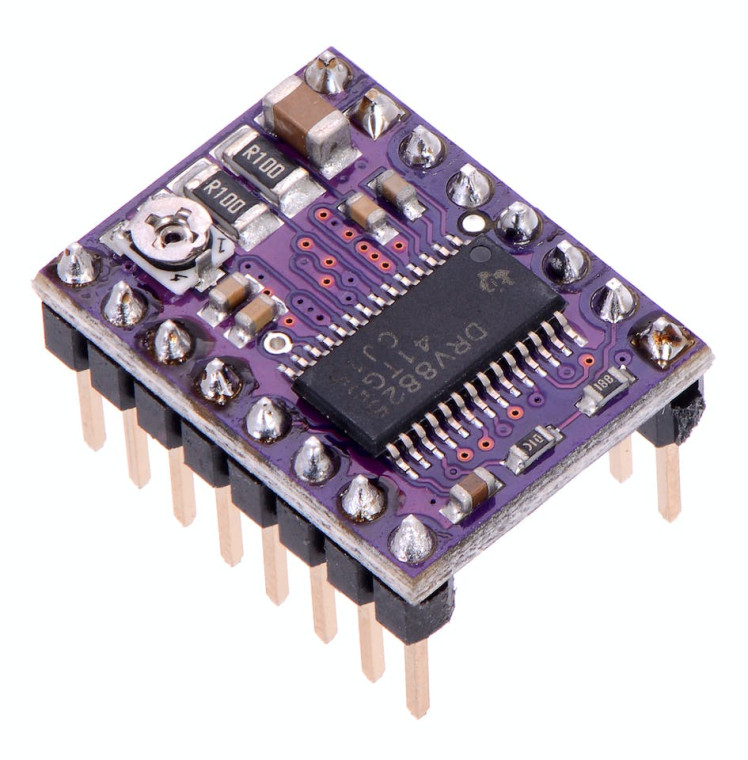
- A4988 Stepper Motor Driver or (DRV8825)
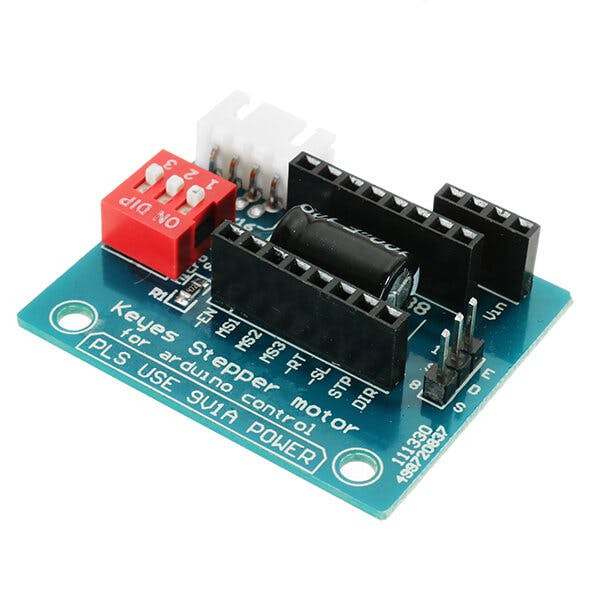
- DRV8825/A4988 Stepper Driver Expansion Module
- Jumper wires
- Power Supply 12V
- Visuino Pro software: Download here
1 / 2
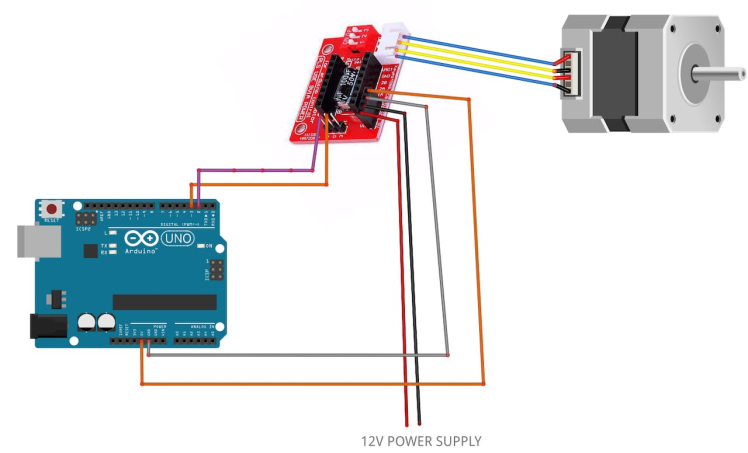
- Arduino Digital Pin 2 will be used for Steps
- Arduino Digital Pin 3 will be used for Motor Direction
- Optional - Arduino Digital Pin 4 will can used for driver pin Enable
If using a Stepper Motor Driver Shield:
- Connect Motor Shield GND pin to Arduino negative pin [GND]
- Connect Motor Shield [5V] pin to Arduino positive pin [5V]
- Connect Motor Shield GND pin to Power Supply negative pin [GND]
- Connect Motor Shield [9V] pin to Power Supply positive pin [+]
- Connect Motor Shield pin[S] to Arduino digital pin [2]
- Connect Motor Shield pin[D] to Arduino digital pin [3]
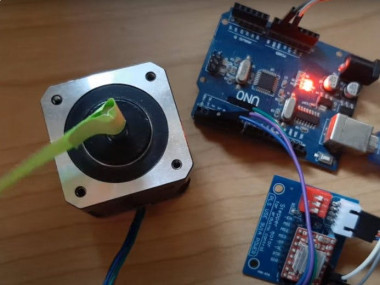
- Connect stepper motor as shown on the picture.
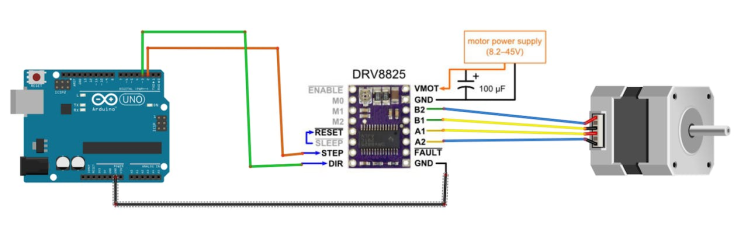
If using a Stepper Motor Driver 8825:
- Connect DRV8825 GND pin to Arduino negative pin [GND]
- Connect DRV8825 DIR pin to Arduino digital pin [3]
- Connect DRV8825 STEP pin to Arduino digital pin [2]
- Connect Power Supply for the motor to DRV8825 VMOT and GND
- Connect Capacitor across VMOT and GND
- Connect stepper motor as shown on the picture.
1 / 2

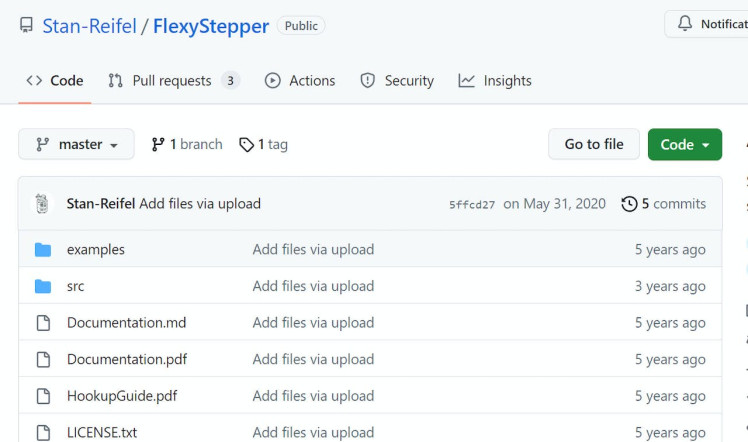
Go to https://github.com/Stan-Reifel/FlexyStepper and download FlexyStepper - Arduino Library
Extract the to your Arduino Libraries folder, usually it looks something like this: C:UsersUserDocumentsArduinolibraries
You can also find the Path if you in Visuino click on the Menu>Arduino>Configure and see it under "Arduino Library Directory" (see attached screenshot)
Step 4: Start Visuino Pro, and Select the Arduino UNO Board Type1 / 2

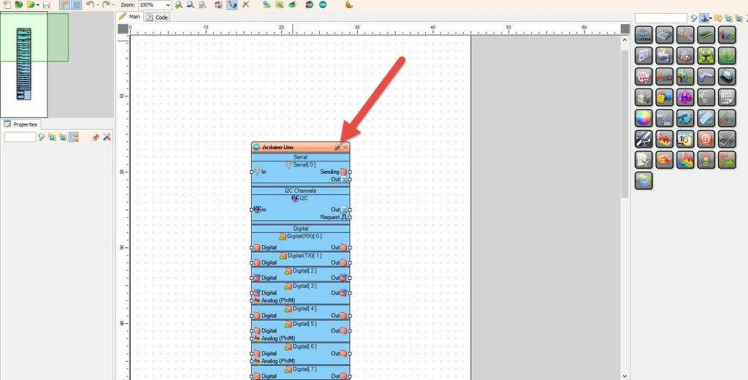
Start Visuino as shown in the first picture Click on the "Tools" button on the Arduino component (Picture 1) in Visuino When the dialog appears, select "Arduino UNO" as shown on Picture 2
Step 5: In Visuino Add Components1 / 3
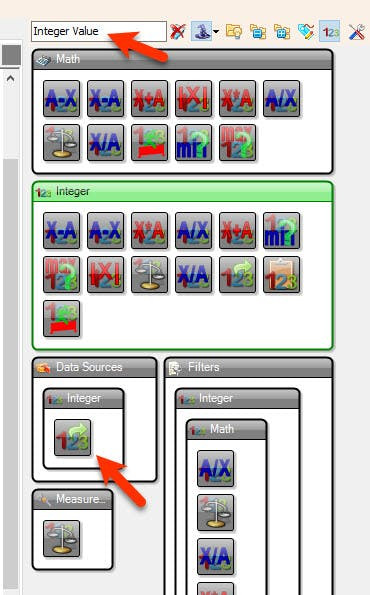
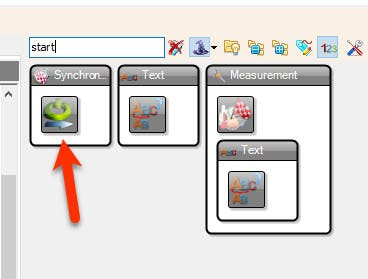
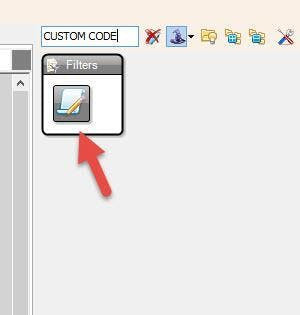
- Add "Custom Code" component
- Add 3X "Integer Value" component
- Add "Start" component (Start component will trigger the code when the Arduino will start)
1 / 3
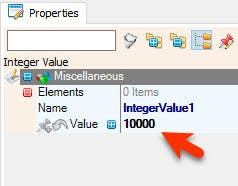
- Select "IntegerValue1" and in the properties window under "Value" set the amount of steps in our case we will use 10000
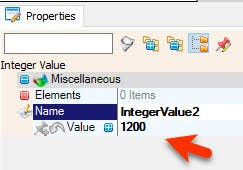
- Select "IntegerValue2" and in the properties window under "Value" set the Speed of the motor in our case we will use 1200
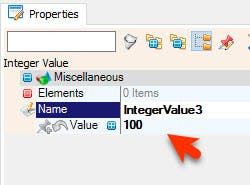
- Select "IntegerValue3" and in the properties window under "Value" set the Acceleration Speed & Deceleration Speed of the motor in our case we will use 100
1 / 16

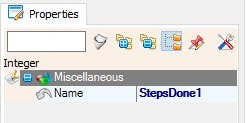

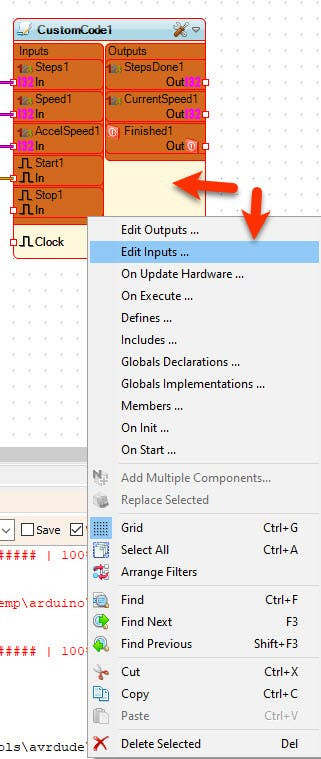


- Double click on the "CustomCode1" and in the "Outputs" window drag "Integer" to the left side and in the properties window set "Name" to "StepsDone1"
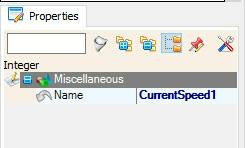
- in the "Outputs" window drag another "Integer" to the left side and in the properties window set "Name" to "CurrentSpeed1"
- in the "Outputs" window drag another "Digital" to the left side and in the properties window set "Name" to "Finished1"
- close the "Outputs" window
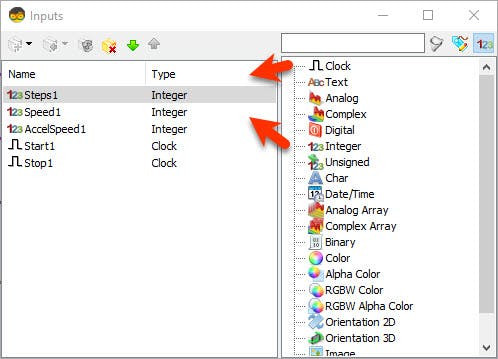
Right mouse click on the "CustomCode1" and in the menu click on the "Edit Inputs"
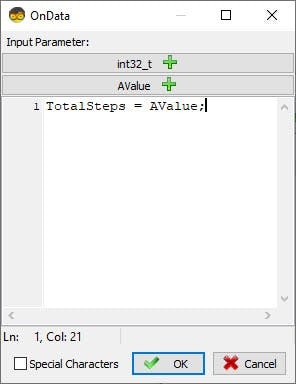
- in the "Inputs" window drag "Integer" to the left side and in the properties window set "Name" to Steps1 & click on the "On Data" 3 dots button and in the "On Data" window add this:
TotalSteps = AValue;- Close the "On Data" window
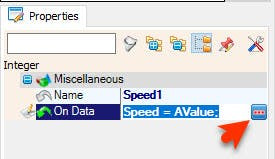
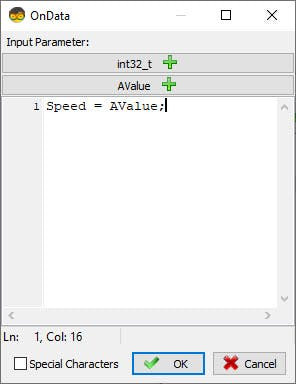
- in the "Inputs" window drag another "Integer" to the left side and in the properties window set "Name" to Speed1 & click on the "On Data" 3 dots button and in the "On Data" window add this:
Speed = AValue;- Close the "On Data" window
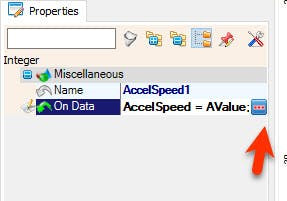
- in the "Inputs" window drag another "Integer" to the left side and in the properties window set "Name" to AccelSpeed1 & click on the "On Data" 3 dots button and in the "On Data" window add this:
AccelSpeed = AValue;- Close the "On Data" window
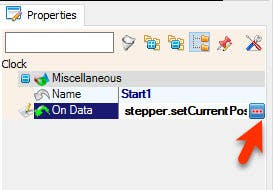
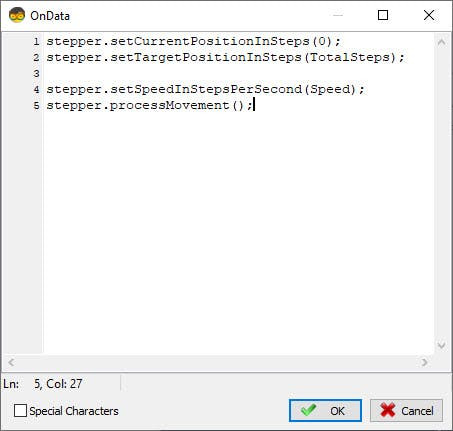
- in the "Inputs" window drag "Clock" to the left side and in the properties window set "Name" to Start1 & click on the "On Data" 3 dots button and in the "On Data" window add this:
stepper.setCurrentPositionInSteps(0);
stepper.setTargetPositionInSteps(TotalSteps);

stepper.setSpeedInStepsPerSecond(Speed);
stepper.processMovement();- Close the "On Data" window
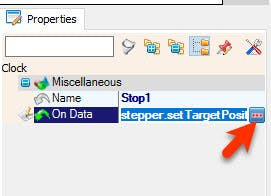
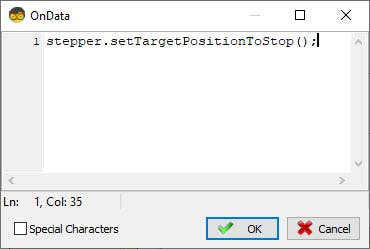
- in the "Inputs" window drag another "Clock" to the left side and in the properties window set "Name" to Stop1 & click on the "On Data" 3 dots button and in the "On Data" window add this:
stepper.setTargetPositionToStop();Close the "On Data" window
Step 8: Arduino CodeYou can find documentation here: https://github.com/Stan-Reifel/FlexyStepper/blob/master/Documentation.pdf
for the Example code we are going to use this BasicStepper code:
//      ******************************************************************
//      *                                                                *
//      *         Simple example for controlling a stepper motor         *
//      *                                                                *
//      *            S. Reifel & Co.                6/24/2018            *
//      *                                                                *
//      ******************************************************************


// This is the simplest example of how to run a stepper motor.
//
// Documentation for this library can be found at:
//    https://github.com/Stan-Reifel/FlexyStepper
//
//
// This library requires that your stepper motor be connected to the Arduino
// using drive electronics that has a "Step and Direction" interface.
// Examples of these are:
//
//    Pololu's DRV8825 Stepper Motor Driver Carrier:
//        https://www.pololu.com/product/2133
//
//    Pololu's A4988 Stepper Motor Driver Carrier:
//        https://www.pololu.com/product/2980
//
//    Sparkfun's Big Easy Driver:
//        https://www.sparkfun.com/products/12859
//
//    GeckoDrive G203V industrial controller:
//        https://www.geckodrive.com/g203v.html
//
// For all driver boards, it is VERY important that you set the motor
// current before running the example.  This is typically done by adjusting
// a potentiometer on the board.  Read the driver board's documentation to
// learn how.
//
//
// Note: FlexyStepper's companion library that supports faster step rates can
// be found here:
//    https://github.com/Stan-Reifel/SpeedyStepper


// ***********************************************************************


#include <FlexyStepper.h>


//
// pin assignments
//
const int LED_PIN = 13;
const int MOTOR_STEP_PIN = 3;
const int MOTOR_DIRECTION_PIN = 4;


//
// create the stepper motor object
//
FlexyStepper stepper;


void setup()
{
  //
  // setup the LED pin and enable print statements
  //
  pinMode(LED_PIN, OUTPUT);
  Serial.begin(9600);


  //
  // connect and configure the stepper motor to its IO pins
  //
  stepper.connectToPins(MOTOR_STEP_PIN, MOTOR_DIRECTION_PIN);
}


void loop()
{
  //
  // Note 1: It is assumed that you are using a stepper motor with a
  // 1.8 degree step angle (which is 200 steps/revolution). This is the
  // most common type of stepper.
  //
  // Note 2: It is also assumed that your stepper driver board is
  // configured for 1x microstepping.
  //
  // It is OK if these assumptions are not correct, your motor will just
  // turn less than a full rotation when commanded to.
  //
  // Note 3: This example uses "relative" motions.  This means that each
  // command will move the number of steps given, starting from it's
  // current position.
  //


  //
  // set the speed and acceleration rates for the stepper motor
  //
  stepper.setSpeedInStepsPerSecond(100);
  stepper.setAccelerationInStepsPerSecondPerSecond(100);


  //
  // Rotate the motor in the forward direction one revolution (200 steps).
  // This function call will not return until the motion is complete.
  //
  stepper.moveRelativeInSteps(200);


  //
  // now that the rotation has finished, delay 1 second before starting
  // the next move
  //
  delay(1000);


  //
  // rotate backward 1 rotation, then wait 1 second
  //
  stepper.moveRelativeInSteps(-200);
  delay(1000);


  //
  // This time speedup the motor, turning 10 revolutions.  Note if you
  // tell a stepper motor to go faster than it can, it just stops.
  //
  stepper.setSpeedInStepsPerSecond(800);
  stepper.setAccelerationInStepsPerSecondPerSecond(800);
  stepper.moveRelativeInSteps(200 * 10);
  delay(2000);
}
1 / 6
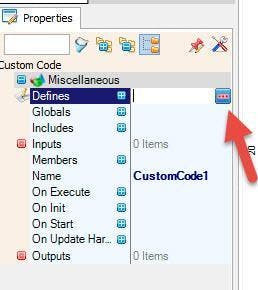


Select "CustomCode1" and in the properties window select "Defines" and Click on the 3dots button
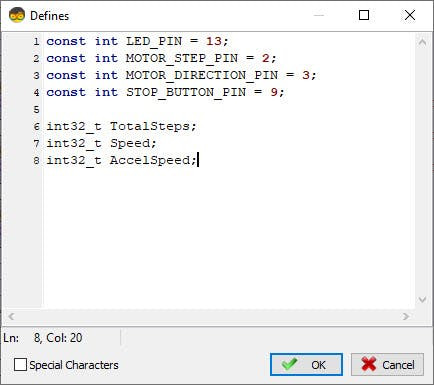
In the "Defines" window add this code:
const int LED_PIN = 13;
const int MOTOR_STEP_PIN = 2;
const int MOTOR_DIRECTION_PIN = 3;
const int STOP_BUTTON_PIN = 9;

int32_t TotalSteps;
int32_t Speed;
int32_t AccelSpeed;
And Close the "Defines" window
Select "CustomCode1" and in the properties window select "Global Declarations" and Click on the 3dots button
In the "Global Declarations" window add this code:
FlexyStepper stepper;And Close the "Global Declarations" window
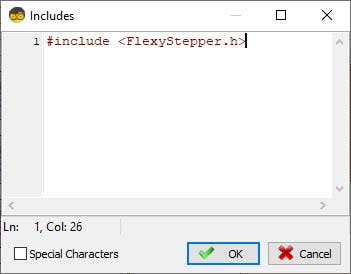
In the "Includes" window add this code:
#include <FlexyStepper.h>And Close the "Includes" window
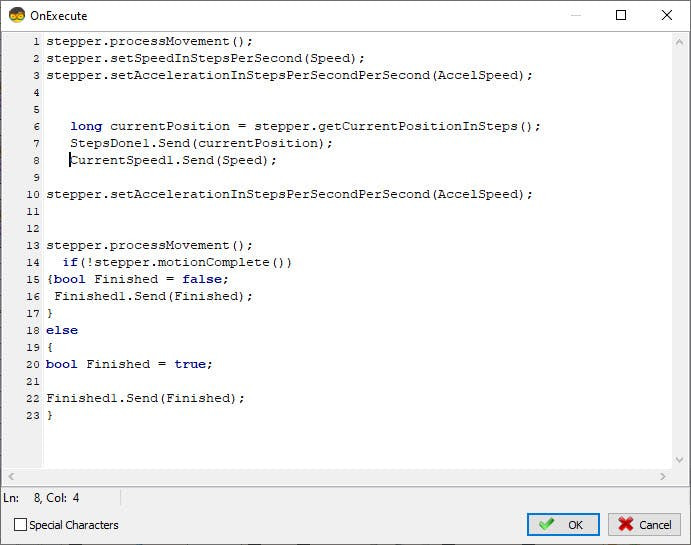
Select "CustomCode1" and in the properties window select "On Execute" and Click on the 3dots button
In the "On Execute" window add this code:
stepper.processMovement();
stepper.setSpeedInStepsPerSecond(Speed);
stepper.setAccelerationInStepsPerSecondPerSecond(AccelSpeed);


   long currentPosition = stepper.getCurrentPositionInSteps();
   StepsDone1.Send(currentPosition);
   CurrentSpeed1.Send(Speed);


stepper.setAccelerationInStepsPerSecondPerSecond(AccelSpeed);

stepper.processMovement();
  if(!stepper.motionComplete())
{bool Finished = false;
 Finished1.Send(Finished);
}
else
{
bool Finished = true;

Finished1.Send(Finished);
}
And Close the "On Execute" window
Select "CustomCode1" and in the properties window select "On Init" and Click on the 3dots button
In the "On Init" window add this code:
pinMode(LED_PIN, OUTPUT);
pinMode(STOP_BUTTON_PIN, INPUT_PULLUP);


stepper.connectToPins(MOTOR_STEP_PIN, MOTOR_DIRECTION_PIN);


bool stopFlag = false;
bool Finished = false;
stepper.setStepsPerRevolution(400);


stepper.setAccelerationInStepsPerSecondPerSecond(AccelSpeed);
And Close the "On Init" window
Step 10: In Visuino Connect Components1 / 2
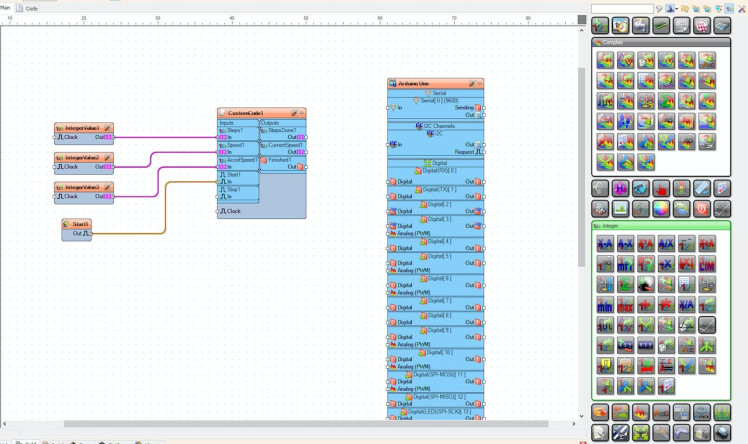
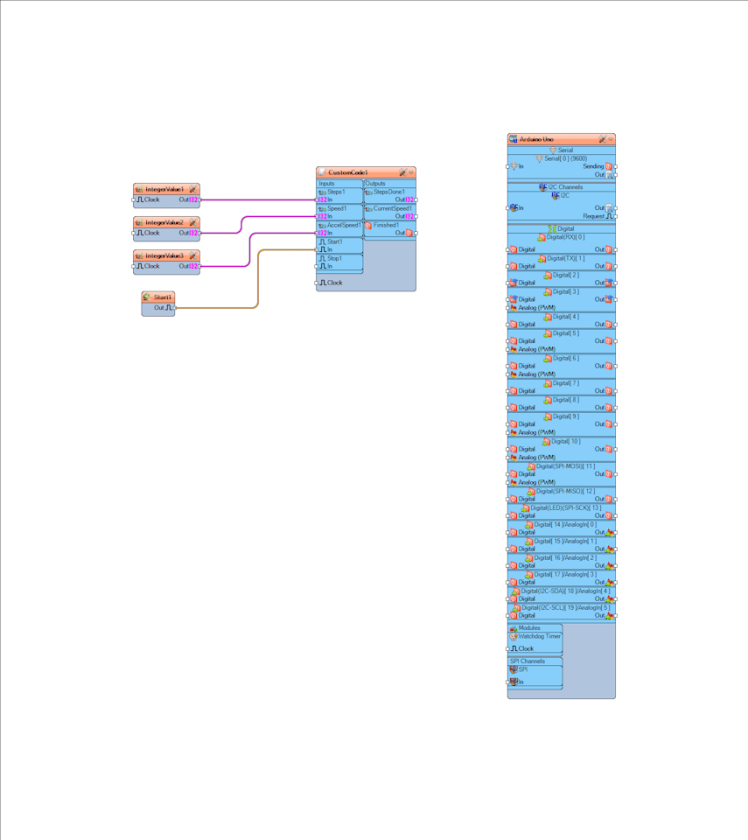
- Connect "IntegerValue1" pin [Out] to "CustomCode1" > "Inputs" > "Steps1" pin [In]
- Connect "IntegerValue2" pin [Out] to "CustomCode1" > "Inputs" > "Speed1" pin [In]
- Connect "IntegerValue3" pin [Out] to "CustomCode1" > "Inputs" > "AccelSpeed1" pin [In]
- Connect "Start1" pin [Out] to "CustomCode1" > "Inputs" > "Start1" pin [In]
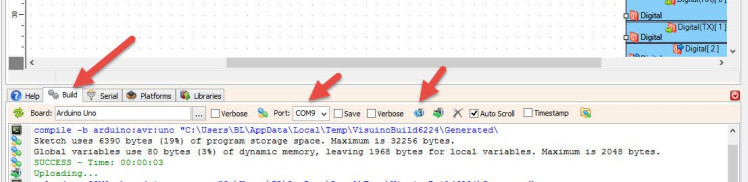
In Visuino, at the bottom click on the "Build" Tab, make sure the correct port is selected, then click on the "Compile/Build and Upload" button.
Step 12: PlayIf you power the Arduino module the motor will do will start to run and when it reaches a certain amount of steps in our case 10000 it will slowly accelerate and decelerate.
Congratulations! You have completed your project with Visuino. Also attached is the Visuino project, that I created for this Instructable, you can download it here and open it in Visuino: https://www.visuino.eu
Schematics, diagrams and documents
Code
Credits
Related products


Leave your feedback...