
Build Rainbow Interactive Bridge Using Minecraft Raspberrypi
Made by Elecrow / Games & Gaming / Robotics / Sensors / IoT
About the project
There are many projects you can do in the Minecraft world with the ras pi but it wasn’t enough, we were looking for something challenging
Project info
Difficulty: Moderate
Platforms: Elecrow
Estimated time: 1 hour
License: GNU General Public License, version 3 or later (GPL3+)
Items used in this project
Hardware components


View all
Story
Yesterday, I saw my 8-year-old nephew playing Minecraft with the Raspberry Pi I gave him before, then I got an idea, that is using code to make a customized and exciting Minecraft-pi LED blocks project. Minecraft Pi is a great way to get started with the Raspberry Pi microcomputer, the Minecraft Pi is a special custom made version of Minecraft that allows us to interact with the game using a deadly simple Python API to customize the game experience and props!
There are many projects you can do in the Minecraft world with the Raspberry Pi but specifically for us it wasn’t enough, we were looking for something challenging and blinking at the same time. In this project, we’ll step on multiple Minecraft blocks, detect the ID of the block and detect the color of the specific block we stepped on, based on the color we’ll light our RGB LED to create interactive steps game!
I will use two methods to achieve the effect, the first is using the accessories, which may be very chaotic...; the second is using CrowPi2 (learning computer with many sensors, currently crowdfunded on Kickstarter:CrowPi2)
let’s get started and see how to archive such an amazing project!
Supplies:The CrowPi2 now is live on the kickstarter now, The CrowPi2 project has raised almost $250k.
Hit the link: https://www.kickstarter.com/projects/elecrow/crowp...
Method1 : Using accessories
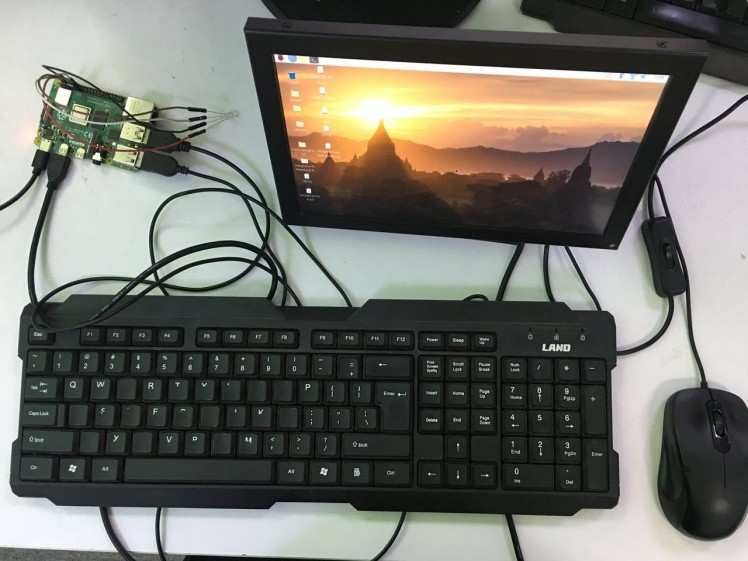
Step 1: Materials● 1 x Raspberry Pi 4 model B
● 1 x TF card with image
● 1 x Raspberry Pi power supply
● 1 x 10.1 inch monitor
● 1 x Power supply for monitor
● 1 x HDMI cable
● 1 x Keyboard and mouse
● 1 x RGB led(Common cathode)
● 4 x Jumpers(Female to female)
Step 2: Connection Diagram
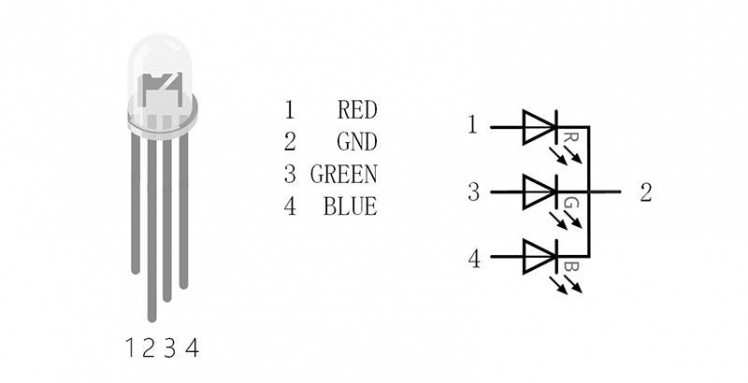
There are actually three lights in the RGB color LED, which are red light, green light and blue light. Control these three lights to emit light of different intensities, and when mixed, they can emit light of various colors. The four pins on the LED light are GND, R, G, and B, respectively. The RGB LED I used is a common cathode, and the connection to the Raspberry Pi is as follows:
RaspberryPi 4B(in function name) RGB LED
GPIO0 1 RED
GPIO1 3 GREEN
GPIO2 4 BLUE
GND 2 GND
Here is the hardware connection:

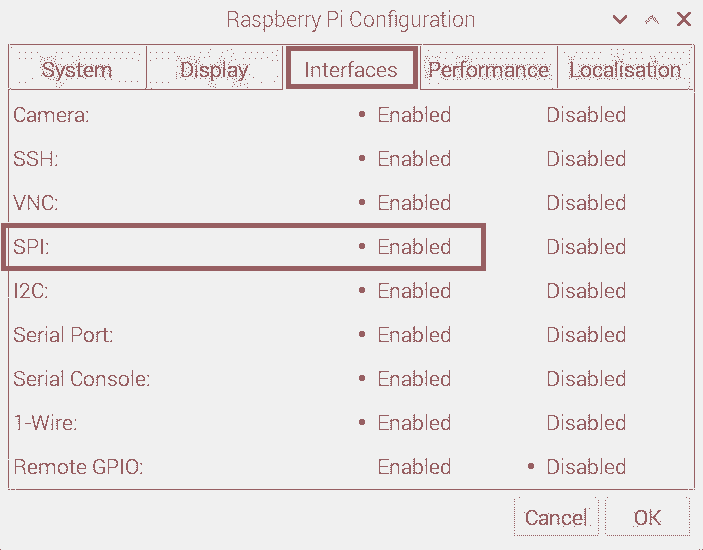
Because we need to use the SPI to control the RGB, we need to enable the SPI interface first, which is disabled by default. You can follow the steps below to enable SPI interface:
First, you can use the Desktop GUI by heading to the Pi start Menu-->preferences-->Raspberry Pi Configuration, as it shown in the first picture.
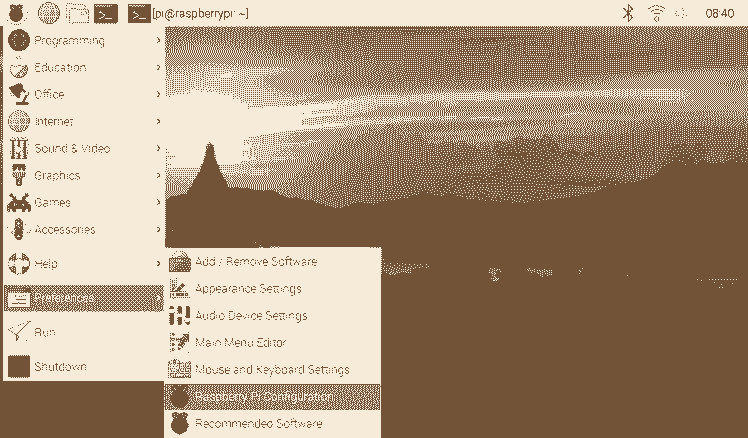
Second, navigate to “Interfaces” and enable SPI and click OK.
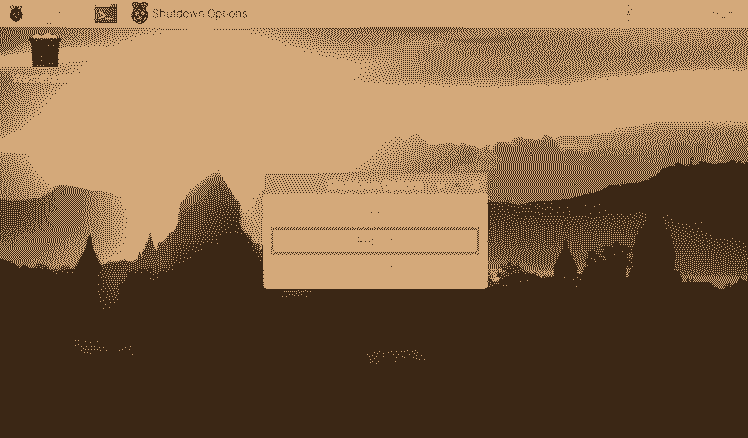
Last, restart your Pi to ensure that the changes to take effect. Click on Pi Start Menu-->Preferences-->Shutdown. Since we just need to restart, click on Reboot button.
We’ll start by writing our python code, first, we’ll start by importing a few libraries that we’ll need in order to integrate our code with the Minecraft world. Then, we’ll import the time library, specifically a function called sleep. The sleep function will allow us to wait a specific interval before performing a function. Last but not least, we import RPi.GPIO library which allows us to control the GPIO on Raspberry Pi.
from mcpi.minecraft import Minecraft
from time import sleep
import RPi.GPIO as GPIO
And that’s it, we’ve done with importing the libraries, now it’s time to use them! First thing first, is to use the Minecraft library, we want to connect our python script to the Minecraft world, we can do this by invoking the init() function of the MCPI library and then set the mode of GPIO and disable the warning.
mc = Minecraft.create()
GPIO.setmode(GPIO.BCM)
GPIO.setwarnings(0)
Now, we define some rainbow colors in hexadecimal so that we can change RGB colors.
WHITE = 0xFFFFFF
RED = 0xFF0000
ORANGE = 0xFF7F00
YELLOW = 0xFFFF00
GREEN = 0x00FF00
CYAN = 0x00FFFF
BLUE = 0x0000FF
PURPLE = 0xFF00FF
MAGENTA = 0xFF0090
Next, we need to define some variables to record the color of the wool block, which is already defined in the Minecraft block list.
W_WHITE = 0
W_RED = 14
W_ORANGE = 1
W_YELLOW = 4
W_GREEN = 5
W_CYAN = 9
W_BLUE = 11
W_PURPLE = 10
W_MAGENTA = 2
We ID of the wool block in the Minecraft is 35. Now, we need to configure the pin for RGB led and set up for them.
red_pin = 17
green_pin = 18
blue_pin = 27
GPIO.setup(red_pin, GPIO.OUT, initial=1)
GPIO.setup(green_pin, GPIO.OUT, initial=1)
GPIO.setup(blue_pin, GPIO.OUT, initial=1)
Then, set up the PWM for each pin, note that the range of PWM value is 0-100. Here, we set the color of RGB led to white(100, 100, 100) first.
red = GPIO.PWM(red_pin, 100)
green = GPIO.PWM(green_pin, 100)
blue = GPIO.PWM(blue_pin, 100)
red.start(100)
green.start(100)
blue.start(100)
Following is to create two functions, which can be used to decode color and light the RGB led up! Note that map2hundred() function is to map values from 255 to 100, as we said mentioned before, the PWM value should be 0-100.
def map2hundred(value): return int(value * 100 / 255)
def set_color(color_code):
# Decode
red_value = color_code >> 16 & 0xFF
green_value = color_code >> 8 & 0xFF
blue_value = color_code >> 0 & 0xFF
# Map values
red_value = map2hundred(red_value)
green_value = map2hundred(green_value)
blue_value = map2hundred(blue_value)
# Light up!
red.ChangeDutyCycle(red_value)
green.ChangeDutyCycle(green_value)
blue.ChangeDutyCycle(blue_value)
Well done! It is time to start our main program, wait, another variable should be define to record the color code of wool block before the main program:
last_data = 0
try:
x, y, z = mc.player.getPos()
mc.setBlocks(x, y, z, x+1, y, z+2, 35, 14)
mc.setBlocks(x+2, y+1, z, x+3, y+1, z+2, 35, 11)
mc.setBlocks(x+4, y+2, z, x+5, y+2, z+2, 35, 2)
mc.setBlocks(x+6, y+3, z, x+7, y+3, z+2, 35, 5)
mc.setBlocks(x+8, y+4, z, x+9, y+4, z+2, 35, 4)
mc.setBlocks(x+10, y+5, z, x+11, y+5, z+2, 35, 10)
mc.setBlocks(x+12, y+6, z, x+13, y+6, z+2, 35, 1)
mc.setBlocks(x+14, y+5, z, x+15, y+5, z+2, 35, 10)
mc.setBlocks(x+16, y+4, z, x+17, y+4, z+2, 35, 4)
mc.setBlocks(x+18, y+3, z, x+19, y+3, z+2, 35, 5)
mc.setBlocks(x+20, y+2, z, x+21, y+2, z+2, 35, 2)
mc.setBlocks(x+22, y+1, z, x+23, y+1, z+2, 35, 11)
mc.setBlocks(x+24, y, z, x+25, y, z+2, 35, 14)
while True:
x, y, z = mc.player.getPos() # player position (x, y, z)
block = mc.getBlockWithData(x, y-1, z) # block ID
#print(block)
if block.id == WOOL and last_data != block.data:
if block.data == W_RED:
print("Red!")
set_color(RED)
if block.data == W_ORANGE:
print("Orange!")
set_color(ORANGE)
if block.data == W_YELLOW:
print("Yellow!")
set_color(YELLOW)
if block.data == W_GREEN:
print("Green!")
set_color(GREEN)
if block.data == W_CYAN:
print("Cyan!")
set_color(CYAN)
if block.data == W_BLUE:
print("Blue!")
set_color(BLUE)
if block.data == W_PURPLE:
print("Purple!")
set_color(PURPLE)
if block.data == W_MAGENTA:
print("Magenta!")
set_color(MAGENTA)
if block.data == W_WHITE:
print("White!")
set_color(WHITE)
last_data = block.data
sleep(0.05)
except KeyboardInterrupt:
pass
GPIO.cleanup()
As the main program is shown above, first to use some commands to generate some colorful wool blocks, then we need to find out the player position so that we can get the blocks' id and its color code. After getting the block information, we will use the statement to determine if the block under the player is a wool block and whether it has the color code. If yes, judge which color the wool block is and call the set_color() function to change the color of RGB led the same as the wool block.
In addition, we add a try/except statement to catch the exception of user interrupt when we want to quit the program to clear the output of GPIO pins.
Well done, so many accessories and too complicated right? Don't worry, let's see the second method to achieve the project, which will make you feel more flexible and convenient, which is using our CrowPi2!
Step 5: The ResultOpen the game and run the script, you will see the result in the video below
Then we will use CrowPi2 to build Rainbow interactive bridge next
Step 1: -Materials●1 x CrowPi2
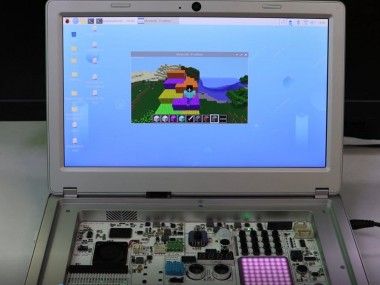
Step 2: Connection DiagramNo need. There are many useful sensors and components (more than 20) on CrowPi2, it’s all in one raspberry pi laptop and STEM education platform that allows us to do multiple projects with ease and no sweat! In this case, we will use an attractive and colorful module on CrowPi2, which is an 8x8 RGB matrix module, which allows us to control 64 RGB led at the same time!

No need. CrowPi2 comes with a built-in image with a learning system! Everything has been prepared which means you can program and learn directly. Besides, with our CrowPi2 it’s easy and already integrated into the board as a STEAM platform ready to go.
Step 4: the CodeNow, it’s time to start our program! First, import a few libraries, such as MCPI library which is the Minecraft Pi Python library that allows us to use a very simple API to integrate with the Minecraft world; time library which allows us to us sleep function to wait a specific interval before performing a function; RPi.GPIO library which allows us to control the Raspberry Pi GPIO pins.
from mcpi.minecraft import Minecraft
from time import sleep
import RPi.GPIO as GPIO
Finally, we’ll import a library called rpi_ws281x which is the RGB Matrix library, inside the library, there are multiple functions that we’ll use such as PixelStrip to setup the LED strip object and Color to configure an RGB color object to light on our RGB LEDs
from rpi_ws281x import PixelStrip, Color
And that’s it, we’ve done with importing the libraries, now it’s time to use them! As same, the first thing is to use the Minecraft library, we want to connect our python script to the Minecraft world we can do this by invoking the init function of the MCPI library:
mc = Minecraft.create()
Now everytime we want to perform operations on the minecrat world, we can use the mc object.
Next step will be to define the RGB LED matrix class that we will be using to control our RGB LEDs, we initialize the class with basic configuration such as number of leds, pins, brightness etc …
we create a function called clean which will “clean” the less with specific color given and also a function called run that will initialize the actual RGB LED object at the first time we want to use it.
class RGB_Matrix:
def __init__(self):
# LED strip configuration:
self.LED_COUNT = 64 # Number of LED pixels.
self.LED_PIN = 12 # GPIO pin connected to the pixels (18 uses PWM!).
self.LED_FREQ_HZ = 800000 # LED signal frequency in hertz (usually 800khz)
self.LED_DMA = 10 # DMA channel to use for generating signal (try 10)
self.LED_BRIGHTNESS = 10 # Set to 0 for darkest and 255 for brightest
self.LED_INVERT = False # True to invert the signal
self.LED_CHANNEL = 0 # set to '1' for GPIOs 13, 19, 41, 45 or 53
# Define functions which animate LEDs in various ways.
def clean(self, strip, color):
# wipe all the LED's at once
for I in range(strip.numPixels()):
strip.setPixelColor(i, color)
strip.show()
def run(self):
# Create NeoPixel object with appropriate configuration.
strip = PixelStrip(
self.LED_COUNT,
self.LED_PIN,
self.LED_FREQ_HZ,
self.LED_DMA,
self.LED_INVERT,
self.LED_BRIGHTNESS,
self.LED_CHANNEL)
try:
return strip
except KeyboardInterrupt:
# clean the matrix LED before interruption
self.clean(strip)
After we’ve done with the above, it’s time to invoke those classes and create objects that we can use in our code, first let’s create an RGB LED matrix object that we can use using the class we’ve created earlier:
matrixObject = RGB_Matrix()
Now let’s use this object to create active LED strip object that we will use to control our individual LEDs on the RGB Matrix:
strip = matrixObject.run()
Finally in order to activate this strip, we’ll need to run one last function:
strip.begin()
The Minecraft API includes a lot of blocks, each Minecraft block has it’s own ID. In our example we’ve took some amount of Minecraft blocks and tried to guess which color is most suitable for them.
RGB stands for Red, Green and blue so we’ll need 3 different values ranging from 0 to 255 for each one, colors can be HEX or RGB format, we are using the RGB format for our example.
In the Minecraft Pi world there are normal blocks IDs and special wool blocks IDs, the special wool comes under ID number 35 but with sub numbers ranging to many different ids … We’ll solve this problem by creating 2 separate lists, one for normal blocks and one list for special wool blocks:
The first list is for normal blocks, for example 0 represent Air block, we’ll set it color 0, 0, 0 which is blank or complete white, when the player will jump or fly in the game the RGB will turn off, 1 is different block with RGB color 128, 128, 128 and so on …
#Rainbow Colors
rainbow_colors = {
"0":Color(0, 0, 0),
"1":Color(128, 128, 128),
"2":Color(0, 255, 0),
"3":Color(160, 82, 45),
"4":Color(128, 128, 128),
"22":Color(0, 0, 255)
}
Forthe wool blocks we do the same but it’s important to remember that all the blocks have an ID of 35, in this list we define the subtypes of the block which is wool block. Different wool subtypes have different colors but all of them are wool blocks.
wool_colors = {
"6":Color(255, 105, 180),
"5":Color(0, 255, 0),
"4":Color(255, 255, 0),
"14":Color(255, 0, 0),
"2":Color(255, 0, 255)
}
Nowwhen we’ve finishing defining our main program, classes and functions, it’s time to integrate with our CrowPi2 RGB LED on board sensor.
The main program will take the parameters we defined earlier and put the impact on the hardware.
We are going to use the CrowPi2 RGB LED in order to light them up based on the steps we do inside the Minecraft Pi on each block, let’s get started!
First thing we’ll do is to generate some wool blocks with commands and create a while loop, to keep the program running as long as we play the game.
We’ll need to get some data from the player, first thing we use the player.getPos() command to get the player position then we use getBlockWithData() to get the block we are currently standing on (y coordinate is -1 which means under the player)
x, y, z= mc.player.getPos()
mc.setBlocks(x, y, z, x+1, y, z+2, 35, 14)
mc.setBlocks(x+2, y+1, z, x+3, y+1, z+2, 35, 11)
mc.setBlocks(x+4, y+2, z, x+5, y+2, z+2, 35, 2)
mc.setBlocks(x+6, y+3, z, x+7, y+3, z+2, 35, 5)
mc.setBlocks(x+8, y+4, z, x+9, y+4, z+2, 35, 4)
mc.setBlocks(x+10, y+5, z, x+11, y+5, z+2, 35, 10)
mc.setBlocks(x+12, y+6, z, x+13, y+6, z+2, 35, 1)
mc.setBlocks(x+14, y+5, z, x+15, y+5, z+2, 35, 10)
mc.setBlocks(x+16, y+4, z, x+17, y+4, z+2, 35, 4)
mc.setBlocks(x+18, y+3, z, x+19, y+3, z+2, 35, 5)
mc.setBlocks(x+20, y+2, z, x+21, y+2, z+2, 35, 2)
mc.setBlocks(x+22, y+1, z, x+23, y+1, z+2, 35, 11)
mc.setBlocks(x+24, y, z, x+25, y, z+2, 35, 14)
while True:
x, y, z = mc.player.getPos() # player position (x, y, z)
blockType, data = mc.getBlockWithData(x, y-1, z) # block ID
print(blockType)
Then we’ll check if the block is wool block, block ID number 35, if it is we will refer to wool_colors with the color of the block based on the ID of the dictionary and light up the right color accordingly.
if blockType == 35:
# custom wool colors
matrixObject.clean(strip, wool_colors[str(data)])
If it’s not wool block, we’ll check if the block is currently inside the rainbow_colors dictionary to avoid exceptions, if it is we’ll continue by taking the color and changing the RGB.
if str(blockType) in rainbow_colors:
print(rainbow_colors[str(blockType)])
matrixObject.clean(strip, rainbow_colors[str(blockType)])
sleep(0.5)
You can always try and add more blocks to the rainbow_color to add more colors and more blocks support!
Perfect! Doing projects using accessories is complicated but using the CrowPi2 integrated circuit, things get much easier! What’s more, there are more than 20 sensors and components on CrowPi2, which allows you to achieve your ideal projects and even AI projects!
Step 5: the ResultOpen the game and run the script, you will see the result in the video below:
Step 6: Going FurtherNow we have finished our colorful project in the Minecraft game with CrowPi2. Why not try to use other sensors and components on CrowPi2 to play with the game, such as joystick to control the player’s movement, RFID to generate blocks based on different NFC cards and etc. Have fun with your game on CrowPi2 and hope you can do more incredible projects with CrowPi2!
Now, CrowPi2 is on the Kickstarter now, you also could enjoy the attractive price.
Attach the Kickstarter page link CrowPi2--Raspberry Pi laptop
Leave your feedback...