

Arduino Seeeduino Xiao Compass Qmc5883-gy-271 And Oled Di...

About the project
In this tutorial we will learn how to use the seeduino Xiao with the compass I2C sensor QMC5883 and the OLED Display.
Project info
Difficulty: Easy
Estimated time: 1 hour
License: GNU General Public License, version 3 or later (GPL3+)
Items used in this project
Hardware components

Story
In this tutorial we will learn how to use the seeduino Xiao with the compass I2C sensor QMC5883 and the OLED Display. We will Display all the axis and the temperature on the OLED Display.
Watch the video!
Step 1: What You Will Need
1 / 5

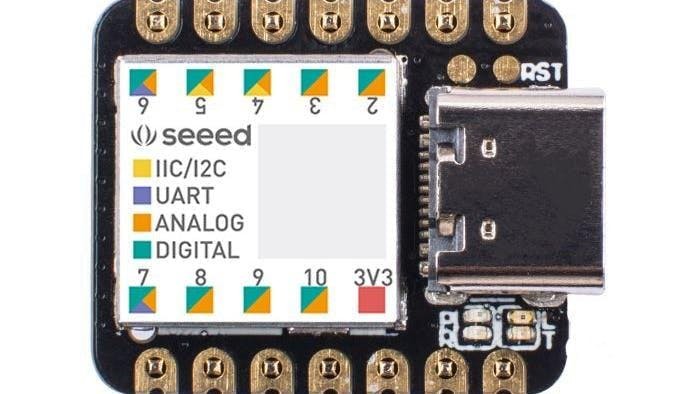
- Seeeduino XIAOLED
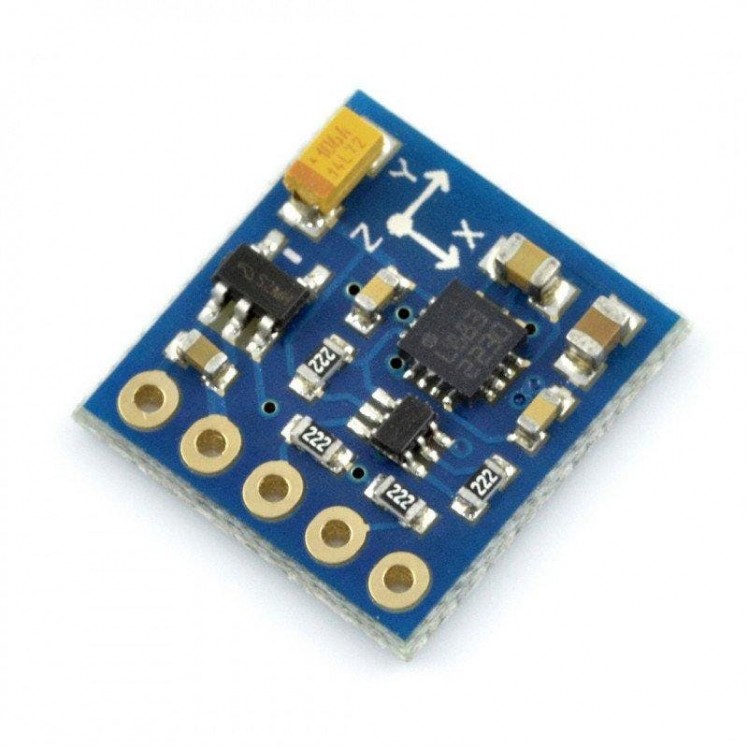
- Compass QMC5883/GY-271 Sensor
- OLED Display
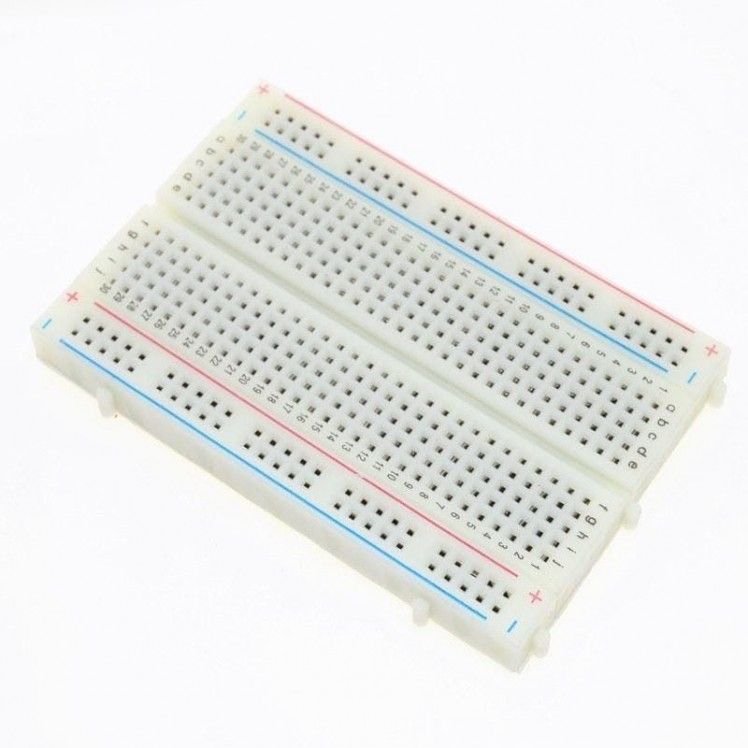
- Breadboard
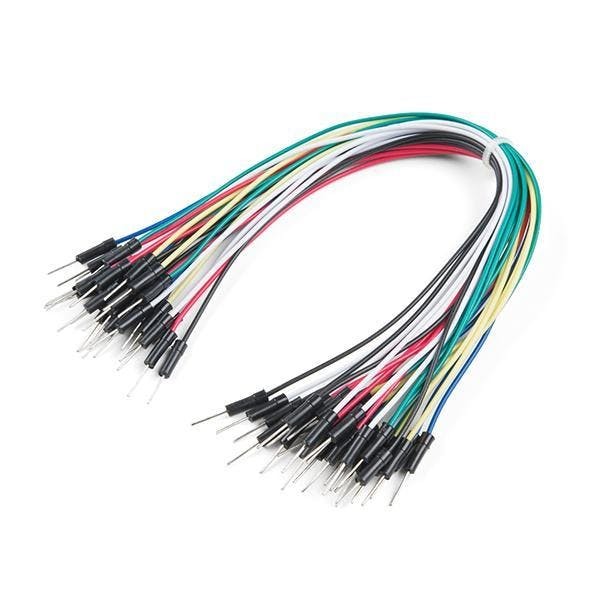
- Jumper Wires
- Visuino program: Download Visuino
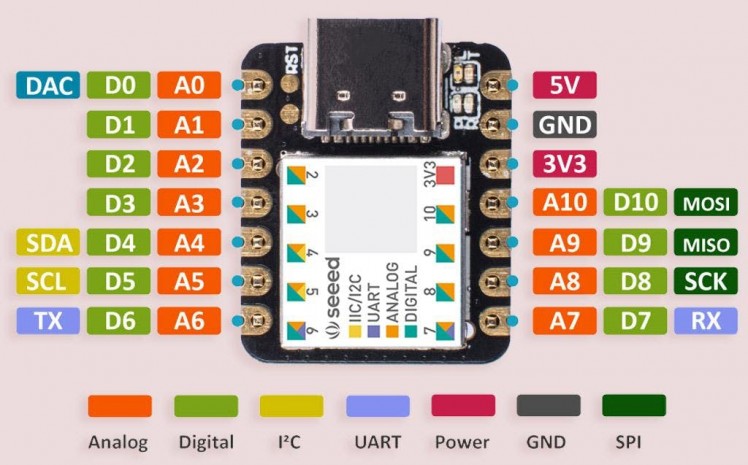
- Powerful CPU: ARM® Cortex®-M0+ 32bit 48MHz microcontroller(SAMD21G18) with 256KB Flash, 32KB SRAM
- Flexible compatibility: Compatible with Visuino & Arduino IDE
- Easy project operation: Breadboard-friendly
- Small size: As small as a thumb(20x17.5mm) for wearable devices and small projects.
- Multiple development interfaces: 11 digital/analog pins, 10 PWM Pins, 1 DAC output, 1 SWD Bonding pad interface, 1 I2C interface, 1 UART interface, 1 SPI
interface.Typical Application
- Wearable devices
- Rapid prototyping (directly attached to the expanded PCB as a minimal system)Perfect for all the projects need mini Arduino
- DIY keyboard
- USB development (USB to multi-channel TTL/USB host mode, etc.)
- A scenario where you need to read multiple mock values The DAC output
1 / 2
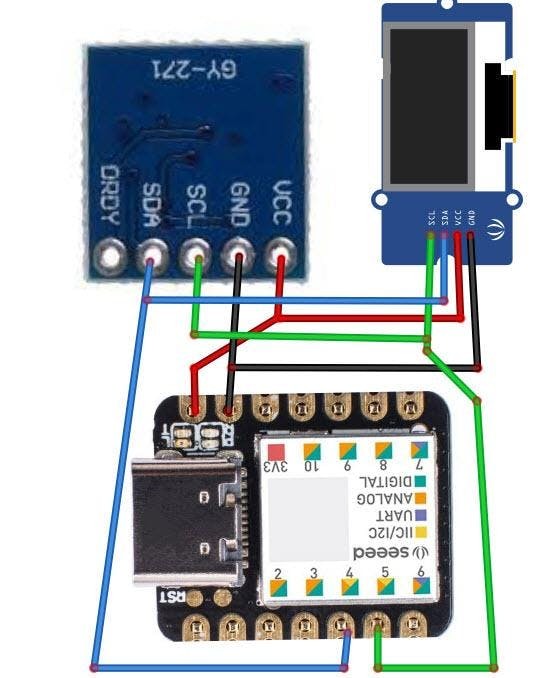
- Connect XIAO pin [5V] to Compass sensor pin [VCC]
- Connect XIAO pin [GND] to Compass sensor pin [GND]
- Connect XIAO SCL pin [5] to Compass sensor pin [SCL]
- Connect XIAO SDA pin [4] to Compass sensor pin [SDA]
- Connect XIAO pin [5V] to OLED Display pin [VCC]
- Connect XIAO pin [GND] to OLED Display pin [GND]
- Connect XIAO SCL pin [5] to OLED Display pin [SCL]
- Connect XIAO SDA pin [4] to OLED Display pin [SDA]
1 / 2

The Visuino: https://www.visuino.eu also needs to be installed. Download Free version or register for a Free Trial.
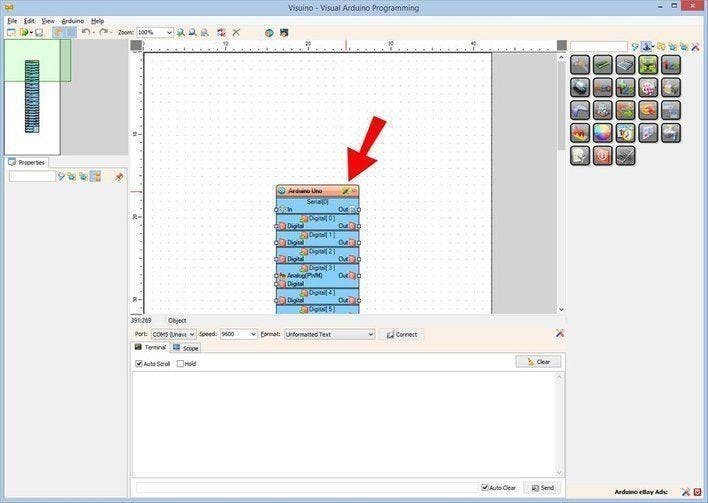
Start Visuino as shown in the first picture Click on the "Tools" button on the Arduino component (Picture 1) in Visuino When the dialog appears, select "Seeeduino XIAO" as shown on Picture 2
Step 5: In Visuino Add & Set Components
1 / 11


- Add "Compass QMC5883/GY-271" component
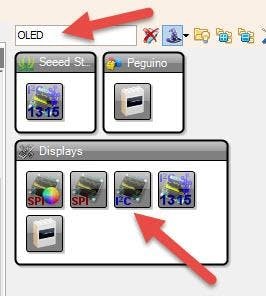
- Add "OLED I2C Display" component
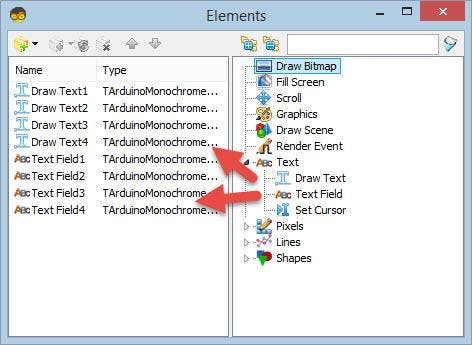
- Double click on the "DisplayOLED1" and in the "Elements" window drag 4X "Draw Text" to the left side and 4X "Text Field" to the left side.
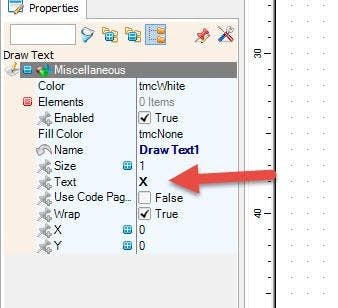
- In the "Elements" window select "Draw Text1" and in the properties window set "Text" to X
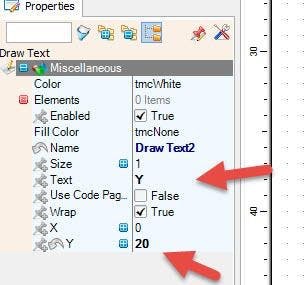
- In the "Elements" window select "Draw Text2" and in the properties window set "Text" to Y, and "Y" to 20
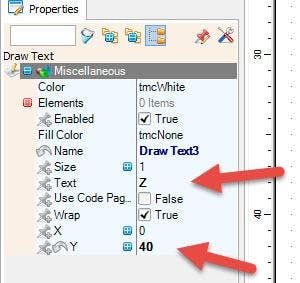
- In the "Elements" window select "Draw Text3" and in the properties window set "Text" to Z, and "Y" to 40
- In the "Elements" window select "Draw Text4" and in the properties window set "Text" to TEMP and "Y" to 55
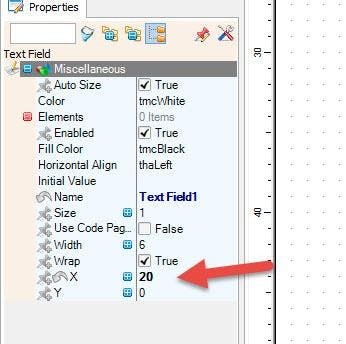
- In the "Elements" window select "Text Field1" and in the properties window set "X" to 20
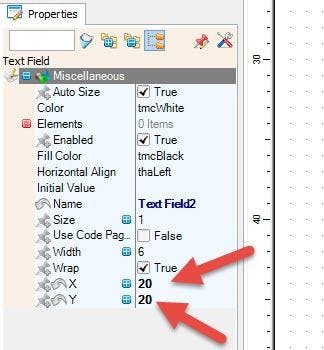
- In the "Elements" window select "Text Field2" and in the properties window set "X" to 20 and "Y" to 20
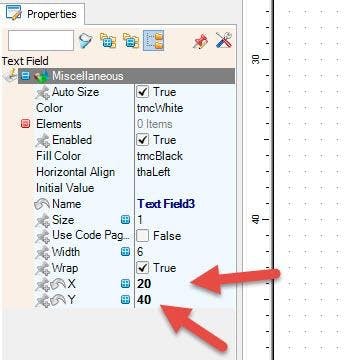
- In the "Elements" window select "Text Field3" and in the properties window set "X" to 20 and "Y" to 40
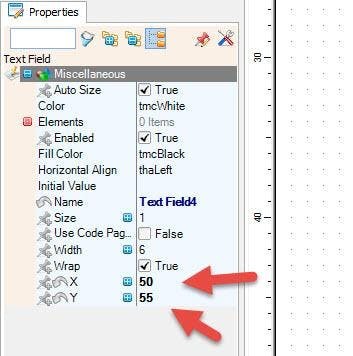
- In the "Elements" window select "Text Field4" and in the properties window set "X" to 50 and "Y" to 55
Close the "Elements" window.
Step 6: In Visuino Connect Components
1 / 2
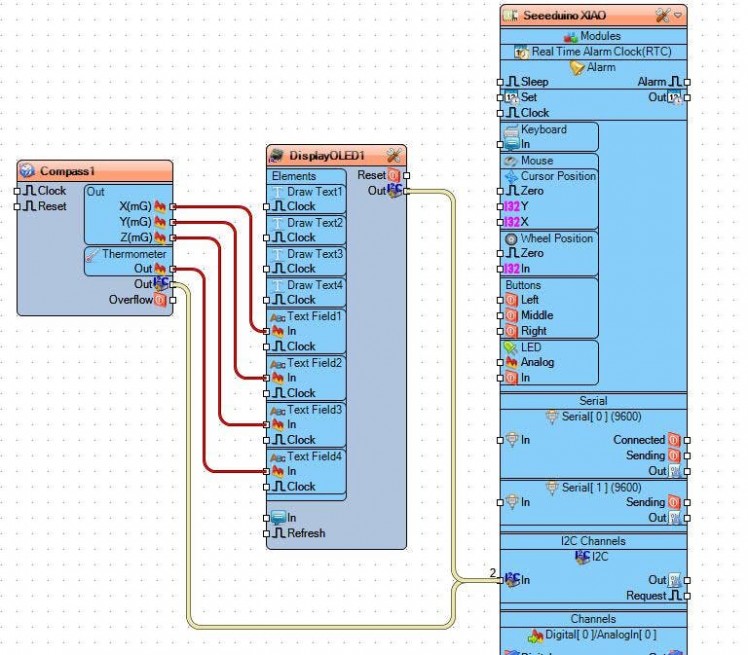
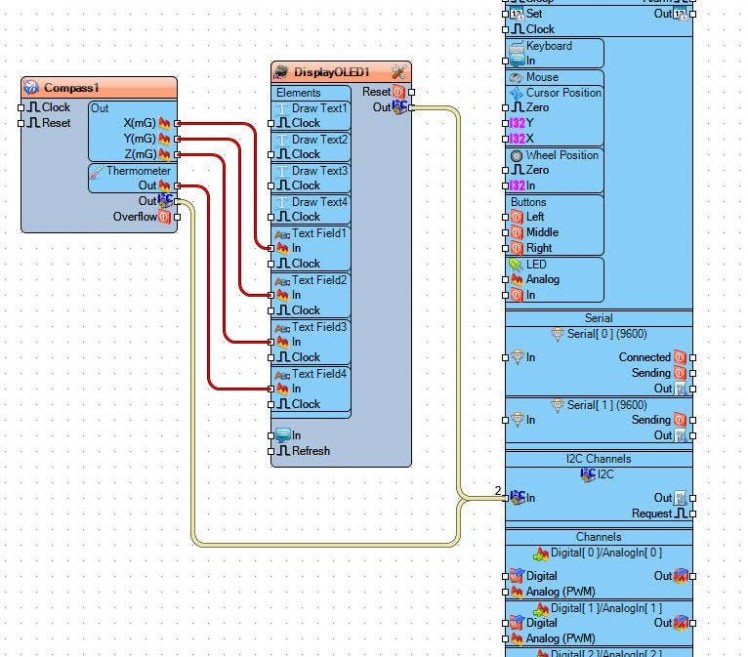
- Connect "Compass1" pin [X] to "DisplayOLED1" pin [Text Field1 In]
- Connect "Compass1" pin [Y] to "DisplayOLED1" pin [Text Field2 In]
- Connect "Compass1" pin [Z] to "DisplayOLED1" pin [Text Field3 In]
- Connect "Compass1" pin [Thermometer] to "DisplayOLED1" pin [Text Field4 In]
- Connect "Compass1" pin [I2C Out] to XIAO board pin [I2C In]
- Connect "DisplayOLED1" pin [I2C Out] to XIAO board pin [I2C In]
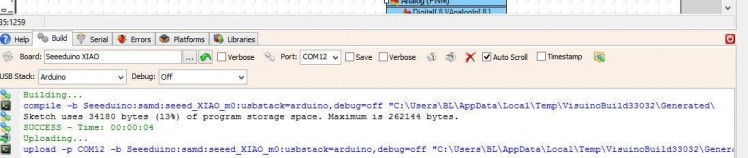
In Visuino, at the bottom click on the "Build" Tab, make sure the correct port is selected, then click on the "Compile/Build and Upload" button.
Step 8: PlayIf you power the Seeeduino XIAO module, the OLED Display will start to show the sensor Values.
Congratulations! You have completed your project with Visuino. Also attached is the Visuino project, that I created for this Tutorial, you can download it and open it in Visuino: https://www.visuino.eu
Step 9: TroubleshootingIf Port is not detected in Visuino when you try to upload the code do a reset
- Connect the Seeeduino XIAO to your computer.
- Use tweezers or short lines to short the RST pins in the diagram twice.
- The orange LED lights flicker on and light up.
Find out more on this links:
Schematics, diagrams and documents
Code
Credits
Related products


Leave your feedback...