
Arduino And Visuino: Controlling Servo With Ps2 Controller

Made by Ron / Displays / Games & Gaming / Home Automation / Robotics / Sensors
About the project
Learn how to program Arduino to control Servo motor from a Play Station 2 controller with the help of Visuino.
Project info
Difficulty: Easy
Estimated time: 1 hour
License: GNU General Public License, version 3 or later (GPL3+)
Items used in this project

Story
In this Tutorial you will learn how to program Arduino to control Servo
motor from a Play Station 2 controller with the help of Visuino - an easy to use graphical development environment for Arduino.
1 / 2 • Picture 1

Picture 1

Picture 2
You will need:
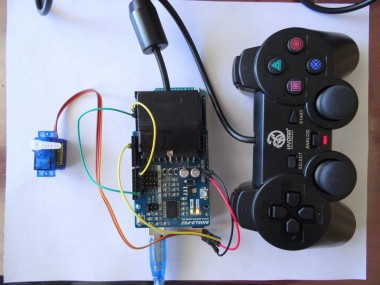
- One Arduino Mega (You can easily modify for another Arduino compatible board)
- One Cytron PS2 Shield. You can buy it easily from here http://www.robotshop.com/en/ps2-shield-arduino.html
- One Small Servo
- Up to 5 jumper wires
1 / 6 • Picture 1

Picture 1

Picture 2

Picture 3

Picture 4

Picture 5

Picture 6
The Cytron PS2 Shield used in the demo has configuration jumpers for the Arduino UNO serial, or to use software serial.
Using the main hardware serial is problematic as the same serial is used to program the Arduino and for debugging.
Arduino Mega has 4 serials, and it is recommended to use a hardware serial whenever one is available.
To connect the PS2 Shield to one of the additional serial ports of the Arduino Mega, you can use jumper wires.
1. Disconnect the jumpers from the PS2 Shield.
2. If you have Male to Female jumper wires connect directly the pins of the jumper marked on the second picture with the red circles to the Arduino Mega pins marked with red ellipses in the first picture.
The RX pin (right on the PS2 Shield picture) should be connected to the pin 19 (RX1) of the Arduino Mega (Picture 1)
The TX pin (left on the PS2 Shield picture) should be connected to the pin 18 (TX1) of the Arduino Mega (Picture 1)
If you have only male-male jumper wires as in my case, you can use the jumper cap to make the connection as shown in picture 3.
Step 3: Start Visuino and select Arduino Board
1 / 2 • Picture 1

Picture 1

Picture 2
To start programming the Arduino, you will need to have the Arduino IDE installed from here: http://www.arduino.cc/.
Please be aware that there are some critical bugs in Arduino IDE 1.6.6.
Make sure that you install 1.6.7 or higher, otherwise this Tutorial will not work!
The Visuino: https://www.visuino.com also needs to be installed.
Click on the "Tools" button on the Arduino component in Visuino.
- When the dialog appears, select Arduino Mega as shown on Picture 2
1 / 3 • Picture 1

Picture 1

Picture 2

Picture 3
- From the toolbar expand the "Remote Controllers" Category, then the "Digital" Sub Category, and select the "PlayStation 2 Controller (Serial Shield)" as shown on the first picture, then drop the component in the design area
- Connect the "Out" pin of the PS2Controller1 component to the "In" pin of "Serial[ 1 ]" of the Arduino component (Picture 2)
- Connect the "RightStick" "Y" pin of the PS2Controller1 component to "In" pin of "Serial[ 0 ]" of the Arduino component (Picture 3)
1 / 2 • Picture 1

Picture 1

Picture 2
- In Visuino Press F9 to generate the Arduino code
- When the Arduino IDE appears, click on the Upload button (Picture 1)
- Open the Arduino IDE Serial Terminal to monitor the position of the right stick (Picture 2), and move the right stick up and down
- The position of the stick will be printed on the serial, each time it has changed. The position will be in values between 0 and 1 where 0.5 is the center position of the stick
1 / 3 • Picture 1

Picture 1

Picture 2

Picture 3
- Connect the "Signal" wire of the servo to pin Digital 2 of the Arduino (Picture 1)
- Connect the +5V and the Ground for the servo. It is recommended to use external power for the servo, but for testing with small servos, you can connect directly to the Arduino as shown on the schematic. (Picture 2) My servo has female connectors and I used male-male jumper cables to connect it to the Arduino Mega as you can see in Picture 3. If your servo has separated male connectors, you can connect it directly to the Arduino.
1 / 2 • Picture 1

Picture 1

Picture 2
- From the toolbar expand the "Motors" category, select "Servo" (Picture 1)
- Drop it in the design area, then connect the "RightStick" "Y" of the PS2Controller1 to the "In" pin of the Servo1, and the "Out" pin of the Servo1 to the "Digital" input pin of "Digital[ 2 ]" channel of the Arduino component as sown in Picture 2

- In Visuino Press F9 to generate the Arduino IDE code as you did in Step 3 and when the IDE appears press the "Upload" button.
- Once the code is uploaded, you can start controlling the servo with the right stick by moving it up and down as shown in the video.
Congratulations! You created your own Arduino program to control Servo motor with a PS2 Shield in just few minutes!
Also attached is the Visuino project, that I created for this Tutorial. You can download and open it in Visuino : https://www.visuino.com
Credits
Related products


Leave your feedback...