
Ultimate Guide to Arduino Nano: Every Model Reviewed & Compared!
When it comes to choosing a microcontroller platform, one is faced with numerous challenges as microcontrollers can have all kinds of varying capabilities, ranging from CPU type, speed, memory sizes, and peripherals.
To make matters worse, not only do you have so many options to choose from, but you have to plan ahead and try to think what your project will need.
This Arduino Nano guide will explore the evolution of the Nano boards ever since the release of the first Arduino Nano board, highlighting advances in technology and the growing hunger from makers and engineers have seen Arduino release several Nano variations. Well, today you are in luck because I will now tell you everything, you need to know about each nano board, starting with…The original Arduino Nano.
Arduino Nano
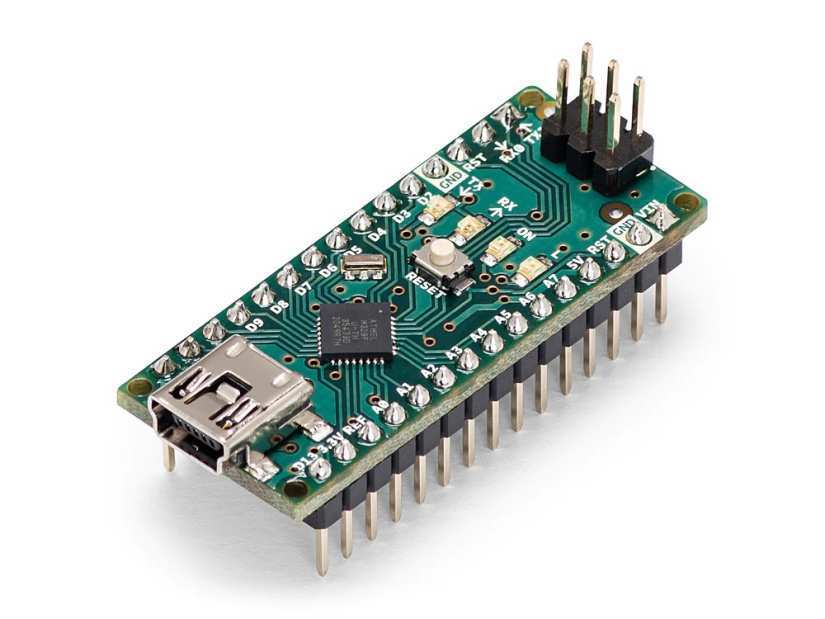
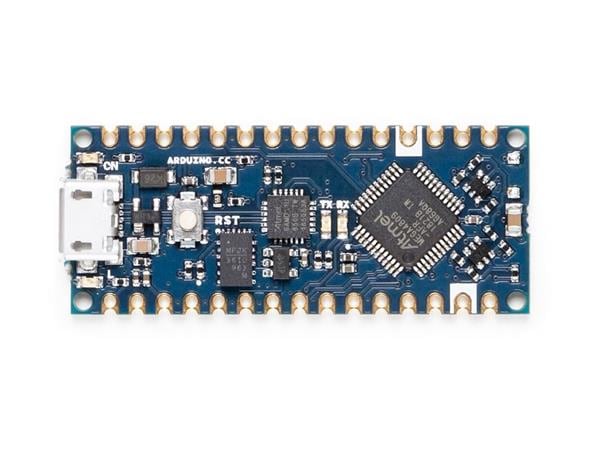
In this guide for the Arduino Nano, we'll start with the classic board that marked a new era for Arduino. This board is based on the Atmega328 microcontroller which has a 16MHz core, 32KB of flash, 2KB of SRAM, and 1KB of EEPROM.
In this guide for the Arduino Nano, we'll start with the classic board that marked a new era for Arduino.
With 14 digital pins and 8 analog pins, there is plenty of GPIO to go around, and the fact that the Nano runs at 5V means that it is compatible with most circuits.
The input power supply to the Nano can be between 7 to 12V, and this is handy for circuits that are powered by large batteries, solar panels, and turbines.
Connectivity to this board is provided via a mini USB B connector, and while these were all the rage back in the day of the first Nanos, these have slowly been replaced with the likes of micro USB and USB C. But, it is indeed a small robust connector and such cables are still manufactured, so you won't have any issue with using the classic Nano in a modern environment.
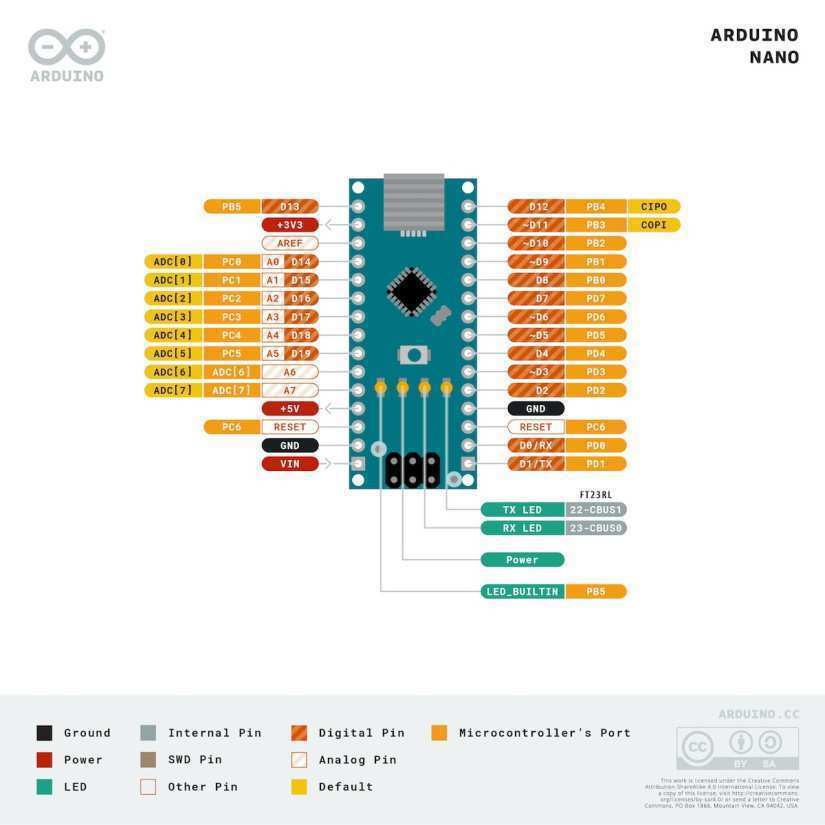
Arduino Nano Pinout Diagram:
Arduino Nano use cases:
While it was certainly ahead of its time when it came out, now that technology has significantly progressed, it has become a legacy product.
As such, you should only consider using this board if you have an older project that requires a Nano replacement and absolutely must use the Nano.
If you need an Arduino Nano but it isn’t essential that you need the original, the Nano Every is a far better choice as it has better specs, is much cheaper, and has no components on its underside.
But, if you insist on using a Nano, then it is a great board for small projects that have a hardware focus, such as controllers, sensor interfaces, rapid-response systems, and autonomous robots.

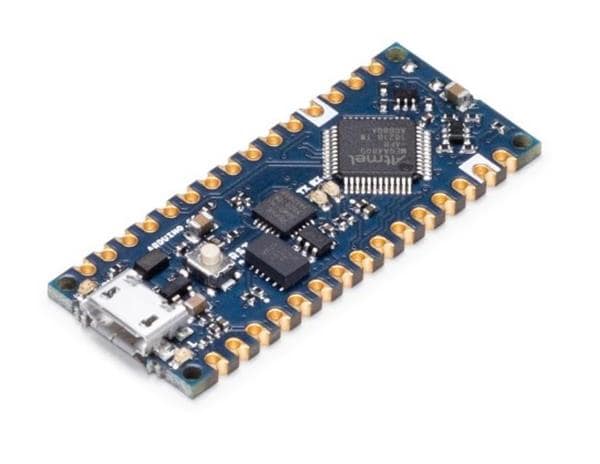
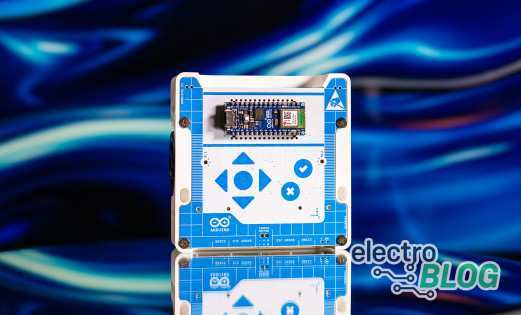
Arduino Nano ESP32
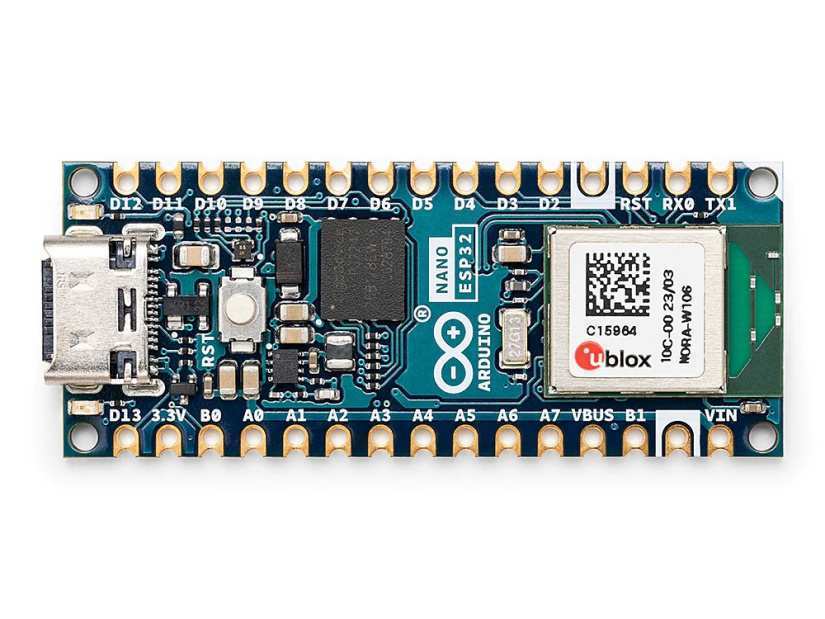
The Arduino Nano ESP32, as the name suggests, is a Nano based on the ESP32 SoC from Espressif. Well, to be specific, this board uses the uBlox NORA-W106 which itself incorporates the ESP32 IC along with all the needed supporting hardware to make it work.
Anyway, the Nano ESP32 has both Wi-Fi and Bluetooth capabilities thanks to the ESP32, and with a core frequency of up to 240MHz, flash size of 384KB, and 512KB of SRAM, the Nano ESP32 provides you with an insane amount of computational and connectivity power.
For user applications that need more memory than the 384KB of flash, an additional 16MB flash is incorporated into the board which can be used for storing large files such as images, sound, and firmware.
Unlike the classic Nano, the Nano ESP32 is a 3.3V board, meaning that it cannot be used with older 5V circuits. But the input voltage from 3 to 21 volts is an excellent upgrade over the classic Nano, allowing for it to be used on all kinds of power sources.
Two onboard LEDs are also provided for use as quick peripherals. One of these LEDs is an RGB variation which allows for any colour to be generated.
Finally, this board uses a USB C connector, which makes it highly suitable for modern designs. Plus, it eliminates the issues with USB superposition where you have to make three attempts to get the connector to work!
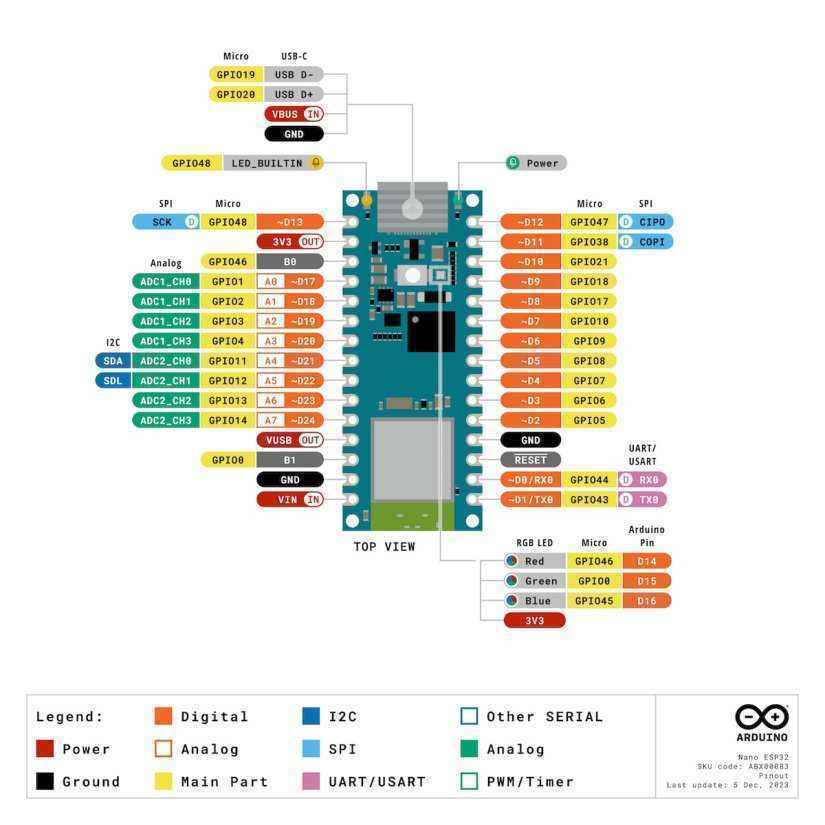
Arduino Nano ESP32 Pinout Diagram:
Arduino Nano ESP32 use cases:
The Nano ESP32 is an excellent workhorse for any Wi-Fi and Bluetooth project. As the ESP32 is well supported across all engineering communities, you won’t find any shortage of example projects, libraries, and boffins online willing to help you with any issues you may encounter.
While security on the ESP32 may be lacking to some degree (meaning you should think twice before using it in applications where privacy may be of concern), that doesn’t mean you can’t use it to create smart home devices, wireless controllers, and plenty of other cool IoT gadgets.
Additionally, the ESP32’s obscenely powerful processor and memory make it an absolute beast when doing advanced projects such as VGA controllers, tiny operating systems, and interfaces. Of course, this means that it isn’t exactly the best when needing to save power.
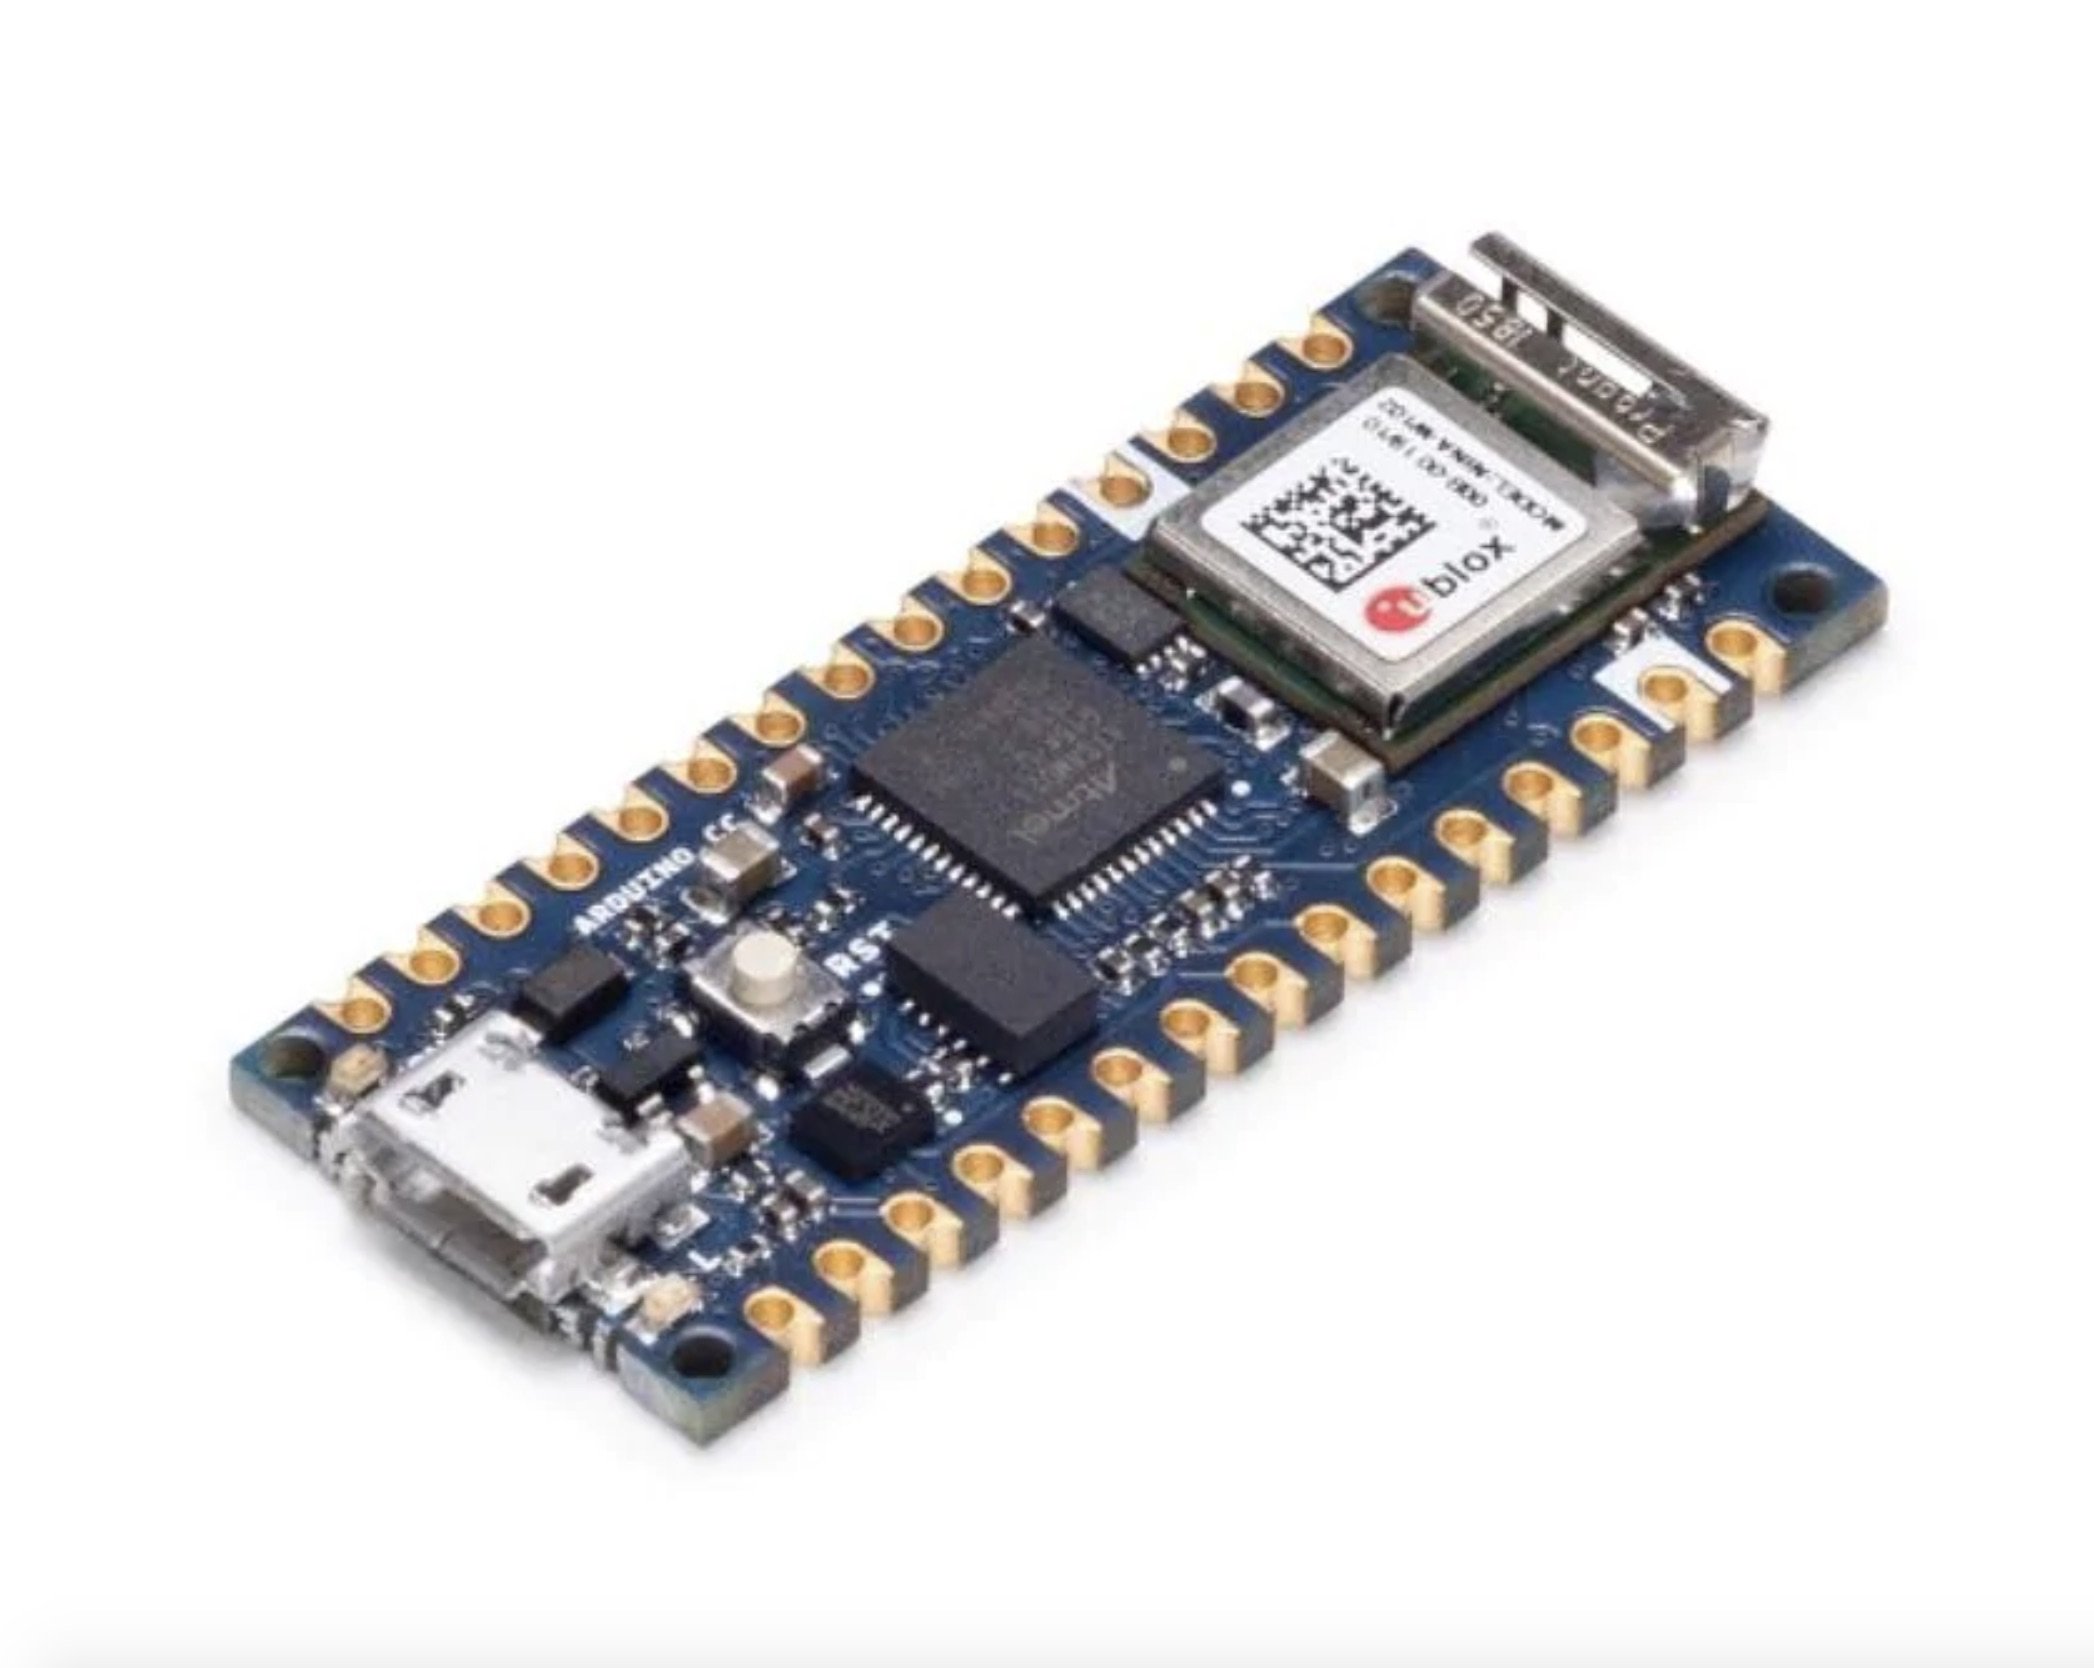
Arduino Nano 33 IoT
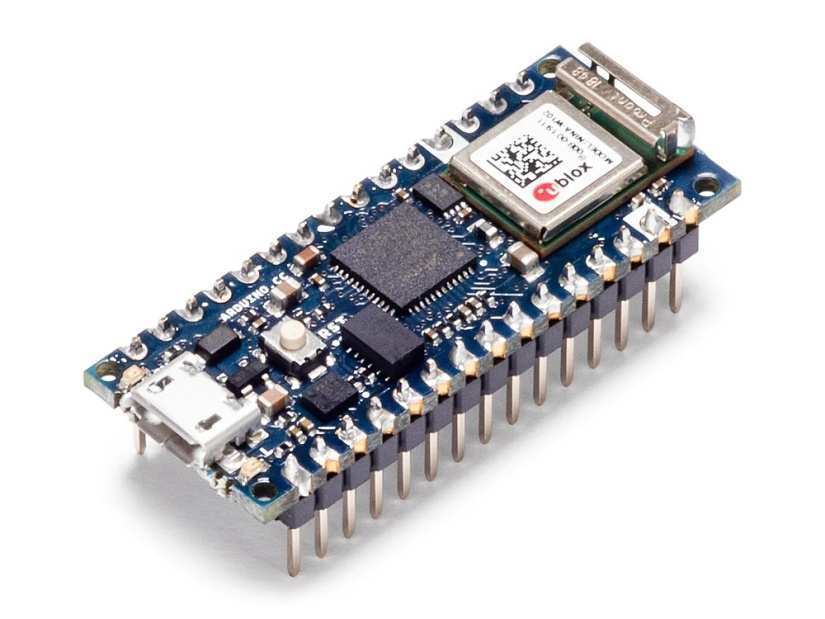
Continuing our Arduino Nano guide, the next board, Arduino Nano 33 IoT (fun fact...it is called the 33 IoT because it runs on 3.3v!), is based on the SAMD21 microcontroller, which has an ARM core clocked at 48MHz, 256KB of Flash, and 32KB of SRAM.
Wireless connectivity, both Wi-Fi and Bluetooth, is provided via the uBlox NINA-W102 module, and anyone who has used uBlox products will know that they are top quality.
One feature about this board that makes it stand out is its inclusion of an ATECC608A secure element, which provides cryptographic and authentication functions. This makes the Nano 33 IoT extremely secure, but more on this later.
Also Integrated into this board is the LSM6DS3 IMU which provides 6 degrees of freedom via a 3-axis gyroscope and 3-axis accelerometer. This is great for those who want to interact with physical movement (such as a game controller or VR/AR system).
The SAMD21 micro also supports native USB, which allows for creating USB devices, and the power of the uBlox module is so vast that it can be used to run a small Linux system. This allows for the SAMD21 to provide low-level GPIO access while the uBlox module provides high-level system functions.
Finally, the Nano 33 IoT operates at 3.3V, can support up to 21V input voltage for power, and uses a micro USB cable, just like the first Nano.
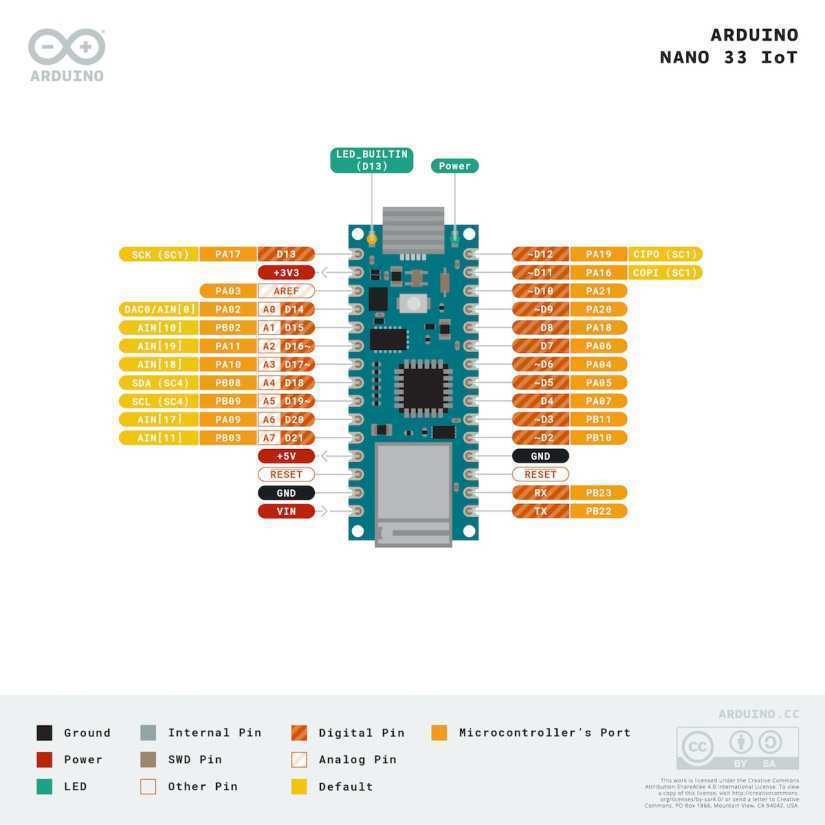
Arduino Nano 33 IoT Diagram:
Arduino Nano 33 IoT Use Cases:
The Arduino Nano 33 IoT is an extremely secure device thanks to its secure element chip which makes it hard for hackers to inject malicious start-up code, break encrypted memory, or hack the device remotely.
As such, the Nano 33 IoT is an excellent candidate for those looking to create IoT projects that need to ensure privacy. Such examples could include wearable medical devices, camera and microphone systems, and even in cryptocurrency applications (you could quite easily use this as offline storage for some crypto).
The separation of the main processor from the wireless module is also beneficial as it frees the CPU from network-related tasks which are often very heavy. Thus, the Nano 33 IoT is also ideal for use in applications where real-time low-level hardware signals are being used such as motor controls, sensor monitoring, and signal timing.
Arduino Nano 33 BLE and Nano BLE Sense
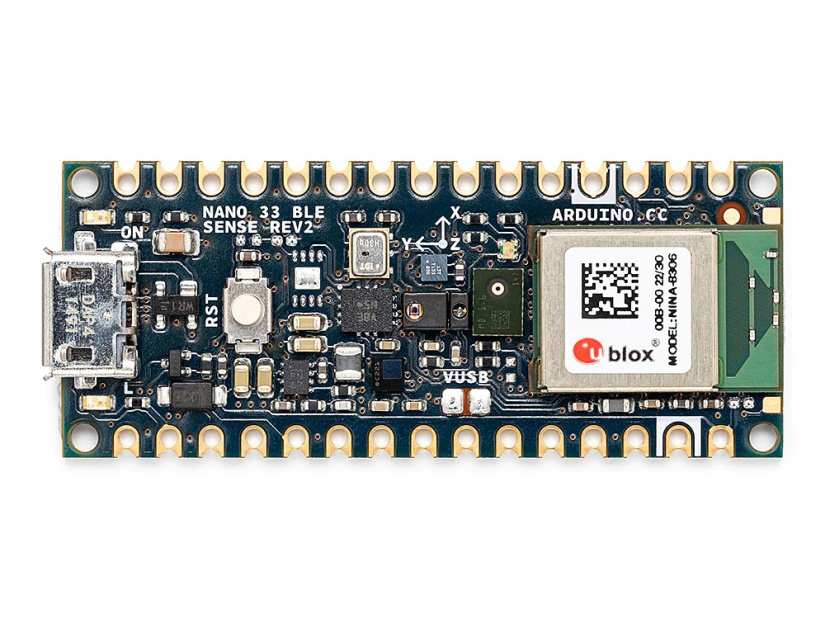
Up next is the Arduino Nano 33 BLE and BLE Sense (yes, I’m being a bit cheeky and covering these two boards here, but it's because they are very similar, and not because I’m lazy!). At the heart of these boards is the Nordic nRF52840, an MCU that has plenty of experience in the field of professional commercial devices.
This MCU has a core speed of 64MHz, 1MB of flash memory, and 256KB of SRAM, but what makes this microcontroller of particular importance is that it supports Bluetooth Low Energy and consumes a tiny amount of power.
As such, the Nano 33 BLE and BLE sense are ideal for low-energy applications running on batteries, but again, more on this later (I have included some details on each board and its applications/uses below).
Native USB is provided via the nRF52840 which makes it ideal for USB projects, and the use of a micro USB connector makes it compatible with older Nano projects. However, as it is a 3.3V, it can't work with 5V circuits, but the input power supply of up to 21V makes it easy to power.
What are the differences between the Nano BLE and Nano BLE Sense?
Now, where the differences are between the BLE and BLE Sense is that the sense has a bunch of extra sensors. To be specific, the Nano 33 BLE Sense integrates an MP34DT05 microphone, ADS9960 gesture, light, and proximity sensor, LPS33HB barometric pressure sensor, and finally, a HTS221 temperature and humidity sensor. So, there is clearly a lot going on with the BLE Sense!
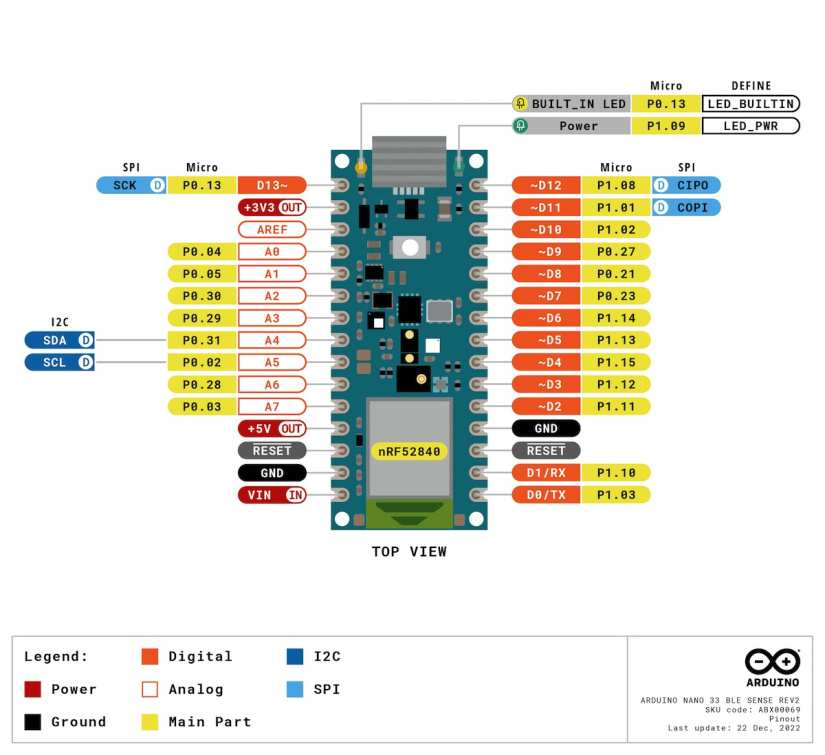
Arduino Nano 33 BLE Sense Pinout Diagram:
Arduino Nano 33 BLE and Nano BLE Sense Use Cases:
The Nano 33 BLE is an excellent option for those looking to create low-energy Bluetooth projects. As the Nano 33 BLE is supported by Nordic and Arduino development environments, you won’t be short of programming options, examples, and libraries.
The low-energy nature of the nRF52840 also gives users the option to run from small battery sources for extended periods, meaning that projects can seriously reduce their overall weight.
As such, the Nano 33 BLE is ideal for use in wireless devices such as headphones, microphones, wearables, and medical devices, but could also be leveraged in small autonomous drones including those that fly, and even as a small rocket guidance computer.
For those who want to create a Nano 33 BLE project with a wide range of sensors, the Nano 33 BLE sense is a better choice due to the numerous integrated sensors including IMU, microphone, temperature, and humidity.
This makes the Nano 33 BLE excellent for numerous Bluetooth projects such as wearables, medical systems, and even environmental sensors.
Arduino Nano RP2040
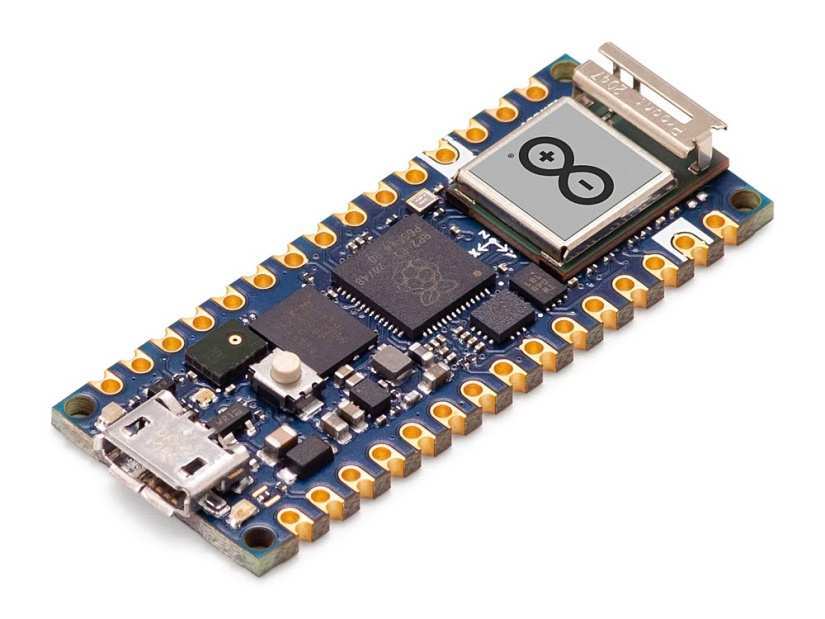
As we conclude our guide for the Arduino Nano, let's look at what is probably my favorite of the Nano boards...the Nano RP2040! For those who have seen my other video about the RP2040, you will know that I rave about this microcontroller because of its high specs, range of peripherals, and simplicity of use.
The RP2040 has a 133MHz core, 264KB of SRAM, and utilizes an external 16MB flash chip for storing program code. As the RP2040 appears as a flash drive when programming, updating its firmware is trivial, and this also allows for storing files that can be used by applications (especially in MicroPython).
But the Nano RP2040 goes one step further thanks to the incorporation of the uBlox NINA W102 which provides Wi-Fi and Bluetooth. This module integrates 448KB of ROM, 520KB of SRAM, and 16MB of flash, so again, there is plenty of resources.
With regards to security, the Nano RP2040 integrates an ATECC608A-MAHDA secure element, providing cryptographic and authentication functions. Two main sensors are also integrated into this board, the LSM6DSOXTR 6-axis IMU, and the MP3DT06JTR digital microphone.
Finally, the RP2040 Nano operates at 3.3V, but the input power voltage can range from 3V to 21V, and connectivity is provided via a micro USB connector.
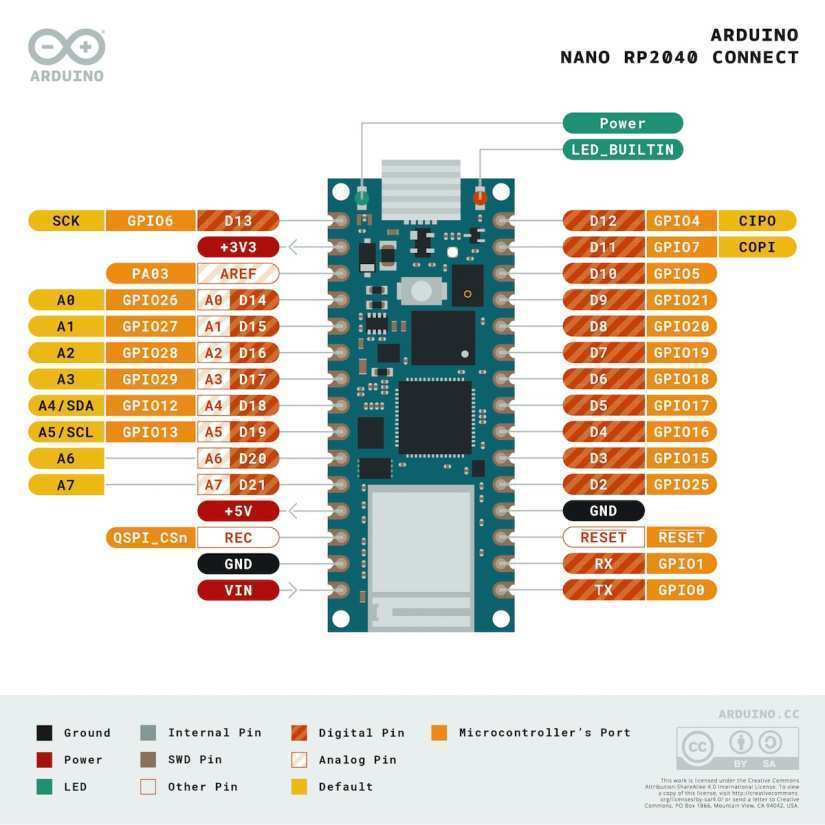
Arduino Nano RP2040 Pinout Diagram:
Arduino Nano RP2040 Use Cases:
The Nano RP2040 is excellent for those who want to use the RP2040 with both Wi-Fi and Bluetooth. The low-cost nature of the RP2040 combined with its powerful range of peripherals make it ideal for use in hardware projects that need wireless connectivity.
Additionally, the PIO peripheral in the RP2040 also makes it excellent for low-level signal conditioning and custom bus protocols, and the ability to utilize MicroPython, providing makers with a powerful programming environment.
When taking all of this into consideration, the Nano RP2040 is great for projects that need to be developed rapidly, utilize the Arduino programming environment, and need wireless connectivity. Such projects could include wireless devices, small drones, sensor stations, and hardware controllers.
However, just remember that as the RP2040 doesn’t have code protection (nor can it encrypt the external flash), it is highly susceptible to hacking, so don’t use it where security or privacy is important.
Arduino Nano Every
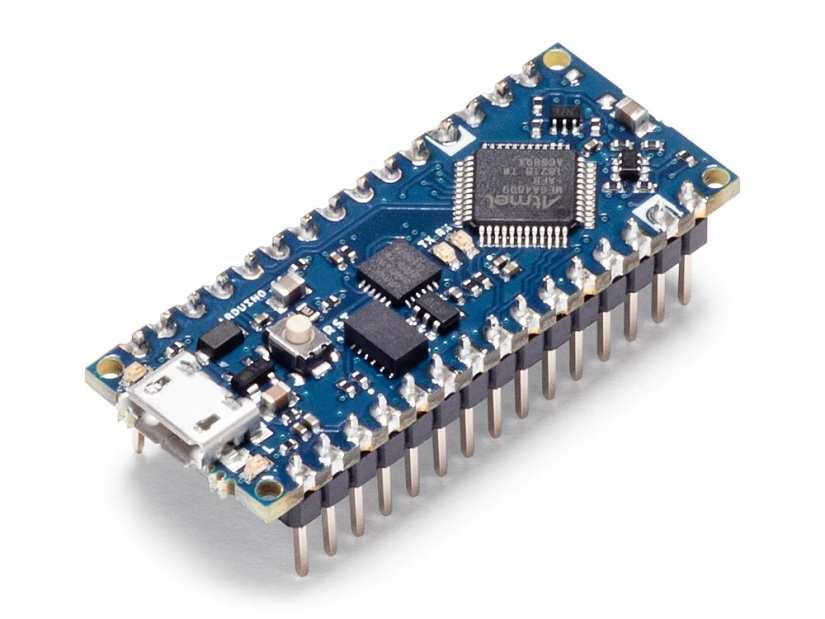
The Arduino Nano Every is an interesting variation of the Nano as it provides an upgraded version of the Nano while being significantly cheaper.
At the heart of this board is the ATMega4809 MCU which integrates a 20MHz core, 48KB Flash, 6KB SRAM, and 256 bytes of EEPROM. These specs are far better than what the Nano Classic offers, which makes the Nano Every a no-brainer for new projects.
Just like the Nano, the Every also operates at 5V, which makes it backward compatible with previous Nano projects.
But an extra feature of this board that makes it highly practical is that it has no components on the underside. This means that it can be used with custom PCBs as a module that is directly soldered without the need for headers of spacers, being completely flush.
Finally, this board uses a micro USB connector, so you won’t have any issues finding replacement cables or connecting to other embedded systems.
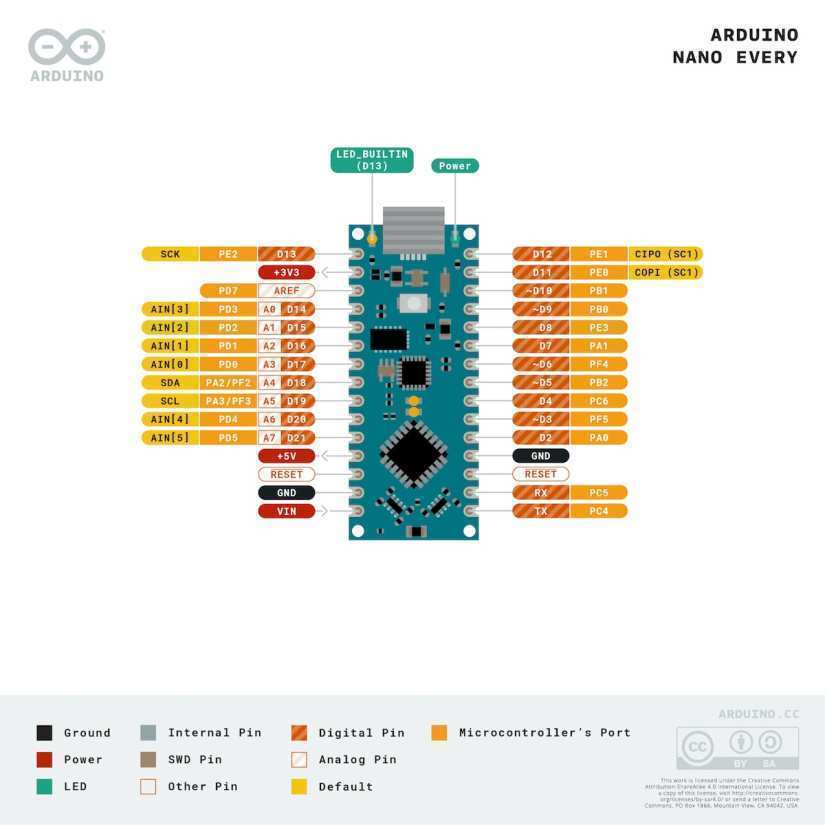
Arduino Nano Every Pinout Diagram
Which Arduino Nano board is the Electromaker favorite?
The Nano ESP32 wins my heart because of the powerful processing capabilities that it offers. You can use the ESP32 to do so many brilliant projects, it can be used as a stand-alone microcontroller, and the ability for it to interact with low-level pins at high speed makes it a good all-around candidate.
Furthermore, the ESP32 is just so well supported, it can be used for IoT projects, Bluetooth projects, and even as an industrial controller if you wanted. There really are no limits to the ESP32, so for me, the Nano ESP32 is number one!
Did you enjoy this article?
Make sure you subscribe to The Electromaker Show for similar content and subscribe to our monthly newsletter!

Robin Mitchell is an electronic engineer who has been involved in electronics since the age of 13. After completing a BEng at the University of Warwick, Robin moved into the field of online content creation developing articles, news pieces, and projects aimed at professionals and makers alike. Currently, Robin runs a small electronics business, MitchElectronics, which produces educational kits and resources.


Leave your feedback...