
Your Environmental Data On Arduino Iot Cloud
Made by Arduino / Environmental Sensing / Sensors / IoT
About the project
Group all the information collected by a MKR WiFi 1010 + MKR ENV Shield in a single, web-based dashboard.
Project info
Difficulty: Moderate
Platforms: Arduino
Estimated time: 1 day
License: Creative Commons Attribution CC BY version 4.0 or later (CC BY 4+)
Items used in this project

Story
ABOUT THIS PROJECT
The story
By making this project you will learn how to read the data from the various sensors available on the ENV Shield, and you also learn how to visualize data on the widgets available in the Arduino Cloud.
What you need
The project requires an Arduino MKR WiFi 1010, the MKR ENV Shield, a battery pack (or other mean of powering the boards) and an account on Arduino IoT Cloud:
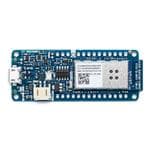
- The core of the project is the Arduino MKR WiFi 1010. This board handles computation and communication thanks to its SAMD21 microcontroller and the on-board NINA-W10 module, capable of WiFi and BLE;
- The battery pack is connected to the MKR WiFi 1010 and is used to power the device when an alternative power supply is not available;
- The MKR ENV Shield is an Arduino MKR shield which featuring environmental sensors to measure temperature, humidity, pressure, light and UV.
- Access credentials are needed to connect to the WiFi network.
The hardware configuration is relatively simple: it only requires the MKR WiFi 1010, a MKR ENV Shield and a battery pack.
MKR WiFi 1010 with MKR ENV Shield and a battery 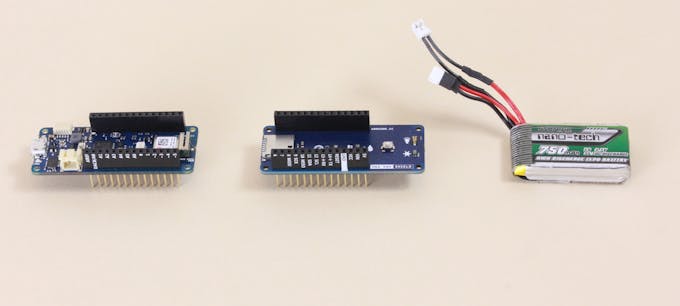
MKR WiFi 1010 with MKR Shield and a battery
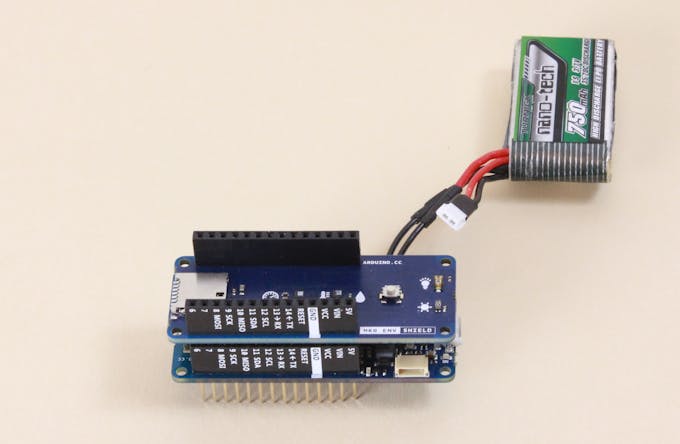
Align the MKR WiFi 1010 and ENV shield making sure that the labeled pin connectors are matching

Carefully plug the MKR ENV Shield in the MKR WiFi 1010 connector
The battery pack should be plugged into the designated connector on the MKR WiFi 1010:
Code structure
There's two main parts to the code required by this project: the skeleton template generated by Arduino IoT Cloud APIs to display data received from the MKR WiFi board and the Arduino MKRENV library which allows us to read values measured by all its sensors:
- Our Arduino IoT Cloud Thing will be configured to hold six properties which will represent all the measurements acquired by the MKR WiFi 1010 and sent over a secure connection.
- The Arduino sketch is first auto generated by IoT Cloud and handles connection to the Internet as well as data transfer between our Thing and the board, we'll then add the Arduino MKRENV library to manage the ENV Shield sensors.
Sketch
The first code section is used to include the libraries required by our application. The thingProperties.h includes all the WiFi connection functionalities and cloud connection management; the only information required from the user are the credentials necessary to establish a connection with a WiFi network (SSID and PASSWORD).
Arduino IoT Cloud authenticates the connected device using a key stored inside the board's crypto-chip during the Getting Started process, guaranteeing data transmission over a secure channel.
The Arduino_MKRENV library includes all that is needed to read values measured by each sensor on the MKR ENV shield.
- #include "thingProperties.h"
- #include <Arduino_MKRENV.h>
As usual, the setup section allows us to initialize all the objects used by the sketch, including Arduino IoT Cloud and its properties. ArduinoCloud.begin() makes sure that our board is prepared to connect and exchange data with the Dashboard:
- void setup() {
- // Initialize Serial and wait for port to open:
- Serial.begin(9600);
- // This delay gives the chance to wait for a Serial Monitor without blocking if none is found
- delay(1500);
- // Defined in thingProperties.h
- initProperties();
- // Connect to Arduino IoT Cloud
- ArduinoCloud.begin(ArduinoIoTPreferredConnection);
- /*
- The following function allows you to obtain more information
- related to the state of network and IoT Cloud connection and errors
- the higher number the more granular information you’ll get.
- The default is 0 (only errors).
- Maximum is 4
- */
- setDebugMessageLevel(2);
- ArduinoCloud.printDebugInfo();
- if (!ENV.begin()) {
- Serial.println("Failed to initialize MKR ENV shield!");
- while(1);
- }
- }
The last bit of code is the loop where we query each sensor on the MKR ENV Shield. After each reading the sketch updates the properties variables and thanks to ArduinoCloud.begin() data is synced with the cloud:
- void loop() {
- ArduinoCloud.update();
- // Your code here
- humidity = int(ENV.readHumidity());
- lux = int(ENV.readIlluminance());
- pressure = int(ENV.readPressure());
- temperature = int(ENV.readTemperature());
- uva = int(ENV.readUVA());
- uvb = int(ENV.readUVB());
- uvi = int(ENV.readUVIndex());
- delay(1000);
- }
How to set up and use
Connect all the parts together, then connect your MKR WiFi 1010 to the computer and log onto your Arduino Cloud account.
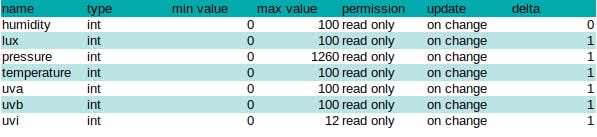
You need to follow the procedure explained in the Arduino Cloud Getting Started and create the properties as specified in the following table, remembering that each name is case sensitive:
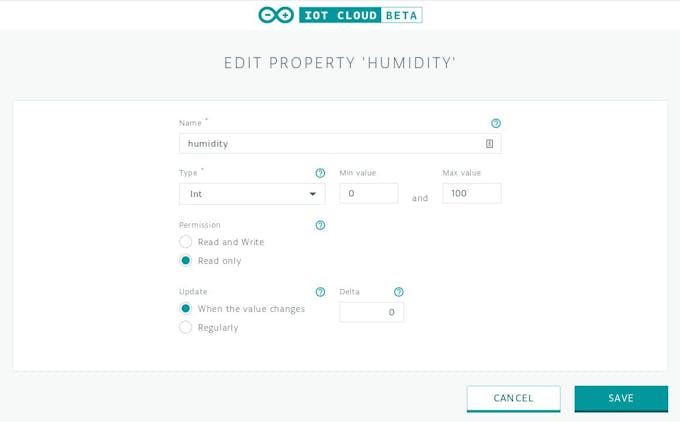
These are the values to use in each widget using the form that pops up every time you add a new widget
Each time you add a new widget you are required to fill a form like the one below.
Follow the table above to fill in all propertiess details
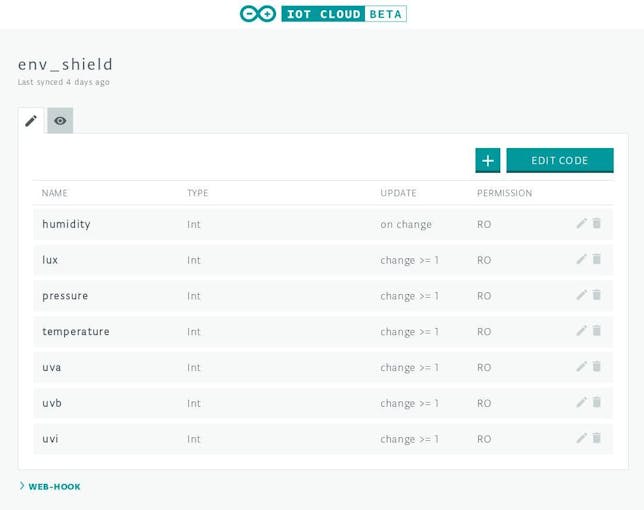
If you filled each property correctly, you should end up with something like this:
This is the list of widgets used by this project
When all the properties are created, click on the button edit code. You will be redirected to the Arduino Create Web Editor where you'll replace the main sketch in the first tab with the following code:
- /*
- Sketch generated by the Arduino IoT Cloud Thing "env_shield"
- https://create.arduino.cc/cloud/things/829941ed-efdd-4572-91c0-e93a732192ec
- Arduino IoT Cloud Properties description
- The following variables are automatically generated and updated when changes are made to the Thing properties
- int humidity;
- int lux;
- int pressure;
- int temperature;
- int uva;
- int uvb;
- int uvi;
- Properties which are marked as READ/WRITE in the Cloud Thing will also have functions
- which are called when their values are changed from the Dashboard.
- These functions are generated with the Thing and added at the end of this sketch.
- */
- #include "thingProperties.h"
- #include <Arduino_MKRENV.h>
- void setup() {
- // Initialize serial and wait for port to open:
- Serial.begin(9600);
- // This delay gives the chance to wait for a Serial Monitor without blocking if none is found
- delay(1500);
- // Defined in thingProperties.h
- initProperties();
- // Connect to Arduino IoT Cloud
- ArduinoCloud.begin(ArduinoIoTPreferredConnection);
- /*
- The following function allows you to obtain more information
- related to the state of network and IoT Cloud connection and errors
- the higher number the more granular information you’ll get.
- The default is 0 (only errors).
- Maximum is 4
- */
- setDebugMessageLevel(4);
- ArduinoCloud.printDebugInfo();
- if (!ENV.begin()) {
- Serial.println("Failed to initialize MKR ENV shield!");
- while(1);
- }
- }
- void loop() {
- ArduinoCloud.update();
- // Your code here
- humidity = int(ENV.readHumidity());
- lux = int(ENV.readIlluminance());
- pressure = int(ENV.readPressure());
- temperature = int(ENV.readTemperature());
- uva = int(ENV.readUVA());
- uvb = int(ENV.readUVB());
- uvi = int(ENV.readUVIndex());
- delay(1000);
- }
- void onHumidityChange() {
- // Do something
- }
- void onLuxChange() {
- // Do something
- }
- void onPressureChange() {
- // Do something
- }
- void onTemperatureChange() {
- // Do something
- }
- void onUvaChange() {
- // Do something
- }
- void onUvbChange() {
- // Do something
- }
- void onUviChange() {
- // Do something
- }
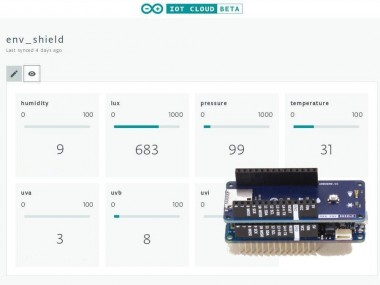
Upload the sketch to the board, and once a connection is established the MKR WiFi will start to sync the values obtained from the MKR ENV Shield with their propeties in the Cloud, which will be shown in the dashboard of the created Thing.

A Dashboard view of the properties synced between our MKR WiFi 1010 and Arduino IoT Cloud
The sketch on Arduino Create is available below in the code section.
We hope you'll enjoy creating your simple home/garden sensor using Arduino IoT Cloud, the MKR WiFi 1010 and the sleek MKR ENV Shield.
Yours,
Arduino Team
Code
Credits
Related products


Leave your feedback...