
Unlock Passwords With Tinyml-based Digit Recognition

Made by vilaksh01 / Artificial intelligence / Home Automation / Productivity / Security / Wearables
About the project
Perform the MNIST digit recognition on passwords using the TinyML approach on a tiny MCU.
Project info
Difficulty: Moderate
Platforms: Arduino, M5Stack, Neuton Tiny ML
Estimated time: 4 hours
License: MIT license (MIT)
Items used in this project
Hardware components

Story
The active development of smart gadgets with touch interfaces is trending nowadays. Lately, I've just got carried away by searching for different ways to solve digit recognition tasks using the machine learning approach (this is my third project on this topic).
This time I made a solution for a simple digital lock with a 4-digit pin code added. The device initially allows you to set a custom 4-digit PIN which could be later reused to unlock the device.
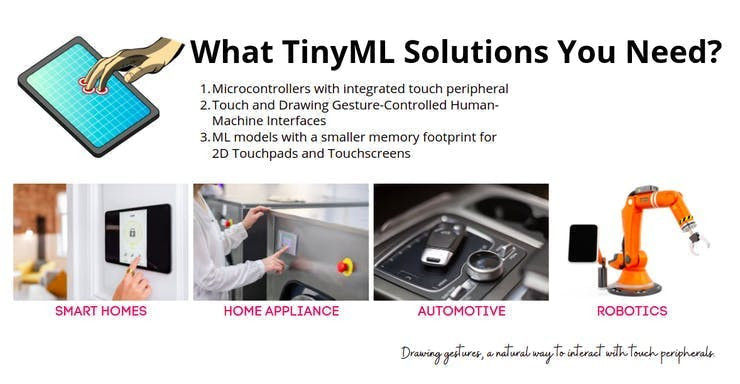
In practice, replacing mechanical pushbuttons with a gesture-controlled interface is an excellent way to:
- add value and advanced features to your device
- improve your product’s performance and reliability
- increase customer appeal
As such, in this project, I decided to focus on handwritten digit recognition in embedded systems through deep learning. I’ll explain how to create an embedded machine learning application that can classify handwritten digits and present an example solution based on Neuton TinyML and M5Stack MCUs.
Brief Task OverviewHandwritten digit recognition with models trained on the MNIST dataset is a popular “Hello World” project for deep learning as it is simple to build a network that achieves over 90% accuracy for it. There are lots of existing open-source implementations of MNIST models on the Internet, making it a well-documented starting point for machine learning beginners.
Deep Learning models usually require a considerable amount of resources for inference, but we are interested in running neural networks on low-power embedded systems with limited available resources.
In my case, the MNIST digit recognition will be performed by a Neuton TinyML model and a GUI interface to increase usability. The model allocation, input, and output processing and inference will be handled by the Neuton C SDK and custom code written specifically for the example.
A Look at the MNIST DatasetThe dataset used in this article consists of 60, 000 training and 10, 000 testing examples of centred grayscale images of handwritten digits. Each sample has a resolution of 28x28 pixels:
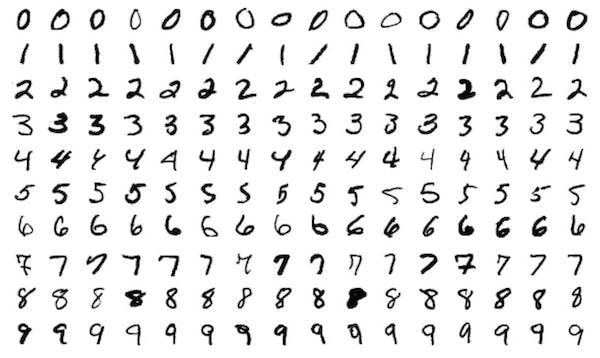
The samples were collected from high-school students and Census Bureau employees in the US, so the dataset contains mostly examples of numbers as they are written in North America. For European-style numbers, a different dataset has to be used. Convolutional neural networks typically give the best result when used with this dataset, and even simple networks can achieve high accuracy.
The data is available on Kaggle:https://www.kaggle.com/competitions/digit-recognizer/data
Dataset DescriptionThe data files train.csv and test.csv contain grey-scale images of hand-drawn digits, from 0 to 9.
Each image is 28 pixels in height and 28 pixels in width, 784 pixels in total. Each pixel has a single pixel value associated with it, indicating the lightness or darkness of that pixel, with higher numbers meaning darker. This pixel value is an integer between 0 and 255, inclusive.
Each pixel column in the training set has a name like pixelx, where x is an integer between 0 and 783, inclusive. To locate this pixel on the image, suppose that we have decomposed x as x = I * 28 + j, where I and j are integers between 0 and 27, inclusive. Then pixelx is located on row I and column j of a 28 x 28 matrix, (indexing by zero).
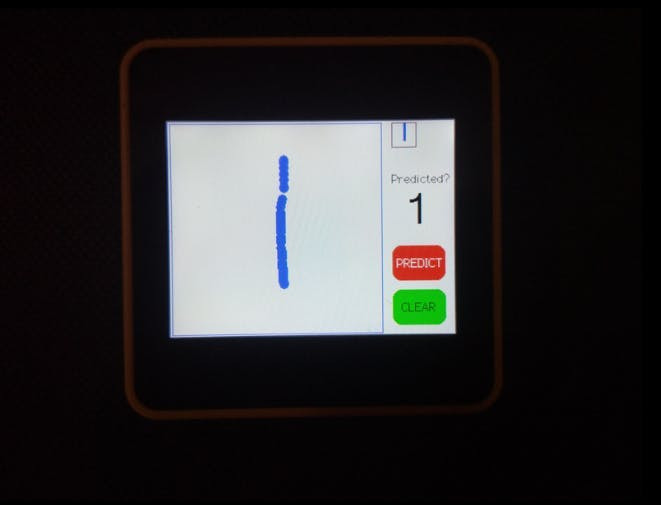
Application FunctionalityThe application is controlled through a GUI displayed on a touch-sensitive TFT LCD. The GUI, as shown, includes a touch-based input area for writing digits, an output area for displaying the results of inference, and two buttons, one for running the inference and the other for clearing the input and output areas. It also outputs the result and the confidence of the prediction to standard output, which can be read by using programs like PuTTY and listening on the associated COM port while the board is connected to the PC.
To skip grayscale conversions in the original Kaggle dataset, pixels of the main color, regardless of what it is, are considered white[1] and everything else black[0]. I modified the original MNIST dataset to get rid of grayscale values using this python script.
import csv
import numpy as np

f = open('train.csv', 'r')

out_file = open("out.csv", "w")

with f:
    file_read = csv.reader(f)
    writer = csv.writer(out_file)
    data = list(file_read)
    for row in data:
        # print(row)
        row_buff = []
        for col in row:
            if int(col) > 0:
                row_buff.append("1")
                # print("1", end=",")
            else:
                row_buff.append(col)
                # print(col, end=",")
        writer.writerow(row_buff)

f.close()
out_file.close()
The above would result in a dataset containing minimum value = 0 and maximum value = 1.
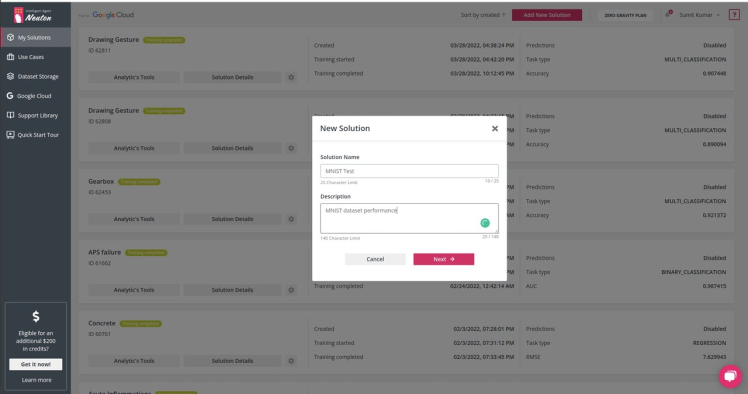
Step 1: Create a new solution on the Neuton AI platform
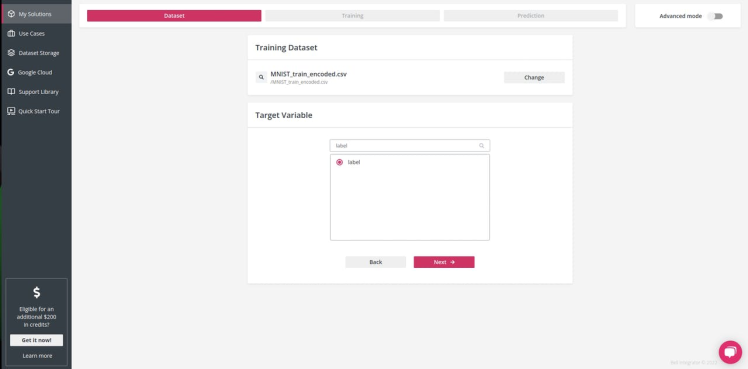
Step 2: Upload the dataset and select the target variable, in our case 'label'
1 / 2

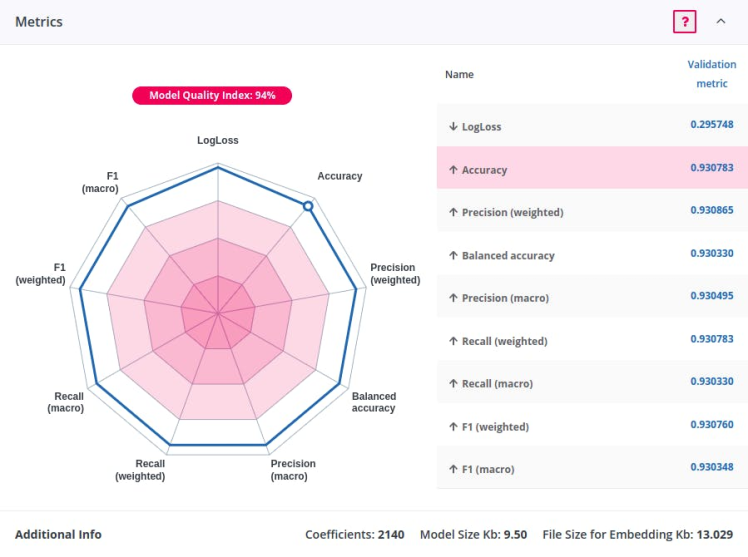
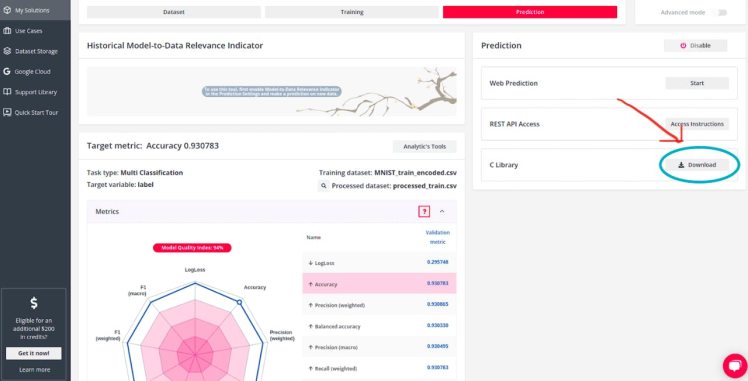
Step 3: Start the training (Since MNIST is a vast dataset, training could be time-consuming but you can stop it once you are convinced that the accuracy is appropriate). I stopped the training at ~94% accuracy.
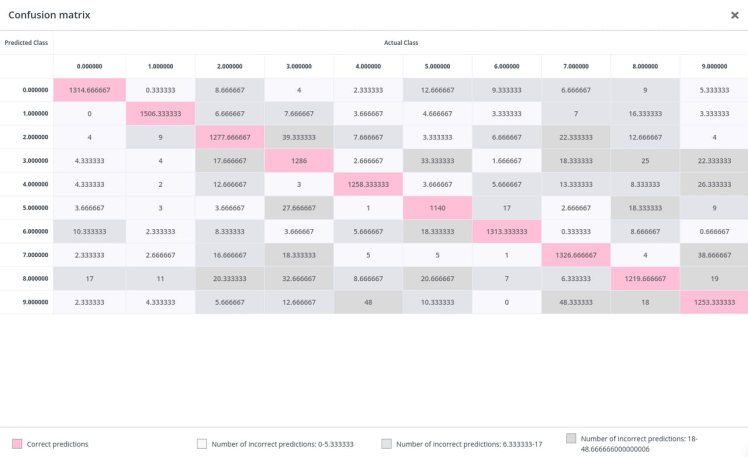
Here's the confusion matrix which would give a better idea about our model accuracy per label.
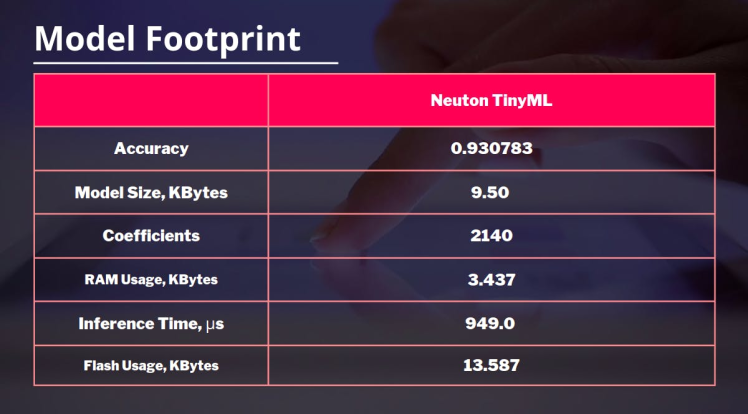
Download the model which we will embed on our device. The best part about Neuton TinyML is that it builds extremely light models, even on large datasets like MNIST. Coefficients: 2140 Model Size Kb: 9.50 File Size for Embedding Kb: 13.029
When a user drags a finger over the input area, the M5Core2 library continually draws a single-pixel under the finger. The Clear button simply sets the colour of pixels inside both the input and result areas to the background colour. The Predict button saves references to the input area, the underlying bitmap, and the width and height of the area, and then passes them to a native Neuton Inference Handler code, which processes the input image.
To make the application use more comfortable, the created input area has a size of 240x240px. However, the actual input image for the machine learning model must be 28x28 pixels large. Therefore, we scale down the input area image by a factor of 28/240, no heavy distortion of the input image was found using this technique for MNIST digits.
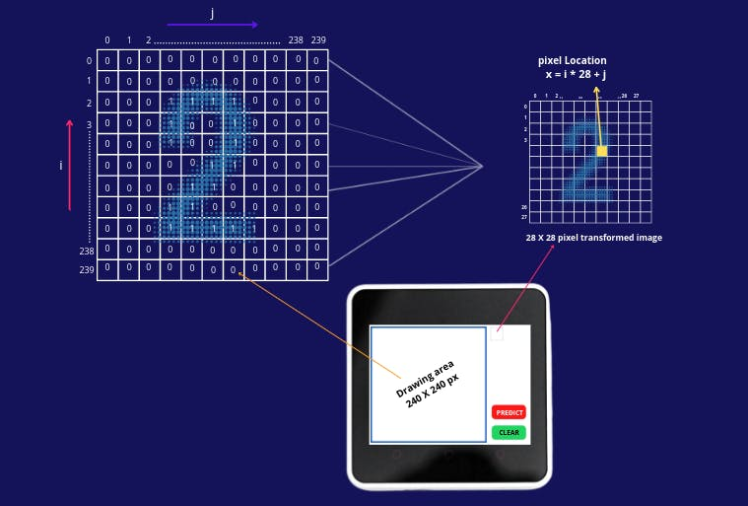
First, a 2D array with the width and height of the image area [28 X 28] is created. We then use the 8-neighbours pixel grouping technique to resize our 240 X 240 px drawing area to 28 X 28 pixels.
We first locate the TouchPoint coordinates for our LCD and translate them to get new x and y coordinates for our target image.
TouchPoint_t coordinate;
coordinate = M5.Touch.getPressPoint();

int x = coordinate.y * ((float)28 / 240);
int y = coordinate.x * ((float)28 / 240);
For the new coordinates X and Y, we set value 1 to all 8 neighbouring pixels, this way we ensure the proper thickness and size to be fed into the Neural Net model.
in_data[x + 1][y + 1] = 1.0;
in_data[x - 1][y - 1] = 1.0;
in_data[x + 1][y] = 1.0;
in_data[x - 1][y] = 1.0;
in_data[x][y + 1] = 1.0;
in_data[x][y - 1] = 1.0;
in_data[x + 1][y - 1] = 1.0;
in_data[x - 1][y + 1] = 1.0;
in_data[x][y] = 1.0;
Source: https://slidetodoc.com/digital-image-processing-chapter-2-digital-image-fundamental/

Source: https://slidetodoc.com/digital-image-processing-chapter-2-digital-image-fundamental/
We must eliminate the irrelevant pixels outside the input area when detecting touched pixels. The amount is always the same since the pixels are stored continuously by row from left to right. Once the input is extracted, it resembles the format of the MNIST images a bit more. See the below image for our resized input image of 28 X 28 pixels after processing the pixels obtained on the 240 X 240 drawing area.
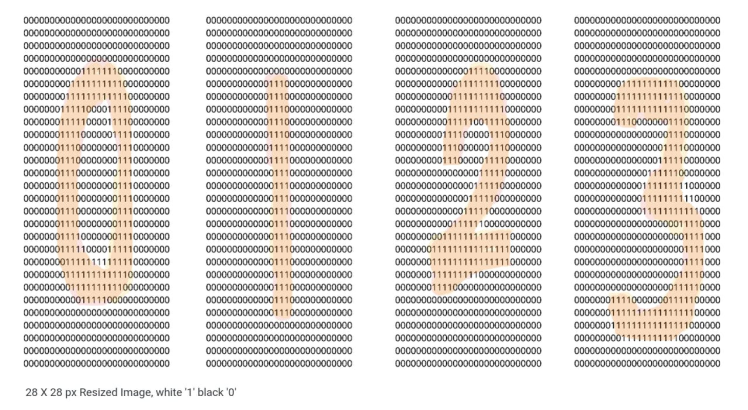
Once you get the input image of 28 X 28 pixels, we flatten the 2D input image array to a 1D array using the pixel array decomposition method used in the Kaggle datasetx = i * 28 + j
for (int i = 0; i < INPUT_IMAGE_WIDTH; ++i)
      {
        for (int j = 0; j < INPUT_IMAGE_HEIGHT;  ++j)
        {
          if (in_data[i][j] > 0.0)
          {
            M5.Lcd.drawPixel(j + 250, i, 255);
            //Serial.print(int(in_data[i][j]));
          }
          Serial.print(int(in_data[i][j]));
          targetBuff[i * 28 + j] = in_data[i][j];
        }
        printf("n");
      }
When the decomposed array is ready, we will run the Neuton model inference.
if (neuton_model_set_inputs(targetBuff) == 0 && counter > 50)
      {
        uint16_t predictedClass;
        float* probabilities;

        if (neuton_model_run_inference(&predictedClass, &probabilities) == 0)
        {
          RedTail();
          // code for handling prediction result
          if (predictedClass == 1)
          {
            M5.Lcd.drawChar('1', 265, 80, 6);
            Serial.println("Output 1");
          }
          if (predictedClass == 2)
          {
            M5.Lcd.drawChar('2', 265, 80, 6);
            Serial.println("Output 2");
          }
          if (predictedClass == 3)
          {
            M5.Lcd.drawChar('3', 265, 80, 6);
            Serial.println("Output 3");
          }
          if (predictedClass == 4)
          {
            M5.Lcd.drawChar('4', 265, 80, 6);
            Serial.println("Output 4");
          }
          if (predictedClass == 5)
          {
            M5.Lcd.drawChar('5', 265, 80, 6);
            Serial.println("Output 5");
          }
          if (predictedClass == 6)
          {
            M5.Lcd.drawChar('6', 265, 80, 6);
            Serial.println("Output 6");
          }
          if (predictedClass == 7)
          {
            M5.Lcd.drawChar('7', 265, 80, 6);
            Serial.println("Output 7");
          }
          if (predictedClass == 8)
          {
            M5.Lcd.drawChar('8', 265, 80, 6);
            Serial.println("Output 8");
          }
          if (predictedClass == 9)
          {
            M5.Lcd.drawChar('9', 265, 80, 6);
            Serial.println("Output 9");
          }
          if (predictedClass == 0)
          {
            M5.Lcd.drawChar('0', 265, 80, 6);
            Serial.println("Output 0");
          }
        }
      }
The inference result is written out both into standard output and the output area in the GUI.
In this extended version, inference gets triggered every time the digit is drawn and the ENTER button is pressed. Once the PIN is set, the user can then unlock the device using the created PIN. Check the video below:
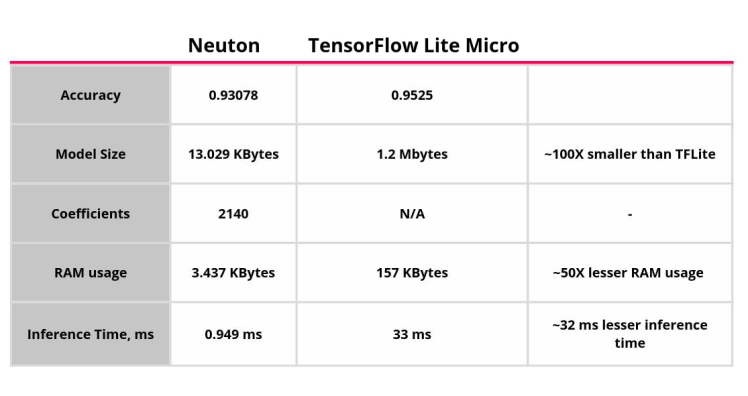
This experiment demonstrates much better results compared to TensorFlow Lite MCU models where the entire network needs 157 KBytes of RAM and 1.2 MBytes of Flash. In our case, the model only required ~3 KBytes of RAM and ~10 KBytes of Flash.
A similar technique is also used on highly popular Apple smartwatches for user text and number input tasks. Since smartwatch displays are very small, an ordinary touch keyboard layout would not be comfortable for any user, so they use drawing gestures on the watch. Check the video below,
In short, tiny models would help companies add cool features to tiny wearables with just three steps - upload, train and deploy!
ConclusionIs that complicated to deploy an innovative user interfaceon a device? I hope this project proved that recognizing handwritten digits using TinyML algorithms is not a problem at all. I showcased how to develop an application for the M5Stack Core2 and apply machine learning capabilities for more complex scenarios, like a digital lock.
The potential of machine learning for embedded platforms is huge so I really enjoy experimenting and searching for new solutions in this field. Don’t hesitate to repeat the project and share your feedback. :)
Schematics, diagrams and documents
Code
Credits
Related products


Leave your feedback...