Touchless Musical Hand Wash Timer
About the project
Touchless hand wash timer that shows a countdown clock & also plays a rotating selection of 20-second jingles. Add your own jingle easily!
Project info
Difficulty: Easy
Estimated time: 1 hour
License: GNU General Public License, version 3 or later (GPL3+)
Items used in this project
Hardware components
View all
Story
While hand-washing has always been an important arsenal in disease-prevention and overall health, it has taken a new prominence as a preventative measure to curb the spread of the COVID-19 pandemic.
The CDC guideline for good hand-washing states that one must ideally scrub their hands for 20 seconds. https://www.cdc.gov/handwashing/when-how-handwashing.html
??** Extra stuff ** ?? Here is some of the science behind hand-washing if you are interested! - https://www.cdc.gov/handwashing/show-me-the-science-handwashing.html
In this redux of a hand-wash timer, our musical hand wash timer is activated by waving our hand in front of an ultrasonic sensor, and displays the count down on a 7-segment display. To make it more interesting, it also plays a rotating selection of 20-second jingles from a list of pre-programmed jingles. You can add your own music easily by transcribing any sheet music notation you have!
Here is a look at the Touchless MusicalHand Wash Timer in action, showing all 4 jingles that I programmed in
- Happy Birthday
- Do-Re-Mi (Sound of Music)
- We Will Rock You (Queen)
- Jeopardy Theme Music
Boy, my hands were super-duper clean by the end of it! ?
Touchless Multi-Jingle-Playing Hand Wash Timer??** Extra stuff ** ??By now, we all know that singing "Happy Birthday to You", twice, takes about 20 seconds, and it has become a de facto standard for hand-wash timing, even sung by Canada's Prime Minister Justin Trudeau! Dr. Theresa Tam, Canada's Chief Public Health Officer, has her own favorites like We Will We Will Wash You! ?Watch this fascinating interview below by CBC Kids News contributor Arjun Ram.
I feature both songs in our Touchless Musical Hand Wash Timer, plus a couple more! ?
Step 1 - SchematicThis project uses an Arduino Uno, a 7-Segment LED Backpack (I2C), a HC-SR04 Ultrasonic Sensor and a Piezo Buzzer. Refer to the schematic below.
ProtoStax Touchless Multi-Jingle-Playing Hand Wash Timer
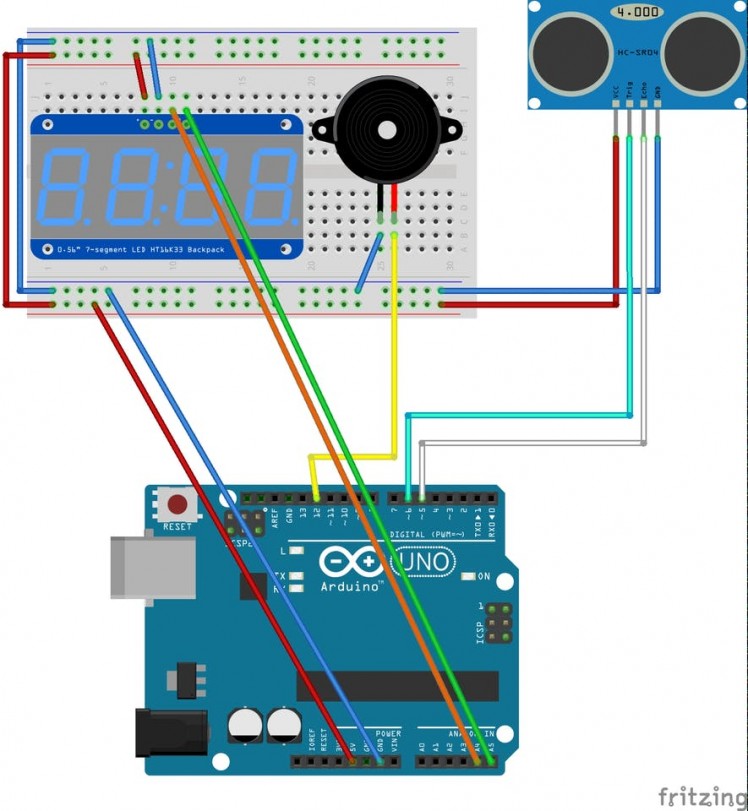
ProtoStax Touchless Multi-Jingle-Playing Hand Wash Timer
Step 2 - Planning and Setting UpBeyond the schematics and the programming, I also wanted to think about the "finished product" and how to make it usable - therefore putting it into an enclosure and planning for that.
I used ProtoStax Enclosures - they are stackable, and come with support for Arduino, Raspberry Pi and Breadboard. Since I used an Arduino with a Breadboarded circuit, I chose ProtoStax Enclosure for Arduino and ProtoStax Enclosure for Breadboard/Custom Boards. I also wanted the Ultrasonic sensor to be accessible from outside and therefore fixed to the enclosure - I used the ProtoStax Kit for Ultrasonic Sensor HC-SR04.
I started off with horizontally stacking the Arduino and Breadboard base platforms using horizontal stacking connectors to facilitate prototyping:
Stacking the Arduino and Breadboard Platforms side-by-side using connectors
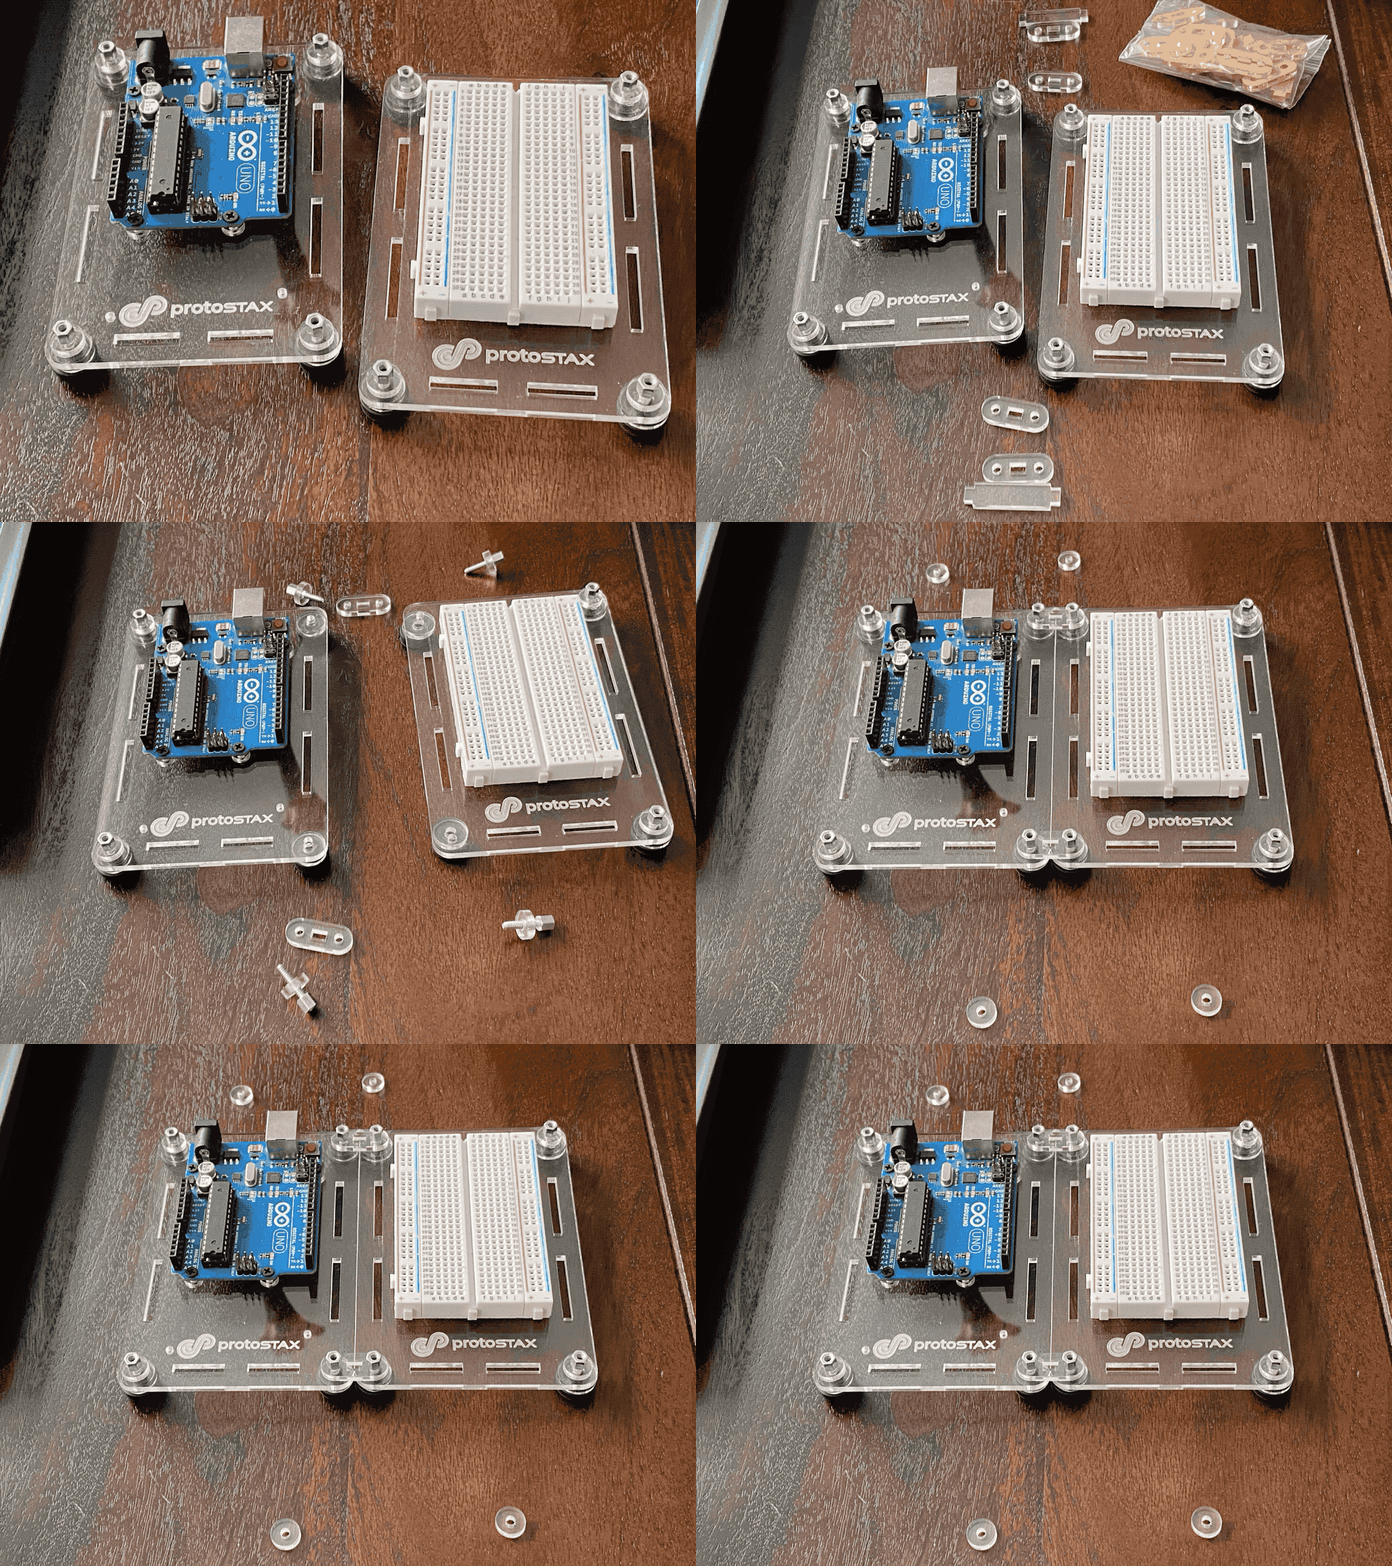
Stacking the Arduino and Breadboard Platforms side-by-side using connectors
Once I had my prototyping platform, I could start populating the components as per the schematic. I attached the HC-SR04 Ultrasonic Sensor to the side-wall from the ProtoStax Kit for Ultrasonic Sensor HC-SR04 to make it accessible once the enclosure was put together after the prototype was complete. The side wall with the sensor goes into the slot of the base platform as shown:
1 / 2 • Using ProtoStax Kit for Ultrasonic Sensor HC-SR04 to mount the Ultrasonic Sensor
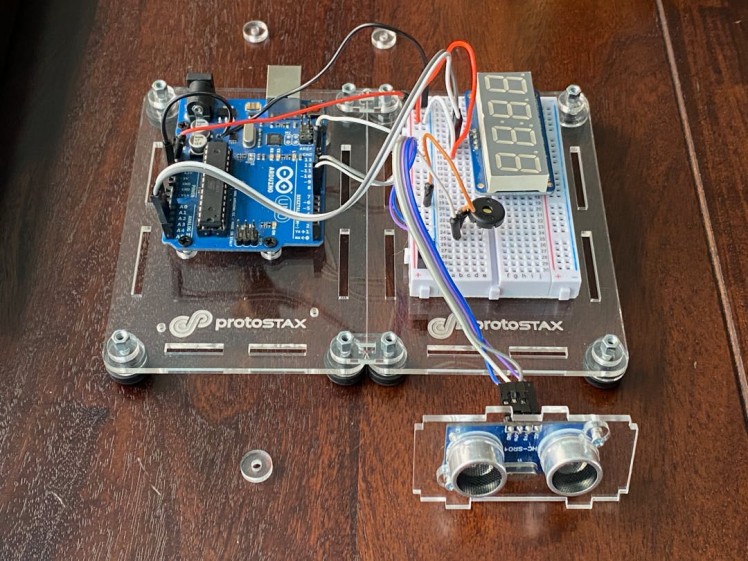
Using ProtoStax Kit for Ultrasonic Sensor HC-SR04 to mount the Ultrasonic Sensor
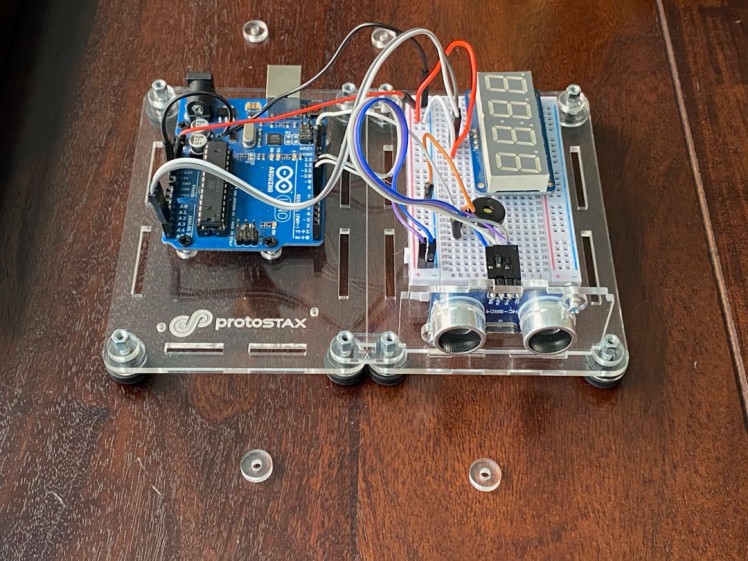
Using ProtoStax Kit for Ultrasonic Sensor HC-SR04 to mount the Ultrasonic Sensor
Step 3 - Programming and TestingNow that I had a working prototyping platform, I could go about developing the code for it. I will delve more into the code functionality and layout in a separate section below. Here is a video of the testing. It is crazy that the iPhone 11 that I used for recording the video actually picked up the distinct sonar pinging of the ultrasonic sensor, which can be heard very clearly in the video below (though the ultrasonic pulsing is barely registrable otherwise with an innocuous click-click-click) ! ?
Testing Touchless Multi-Jingle-Playing Hand Wash Timer PrototypeOnce everything was confirmed to be working, I went ahead and added the side walls and the remaining connectors and tops to finish up my enclosure:
Finishing up the enclosure for the Touchless Multi-Jingle-Playing Hand Wash Timer
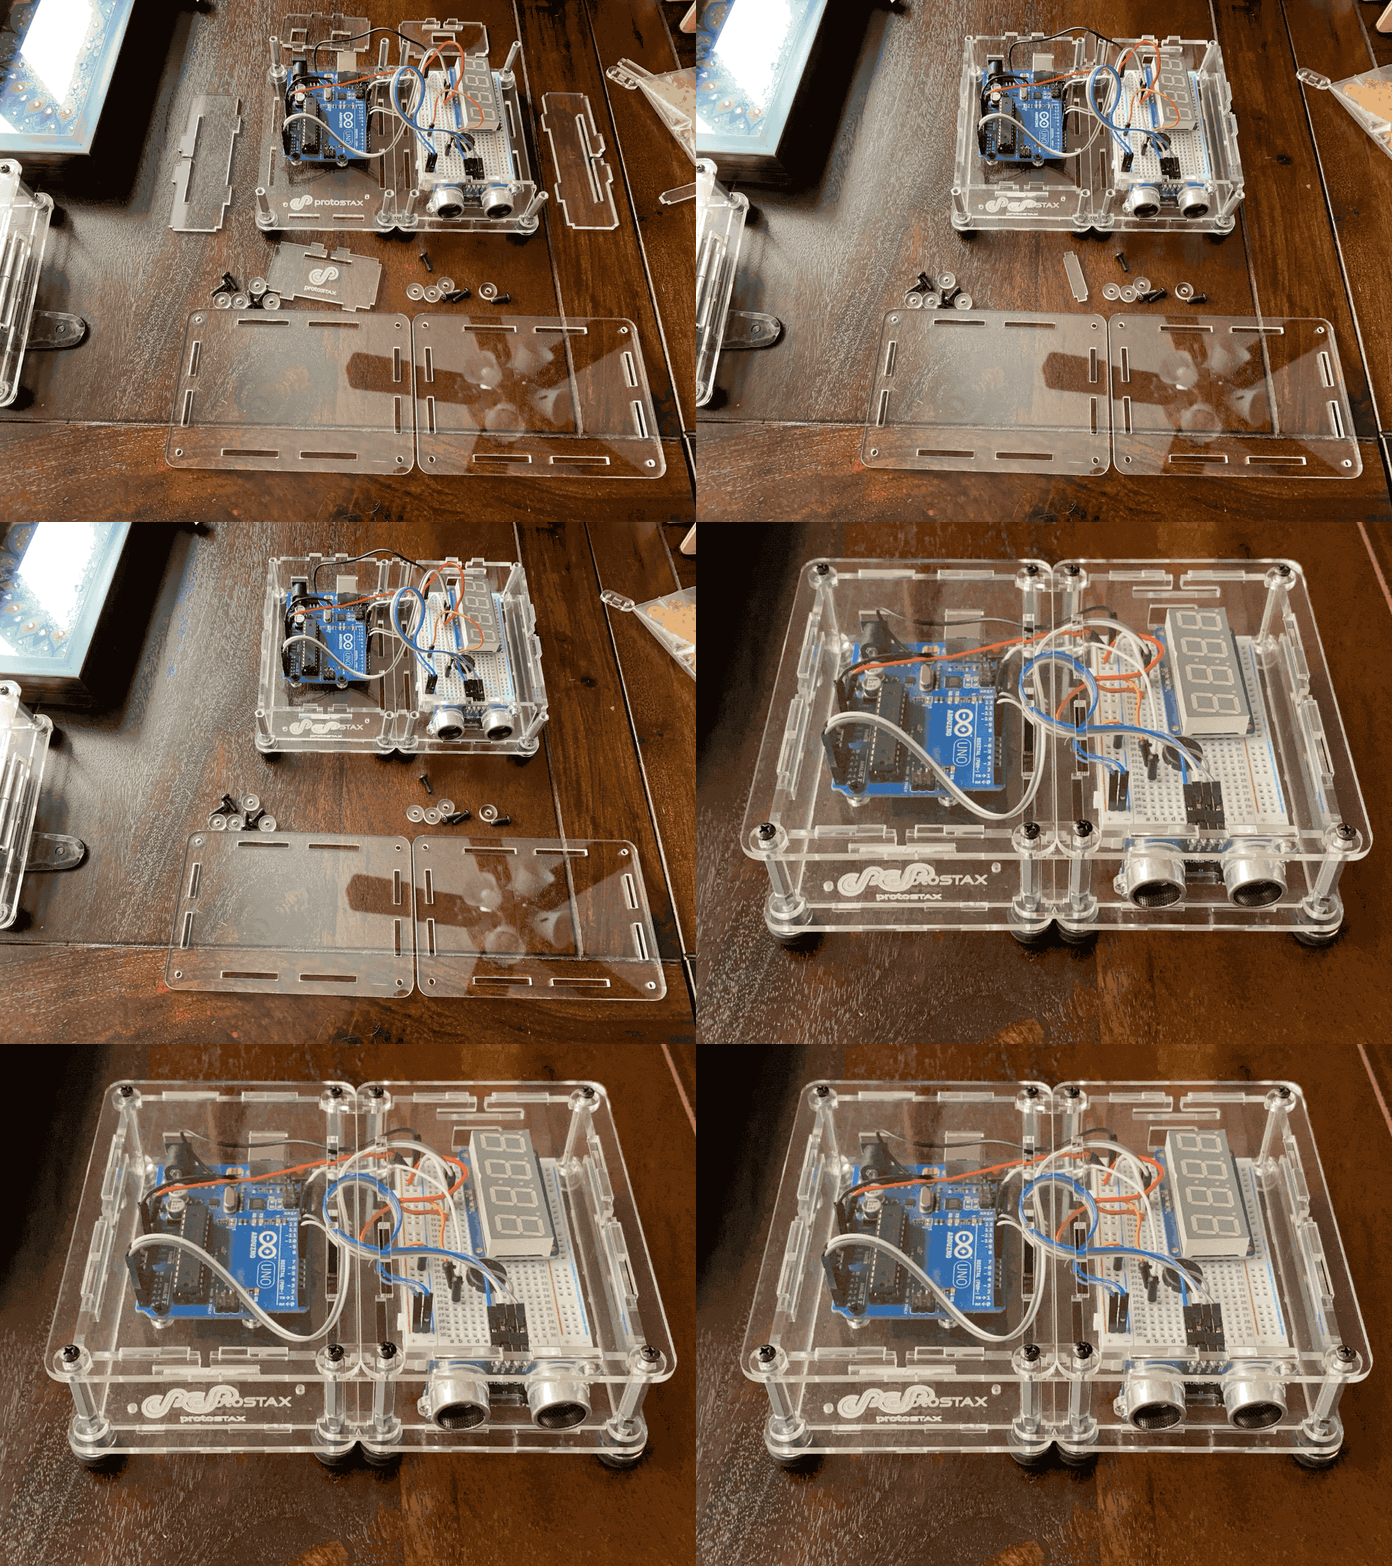
Finishing up the enclosure for the Touchless Multi-Jingle-Playing Hand Wash Timer
The video at the top shows the final "product" in use! ?
Touchless Musical Hand Wash Timer in use! ?
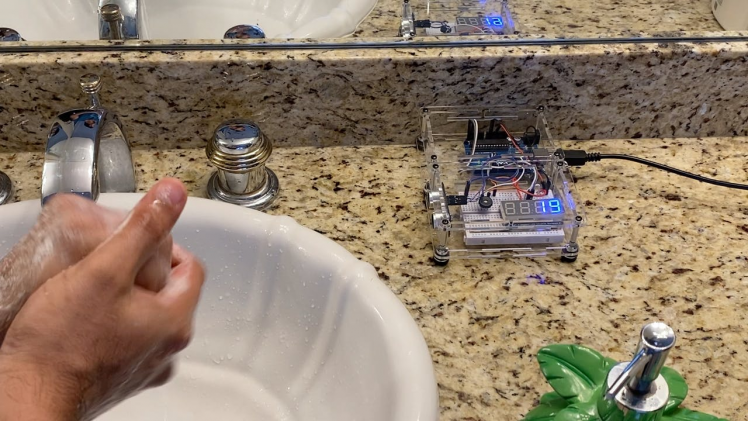
Touchless Musical Hand Wash Timer in use! ?
Understanding the CodeInitializing components:
We use Adafruit_7segment class from the LED Backpack library to initialize and communicate with our 7-segment display.
Adafruit_7segment matrix = Adafruit_7segment();
We also initialize the trig and echo pins on the HC-SR04 as output and input respectively
 pinMode(trigPin, OUTPUT);
 pinMode(echoPin, INPUT);
 matrix.begin(0x70);
In the main loop, here is what is done at a high level:
1) Check the ultrasonic sensor distance reading to see if the Hand Wash Timer has been triggered.
2) If yes, then note the current time, initialize the countDown timer (I set it to 20 for 20 seconds), and also pick the next musical jingle to play. I first used random() to pick a random melody, but I changed it to "round-robin" over the array of melodies (cycling back to the first), and set startMusic to 1 (to set the countdown and music playing in motion.
 if (distance < 10 && !startMusic) {
   startMusic = 1;
   // initializeTimer1();
   countDown = 20;
   currentTime = millis();
   melodyNum = (melodyNum+1)%(NUM_MELODIES(melodies));
 }
Here we are doing two things simultaneously - we want to update the countdown clock periodically showing how many seconds are left for hand washing. We also want to process the jingle and play it in time correctly.
We cannot use delay() therefore.
The typical example of playing music uses the tone() function of the Tone library, and waits for the appropriate delay before moving on to the next note to play. That's not going to work, as we still want to update the countdown clock!
tone() is a non-blocking call. It uses the Timer2 to send the signal for the specified length of time, which means in the interim, we are free to do other processing.
We use millis() and local variables to figure out how much time has elapsed, instead of using delay(), and can proceed to do other checks and perform other operations in the meantime. We will look at the exact code a little further down.
Transcribing Music the Easy Way - Whole Notes, Quarter Notes, etcWe want to play a given melody, and also want to make it easy to transcribe more melodies. Arduino music examples usually store two different arrays, one for the notes, and one array for the duration of the notes (in milliseconds).
To simplify things, I have created a struct to associate a note and its given duration. And instead of using absolute durations, I used relative durations that I have created #defines for
typedef struct Note {
 int frequency;
 float duration;
} Note;
#define NOTE_WHOLE 1
#define NOTE_HALF 0.5f
#define NOTE_QUARTER 0.25f
#define NOTE_EIGHTH 0.125f
#define NOTE_SIXTEENTH 0.0625f
#define DOTTED(X) (X * 1.5f)
Let's take the example of Happy Birthday.
Happy Birthday Musical Score

Happy Birthday Musical Score
This can be transcribed as follows, pretty much note for note. If you can't read sheet music, just find the actual notes to use. ??But learning to read sheet music is always a neat skill to have, and you don't have to be very good at it - just enough to know what the notes are will allow you to do the needful to transpose the music to your Arduino! ??
// Happy Birthday
Note melody[] = {
 {NOTE_G6, DOTTED(NOTE_EIGHTH)}, {NOTE_G6, NOTE_SIXTEENTH}, {NOTE_A6, NOTE_QUARTER}, {NOTE_G6, NOTE_QUARTER}, {NOTE_C7, NOTE_QUARTER}, {NOTE_B6, NOTE_HALF},
 {NOTE_G6, DOTTED(NOTE_EIGHTH)}, {NOTE_G6, NOTE_SIXTEENTH}, {NOTE_A6, NOTE_QUARTER}, {NOTE_G6, NOTE_QUARTER}, {NOTE_D7, NOTE_QUARTER}, {NOTE_C7, NOTE_HALF},
 {NOTE_G6, DOTTED(NOTE_EIGHTH)}, {NOTE_G6, NOTE_SIXTEENTH}, {NOTE_E7, NOTE_QUARTER}, {NOTE_D7, NOTE_QUARTER}, {NOTE_C7, NOTE_QUARTER}, {NOTE_B6, NOTE_QUARTER}, {NOTE_A6, NOTE_HALF},
 {NOTE_F7, DOTTED(NOTE_EIGHTH)}, {NOTE_F7, NOTE_SIXTEENTH}, {NOTE_E7, NOTE_QUARTER}, {NOTE_C7, NOTE_QUARTER}, {NOTE_D7, NOTE_QUARTER}, {NOTE_C7, NOTE_HALF},
};
Note (pun intended!) that I didn't use any actual durations here, I specified the relative durations of the notes as quarter notes, eighth notes, sixteenth notes, etc. I even have a DOTTED() macro to represent a dotted note (1.5 x the duration of whatever note precedes it).
A melody itself consists of this array, as well as additional information on what duration a whole note should represent.
typedef struct Melody {
 Note *notes;
 int numNotes;
 int wholeNoteDurationMs;
} Melody;
Since C arrays cannot be sized by using a pointer to the array, I add the numNotes as the size of the Note array. This can be easily initialized using the MELODY_LENGTH macro - so you don't have to worry about how many notes you created in your Note array as you transcribed your favorite song!
I then define an array of such Melody to use in my program.
Melody melodies[] = {
 {melody, MELODY_LENGTH(melody), 1250}, {melody3, MELODY_LENGTH(melody3), 1000}, {melody4, MELODY_LENGTH(melody4), 1000}
};
In the loop, when starting the countDown timer and the music, I use the above information of notes, relative durations, and the actual duration of a whole note, to figure out how to play the music. In between playing the music, I also check and update the countDown timer and display the number on the 7-segment display.
Because I imagine that people would like to finish listening to the whole jingle, I continue playing the jingle until it ends, even if the 20 seconds are up (the countDown will turn negative until the song ends). Once the jingle finishes, it will stop until further triggered by waving your hand in front of the ultrasonic sensor once again. If the jingle is too short, then it will play over once again, until 20 seconds have elapsed AND the music has finished playing! Simple.
 if (startMusic) {
   // Pick the melody to play
   Melody mel = melodies[melodyNum];
   Note *m = mel.notes;
   int mSize = mel.numNotes;
   // speedUp is an easy way to speed up the playing of the notes. The best way would be to
   // set the wholeNoteDurationMs appropriately.
   int speedUp = 1;
   noTone(TONE_PIN); // Start with a clean slate
   for (int thisNote = 0; thisNote < mSize; thisNote++) {
     // to calculate the note duration, take the duration of the whole note and multiply by the note type.
     //e.g. quarter note = wholeNoteDurationMs * 0.25, eighth note = wholeNoteDurationMs * 1/8 (0.125), etc.
     // reduce the duration by the speedup factor to increase the speed of playing
     // by an appropriate amount
     int noteDuration = mel.wholeNoteDurationMs * m[thisNote].duration / speedUp;
     unsigned long noteTime = millis();
     tone(TONE_PIN, m[thisNote].frequency, noteDuration);
     // to distinguish the notes, set a minimum time between them.
     // the note's duration + 30% seems to work well:
     int pauseBetweenNotes = noteDuration * 1.30;
     unsigned long nowTime = millis();
     countDown = 20 - (int)((nowTime - currentTime)/1000);
     // Look Ma No delay()!
     // Don't use delay(), as we still want to update the countDown timer
     // and update the display
     while(millis() - noteTime <= pauseBetweenNotes) {
       countDown = 20 - (int)((millis() - currentTime)/1000);
       matrix.print(countDown);
       matrix.writeDisplay();
       delay(10);
     }
     noTone(TONE_PIN);
     matrix.print(countDown);
     matrix.writeDisplay();
   }
The entire code can be found on GitHub and the link to the repository is included. I would recommend taking the code from there, rather than copying and pasting code from here.
Taking the Project FurtherOnce you get comfortable playing around with the code sample and understanding the code, it is always nice to try to extend your learning by doing more.
Here are a few suggestions on how you can take this project forward:
1) You can find your favorite tune and then transcribe it using the NOTE and NOTEduration macros as I described above. Just remember to comment out one or more of the other jingles already defined, to keep the memory usage down (unless you went ahead and moved the Note and Melody arrays to PROGMEM successfully as described below! ?)
2) The melodies occupy space in the SRAM and can very quickly eat up the available memory. For example, I transcribed 4 melodies (Happy Birthday, Do-Re-Mi, We Will Rock You, and Jeopardy!). However, these pushed SRAM usage to 96%, not leaving enough for the functioning of the 7-segment display library, and it wasn't updating properly! I had to exclude one of the melodies from the Melody array for everything to work ok.
The Arduino Uno comes with 2k of SRAM, but 32k of Flash memory (where the program resides). If you can move some of the global variables to Flash memory, not only can you free up SRAM for the rest of the program, but you also have more space to store even more songs! Try to move the Note and Melody arrays into Flash by defining them as PROGMEM. [Note: this is an advanced endeavor and is non-trivial. YouwillberelegatingthearrayofstructstoPROGMEMandthenhavetoreadtheprogmemtoaccessthedata.]
To give you an appreciation for the differences, this program (with 3 melodies) took up 31% of program storage and 76% of dynamic memory on an Uno. With the above variables defined in PROGMEM, it occupied 32% of program space (that's only a slight increase in Flash memory usage with plenty more still available) and only 22% (down from 76%) of dynamic memory! That means you can easily add plenty of songs to this Touchless Musical Hand Wash Timer once you move things to PROGMEM! ?
Can you think of other ways to extend this project? Share it with us below! ?
Happy Making! ?


Leave your feedback...