
Tinyml: An Always-on Audio Classifier Using Synthetic Data

Made by shakhizat / Artificial intelligence / Home Automation / Robotics / Voice / IoT
About the project
Use machine learning to build a system that can recognize audible events, particularly your name through audio classification.
Project info
Difficulty: Difficult
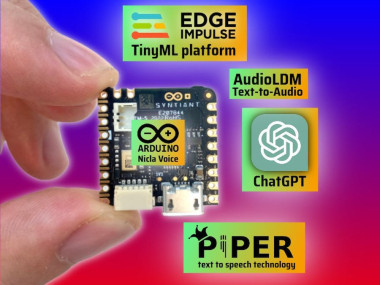
Platforms: Arduino, Edge Impulse
Estimated time: 5 hours
License: GNU General Public License, version 3 or later (GPL3+)
Items used in this project

Story
TinyML is a cutting-edge technology that is revolutionizing the field of machine learning by enabling the creation of ultra-compact, low-power machine learning models that can run on small devices such as microcontrollers.
One of the most popular applications of Deep Learning is Audio Classification, involving the task of classifying sounds and predicting their respective categories. This type of problem has numerous practical applications, such as identifying the genre of music by classifying music clips, or recognizing individual speakers based on their voice by classifying short utterances. With Generative AI and Text to speech technologies, we can now use synthetic data to train these models to recognize specific patterns, such as your name. By using synthetic data, we can create highly realistic and diverse datasets that can be used to train machine learning models in a more efficient and cost-effective manner.
This project aims to demonstrate how you can develop a Audio Classification system that can distinguish between unknown, background noise, and name of person classes. To achieve this, we will be using the Edge Impulse platform to train our model and subsequently deploy it to an edge device such as an Arduino Nicla Voice.
Machine learning pipeline for audio signal processingThe audio processing pipeline shown in the diagram is a common approach for analyzing audio data using machine learning techniques. By using Fast Fourier Transform (FFT), to extract frequency-domain features from audio data, machine learning models can be trained to perform tasks such as speech recognition, music classification, or audio segmentation.
The audio processing pipeline

The audio processing pipeline
Overall, this diagram illustrates the basic steps involved in using machine learning to process audio data, which includes preprocessing the data, feature extraction, model training, and model inference.
Let’s get started!
Dataset generationTo classify audio based on different categories, you will need to gather some sample WAV files of unknown, background noise, and name classes. This will enable the system to differentiate between the three categories.
The dataset generation flow diagram for a machine learning model that uses the Google TensorFlow Speech Command dataset, the AudioLDM text-to-audio generation tool, and the Piper text-to-speech technology to generate the unknown, background noise, and name of person classes respectively, can be outlined as follows:
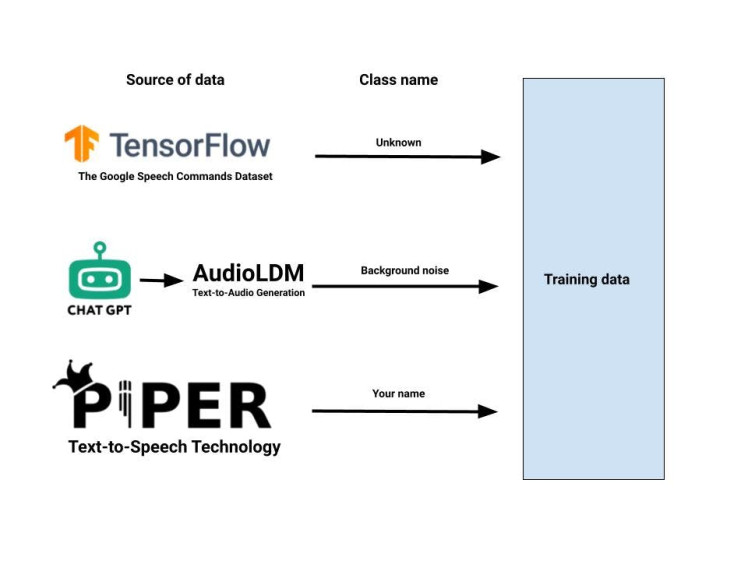
- Download the Google TensorFlow Speech Command dataset, contains a large number of audio samples, along with a class label for each sample that identifies what type of sound it is. These files can be added to the dataset as a separate class representing unknown class.
- Utilize the ChatGPT to generate different text prompt for background noise class.
- After generating text prompts, we sends them to a module that converts text to audio. AudioLDM text-to-audio generation tool cat generate a large number of audio files. These files can be added to the dataset as a separate class representing background noise.
- Use the Piper text-to-speech technology to generate audio files containing the name of person. These files can be added to the dataset as a separate class representing the name of person or other word that you want to classify.
Text-to-Speech (TTS) is a cutting-edge speech synthesis technology that can vocalize written text into audible speech with a human-like voice. One example of a TTS is Piper developed by Michael Hansen, which can be used to generate voice data from text input.
Download the precompiled binary package of Piper TTS from the Github repository. You can use the wget command to download the package by running the following command in your terminal:
wget https://github.com/rhasspy/piper/releases/download/v0.0.2/piper_amd64.tar.gzThis will download the binary package of Piper TTS for the AMD64 architecture. If you are using a different architecture such as ARM64 for devices like Raspberry Pi or Nvidia Jetson, you should download the appropriate version from the github repository of piper. Extract tar.gz file.
Download the English language model, run the following command in your terminal:
wget https://github.com/rhasspy/piper/releases/download/v0.0.2/voice-en-us-ryan-high.tar.gzExtract the tar.gz file of the language model that you downloaded. You can use the following command to extract:
tar -zxvf voice-en-us-ryan-high.tar.gzUse the following code snippet to generate WAV audio files using Piper TTS. Replace the model_path variable with the path to the language model that you downloaded, and replace the text variable with the text that you want to convert to speech. The code will generate 904 audio files in the output directory, each with a different speaker.
import subprocess
text = "Your name"
model_path = "./en-us-libritts-high.onnx"
for i in range(0, 904):
    output_file = f'./output/{i}.wav'
    cmd = f'echo "{text}" | ./piper/piper --model {model_path} --output_file                {output_file} --speaker {i}'
    subprocess.run(cmd, shell=True, check=True)
Also, you can use the Google Colab notebook that has been prepared for you. The notebook includes all the necessary steps and code to generate audio files using Piper TTS.
Google Colab notebook

Google Colab notebook
You can access the notebook by following the link provided to you.
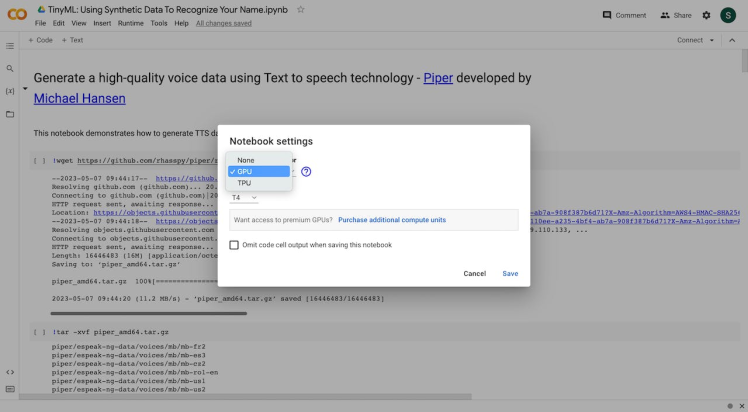
The default runtime uses CPUs, but you can change the run time to GPU.
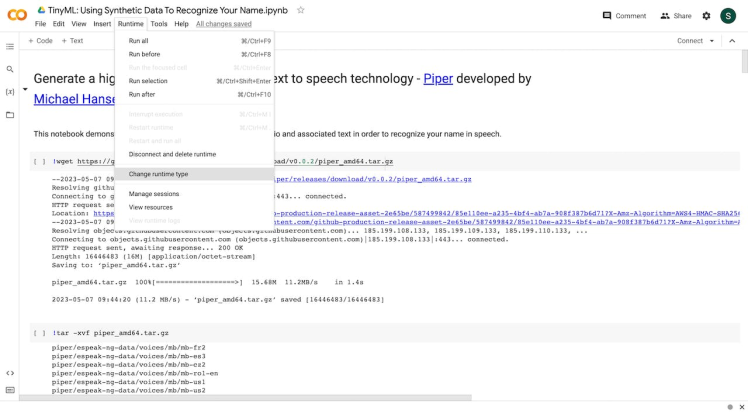
In order to use a GPU with your notebook, select the Runtime > Change runtime type menu, and then set the hardware accelerator dropdown to GPU
Piper TTS can operate without the need for a GPU, whereas the AudioLDM text-to-audio generation tool requires GPU activation. Below are the steps for generating audio through AudioLDM.
Generate a high-quality synthetic audio dataset using - AudioLDMTo produce audio files from text, the next step involves using a text-to-audio generation tool called AudioLDM. This tool utilizes latent diffusion model to generate high-quality audio from text. To use AudioLDM, you will require a standalone computer with a powerful GPU.
To generate audio files using text prompts, you have two options: you can either install audioldm on your own computer with GPU or use Google Colab that I have been prepared for you.
Firstly, you need to install PyTorch using pip by running the below command
pip3 install torch==2.0.0Next, you can install the audioldm package by running the command
pip3 install audioldmOnce you have installed the necessary packages, you can use the code snippet provided in the GitHub section to generate audio files from text prompts. To do this, simply run the command
python3 generate.pyThis will initiate the generation process, and you should see output similar to the following:
genereated: A hammer is hitting a wooden surface
genereated: A noise of nature
genereated: The sound of waves crashing on the shore
genereated: A thunderstorm in the distance
genereated: Traffic noise on a busy street
genereated: The hum of an air conditioning unit
genereated: Birds chirping in the morning
genereated: The sound of a train passing by
Once the wav audio samples have been collected, they can be fed into the neural network to initiate the training process.
That’s all. Now we can simply upload these wav files to the Edge Impulse Studio in order to train our model.
Model Training using Edge Impulse platformFor model training, testing, and deployment, Edge Impulse Studioplatform can be used. It is a TinyML framework that provides almost no code solution and you can build your TinyML model without having good expertise in machine learning.
Firstly, create an account and log in. Then create a new project. The easiest way to load the samples into Edge Impulse is using upload data option.
Select the Data acquisition tab and select upload data option and the following window will appear.
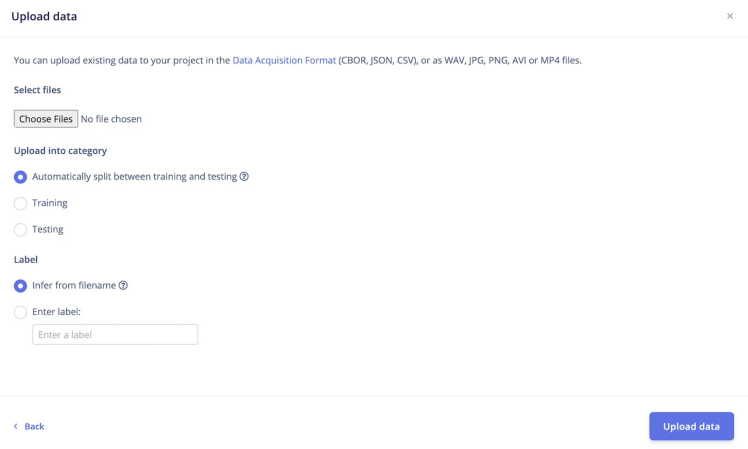
Make sure that under the label option, you have mentioned the Label name under Enter label option. Upload your wav files.
Repeat the same process for uploading other classes audio samples. You should ensure that each audio sample is properly labeled and grouped into its respective class to avoid any confusion during training.
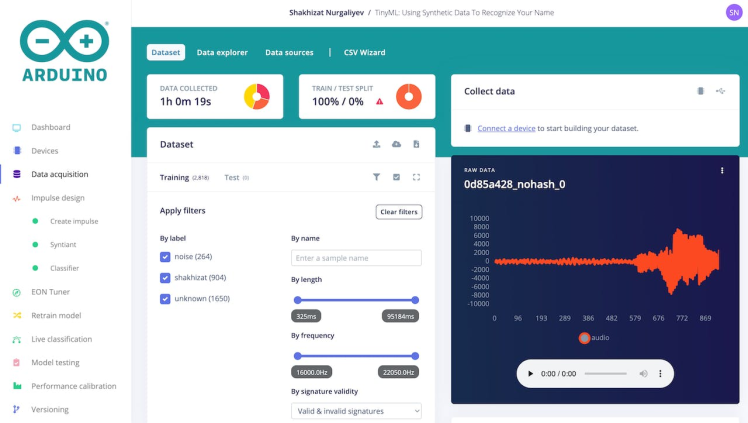
In total, I have gathered 1 hour and 19 seconds worth of data that can be categorized into three distinct classes.
- Unknown class
- Background noise class
- Shakhizat class(my name)
Once you have set up all of your classes and are happy with your datasets, it is time to train the model. Navigate to Impulse Design on the left navigation menu.

Select Add a processing block and add Audio(Syntiant), since it is very suitable for human voice applications, which are based on the Syntiant NDP120 Neural Decision Processor. It will try to convert audio into some kind of features based on time and frequency characteristics that will help us to do classification. Then select Add learning block and add Classification.
Finally, click Save Impulse.
Then navigate to Syntiant. In this step you will generate the features from the input data. Features are unique properties that will be used by the classification algorithm to classify audio.
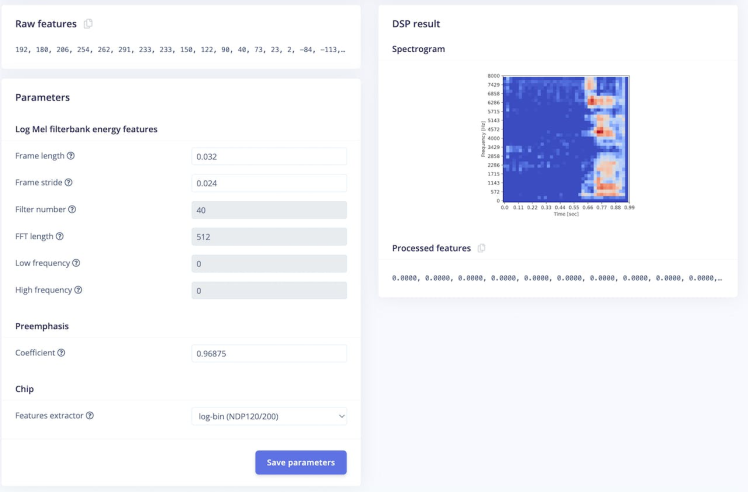
Set the features extractor to log-bin(NDP120/200) and click save parameters.
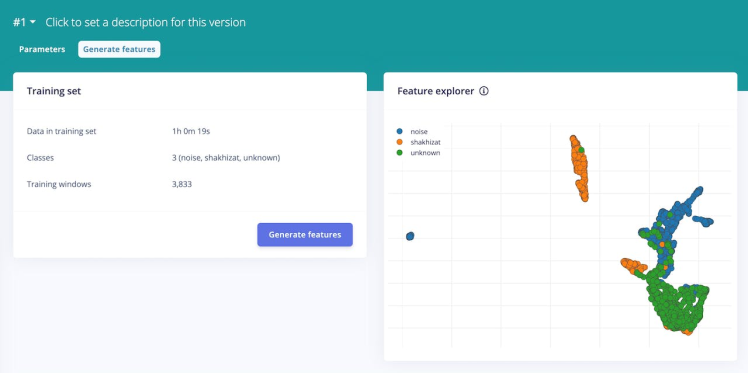
Next, click Generate Features and use the feature explorer to inspect the generated features. Each data sample will be colored in the graph according to its label.
Once you're done playing with the feature explorer, click on the Classifier item in the left navigation menu.
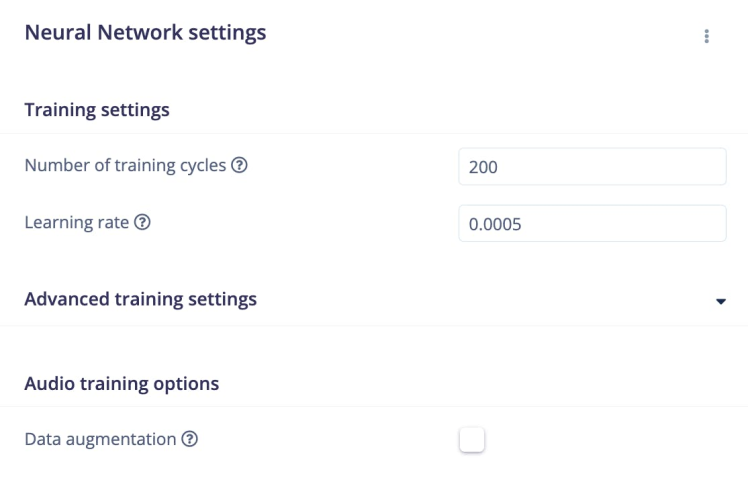
For this project, the number of training cycles was set to 200 and the learning rate was set to 0.0005.
The model has the following structure:
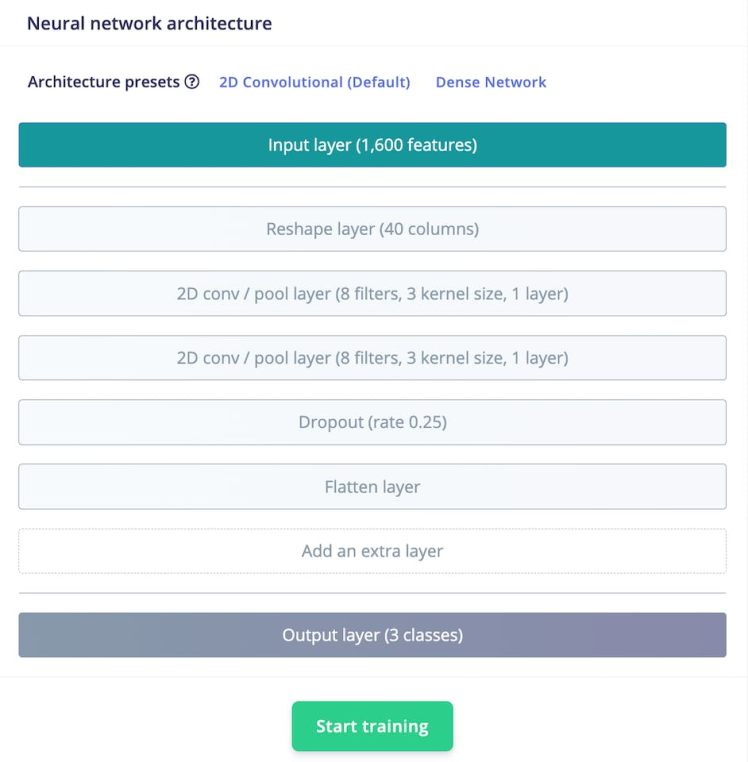
Next, click on Start training to train the machine learning model, this might take some time to complete depending on the size of your dataset.
After training is complete, Edge Impulse Studio will display the performance of the model, a confusion matrix, feature explorer, and on-device performance details.
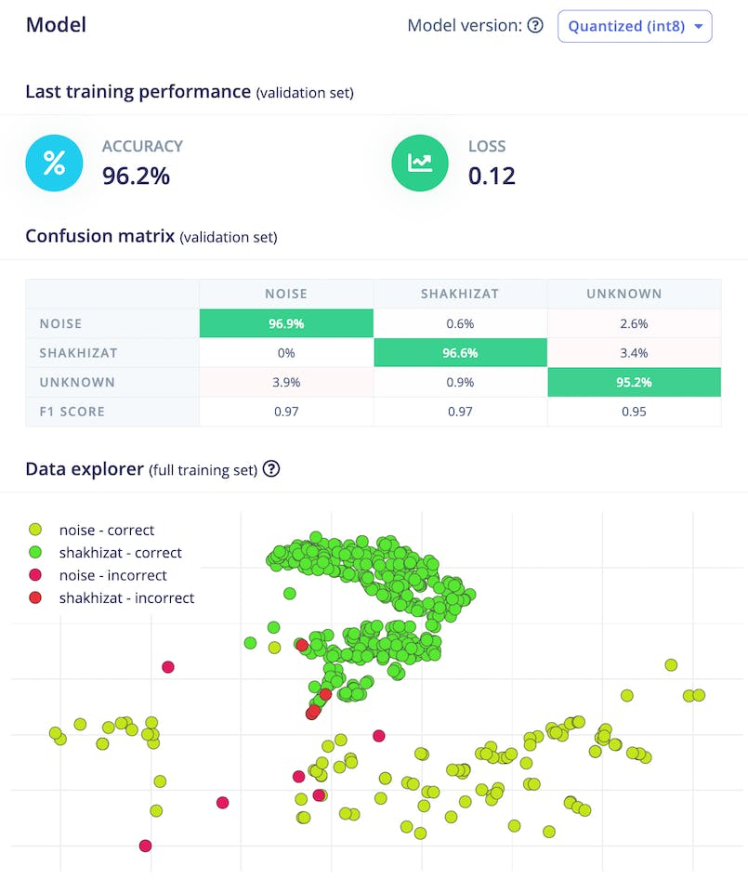
For me, the accuracy was 96.2% and the loss was 0.12. The accuracy is pretty good for the training set.
You might see the following log messages:
| | Total MACs: 284736 | | Total Cycles: 24762 (time=0.0011515066964285713s @ 21.504 MHz) | | Total Parameter Count: 948 | | Total Parameter Memory: 1.4375 KB out of 640.0 KB on the NDP120_B0 device. | | Estimated Model Energy/Inference at 0.9V: 5.56237 (uJ)This information is important because it indicates the memory efficiency of the model and whether it can be deployed on resource-limited devices like Arduino Nicla Voice.
Once you're happy with the performance of your model, it's time to deploy it to your Arduino Nicla Voice. To do so click the the Deployment menu item in Edge Impulse Studio, and then click the Arduino Nicla Voice button.
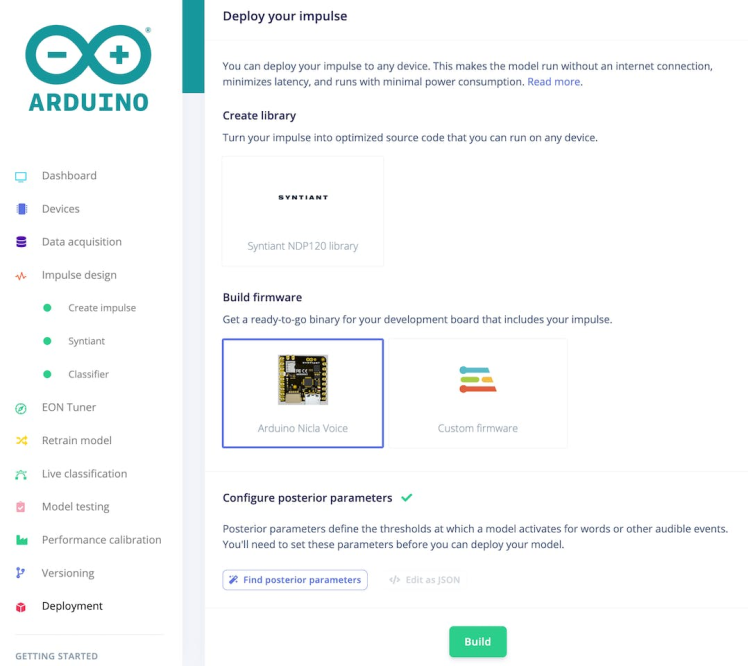
Once you've selected a model, click Build. Edge Impulse Studio will build a model package and deliver a zip archive for you to download. Unzip it.
Then, use the script below that corresponds to your operating system to upload it to the Arduino Nica Voice:
- Use flash_windows.bat if you are using a PC
- Use flash_mac.command if you are using a MAC
- Use flash_linux.sh if you are using a Linux machine
Here is a demonstration video of what the final result looks like.
Open the Arduino IDE Serial Monitor. Set the baud rate to 115200. If everything goes correctly, you should see the following:
As you can see, our model performs pretty well. I feel the results of it are fantastic despite a few misclassifications. The system has the ability to classify every spoken word into an "unknown" class. Also, it correctly recognizes the spoken word 'my name' as a known word and assigns it to the appropriate class. On the other hand, the system identifies the noise sound in the background as a noise class and assigns it accordingly.
In conclusion, this project demonstrates how to build a Audio Classification system using the Edge Impulse platform and deploy it on an edge device like the Arduino Nicla Voice. By training the model using a diverse dataset that includes unknown sounds, background noise, and the name of the person, we can create a robust system that can accurately classify audio samples in real-time.
I have made a project accessible to the public. Further details regarding this project can be found on Edge Impulse. And it can be accessible via this link.
Thank you for reading! If you're interested in learning more about machine learning in audio recognition, I highly recommend checking out the references mentioned in this post below
References- TinyML: Enabling of Inference Deep Learning Models on Ultra-Low-Power IoT Edge Devices for AI Applications
- Audio Analysis with Machine Learning and the Nicla Voice
- TinyML: Baby Cry Detection using ChatGPT and Synthetic data
- A fast, local neural text to speech system
- AudioLDM: Text-to-Audio Generation with Latent Diffusion Models
Code
Credits
Related products


Leave your feedback...