
Crop Growth Monitor

Made by weatherman / Environmental Sensing / Garden / Plants / Sensors
About the project
The project using a HC -SR04 Distance sensor will show you how to monitor crop growth on your allotment or Vegetable patch.
Project info
Difficulty: Easy
Platforms: Arduino, Raspberry Pi
Estimated time: 1 hour
License: GNU General Public License, version 3 or later (GPL3+)
Items used in this project
Hardware components


Story
Hello and welcome to the first of hopefully many tutorials that will help you monitor the world around you using micro-controllers and a variety of sensors. This particular project concentrates on using the HC-SR04 Distance sensor to monitor the growth of crops.
The HC-SR04 uses sonar to detect an object/surface and measure the distance, with an accuracy of up to 3mm it's a pretty decent sensor for the money (£3.00).
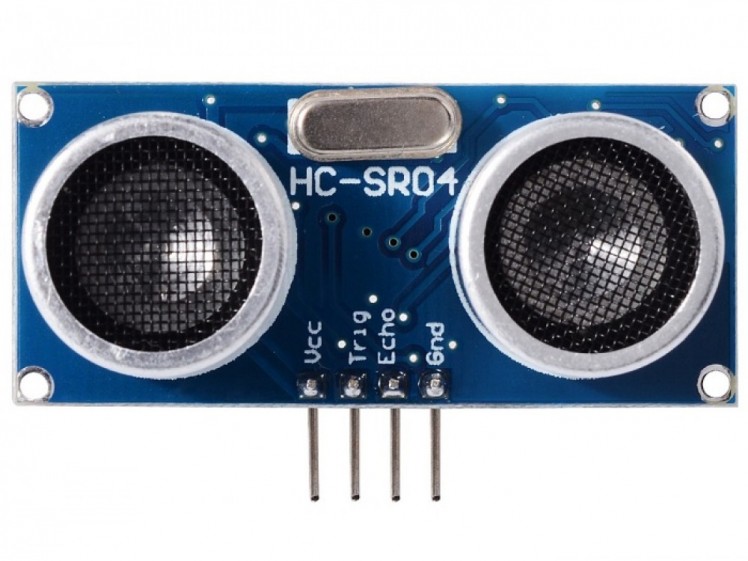
Here are the sensor's features:-
- Input Voltage: 5V
- Current Draw: 20mA (Max)
- Digital Output: 5V
- Digital Output: 0V (Low)
- Working Temperature: -15°C to 70°C
- Sensing Angle: 30° Cone
- Angle of Effect: 15° Cone
- Ultrasonic Frequency: 40kHz
- Range: 2cm - 400cm
- Dimensions
- Length: 43mm
- Width: 20mm
- Height (with transmitters): 15mm
- Centre screw hole distance: 40mm x 15mm
- Screw hole diameter: 1mm (M1)
- Transmitter diameter: 8mm
The sensor is a given in any robotics project and is mainly used for object avoidance, but in this project we will use it in a slightly different manner.
So how do we monitor the rate of growth of our crop i hear you say, well the HC-SR04 will be mounted facing the ground at a given height. The sensor can measure anywhere between 2cm and 400cm, so i think 1 meter is high enough for most crops.
To control the sensor we will hook it up to an Arduino uno clone.
HC-SR04 Arduino
VCC-------------------------------> 5v
Gnd------------------------------->Gnd
Trig-------------------------------->D11
Echo------------------------------>D12
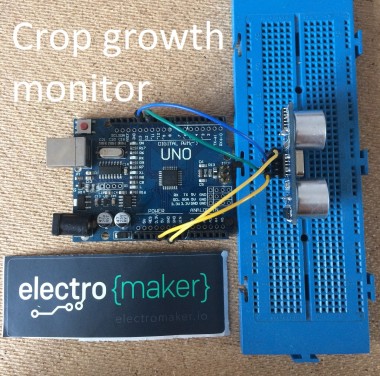
 Wiring photo
Next we are going to upload the code below, open up the Arduino IDE select the correct board from the board manager tab, select the correct port that your Arduino is connected to and upload.
- /*
- * This was created by Andrew Grimley for Crop growth monitor tutorial
- * on electromaker.io 30th July 2018
- *
- * Wiring details
- * HC-SC04 Arduino Uno
- * VCC-------------->5v
- * Gnd-------------->Gnd
- * Trig------------->D11
- * Echo------------->D12
- */
- //define trig and echo pins
- int trig = 11;
- int echo = 12;
- //create variables to store the data
- long duration;
- float distance, cropGrowth;
- int installHeight = 0;// adjust this variable to the height at which you have installed the sensor
- void setup() {
- //init the serial port for debugging and to see incoming data
- Serial.begin (9600);
- //use pinMode to declare trig as OUTPUT & echo as INPUT
- pinMode(trig, OUTPUT);
- pinMode(echo, INPUT);
- }
- void loop()
- {
- //to ensure a clean high pulse turn trig to LOW for 5 microseconds
- digitalWrite(trig, LOW);
- delayMicroseconds(5);
- //trigger the sensor setting the trig pin HIGH for 10 microseconds
- digitalWrite(trig, HIGH);
- delayMicroseconds(10);
- digitalWrite(trig, LOW);
- //Now we are going to wait for the echo to return back to the sensor
- //the duration in microseconds from sending the pulse to receiving it back
- duration = pulseIn(echo, HIGH);
- // convert the time into a distance and calculate measured crop growth
- distance= (duration/2) / 29.1 ;
- cropGrowth = installHeight - distance;
- Serial.print(cropGrowth);
- Serial.println(" cm.");
- delay(1000);
- }
Testing
After uploading the above code to the Arduino open up the serial monitor and you should see data being printed every second. Next we are going to replicate the installation, the board at one end will represent the ground and the HC-SR04 will be place the exact distance (100 cm) as it would be if it was installed in your garden. I have set mine up on the dinning table but the floor would be sufficient.
 Sensor setup
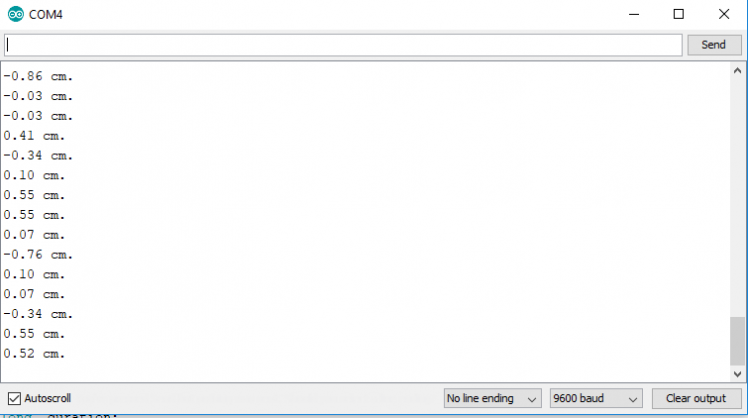
 Serial monitor output
If your seeing the same as in the picture above that's great the sensor is working. Now we need to adjust a variable in the sketch. Go back to the sketch earlier in the tutorial and change the following variable to 100, which is how many cm the sensor is away from the board.
- int installHeight = 100;
Once you have done this upload the sketch to the Arduino and open up the serial monitor and you should see something like the screen shot below.
 Data print out after changing installHeight to 100
So what has happened here? lets take a look.
- distance= (duration/2) / 29.1 ;
- cropGrowth = installHeight - distance;
We have added the known distance to the variable installHeight, the code above makes a simple calculation and takes away the measured height away from the known distance thus zeroing the sensor out.
Crop growth simulation
For this next section we are going to have to rely a little on yours and my own imagination. We are now going to simulate crop growth by moving the board closer to the sensor in 5 cm intervals up to a total of 15 cm. Now move the board 5 cm closer to the sensor which should leave 95cm total distance and you should see something like this on your serial monitor.
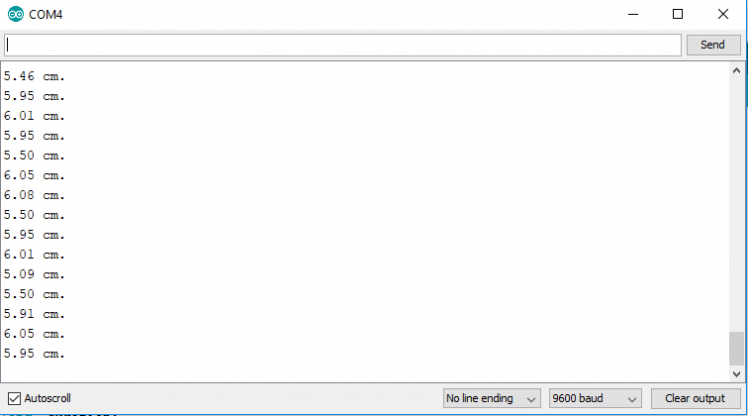
5 cm crop growth simulation
Now move it a further 5 cm closer reducing the total distance to 90 cm and your output should look like this.

10 cm simulated crop growth
And lastly move the board a further 5 cm closer making the total distance 85 cm away from the sensor and your output should look something like this.
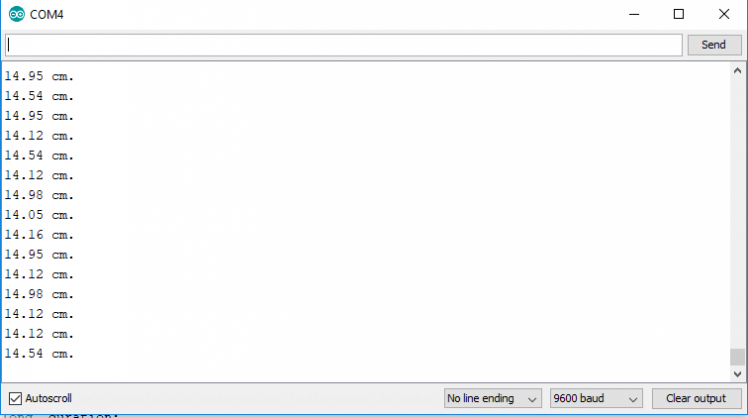
15 cm simulated crop growth
As you can see by the simulation the sensor works pretty well.
Moving on
As the above testing has showed that some of the readings can be quite spiky. if your not to concerned about this leave the sketch as is otherwise i suggest you look at smoothing your data out. You can find a detailed tutorial on the Arduino website.Try adding and soil moisture sensor too, monitor the moisture in the soil and if your crop growth rate stalls your plants may need water.Add wireless connectivity with wifi, bluetooth or Lora, go completely off grid and and use solar power to run this sensor.And lastly you can use this sensor all year round, after you have harvested your crops use it in the winter to measure how much snow has fallen!
And Finally.
I would like to take this opportunity to thank you for reading this tutorial, I hope you have enjoyed doing it as much as i have done writing it. Hope to see you again soon, Happy sensing !!
Code
Credits
weatherman
after working for a well know weather monitoring company for the past ten years, my obsession for measuring whats around us has grown i first picked up an arduino uno 4 years ago since then i have never looked back, jack of all trades master of none
Related products


Leave your feedback...