
Smoke And Gas Detection Using Mq-2 Sensor And Piezo Buzzer

Made by surilli-io / Communication / Environmental Sensing / Fire & Pyrotechnics / Home Automation / Sustainability
About the project
This sensor is used to monitor gas leakage in your home or work place, and it beeps the buzzer whenever leakage is detected.
Project info
Difficulty: Easy
Platforms: Arduino
Estimated time: 1 hour
License: GNU Lesser General Public License version 3 or later (LGPL3+)
Items used in this project
Hardware components


Story
Welcome to surilli tutorials. We are going to interface a buzzer and smoke sensor with surilli wifi, so whenever smoke is detected buzzer starts producing beep.
What is a Piezo Buzzer?

A buzzer or beeper is an audio signalling device, which may be mechanical, electromechanical, or piezoelectric (piezo for short).
Piezo buzzer is an electronic device commonly used to produce sound. Light weight, simple construction and low price make it usable in various applications like car/truck reversing indicator, computers, call bells etc.
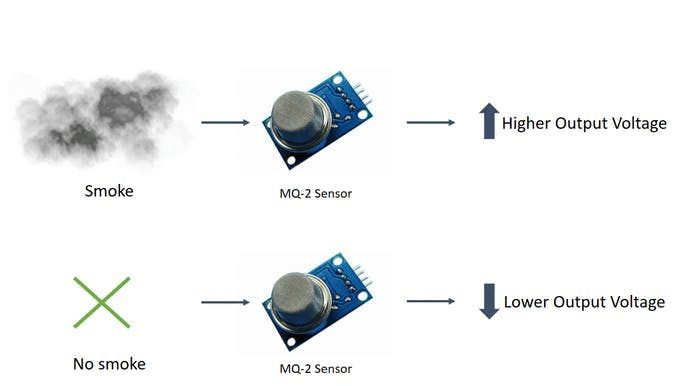
What is an MQ-2 Smoke Sensor?
The MQ-2 smoke sensor is sensitive to smoke and to the following flammable gases:
- LPG
- Butane
- Propane
- Methane
- Alcohol
- Hydrogen
The resistance of the sensor is different depending on the type of the gas.
The smoke sensor has a built-in potentiometer that allows you to adjust the sensor sensitivity according to how accurate you want to detect gas.
How Does It Work?
The relationship between voltage and gas concentration is the following:
- The greater the gas concentration,the greater the output voltage
- The lower the gas concentration,the lower the output voltage
Analog and Digital Pin:
The output can be an analog signal (A0) that can be read with an analog input of the Surilli or a digital output (D0) that can be read with a digital input of the Surilli.
While in this project we will be using digital output.
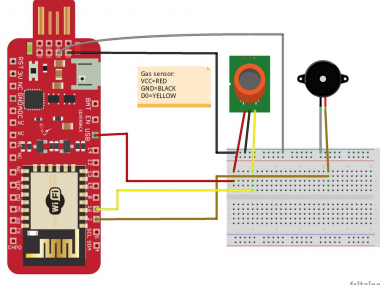
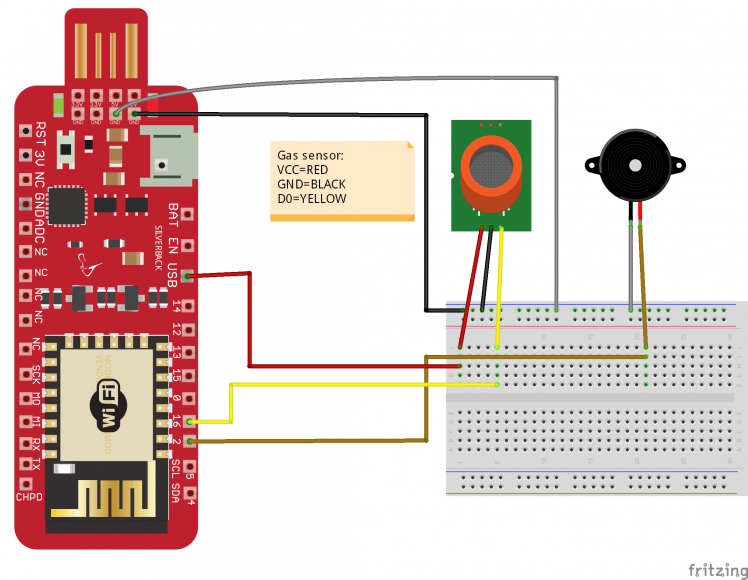
Step 2: Circuitry
Step 3: Setting Up Arduino IDE
Open Arduino IDE and make sure that you have selected the right board & port.
Now copy and paste the Arduino IDE sketch from down below.
 int smoke_sensor_pin =16;//D0 pin of sensor is connected to pin 16 of surilli.
int buzzer =2;//positive pin of buzzer is connected to pin 2 of surilli
void setup() {
 pinMode(smoke_sensor_pin, INPUT);//pin 16 is declared as input
 pinMode(buzzer, OUTPUT);//pin 2 is declared as output
 Serial.begin(9600);
}
void loop() {
 delay(500);
 int SmokeSensor = digitalRead(smoke_sensor_pin);//it will read D0 pin of sensor which is connected to pin 16
 Serial.println(SmokeSensor);//to display value (1 or 0) of pin 16 on serial monitor.
 if(SmokeSensor == 0){
 digitalWrite(buzzer, HIGH);//when gas is detected buzzer will be on.
 Serial.println("Gas detected");
 }
 if(SmokeSensor == 1){
 digitalWrite(buzzer, LOW);//when no gas is detected buzzer is turned off.
 Serial.println("Gas not detected");
 }
}
That's it! After uploading this code on you surilli board, sensor will start working and whenever smoke is detected buzzer starts producing beep.
If you have any queries, feel free to contact us at surilli.io
Schematics, diagrams and documents
Code
Credits
Related products


Leave your feedback...