
Smart Door Lock With Esp32 And Blues Notecard

Made by Pius4109 / Home Automation / Security / IoT
About the project
Create a smart door lock that utilises BLE for local unlocking and a mobile app integrated with Blues Notecards for remote unlocking.
Items used in this project
Hardware components

View all
Software apps and online services
Story
Building a smart door lock has been on my to-do list for the longest time. Many DIY smart door locks I've come across rely on a mobile app, which, in my opinion, tends to negate the time-saving benefits as it still involves connecting to the smart lock before unlocking the door—almost akin to fetching a physical key. Then, a lightbulb moment struck when I recalled a YouTube video where an individual synchronised his room lights to activate upon the presence of his smartwatch. This sparked the idea that I could implement a similar concept for a smart door lock.
Instead of dismissing the notion of a mobile app entirely, I integrated it into the project to facilitate remote door unlocking from anywhere in the world via the internet, utilising the Blues Notecards. One remarkable feature of Blues Notecards is that you can easily switch from a cellular Notecard to a Wi-Fi Notecard without changing a single line of code.
If this is your first time using Blues Notecard, check out the Notecard Quick Start article here.
How it worksThe Smart door lock offers two unlocking options: Bluetooth and internet connectivity through a cellular network. To unlock via Bluetooth, your device (phone, smartwatch, etc.) just needs to be near the door, and the door will open. This method is ideal for convenient nearby access. However, Bluetooth range limitations restrict its use to proximity. For remote access, the Blues Notecard provides internet connectivity through a cellular or Wi-Fi, depending on the Notecard you are using. This allows you to control the lock anywhere in the world, making it convenient for granting guests access when you're away from home.
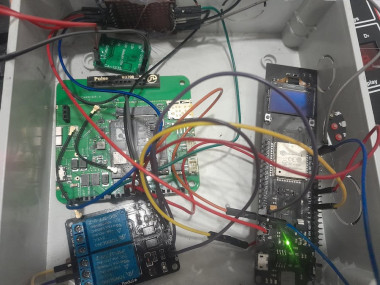
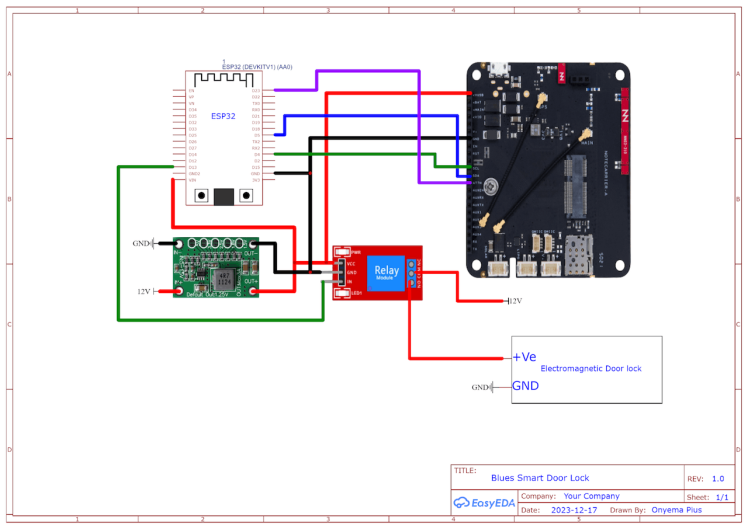
Schematic Diagram and ConnectionsBefore you make a connection, we have to connect the Notecard to the notecarrier.
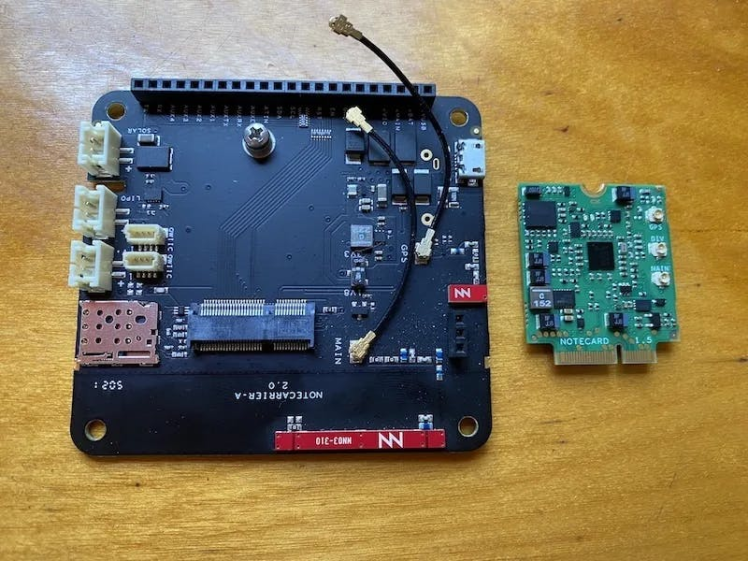
Remove the screw from the mounting receptacle on the Notecarrier and rotate the U.FL cables away from the M.2 socket.
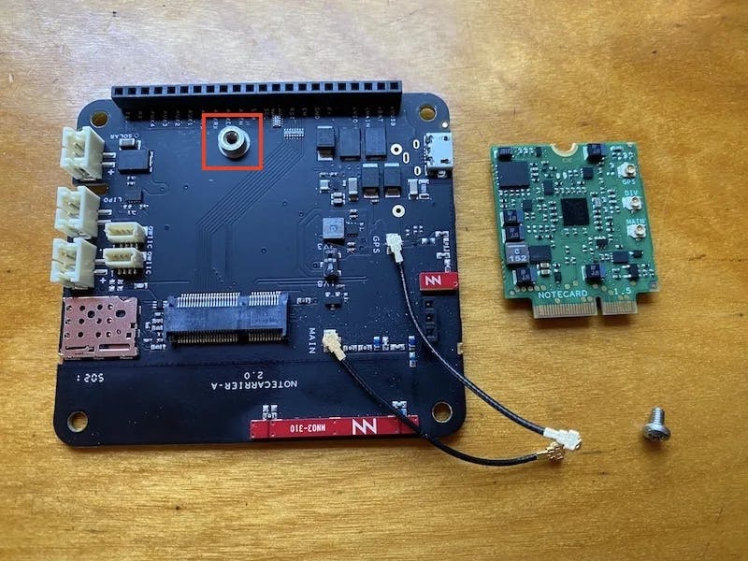
Place the Notecard into the M.2 slot on the Notecarrier. Once inserted, press gently until the Notecard is inserted and the screw receptacle hole is completely visible.
Re-insert the screw into the mounting receptacle and tighten to secure the Notecard to the Notecarrier. Be sure not to overtighten the screw.
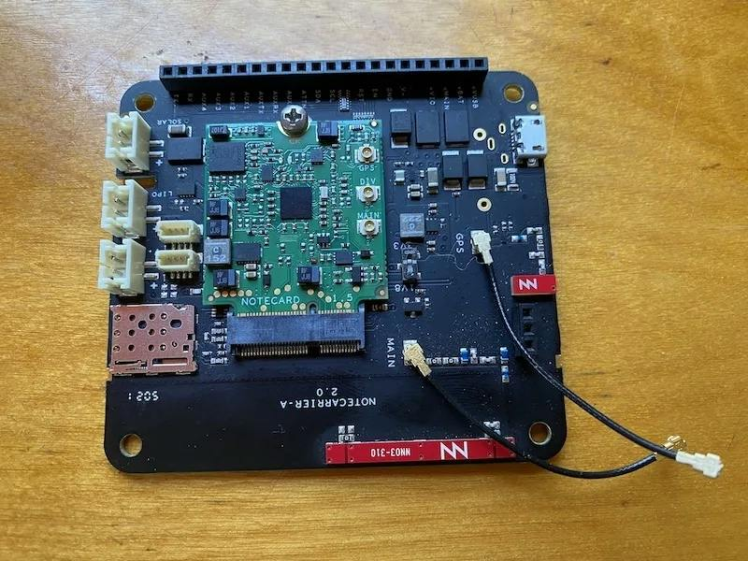
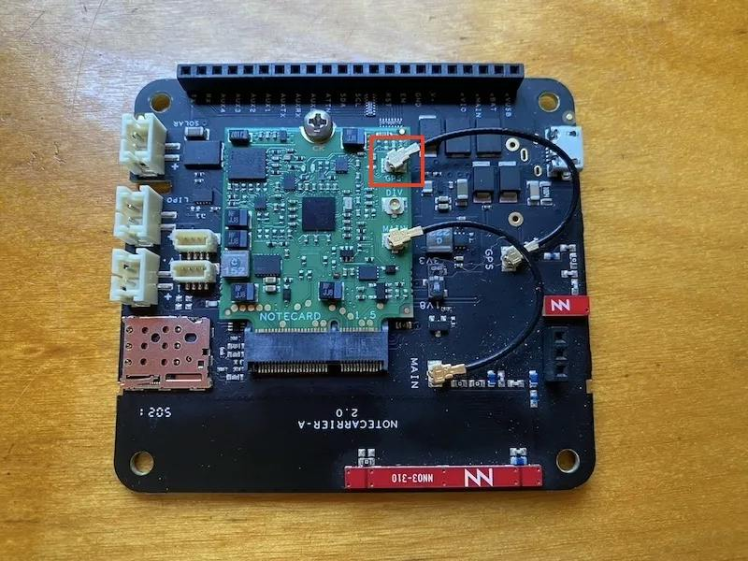
Secure the free end of the u.FL cable connected to the socket labelled MAIN on the Notecarrier to the MAIN socket on the Noteca
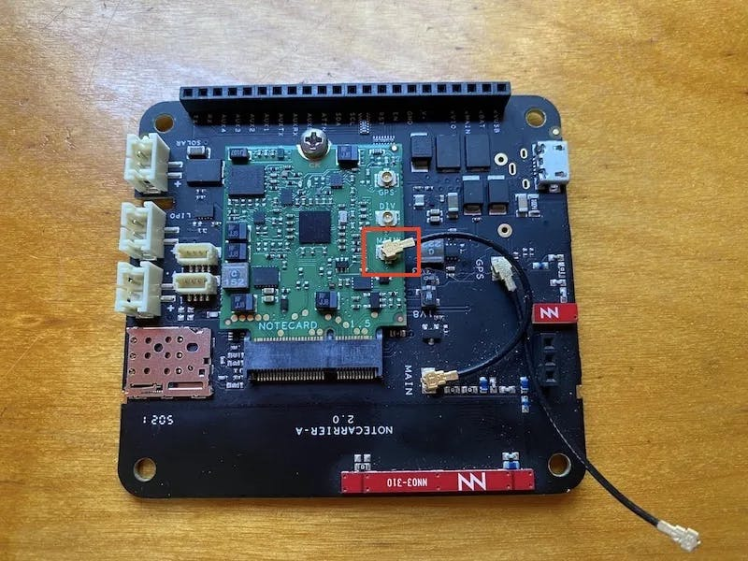
Secure the free end of the u.FL cable connected to the socket labelled GPS on the Notecarrier to the GPS socket on the Notecard.
If you use an external SIM card, insert it into the SIM slot. To set up an external SIM card, please check out this article by Blues.
Also, if you are using the Wi-Fi Notecard, check out this article to connect the Wi-Fi Notecard to an access point.

Here is a schematic diagram of the circuit
To use the Notecard, we must have a project on Notehub. Go to the Notehub website and follow the steps below
- Navigate to the Notehub Projects Dashboard.
- Click Create Project and type your project's name in the pop-up form.
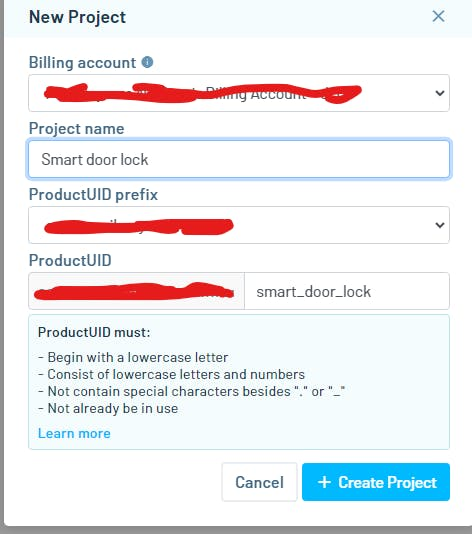
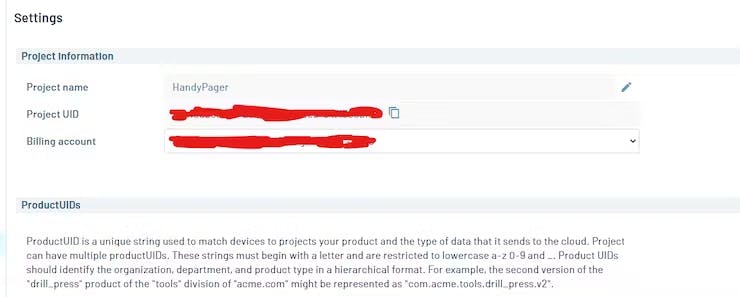
Type in your project name in the textbox labelled project name.
Take note of your project UID because Notehub will use it to associate your Notecard with the project we created.
The codeI will be using Arduino IDE as my code editor. You can download the code from my GitHub repository.
Open the code using the Arduino IDE and install the following libraries from the library manager.
- Arduino JSON
- Blues Notecard

These are the UUIDs for our BLE SERIVE and CHARACTERISTIC. You can generate a new one for yourself using the UUID generator.
#define productUID "com.gmail.xxxxxxxxxx:smart_door_lock"This is where you put in the productUID I asked you to take note of.
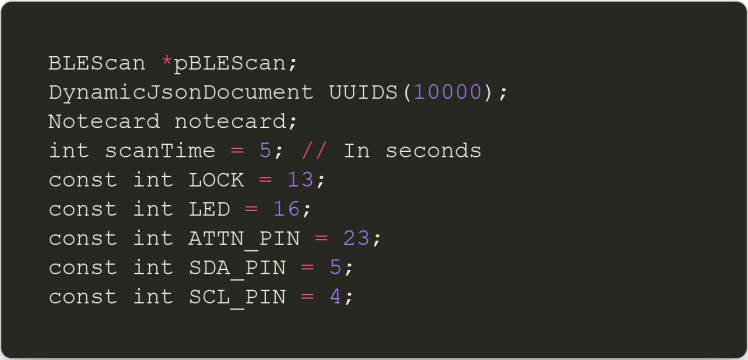
Here, we initialise our objects, variables and constants.
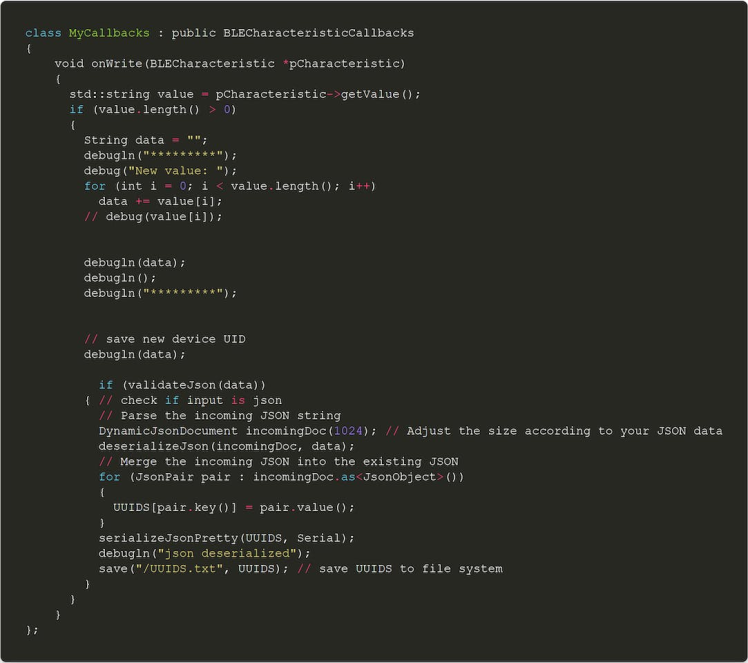
The function in the class MyCallbacks is called whenever data is sent via BLE to the ESP32.
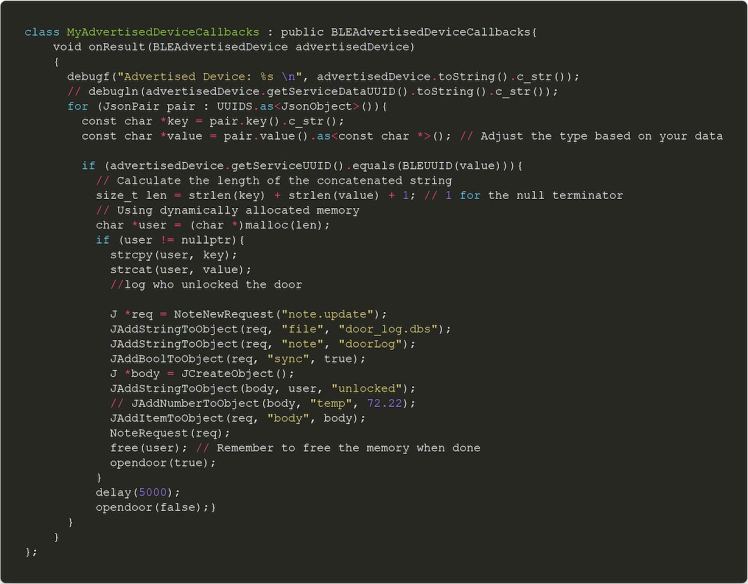
The function onResult in the class MyAdvertisedDeviceCallbacks is called whenever advertised devices are found; however, if the advertised device is a device, we register the door as unlocked using the opendoor function.
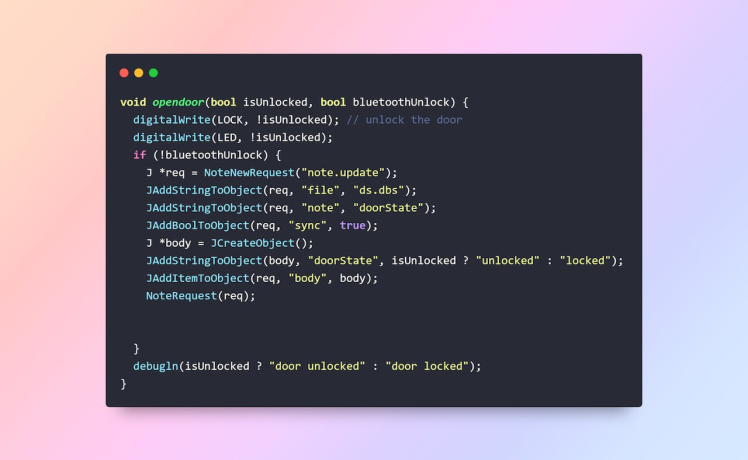
When the door is remotely unlocked using Notehub over the internet, the function is invoked with the bluetoothUnlock boolean set to false. As a result, the doorState is then updated on Notehub.
In the setup function, we associate our projectUID with the Notecard and put the Notecard in continuous mode using the code snippet below.
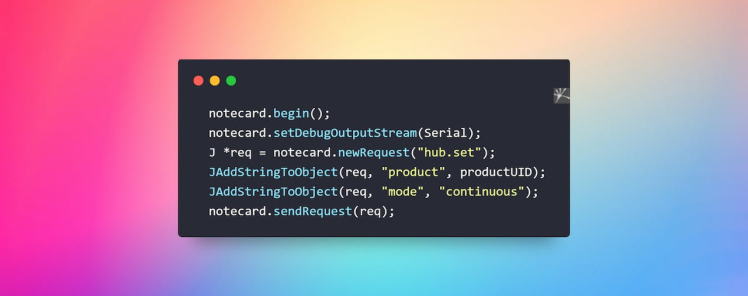
This stands in contrast to periodic mode, where the Notecard periodically powers on the modem and connects to Notehub only when synchronisation with the service is necessary. In periodic mode, the modem is powered off when not in use, making it power-efficient—an advantageous feature for battery-powered projects. However, continuous mode is more suitable for our device (ESP32 circuit) powered by a 12V supply.
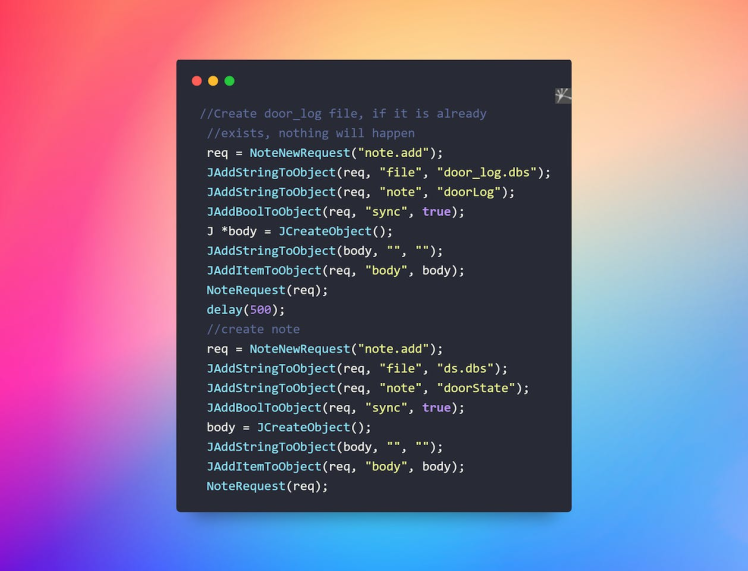
Before we update a note, the note has to exist first; thus, using the code snippet above, we use the note.add request to add a new note; however, if the note exists already, the Notecard will return an error stating that the note exists, but this won't stop our code execution. So, it won't be a problem to create a note even when it exists. The code above is in the setup function, so it will happen once the ESP32 boots up.
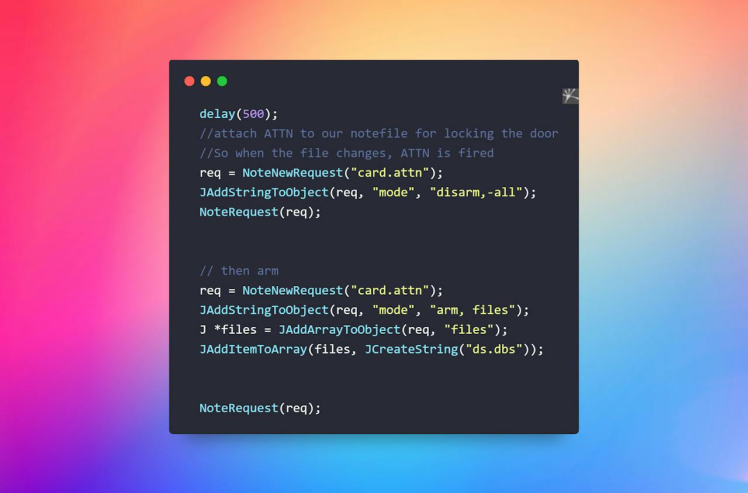
Whenever the note that contains the door state is changed, we would like some kind of notification; this is where the ATTN pin comes in. We can make the ATTN go HIGH whenever a particular file has been changed using the card.attn request. The card.attn request enables us to arm (make HIGH) the ATTN pin when a file changes.
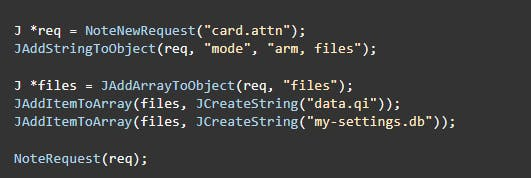
However, if we arm the ATTN pin when it is already armed, it will be disarmed, so we need to be sure it is disarmed. So, just before I arm the ATTN pin in the Arduino code above, I disarm it using the disarm mode. This helps ensure the ATTN pin is disarmed before I arm it.
Click here for more information about the card.attn request.
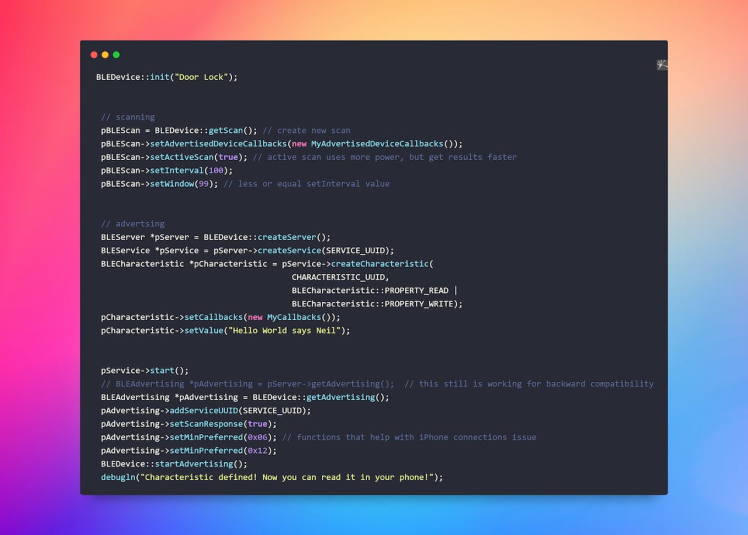
The code below initialises BLE and sets it up for scanning and advertising.
We examine whether the ATTN (Attention) pin is in a HIGH state in the void loop. If it registers as HIGH, it indicates that a note has changed. Consequently, we retrieve the note and examine whether the door state is set to "unlocked." If the door is set to “unlocked”, we open the door, wait for a few seconds and relock it.
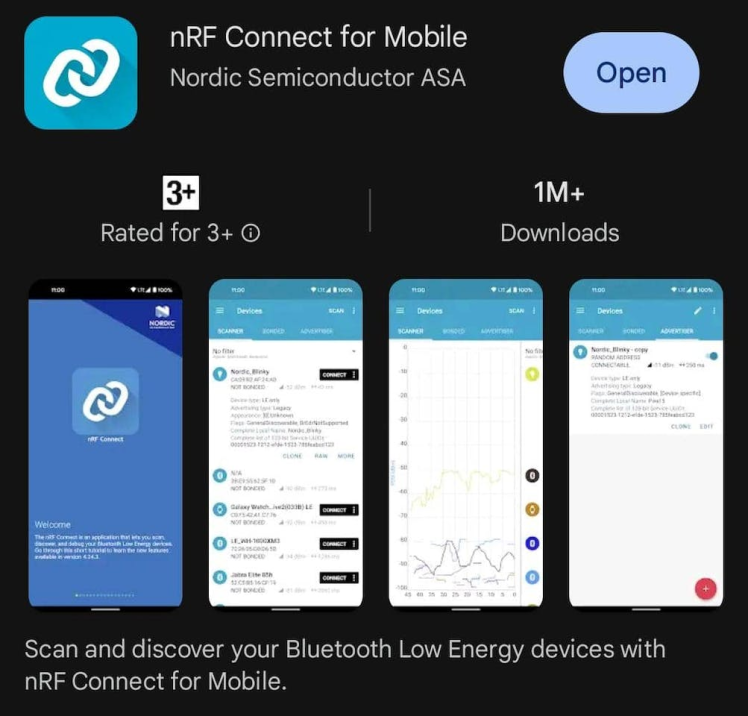
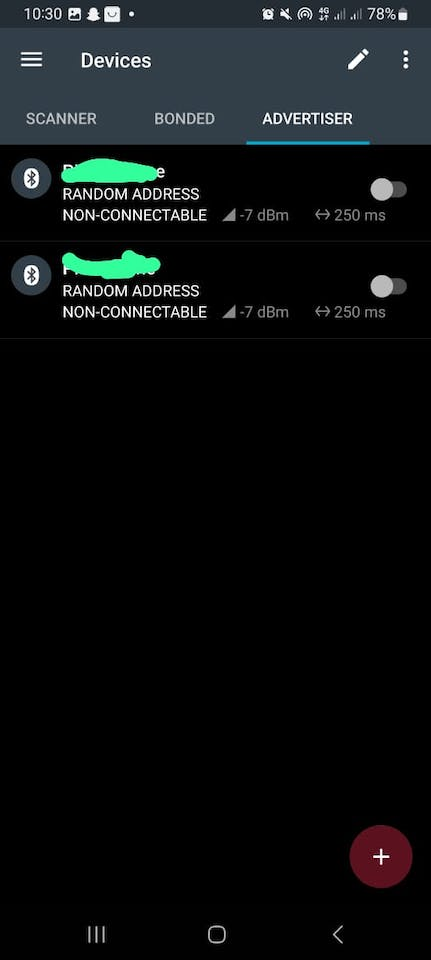
The Mobile AppThe mobile app's original purpose was to register new users/devices. Unfortunately, I could not get Bluetooth Low Energy (BLE) to function through Flutter. As a result, we will use NRF Connect to register new devices. Regular mobile phones do not enable BLE advertising automatically; we must also do this through the NRF Connect app. If this is your first time working with BLE, I recommend reading this article.
You can download the NRF Connect app from the Google Play store.
Previously, I said that the device scans for your Bluetooth device. To clarify, it scans for a Universal Unique Identifier (UUID), which our phones must advertise. To get a UUID, go to https://www.uuidgenerator.net/ and copy the generated UUID.

The UUID generated will differ from the one you see above; remember, it has to be unique.
Now open the NRF connect app and click ADVERTISER at the top bar of the screen.
Click the plus icon to create your advertiser.

Type in your name and click the checkbox scannable. Click ADD RECORD. Then select Service UUID.
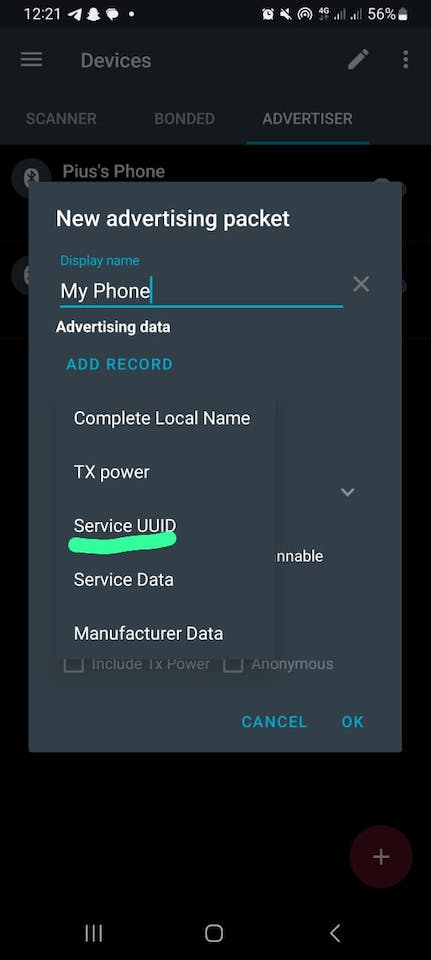
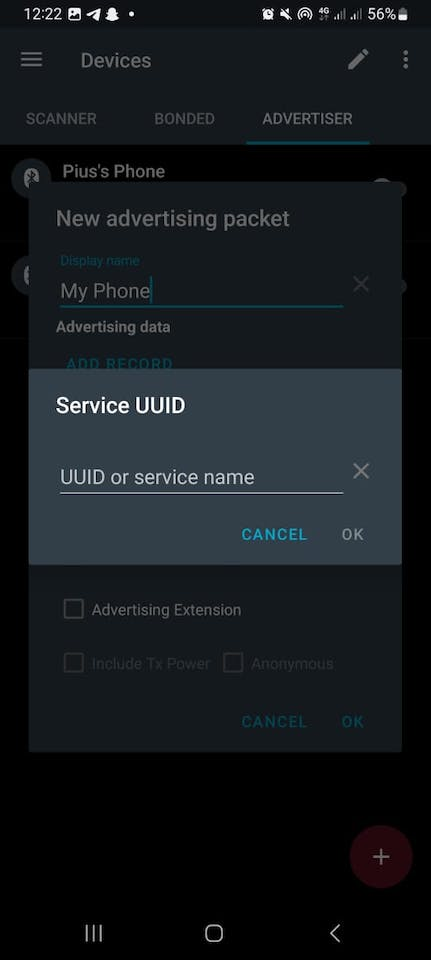
Paste the UUID you copied from the UUID generator, click OK, and then OK again. You have successfully created your BLE advertiser.
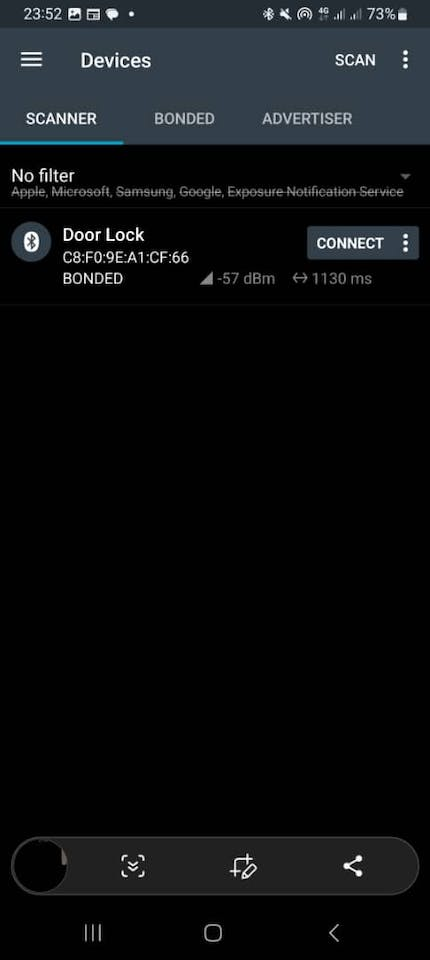
To register the BLE advertiser, we need to send the UUID of the BLE advertiser to our ESP32 so that it will unlock the door when the ESP32 scans for BLE devices and sees our advertiser. To do this, we need to connect to the ESP32. In the NRF Connect app, at the top bar, click on SCANNER and then click SCAN. Ensure the device (our circuit) is powered, and you should see a device called Door Lock. Click connect.
You should see the screen below.
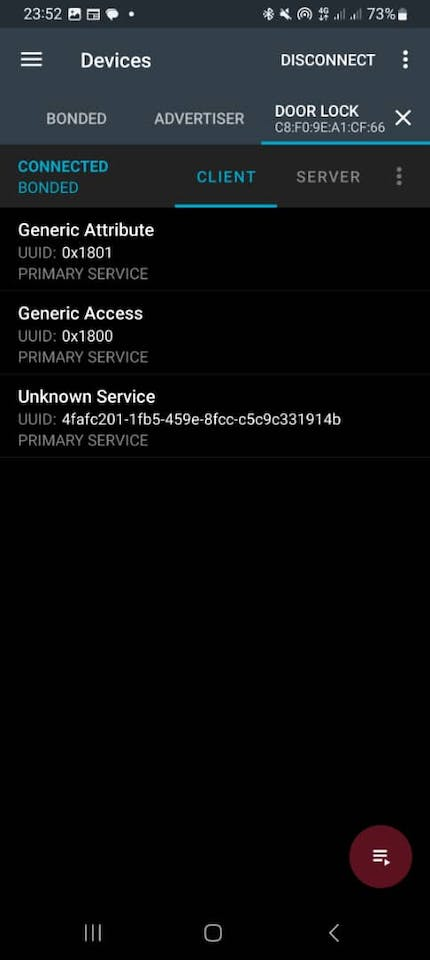
Click on Unknow Service, and a drop-down called Unknow Characteristics will appear.

Click on the arrow pointing up.
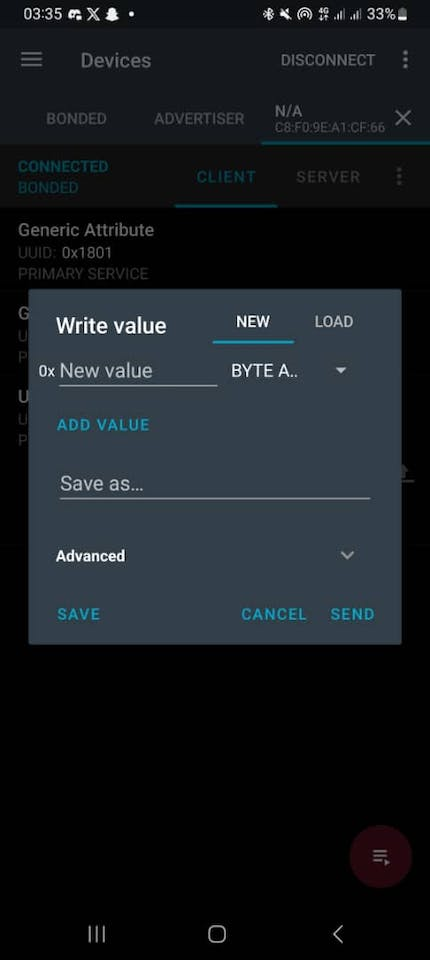
Click on the BYTE A… drop down and select TEXT.
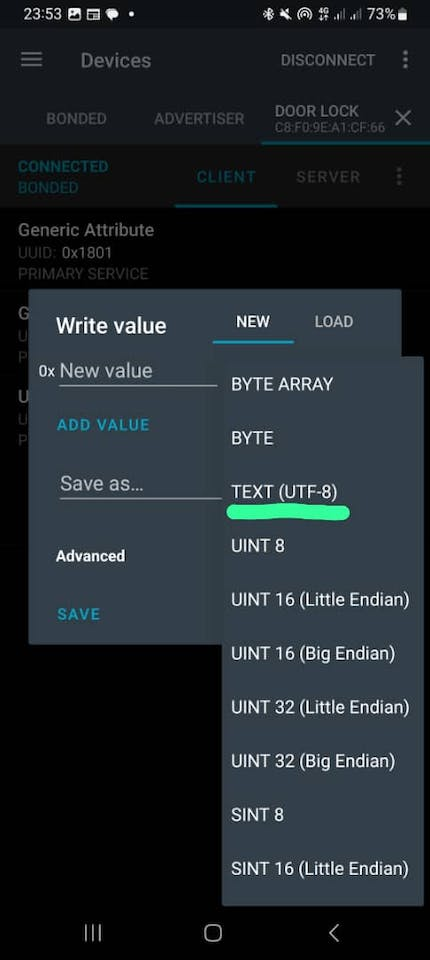
In the NEW VALUE text box, type in your name and the UUID you created earlier for your advertiser in JSON format.
For example: {“pius”:”f2fd9029-ca9b-43d0-9c24-382887e164f6”}, you can add more by separating them with commas.
You can also add other BLE-enabled devices, like some smartwatches. Scan for them using the NRF connect app, connect and get their UUID, then register them.
If it was successful when you turn on your advertiser or bring your BLE-enabled device close to the door lock, the door should unlock, you will hear the clicking sound of the relay, and you should see an entry in Notehub that you have opened the door.

You should see your name and UUID.
Now, you can download the APK file for the mobile app and explore its source code on my GitHub repository.
Some credentials will be needed to use the mobile app, such as:
- Client ID
- Client Secret
- Device UID
- Project UID
In Notehub, click on Settings.
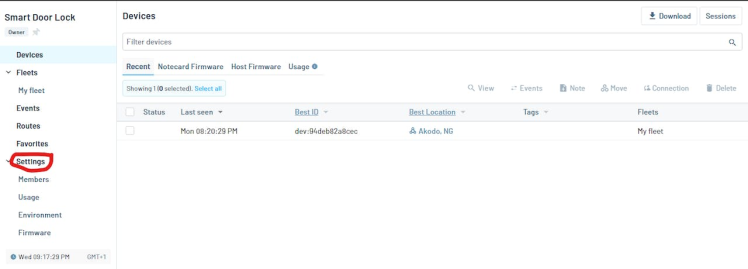
You should see your project UID, copy it and keep it somewhere.
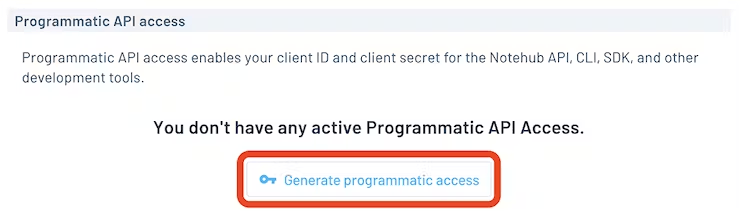
Scroll down to programmatic API keys to get your client ID and client Secret.
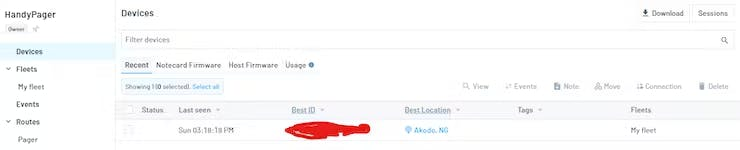
To retrieve your device UID, navigate to the 'Devices' section, and you'll find your device UID listed under your specific device.

By now, you should have gotten all your credentials.
The app is straightforward to use. The first page is the login page.
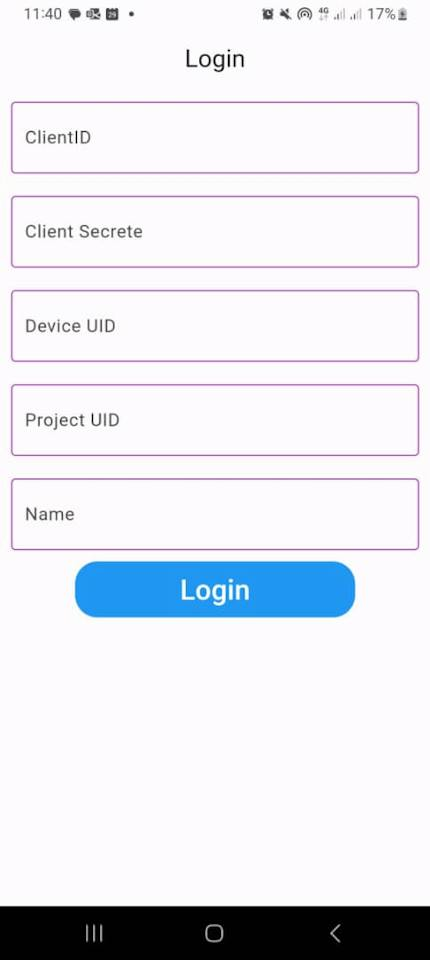
Just input your credentials and click login; you will be taken to the controls page, which uses blues HTTP request API to edit a note containing the door's state.
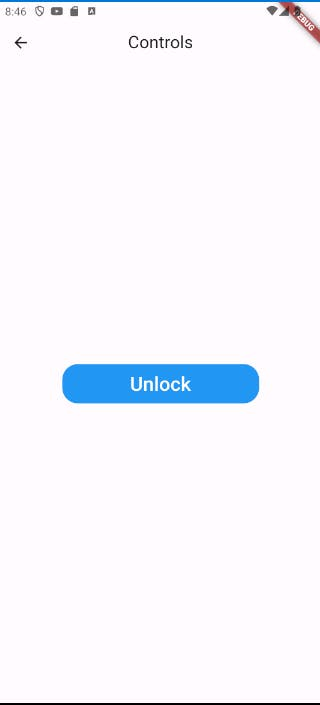
Click the Unlock button to unlock the door from anywhere in the world. The Notecard takes a while to get the update.
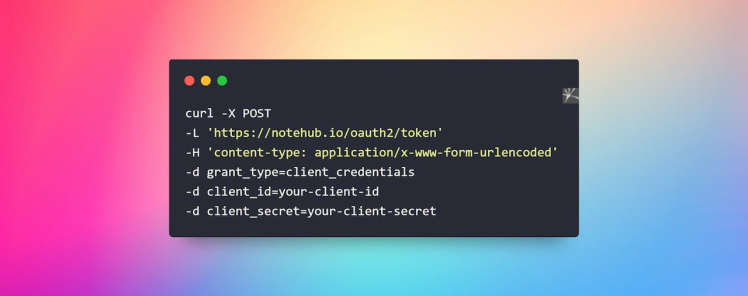
Blues Notehub APII Used the Blues API to communicate with Notehub from the Flutter app; moreover, there is another way to communicate with Notehub, using Notehub routes. That aside. We will be using only a few requests from the Nothub API.
To communicate with Notehub, we must generate a token that expires every 30 minutes. This security feature enhances the overall protection of our system by regularly refreshing authentication credentials, reducing the risk of unauthorised access and ensuring a higher level of data security.
You can generate a token using the request below.
We will need two extra requests from Notehub to:
- Create a note
- Update a note
You can create a note using the request below.
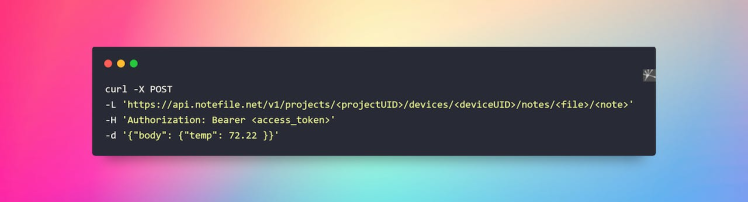
Modify the JSON body with your desired data and fill in your credentials.
Update a note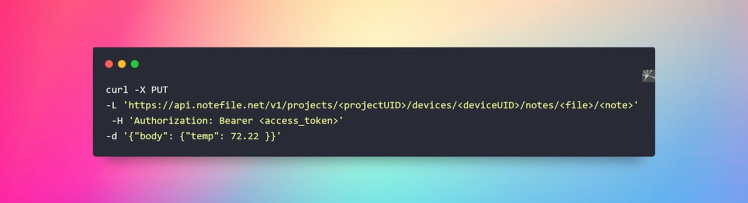
If the door doesn't unlock when your phone/device gets close to it, it could mean you did not register the phone/device properly. When registering a device, the input text must be a valid JSON; otherwise, it won't be saved. Try registering the device again and make sure you have a valid JSON.
WorkflowLet's conclude by going over the workflow of the door lock.
1. Create BLE Advertiser for Phone:
- Use the NRF Connect app to create a BLE advertiser on your phone.
- Assign a UUID to the advertiser.
2. Register New Devices:
- Utilize the NRF Connect app to register new devices.
- This registration process associates each device with a unique identifier.
3. Door Lock's Device Discovery:
- The door lock continuously scans for registered devices in its proximity.
- Upon discovering a registered device, the door is automatically unlocked.
4. Logging and Note Update (Door Unlocked by Device):
- A log is generated and sent to Notehub when a registered device is detected.
- A note containing the updated door state is sent to Notehub.
- The door lock itself updates a note to reflect the unlocked state.
5. Mobile Application Unlock:
- If the door is unlocked via the mobile application, a log is sent from the app to Notehub.
- The app sends a note to Notehub containing the updated door state.
- When the Notecard receives the note, it processes the unlock command.
- The door is unlocked for a set duration.
- After a few seconds, the door is locked.
- The door state is updated in Notehub by the door lock.
Video Demonstration.
Code
Credits
Pius4109
Let’s see… I’ll skip to the best parts. I am an aspiring embedded software engineer passionate about creating a sustainable embedded system ecosystem in Nigeria. I have been tinkering with embedded systems since my high school days until the present. My fascination with robotics brought about my interest in embedded systems. I have always wondered how GOD made humans walk, and it still fascinates me when I sit and watch people walking. So, I decided to delve into robots and stumbled upon a video on YouTube on how to make a robot with Arduino. That was it; I have been writing codes since then. However, now, my interest is in becoming an embedded software engineer rather than focusing on robots. Robots just served as a means to introduce me to embedded systems.
Related products


Leave your feedback...