
Remotely Query Sensor Data Via Sms

Made by RobLauer / Communication / Notifications / Sensors / IoT
About the project
Learn how to use text messaging to report on remote sensor data with Twilio and the Blues Notecard.
Project info
Difficulty: Easy
Platforms: Adafruit, Twilio, Blues Wireless
Estimated time: 2 hours
License: MIT license (MIT)
Items used in this project

Story
They say the "next big thing" for the IoT is Machine Learning, but the "current big thing" is cloud dashboards. Gorgeous visualizations of accumulated data with colorful charts, informative widgets, and live data streams.

An example dashboard from Datacake
Do I agree with this? Absolutely!
I will, however, suggest that some data-digesting scenarios don't require the full power of a cloud dashboard. Heck, maybe they don't require much of a UI at all.

Using SMS to retrieve sensor data
Project Summary
Today I'm going to walk you through setting up a simple IoT application that:
- Gathers sensor data (e.g. temp, humidity, pressure, and battery voltage) at a defined interval.
- Syncs accumulated sensor data with a cloud service, using low-power cellular from Blues.
- Sends you a data report in reply to an SMS sent from your phone.
The (Minimal) Hardware Requirements
I promised you a simple IoT application and that starts with a simple (but powerful) set of hardware.
Let's begin with the carrier board - that being the Notecarrier A from Blues. This is a host board for the Notecard (a Cellular IoT system-on-module), which includes on-board cellular and GPS antennas, two Qwiic ports for connecting I2C peripherals, and header pins for hooking up to a host MCU.

Blues Notecarrier A
To gather environmental data with a relatively inexpensive sensor, we are going to use an Adafruit BME280 sensor with Qwiic. The BME280 returns reliable temperature, pressure, and humidity readings.

Adafruit BME280 with a Qwiic cable
Finally, to add connectivity to this project, we are using the aforementioned Blues Notecard (see the NBGL Notecard datasheet). The Notecard is a prepaid cellular module that provides 500MB of data and 10 years of global service for a one-time fee starting at $49 (no monthly SIM fees or subscriptions required).

NBGL Notecard from Blues
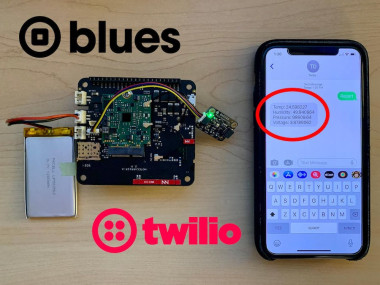
The assembled project hardware should look something like the following picture, with LiPo battery and a Micro USB cable attached to the Notecarrier allowing us to communicate with the Notecard via the terminal provided at dev.blues.io.

Notecarrier + Notecard + BME280
The Host Microcontroller
What about the host microcontroller needed to handle the application logic...? And gathering data from the sensor...? And sending that data to the Notecard...?
Sorry to disappoint you, but there is no host MCU used with this project!
All of the application logic is accomplished using the APIs provided by Blues. Let's dive into some of those and see how Cellular IoT with Blues actually works.
Cellular IoT with Blues
To continue the thread of simplicity, I'd like to introduce you to Cellular IoT with Blues.

The Blues Notecard
Aside from the prepaid data and global connectivity (LTE Cat-1, LTE-M, and NB-IoT are all supported), the Notecard is hyper-focused on:
- Developer Experience - While the Notecard is a cellular device, you don't have to program the modem with AT commands.
- Low-Power - The hardware components and firmware defaults are low-power by default (idling at ~8uA).
- Security - Data is transferred via private VPN tunnels and can optionally be encrypted.
Speaking of developer experience, the Notecard speaks JSON. For instance, if you wanted to ascertain the last known location of the Notecard, you'd use the card.location API:
// Request
{ "req": "card.location" }

// Response
{
  "status": "GPS updated (58 sec, 41dB SNR, 9 sats),
  "mode":   "periodic",
  "lat":    42.577600,
  "lon":    -70.871340,
  "time":   1598554399
}The Notecard communicates with the cloud "off the public Internet", using the Blues cloud service Notehub as a secure proxy.

Blues Notehub dashboard
Notehub is also key to this project (and free to use for most applications). Aside from acting as a secure proxy for receiving data from Notecard, it enables cloud connectivity with providers like Twilio, among many others via an extensive routing system.
Configuring the Notecard and Notehub
If we don't have a host MCU to program our application logic, how do we build out the rest of this project?
The Notecard API enables a multitude of capabilities that let you program complicated scenarios without using a host MCU.
Assuming your Notecard + Notecarrier + Sensor are fully assembled - and you can communicate with the Notecard via USB (see the Blues quickstart for help!) - let's configure this application.
NOTE: If you previously used this Notecard with a different application, I recommend performing a full reset on it with thecard.restoreAPI:{"req":"card.restore", "delete":true}.
Set up a Notehub Project
While the Notecard knows where to go when it's powered-on (it automatically knows to use a private APN to communicate with Notehub), it does need you to tell it which Notehub project it should use.
Head to notehub.io and set up a new project. You'll need to copy the ProductUID, which is a globally-unique identifier for your project:

Get the unique ProductUID from your Notehub project
Now, let's program the Notecard!
Associate the Notecard with Your Notehub Project
By using the hub.set API, you can tell the Notecard that it should sync any pending data (known as Notes) to your Notehub project on a regular interval. In this case, you're telling it to sync every 15 minutes:
{
   "req": "hub.set",
   "product": "<your-product-uid>",
   "mode": "periodic",
   "outbound": 15
}
Again, you can send this JSON request to your Notecard using the terminal provided at dev.blues.io.
Place the Notecard in "AUX Track Mode"
The Notecard's AUX track mode allows you to supplement sensor readings from the Notecard with temperature, pressure, and humidity readings from a BME280 sensor wired to the AUX pins.
Send this request to configure AUX track mode on the Notecard:
{
  "req": "card.aux",
  "mode": "track"
}
Gather Sensor Data on the Notecard
Using an optional parameter of the card.temp API (which is normally used to retrieve the temperature from the Notecard's onboard temperature sensor), we can tell the Notecard to gather sensor values at the specified seconds interval (which automatically uses the BME280 sensor due to the card.aux call above).
Send this request to the Notecard:
{
   "req": "card.temp",
   "seconds": 600
}
Viewing Accumulated Sensor Data in Notehub
With those three API requests sent to your Notecard, your solution should start saving sensor data every 600 seconds (the card.temp request above) and then syncing that data with Notehub every 15 minutes (the outbound parameter of the hub.set request above).
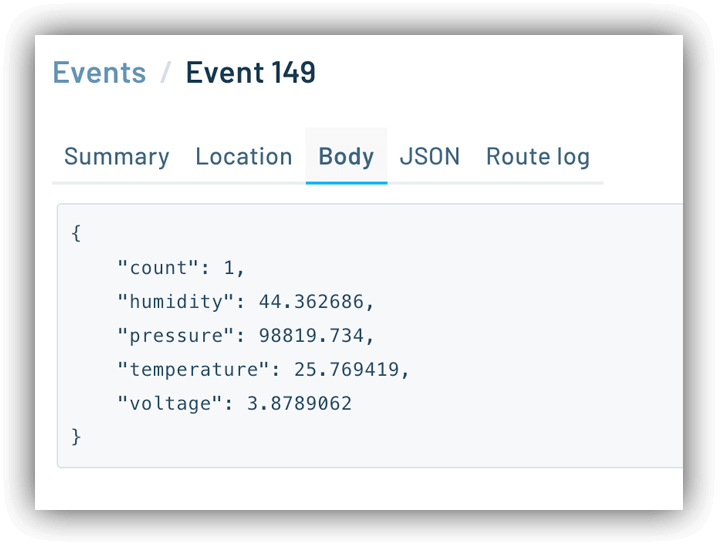
Each reading of sensor data will appear in Notehub like so:
But it's not all that useful to see the data in Notehub. Remember, our end result is to access this data via SMS! Luckily, using a combination of Twilio Functions and the Notehub API, this is a surprisingly simple endeavor.
Accessing Sensor Data via SMS
Using the Notehub API
Let's start with the Notehub API, because we need a means to programmatically pull the most recent set of sensor data sent by our device.
The Event API includes the Get Events by Project endpoint. This API call requires two arguments:
- The ProjectUID of your Notehub project (NOT to be mistaken with the
ProductUIDused above!). - The name of the Note (i.e. the event) that is sent to Notehub. In our case this is
_temp.qo.
Resulting in the following URL:
https://api.notefile.net/v1/projects/<your-project-uid>/events?&sortBy=captured&sortOrder=desc&files=_temp.qoSorting by captured in desc order assures us that the most recently-captured sensor data will be the first in the list of events returned (with additional meta data about the event):
{
   "events":[
      {
         "event":"d88acdc6-dae0-4275-b53b-b5b2b7636759",
         "session":"5c0a9b77-7aa6-4ddc-9335-c533b47565f1",
         "best_id":"dev:864475044220000",
         "device":"dev:864475044220000",
         "product":"product:com.blues.your-product-uid",
         "app":"app:1ed79a67-39e1-4943-9527-ef3sr258eeee",
         "received":1687376930.459287,
         "req":"note.add",
         "file":"_temp.qo",
         "body":{
            "count":1,
            "humidity":44.362686,
            "pressure":98819.734,
            "temperature":25.769419,
            "voltage":3.8789062
         },
         "best_location_type":"tower",
         "best_location_when":1687376924,
         "best_lat":43.0738875,
         "best_lon":-89.44357812499999,
         "best_location":"Shorewood Hills WI",
         "best_country":"US",
         "best_timezone":"America/Chicago",
         "tower_when":1687376924,
         "tower_lat":43.0738875,
         "tower_lon":-89.44357812499999,
         "tower_country":"US",
         "tower_location":"Shorewood Hills WI",
         "tower_timezone":"America/Chicago",
         "tower_id":"310,410,17169,77315601",
         "fleets":[
            "fleet:0a930fe2-b947-4c2f-9623-df1504f83729"
         ]
      },
...NOTE: Be sure to consult the Notehub API docs to learn how to authenticate your API requests.
Using a Twilio Function
Now that we can programmatically pull event data from Notehub on demand, we need to use Twilio to call the Notehub API and send an SMS. To do that, we are going to use a Twilio Function.

Twilio Function diagram. Image source Twilio.
If you haven't already, sign up for a Twilio account. Then head to your Twilio Console, specifically to the Services section of Functions and Assets.
Create a new Service (name it whatever you like). In the Service, create a new Function (which is essentially just an endpoint, and can also be named arbitrarily).

My Twilio Function, with important sections highlighted for reference below.
This function is a serverless function written in JavaScript (every embedded developer's favorite language I know ?).
Here is the complete Node.js (JavaScript) function I used, with some inline comments to explain what is happening at each step:
const axios = require('axios');

exports.handler = async (context, event, callback) => {

  // Create a new messaging response object
  const twiml = new Twilio.twiml.MessagingResponse();

  // Access the incoming text content from `event.Body`
  // (this is the inbound SMS message)
  const incomingMessage = event.Body.toLowerCase();

  // if the incoming SMS includes the word "report",
  // use the Notehub API to pull event data from Notehub
  if (incomingMessage.includes('report')) {

    try {
      const notehub_token = '<your-Notehub-token>';
      const url = "https://api.notefile.net/v1/projects/<your-project-uid>/events?&sortBy=captured&sortOrder=desc&files=_temp.qo";

      const response = await axios.get(url, {
        headers: {
          'Authorization': `Bearer ${notehub_token}`
        }
      })

      // pull out the temp, humidity, pressure, voltage values
      // from the Notecard event
      const body = response.data.events[0].body;
      const temperature = body.temperature;
      const humidity = body.humidity;
      const pressure = body.pressure;
      const voltage = body.voltage;

	   // send the SMS response back to the sender!
      twiml.message('Temp: ' + temperature + 'nHumidity: ' + humidity + 'nPressure: ' + pressure + 'nVoltage: ' + voltage );

      return callback(null, twiml);
    } catch (error) {
      // In the event of an error, return a 500 error and the error message
      console.error(error);
      return callback(error);
    }
  } else if (incomingMessage.includes('test')) {
    // great for testing a simple response!
    twiml.message('Hello there!');
  } else {
    // undefined incoming message
    twiml.message('Not sure what you meant!?!');
  }

  return callback(null, twiml);
};
NOTE: Before deploying, you will need to update your Dependencies under Settings and import the axios package.When your Twilio Function is ready to publish, click the Deploy All button to deploy your function.
Finally, send an SMS with the word report to your Twilio phone number, and wait for the magic to happen ?:

Notecard event data...via SMS!
Having trouble? Be sure to check your Notehub project's list of Events to make sure data is being sent successfully from your Notecard to the cloud. Also, utilize the "live logs" feature of the Twilio console to debug any issues with your Twilio Function.
Next Step: Real-Time Data
What if you wanted to get real-time data from a Notecard in this same scenario, instead of the most recent event published to Notehub? That's also possible, but you would need to add a host MCU to the equation. You can use the same workflow, but instead of pulling data out of Notehub, you would send an inbound request to the Notecard, telling the host MCU to gather sensor data and send that in an SMS with Twilio. ?
Reach out on the Blues community forum if you have any questions or would like to learn more.
Conclusion
Hopefully you've seen how easy it can be to create a simple reporting system that uses SMS to report on sensor data from the cloud.
This combination of the Notehub API and Twilio Functions allows you to customize your server-side logic and effectively retrieve any data from any device (or even from fleets of devices as you scale). Imagine sending an SMS like report gas device-123 which would be parsed inside a Twilio Function to return specific data (e.g. gas readings) from a specific device (e.g. one with an ID of device-123).
Ready to go? Grab your own Blues Starter Kit...and happy hacking! ??
Credits
Related products


Leave your feedback...