
Online Attendance System (without Ethernet)

Made by electrouser780 / Communication / Home Automation / Security
About the project
Online Attendance System using RFID Module and PHP&MYSQL Only. Utility for all type of attendance requirements. Useful for online tracking
Project info
Difficulty: Easy
Platforms: Arduino
Estimated time: 1 hour
License: GNU General Public License, version 3 or later (GPL3+)
Items used in this project
Hardware components


Story
About this Project
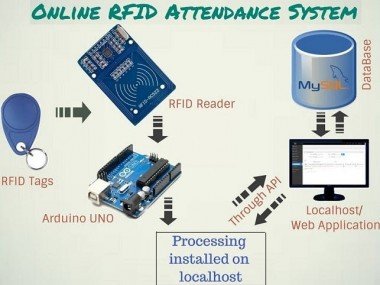
This is a unique project in the world of Arduino for marking Online Attendance without using ethernet and GSM modules. We have developed this unique project to automate the attendance system for offices, schools and universities etc. using RFID RC522 Module and Arduino. For web support and API you need php and mysql. This project costs less than $10.
The purpose of this project is to remove tedious process of marking attendance manually. We've visited so many sites but no one has the solution for marking online attendance without using Ethernet or GSM Module, so we decided to develop our system without using these components which reduces our project costing.
How It Works?
To view full project goto :
http://www.gadgetprogrammers.online
The system can be connected to the computer through RS232 or Universal Serial Bus (USB) port and store the attendance taken inside database (MySQL).To view the recorded attendance, web interface is provided using PHP and HTML.
There are 2 types of RFID Tags. They are Passive RFID Tags and Active Tags.
Here, we are using Passive RFID Tags which contains 8 digit number tags inbuilt in it. RFID reader contains a copper winding in it. This winding acts as an antenna. When a person with RFID tag or transponder enters in the range of RFID reader, the RF field induces voltage in the coils of tag. The range can be set by using the appropriate reader of appropriate frequency. This induced field supplies the voltage in case of passive tags and act as a battery in that case.
Due to interaction of tag with reader 8 characters from tag are sent to controller. These 8 characters are sent to Arduino via serial communication.
Here, Processing software is used to communicate between Arduino and PHP Web Application .This processing software read the 8 characters at serial communication and matched with data stored in DB (MYSQL) by calling PHP Api. If it is matched then it is replied with valid user and attendance marked otherwise it is replied with not valid and no attendance marked (Reply from PHP API) on serial you can view the results (Processing output window).
Circuit and Programming
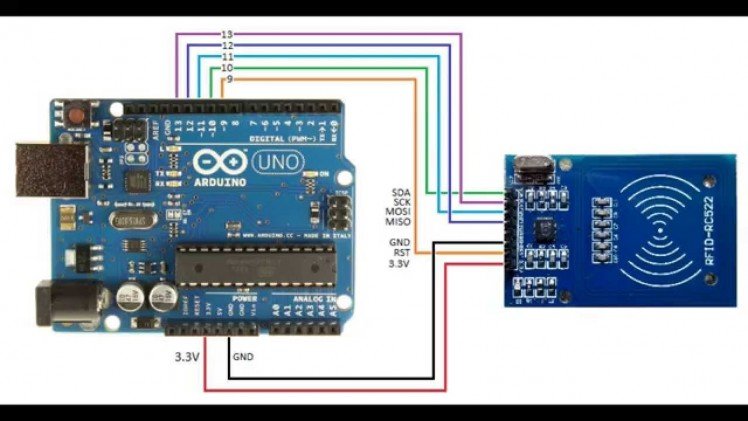 Circuit diagram for Arduino and RFID RC522 Connection
Programming:
Installing XAMPP And Setting up Web Interface:
View full detail by going: http://www.gadgetprogrammers.online
For web interface we require php installed in our system so firstly we need to install apache and mysql in our system for this install XAMPP using link https://www.apachefriends.org/download.html (According to your os) , may be your'e not good with web programming so there is no need to worry about. Please follow steps in order to install XAMPP for php link: (https://www.wikihow.com/Install-XAMPP-for-Windows )
After installing XAMPP please start the xampp apache/mysql services from xampp control panel as described in tutorial of wikihow.
How to test xampp is working fine?
Open your browser and type:
you will see below screen if everything is fine otherwise please repeat above steps.
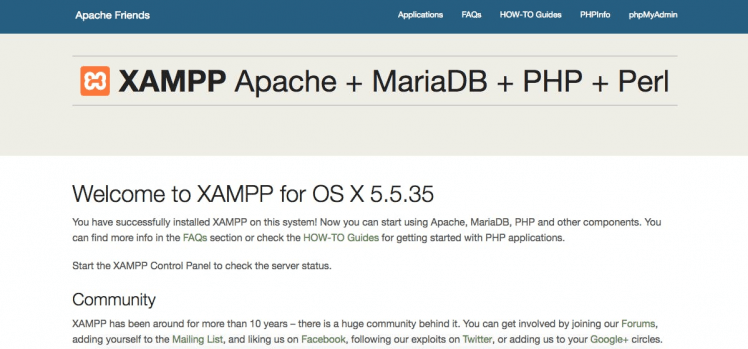 This is showing os x because i am using xampp for mac book
Now copy and paste the attendance zip folder in htdocs
XAMPP->htdocs->attendanceSystem
copied folder will be used in PROCESSING code to call api through path specified and to show attendance data online.
Creating DATABASE
Now open the mysql using browser:
Paste the mysql query code to create database and tables.
Now we're ready to run our web application :
http://localhost/(your folder name)/ (if you have changed the name of folder)
Or its
http://localhost/attendanceSystem/
Here you'll see image given below if everything is going fine:
username: anshulpareek@gmail.com
password:12345
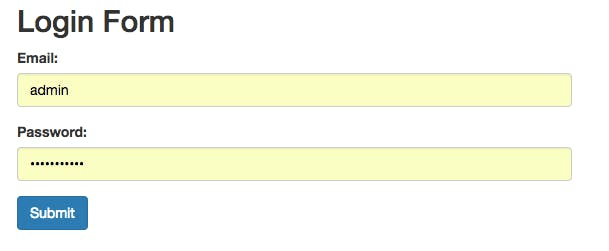 Login screen (username: anshulpareek91@gmail.com, password: 12345)
Adding Users in Our DB:
1.Before login please copy and paste Arduino code.
2.Now run and upload Arduino code to device.
3. Please copy and paste the markattendance program into processing window(to mark attendance)(PLEASE CHANGE YOUR PORT ACCORDING TO SYSTEM)
4. Please copy and paste the add_user program into processing window by creating new file in processing software because we have different module to add users.
Note: (There will be three .pde files which you must need to open in a same window in different tabs and after opening choose add_user.pde tab in window), do remember that you have installed incerfascia library in your processing software.
5. Open processing and run add_user program it will show you a message to approximate your card so please approximate your card to RFID after this you'll see the UID Code and a user name box so please enter name of the user related to this UID (RFID TAG) store information to web then press add user button.
hoooorrrreeeyyyy! !
you've Added a new in user.
Now run our php code :
After Login as we've logged in before :
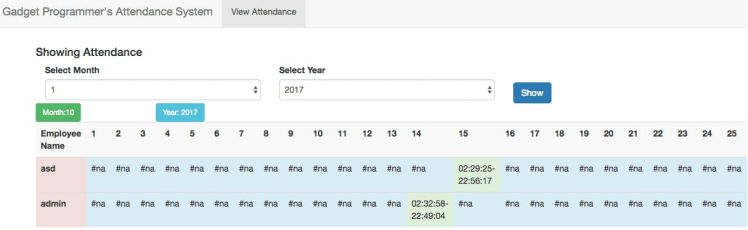 Showing Attendance information of users (in my db there is two users)
So this is overall information about our project please grab as you want.
We've developed fully functional system for all of the users to use this goto:
http://www.gadgetprogrammers.online
Please shout in comment box if you have any query.
Schematics, diagrams and documents
Code
Credits
Related products


Leave your feedback...