
Notecade: Monitor Your Retro Gaming With The Notecard

Made by brandonsatrom / Communication / Games & Gaming / Retro Tech / IoT
About the project
Build a web-based dashboard to monitor your retro gaming with the Pimoroni Picade and the Blues Wireless Notecard.
Project info
Difficulty: Easy
Platforms: Microsoft, Blues Wireless, Pimoroni
Estimated time: 2 days
License: MIT license (MIT)
Items used in this project
Hardware components

Software apps and online services
Story
Christmas 1986 was the best Christmas ever.
It was that year that I was gifted my first ever video game console, the venerable Nintendo Entertainment System. Debuting in the US in late 1985, the NES was still on the top of every kid's wish list over a year later. I still remember my eight-year-old self picking up the wrapped box that I was sure was a Nintendo, tearing into it, and shouting for joy that I'd gotten the gift I'd desired for the last year.
Over the years since, I've owned other consoles, but nothing has ever replaced my love for those gaming experiences of my youth. Beating Super Mario Brothers 2 for the first time, throwing my controller across the room because I couldn't time a jump quite right in Mega Man, discovering the secrets of The Legend of Zelda, and playing the best NES game of all time: River City Ransom.

If you know, you know.
It's this nostalgia for retro gaming that takes me back to these old systems again and again. I still own some old consoles and games, but I am a sucker for retro gaming hardware and software, from handhelds, to emulation tools.
Basically, I am Pimoroni's target market for the Picade. I assembled a Sparkfun PiRetrocade years ago and love it, but I've had my eye on one of these mini-self-contained arcade cabinets for ages. Just imagine how much fun it would be to fire up Street Fighter II on one of these and relive the glory days of your button-mashing, accidental combo-discovering youth without having to pump quarters into the machine for hours.
So, after convincing myself that I needed a Picade to "build with the kids, " I pulled the trigger late last year. The boys and I assembled it over a few days, and it has been hours of retro-gaming fun for all of us since.
Of course, as a longtime web developer and someone who's been in the "connected hardware" space for a while, I started to wonder what it would take to hook into the emulation software running on the Raspberry Pi and capture information about the games we were playing so that I could build a web-based monitoring dashboard. I don't know why my mind always goes to charts and graphs, but after pretty LEDs, aren't cool data visualizations the second-greatest thing about the IoT world?
And so, I added a Notecard and Notecarrier-PI Hat to my Picade, added a few scripts to capture game data, and built a retro-themed web dashboard for my modded system, which I am calling the Notecade.
In this article, I'll share the full experience, including:
- How I added a Notecard to my Raspberry Pi-based Picade retro gaming cabinet.
- How I hooked into the RetroPie and Emulation Station software running on the cabinet to send game data to the Notecard.
- The tools and services I used for storing game data (Notehub.io, Azure Functions, and Azure CosmosDB).
- How I built a web-based dashboard using Svelte, Chart.js, and NES.css.
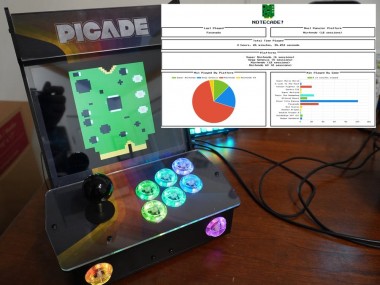
Here's a sneak peek of the end result.

What is the Notecard?

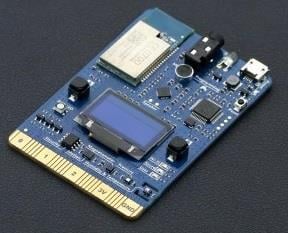
The hardware I chose for this project is the blues wireless Notecard. The Notecard is a cellular and GPS-enabled device-to-cloud data-pump that comes with 500 MB of data and 10 years of cellular service for $49. No activation charges, and no monthly fees.
The Notecard is a small 30 by 34 mm SoM that’s ready to embed in a custom project via its m.2 connector. But blues also provides a series of expansion boards, called Notecarriers, that include an m.2 socket for the Notecard and a number of other features for prototyping. For the Notecade project, I used the Notecarrier-PI, a stackable Pi Hat with pass through headers I was able to sandwich between my Raspberry Pi and the Picade X HAT.
On the cloud side, the Notecard is preconfigured to securely talk to Notehub.io, the Blues Wireless service that enables secure device-to-cloud data flow. Notecards are assigned to a project in Notehub.io, which then sync data into those projects for routing to your cloud application.
Assembling the Picade and Adding the Notecarrier-Pi
Pimoroni provides a fantastic step-by-step guide for assembling the Picade, and it took the kids and I about 4 hours over two days to put it together.

Once I had the system assembled and working, the next step was to sandwich the Notecard and Notecarrier between my Raspberry Pi and the Pimoroni X HAT. I also fed the molex antenna that comes with the Notecarrier Pi Kit through an opening on the bottom of the Picade and affixed it to the side of the cabinet.

Notecarrier-PI sitting on top of the Raspberry Pi

My Picade setup, with a Notecarrier-PI Sandwiched in the middle.
With assembly complete, it was time to hook into the Picade system and send game data to the Notecard.
Creating the Notecard Game Monitoring Scripts
For on-device game logging, I wasn't quite sure what to expect when I started this project. My hope was that I would be able to hook into game events and fire details about the game in question over to a Python utility that would interface with the Notecard using I2C and the note-python library.
I created two Python scripts to manage the Notecard side of things. First, a simple script to configure the Notecard ProductUID and sync schedule when the Picade boots up.
import json
import notecard
from periphery import I2C
import time

print("Configuring Notecard...")

productUID = "com.blues.bsatrom:notecade"

port = I2C("/dev/i2c-1")
card = notecard.OpenI2C(port, 0, 0, debug=True)
print("Notecard connection active...")

req = {"req": "hub.set"}
req["product"] = productUID
req["mode"] = "continuous"
req["outbound"] = 60
req["inbound"] = 240
req["align"] = True

card.Transaction(req)
Next, I created a Python-based command-line utility, created with the help of the click library, that accepts game data and adds it to the Notecard via a note.add request.
import click
import json
import notecard
from notecard import note
from periphery import I2C
from datetime import datetime
import os

def connectToNotecard():
  port = I2C("/dev/i2c-1")
  ncard = notecard.OpenI2C(port, 0, 0, debug=True)
  print("Notecard connection active...")

  return ncard

@click.command()
@click.option('--event', default='start',
              prompt='Event name',
              help='The type of event to log.')
@click.option('--platform', default='nes',
              prompt='Game platform',
              help='The game platform.')
@click.option('--game', prompt='The game',
              help='The game related to the event.')
def capture_event(event, platform, game):
  ncard = connectToNotecard()
  event_time = str(datetime.utcnow())

  # Get the game name from the path
  # /home/pi/RetroPie/roms/nes/RiverCityRansom.nes
  game_filename = os.path.basename(game)
  game_name = os.path.splitext(game_filename)[0]

  # Strip common special characters from ROM name
  game_name = game_name.replace('(U)', '').replace('[!]', '').strip()

  rsp = note.add(ncard,
    file= "notecade.qo",
    body= {
      "event": event,
      "platform": platform,
      "game": game_name,
      "event_time": event_time
    },
  sync= True)

if __name__ == '__main__':
  capture_event()
To call this utility, I was delighted to find a simple way of hooking into game events in the RetroPie docs. In short, the system supports running user scripts when a game launches or exits from its emulator, which is exactly what I needed. This approach also provides game and platform data, so I was able to throw together a few simple shell scripts to call my Python utility, and place these in the /opt/retropie/configs/all directory.
Here's the script that runs before a game starts.
# Save Game Stats for Debug
echo $(date)'|'start'|'$1'|'$2'|'$3'|'$4 >> ~/RetroPie/game_stats.log

# Call The Notecard Utility
python3 ~/notecade/capture-event.py --event=start
  --platform=$1 --game="$3"
And the script for the game end event.
# Save Game Stats for Debug
echo $(date)'|'end'|'$1'|'$2'|'$3'|'$4 >> ~/RetroPie/game_stats.log

# Call The Notecard Utility
python3 ~/notecade/capture-event.py --event=end
  --platform=$1 --game="$3"
Viewing Game Data in Notehub.io
After I got my Picade and Notecard talking and played a few games, events from the Notecard showed up in the Notehub.io events view for my project.

Game data streaming into the Notehub console
Each individual event includes a body with the game session data I needed like the game platform, game name, time and event type.

Game data contained in an event payload
Routing Game Data to Microsoft Azure and Cosmos DB
Notehub.io is designed to allow you to easily direct data to your own cloud apps. This is accomplished with Routes. Notehub.io provides a number of pre-built routes for popular cloud services, as well as support for any HTTPS or MQTT endpoint. For the Notecade project, I created a simple Microsoft Azure Function App and CosmosDB database for storing location data. The saveGameData function below receives data from Notehub.io in the form of a JSON payload, and saves that data to CosmosDB (signified by gameDataStorage) so I can retrieve it later for my web dashboard.
module.exports = async function (context, req) {
  context.log('Processed Location Data from Notehub.');
  context.bindings.gameDataStorage = req.body;

  const game = (req.query.game || (req.body && req.body.game));
  const responseMessage = game
    ? "Data for " + game + " received."
    : "Game data received.";

  context.res = {
    body: responseMessage
  };
}
For additional information on using Azure Function Apps and CosmosDB, checkout the Microsoft docs.
Once I’ve created and deployed my Function app, I can create a Route in Notehub.io. Under the Routes view of my project, I clicked “Add Route” and chose the “Azure Function” with secret Key Route Type.
Notecard data is sent to Notehub.io as Notes (JSON objects) in Notefiles. For my project, I am sending data to a Notefile called notecade.qo. When creating Routes, its possible to select a Notefile so that your Route only covers data you want to publish to your cloud app. In my case, this is just the game session data.

Notehub.io Route to send game data to my Azure Function.
Rather than sending the entire JSON payload to my Azure Function app, I can use JSONata to transform the payload into just the data that I want to save into my CosmosDB database. JSONata is a powerful and simple JSON transformation library that supported out-of-the-box with Notehub routes. With the JSONata transformation below, I can create a simple JSON object to send to my Azure Function.
{
  "event": body.event,
  "game": body.game,
  "platform": body.platform,
  "event_time": body.event_time,
  "timestamp": when * 1000,
  "lat": tower_lat,
  "lng": tower_lon
}
Once my Route is created, I can verify that it works by viewing the Route Log for any notecade.qo event.

Creating an Azure Function to Retrieve Game Data
At this point, I was nearly ready for my web dashboard. First, I needed to create another function in my Azure Function App to fetch game data from CosmosDB. Since I want all of the data, I just grab everything from my CosmosDB gameDataStorage binding. Then, before returning, I'll extract a few values, combine start and end events into one record, and group by platform, to make the data easier to work with on the client side.
module.exports = async function (context, req) {
  data = context.bindings.gameDataStorage;

  const gameData = data
    .sort((first, second) => first.event_time - second.event_time)

  const numRecords = gameData.length;
  const lastEntry = gameData[numRecords-1];
  const currentlyPlaying = lastEntry.event === 'start' ? lastEntry.game : '';
  const lastPlayed = lastEntry.event === 'end' ? lastEntry.game : '';
  let totalTimePlayed = 0;

  const sessionData = gameData.reduce((accumulator, next, index) => {
    if (next.event === 'start') {
      endTime = numRecords > index+1 ? gameData[index+1].event_time : "";

      const session = {
        "game": next.game,
        "platform": next.platform,
        "start": next.event_time,
        "end": endTime,
        "time_played": endTime !== "" ? (new Date(endTime).getTime() - new Date(next.event_time).getTime()) / 1000 : 0
      };

      totalTimePlayed += session.time_played;
      accumulator.push(session);
    }

    return accumulator;
  }, []);

  const platformData = sessionData.reduce((previous, next) => {
    previous[next.platform] = previous[next.platform] || [];
    previous[next.platform].push(next);
    return previous;
  }, Object.create(null));

  context.res = {
    body: {
      currentlyPlaying,
      lastPlayed,
      totalTimePlayed,
      sessions: platformData
    }
  };
}
Creating a Web Dashboard with SvelteJS, Chart.js and NES.css
With the new function deployed, I was ready for the final piece, a web dashboard to view charts and graphs about games played on my Picade. My simple app uses Svelte for the frontend, Chart.js for the data viz, and NES.css for some retro-style touches, because what's a retro gaming dashboard without a retro look?
The full source (including the Picade, Notecard scripts and Azure Function source) is available on GitHub, but the basic flow of the app is as-follows:
- Fetch game data from my Azure Function.
- Extract data for the currently playing (or last played) game, total time played, and most popular platform for the dashboard. (The dashboard toggles the top left element to show either the last played game, or the current game if a session is still ongoing)
- Create the pie, bar and line charts using Chart.js. Most of the logic for this step is in the chartHelpers.js file, where I do some massaging of the data and then use Chart.js to render the chart into an empty canvas element.
Once my dashboard was in a good place, I deployed it to Vercel. You can check it out for yourself at https://notecade-dashboard.vercel.app/.

The final Notecade Dashboard in Action
This was a fun project to work on, from the hardware assembly all the way to the web dashboard, and it hopefully demonstrates how easy it is to use the Blues Wireless Notecard and Notehub.io, along with cloud services and front-end tools, to create simple, yet powerful, device monitoring dashboards. To learn more about the Notecard, visit blues.io. We can't wait to see what you'll build with developer-friendly cellular IoT.
Code
Credits
brandonsatrom
Making & breaking things in the IoT | DevX @blueswireless | Formerly @particle @telerik @microsoft | speaker, maker & optimistic nay-sayer
Related products


Leave your feedback...