
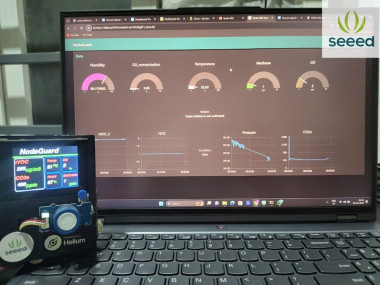
Nodeguard: Wioterminal Mqtt Air Quality Monitor

Made by byte-knights / Communication / Displays / Sensors / Weather / IoT
About the project
Transforming air quality monitoring with cutting-edge technology. Our system combines advanced sensors and real-time analytics for proactive
Project info
Difficulty: Moderate
Platforms: Bosch, Seeed Studio, MQTT, Node-RED
Estimated time: 3 hours
License: MIT license (MIT)
Items used in this project
Hardware components

Software apps and online services
Hand tools and fabrication machines
Story

Fire at Brahmapuram solid waste plant
Inspired by the recent fire outbreak at the solid waste dumpsite in Brahmapuram, Kochi, this project emerges as a comprehensive solution not only tailored to address the immediate environmental concerns of the incident but also designed with a broader vision. While the Brahmapuram fire serves as a catalyst for our initiative, the objective extends beyond a singular event to create an adaptable and scalable Air Quality Monitoring System applicable to various scenarios akin to the challenges faced in Kochi.
The impetus for this endeavor lies in recognizing the critical need for continuous air quality monitoring in the face of unforeseen incidents, such as fires and industrial activities, that can significantly impact the well-being of communities. By leveraging advanced sensor technology, real-time data analytics, and robust communication systems, our project aims to provide a proactive and versatile solution applicable to diverse situations.
This introduction sets the stage for understanding the dual purpose of our project: to address the immediate aftermath of the Brahmapuram fire and to establish a framework for a broader, scalable system that can be employed in various contexts where air quality monitoring is paramount.
Problem StatementDespite advancements in waste management, the recent fire outbreak at the solid waste dumpsite in Brahmapuram, Kochi, highlights the persisting challenges associated with environmental emergencies. The incident not only led to hazardous air quality conditions but also posed significant health risks for the residents of Kochi and neighboring areas. The lack of an effective real-time air quality monitoring system exacerbated the impact of the fire, making it challenging to implement timely interventions.
The problem extends beyond this specific event, reflecting a broader issue of inadequate infrastructure for continuous air quality monitoring in many regions. Without proactive measures, communities remain vulnerable to the consequences of environmental incidents, such as fires, industrial accidents, or waste mismanagement. Therefore, the pressing problem is the absence of a comprehensive and scalable air quality monitoring solution that can address both immediate crises and serve as a preventive measure for future occurrences.
Solution OverviewTo address the critical need for efficient and comprehensive air quality monitoring, our project draws inspiration from the recent fire outbreak at the Brahmapuram solid waste dumpsite in Kochi. We present an innovative solution designed to provide real-time monitoring of air quality in high-risk areas, with the capability to adapt to various environmental challenges.
The core components of our solution include a robust hardware platform, advanced sensors, and a centralized data processing system. Leveraging state-of-the-art technology, our project aims to create a scalable and adaptable air quality monitoring system applicable in diverse scenarios, similar to the challenges faced during the Brahmapuram incident.
By providing a comprehensive and adaptable solution, our project aims to contribute to the development of a robust air quality monitoring infrastructure that goes beyond reactive responses to environmental emergencies. The lessons learned from the Brahmapuram incident serve as a catalyst for developing a system with broader applications and the potential to safeguard communities in various high-risk scenarios.
Now the first step to doing our project is setting up the wio terminal this can be done by following the steps,
Getting started with wio Terminal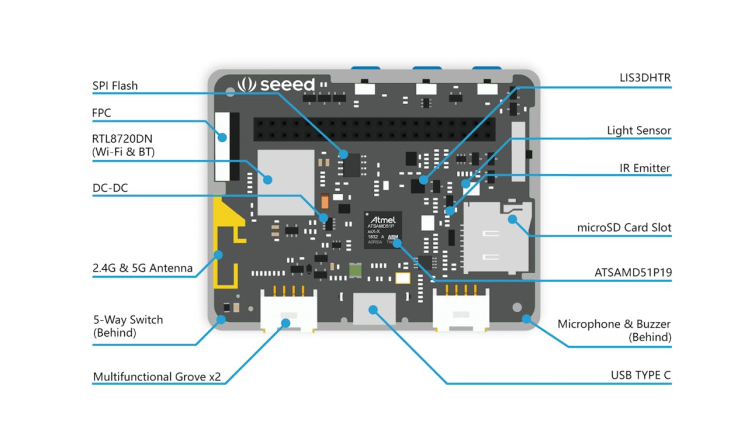
Welcome to the world of Wio Terminal! In this easy tutorial, we'll walk you through updating the Wireless Core Firmware on your Wio Terminal to unlock exciting new features. Don't worry if you're new to this – we'll keep it simple, and you'll be a pro in no time!
now some of you maybe thinking why do I need to upgrade this firmware thingy.because new updates always comes with bugfixes and having the latest firmware ensures that there are no pesky bugs between you and your wio terminal
Materials Needed:
- Wio Terminal
- Computer (Windows, macOS, or Linux)
- Internet connection
Step 1: Get Ready with Arduino:
- Make sure your Wio Terminal is connected to your computer.
- Download the firmware update files (uf2 files) from the provided link.(click here).
- Slide the Wio Terminal's power switch twice quickly. When the blue LED starts breathing differently, check your computer for a new drive called "Arduino."
Step 2: Update Firmware:
- Drag the downloaded rtl8720_update_v2.uf2 file into the Arduino drive. Your Wio Terminal will reset, and you'll see "Burn RTL8720 fw" on the screen – it means the firmware update is in progress.
Step 3: Download Latest Firmware:
- Download the latest firmware for RTL8720 from the given link(click here).
Step 4: Download Flash Tool:
- Download the flash tool from the provided repository link.(this is a link for the github repository there is button called code in the repository click it then click download zip from there to download the whole repository).
Step 5: Erase Initial Firmware:
- Open PowerShell (for Windows) or Terminal (for macOS/Linux) in the flash tool directory.(go to the space where u downloaded the flash tools then right click and select open terminal option).
- Make sure that the folder containing the flashtool must be in the desktop so that no error occurs
this is the place you should right click then select terminal option

this is the place you should right click then select terminal option
Type and run:
.ambd_flash_tool.exe erasein the terminal
- Wait for about 3 minutes until you see a success message.
Step 6: Flash New Firmware:
- In the same PowerShell/Terminal, type and run:
.ambd_flash_tool.exe flash -d [RTL8720-firmware-path]- Replace
[RTL8720-firmware-path]with the full path of your downloaded firmware. - make sure that your download path does not contain any characters like(1), (2),..etc this may lead to errors
- in my case it looks like this :
.ambd_flash_tool.exe flash -d C:UserssapniDocumentshackster20210519-seeed-ambd-firmware-rpc-v2.1.3- Wait for the success message.
- tip: if you are having any issues while flashing check out the seeed studio website
Step 7: Install Libraries:
- Download the required libraries for WiFi and BLE functionalities.
- The libraries -
- Seeed_Arduino_rpcBLE
- Seeed_Arduino_rpcWiFi
- Seeed_Arduino_FreeRTOS
- Seeed_Arduino_rpcUnified
- Seeed_Arduino_SFUD
- when u click one of these links you will go to the github page where you can click on code button then press download zip option then do as follows.
- Open Arduino IDE, go to Sketch -> Include Library -> Add.ZIP Library, and choose the downloaded library files.
Step 8 :
We need to install the board manager of wio terminal
for this open the arduino ide then go to file->preferences
and then paste the link given below in the additional boards manager url :
paste the link there

paste the link there
https://files.seeedstudio.com/arduino/package_seeeduino_boards_index.jsonAfter pasting the above URL click ok. Then Tools>Board>Boards Manager and type wio terminal then click install on Seeed SAMD Boards.After installing click on Tools>Board>Seeed SAMD>Seeedstudio Wio Terminal.
ArduinoPubSubClient Setup
For installing the PubSubClient library go to Sketch>Include Library>Manage Library.
then type PubSubClient and click download option

Testing Grove - BME680 Sensor with Wio Terminal
BME680

BME680
Steps
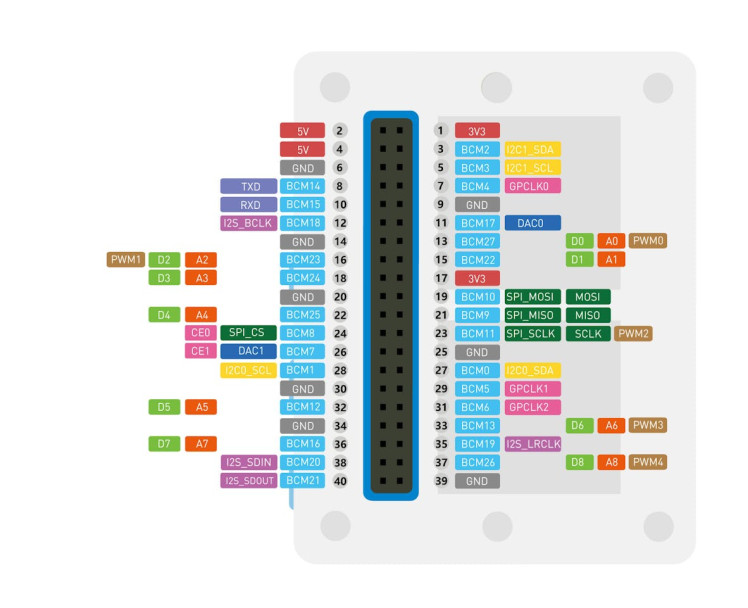
1. Connect the Hardware:
- Connect the Grove - BME680 sensor to the I2C port of the Wio Terminal.
- Connect the Wio Terminal to your computer using a USB cable.
2. Download and Install Libraries:
- Download the Grove BME680 Library from GitHub.
- Install the library in the Arduino IDE. Refer to the official Arduino guide on how to install a library.
3. Open Example Code:
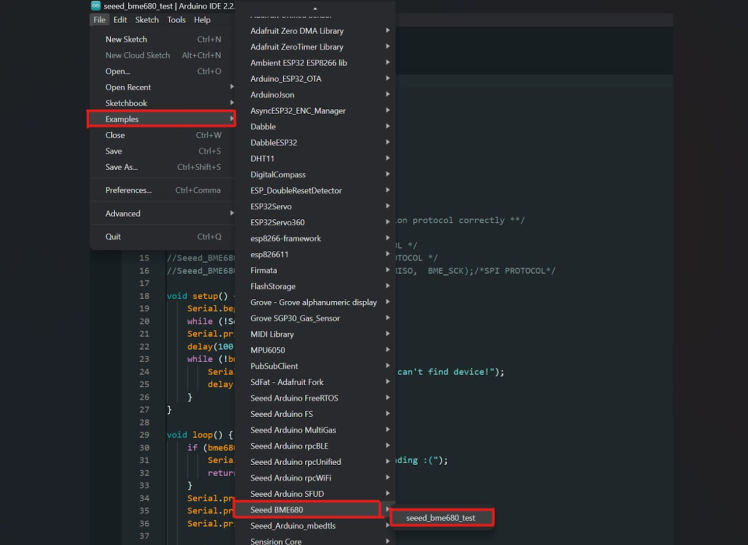
4. Upload the Code:
- Upload the example code to your Wio Terminal by clicking on the right-pointing arrow icon (or Sketch > Upload).
5. Open Serial Monitor:
- After uploading, open the Serial Monitor by clicking on Tools > Serial Monitor, or press Ctrl + Shift + M at the same time.
- Ensure the baud rate is set to the same value mentioned in the code (usually 9600).
6. Check the Results:
- You should start seeing temperature, pressure, humidity, and gas values in the Serial Monitor.
- Example output might look like:
Serial start!!!
temperature ===>> 27.14 C
pressure ===>> 94.51 KPa
humidity ===>> 65.76 %
gas ===>> 101.51 Kohms


temperature ===>> 27.15 C
pressure ===>> 94.51 KPa
humidity ===>> 65.76 %
gas ===>> 101.64 Kohms


temperature ===>> 27.14 C
pressure ===>> 94.51 KPa
humidity ===>> 65.77 %
gas ===>> 101.64 Kohms
Testing Grove - Oxygen Sensor with Wio Terminal
Grove - Oxygen Sensor

Grove - Oxygen Sensor
Steps
1. Connect the Hardware:
- Connect the Grove - Oxygen Sensor to the Grove port A0 of the Wio Terminal.
- Use a Grove cable for the connection.
2. Upload the Code to Wio Terminal:
- Copy the following code into the Arduino IDE:
// Grove - Gas Sensor(O2) test code
// Note:
// 1. It needs about 5-10 minutes to preheat the sensor
// 2. Modify VRefer if needed
const float VRefer = 3.3;       // voltage of ADC reference
const int pinAdc = A0;
void setup()
{
Serial.begin(9600);
Serial.println("Grove - Gas Sensor Test Code...");
}
void loop()
{
float Vout = 0;
Serial.print("Vout =");
Vout = readO2Vout();
Serial.print(Vout);
Serial.print(" V, Concentration of O2 is ");
Serial.println(readConcentration());
delay(500);
}
float readO2Vout()
{
long sum = 0;
for (int i = 0; i < 32; i++)
{
sum += analogRead(pinAdc);
}
sum >>= 5;
float MeasuredVout = sum * (VRefer / 1023.0);
return MeasuredVout;
}
float readConcentration()
{
float MeasuredVout = readO2Vout();
float Concentration = MeasuredVout * 0.21 / 2.0;
float Concentration_Percentage = Concentration * 100
return Concentration_Percentage;
}- Choose the Wio Terminal board and the correct COM port in the Arduino IDE.
- Click on the Upload button to upload the code to the Wio Terminal.
3. Get Data:
- Open the Serial Monitor in the Arduino IDE.
- After about 20-30 minutes of preheating, you should start seeing the oxygen concentration data.
Tips and Warnings:
SGP30

SGP30
Steps
1. Connect the Hardware
- Connect the Grove-VOC and eCO2 Gas Sensor(SGP30) to the I2C port of the Wio Terminal.
- Use a Grove cable for the connection.
2. Download the SGP30 Library
Visit the Seeed SGP30 library on GitHub and download the library to your computer.
3. Install the Library
Refer to the previous step to learn how to install libraries for Arduino. Ensure you have the library properly installed before proceeding.
4. Upload the Code to Wio Terminal
Copy the following code into the Arduino IDE:
#include <Arduino.h>
#include "sensirion_common.h"
#include "sgp30.h"
void setup() {
s16 err;
u16 scaled_ethanol_signal, scaled_h2_signal;
Serial.begin(115200);
Serial.println("serial start!!");
/For wio link!/
#if defined(ESP8266)
pinMode(15, OUTPUT);
digitalWrite(15, 1);
Serial.println("Set wio link power!");
delay(500);
#endif
/*  Init module,Reset all baseline,The initialization takes up to around 15 seconds, during which
all APIs measuring IAQ(Indoor air quality ) output will not change.Default value is 400(ppm) for co2,0(ppb) for tvoc*/
while (sgp_probe() != STATUS_OK) {
Serial.println("SGP failed");
while (1);
}
/Read H2 and Ethanol signal in the way of blocking/
err = sgp_measure_signals_blocking_read(&scaled_ethanol_signal,
&scaled_h2_signal);
if (err == STATUS_OK) {
Serial.println("get ram signal!");
} else {
Serial.println("error reading signals");
}
err = sgp_iaq_init();
//
}
void loop() {
s16 err = 0;
u16 tvoc_ppb, co2_eq_ppm;
err = sgp_measure_iaq_blocking_read(&tvoc_ppb, &co2_eq_ppm);
if (err == STATUS_OK) {
Serial.print("tVOC  Concentration:");
Serial.print(tvoc_ppb);
Serial.println("ppb");
Serial.print("CO2eq Concentration:");
Serial.print(co2_eq_ppm);
Serial.println("ppm");
} else {
Serial.println("error reading IAQ valuesn");
}
delay(1000);
}- Choose the Wio Terminal board and the correct COM port in the Arduino IDE.
- Click on the Upload button to upload the code to the Wio Terminal.
5. Get Data
- Open the Serial Monitor in the Arduino IDE.
Now, after a short delay, you should start seeing real-time air quality data, including tVOC and CO2eq concentrations.Testing Grove - Multichannel Gas Sensor V2 with Wio Terminal
Multichannel Gas Sensor V2

Multichannel Gas Sensor V2
Step 1: Hardware Connection
- Connect the Grove - Multichannel Gas Sensor V2 to the I2C port of the Wio Terminal
- Connect the Wio Terminal to your PC using a USB cable.
Step 2: Library Installation
- Download the Grove_Multichannel_Gas_Sensor_v2 Library from GitHub.
- Install the library for Arduino using the library installation guide.
Step 3: Upload the Code
Copy and paste the provided Arduino code into the Arduino IDE:
#include <Multichannel_Gas_GMXXX.h>
#include <Wire.h>
GAS_GMXXX<TwoWire> gas;
void setup() {
Serial.begin(9600);
gas.begin(Wire, 0x08); // use the hardware I2C
}
void loop() {
// put your main code here, to run repeatedly:
int val;
// GM102B NO2 sensor
val = gas.getGM102B();
if (val > 999) val = 999;
Serial.print("NO2 = ");
Serial.print(val);
// GM302B C2H5CH sensor
val = gas.getGM302B();
if (val > 999) val = 999;
Serial.print(", C2H5CH = ");
Serial.print(val);
// GM502B VOC sensor
val = gas.getGM502B();
if (val > 999) val = 999;
Serial.print(", VOC = ");
Serial.print(val);
// GM702B CO sensor
val = gas.getGM702B();
if (val > 999) val = 999;
Serial.print(", CO = ");
Serial.println(val);
delay(100);
}
Caution:
- The sensor will heat up during the process after powering on, which is normal.
- Preheat the module for accurate gas measurements (about 20-30 minutes).
- The values obtained by this sensor are analog and for qualitative measurements, not quantitative.
This is what the first step of the design should look like
For starters lets just display node guard :
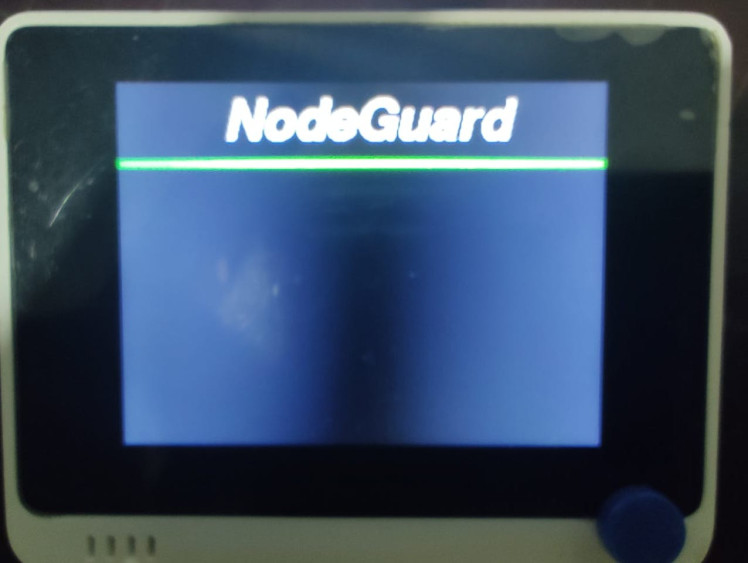
#include <TFT_eSPI.h>

#include <Wire.h>


TFT_eSPI tft;
TFT_eSprite spr = TFT_eSprite(&tft);  //sprite


;

void setup() {
  Serial.begin(115200);
  tft.begin();
  tft.setRotation(3);

  //Head
  tft.fillScreen(TFT_BLACK);
  tft.setFreeFont(&FreeSansBoldOblique18pt7b);
  tft.setTextColor(TFT_WHITE);
  tft.drawString("NodeGuard", 70, 10 , 1);
//Line
for (int8_t line_index = 0; line_index < 5 ; line_index++)
{
tft.drawLine(0, 50 + line_index, tft.width(), 50 + line_index, TFT_GREEN);
}
}

void loop() { }
Include Libraries:
#include <TFT_eSPI.h>
#include <Wire.h>
These lines include the necessary libraries for using a TFT display and I2C communication.
Create TFT Object:
TFT_eSPI tft;This line creates an object named tft of the class TFT_eSPI, which is used to control the TFT display.
Create TFT Sprite Object:
TFT_eSprite spr = TFT_eSprite(&tft);This line creates a sprite object named spr associated with the tft display. Sprites are often used for efficient graphics rendering.
Setup Function:
void setup() {The setup function runs once when the program starts.
Initialize Serial Communication:
Serial.begin(115200);This line initializes serial communication with a baud rate of 115200.
Initialize TFT Display:
tft.begin();This line initializes the TFT display.
Set Display Rotation:
tft.setRotation(3);This sets the display rotation to 3 (landscape mode).
Draw Head Text:
tft.fillScreen(TFT_BLACK);
tft.setFreeFont(&FreeSansBoldOblique18pt7b);
tft.setTextColor(TFT_WHITE);
tft.drawString("NodeGuard", 70, 10 , 1);
This section fills the screen with a black color, sets the font, text color, and then draws the text "NodeGuard" at coordinates (70, 10) on the display.
Draw Lines:
for (int8_t line_index = 0; line_index < 5 ; line_index++)
{
    tft.drawLine(0, 50 + line_index, tft.width(), 50 + line_index, TFT_GREEN);
}
This loop draws five horizontal lines in green color starting from y-coordinate 50 with a slight separation.
Loop Function:
void loop() { }The loop function runs repeatedly after the setup function. In this case, it's empty, so the program doesn't perform any continuous tasks in the loop.
Second step of the design should look like this :
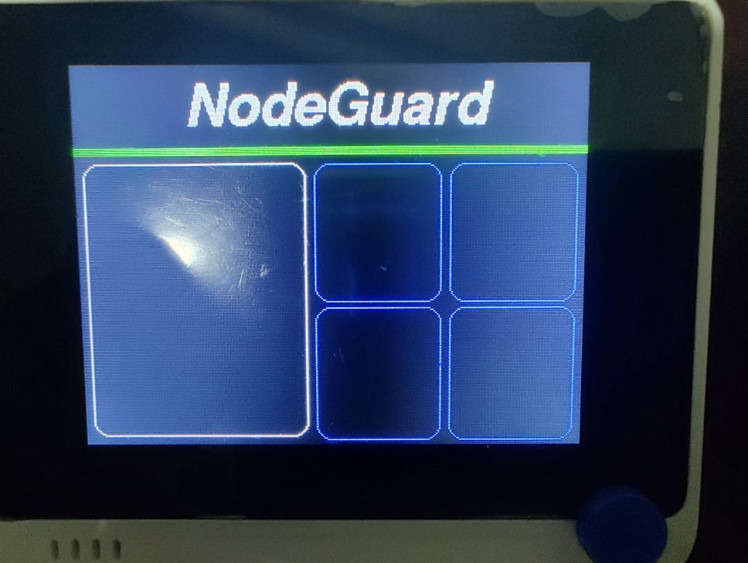
inorder to make the display look like this we need to add the code for makings the rectangles you see on the display
#include <TFT_eSPI.h>


TFT_eSPI tft;
TFT_eSprite spr = TFT_eSprite(&tft);  //sprite


void setup() {
  Serial.begin(115200);
  tft.begin();
  tft.setRotation(3);


  //Head
  tft.fillScreen(TFT_BLACK);
  tft.setFreeFont(&FreeSansBoldOblique18pt7b);
  tft.setTextColor(TFT_WHITE);
  tft.drawString("NodeGuard", 70, 10 , 1);

  //Line
  for (int8_t line_index = 0; line_index < 5 ; line_index++)
  {
    tft.drawLine(0, 50 + line_index, tft.width(), 50 + line_index, TFT_GREEN);
  }


  //VCO & CO Rect
  tft.drawRoundRect(5, 60, (tft.width() / 2) - 20 , tft.height() - 65 , 10, TFT_WHITE); // L1

  // Temp rect
  tft.drawRoundRect((tft.width() / 2) - 10  , 60, (tft.width() / 2) / 2 , (tft.height() - 65) / 2 , 10, TFT_BLUE); // s1

  //o2 rect
    tft.drawRoundRect(((tft.width() / 2) + (tft.width() / 2) / 2) - 5  , 60, (tft.width() / 2) / 2 , (tft.height() - 65) / 2 , 10, TFT_BLUE); // s2

  //Humi Rect
  tft.drawRoundRect((tft.width() / 2) - 10 , (tft.height() / 2) + 30, (tft.width() / 2) / 2 , (tft.height() - 65) / 2 , 10, TFT_BLUE); // s3

  //methane Rect
  tft.drawRoundRect(((tft.width() / 2) + (tft.width() / 2) / 2) - 5  , (tft.height() / 2) + 30, (tft.width() / 2) / 2 , (tft.height() - 65) / 2 , 10, TFT_BLUE); // s4

}

void loop() {

}
explanation of the newly added code :
Create TFT Display and Sprite:
TFT_eSPI tft;
TFT_eSprite spr = TFT_eSprite(&tft);  //sprite
cppCopy code
TFT_eSPI tft;
TFT_eSprite spr = TFT_eSprite(&tft);  //sprite
Similar to the previous code, an instance of the TFT display (tft) and a sprite (spr) are created.
Draw Rectangles for Different Parameters:
tft.drawRoundRect(5, 60, (tft.width() / 2) - 20 , tft.height() - 65 , 10, TFT_WHITE); // L1
tft.drawRoundRect((tft.width() / 2) - 10  , 60, (tft.width() / 2) / 2 , (tft.height() - 65) / 2 , 10, TFT_BLUE); // s1
tft.drawRoundRect(((tft.width() / 2) + (tft.width() / 2) / 2) - 5  , 60, (tft.width() / 2) / 2 , (tft.height() - 65) / 2 , 10, TFT_BLUE); // s2
tft.drawRoundRect((tft.width() / 2) - 10 , (tft.height() / 2) + 30, (tft.width() / 2) / 2 , (tft.height() - 65) / 2 , 10, TFT_BLUE); // s3
tft.drawRoundRect(((tft.width() / 2) + (tft.width() / 2) / 2) - 5  , (tft.height() / 2) + 30, (tft.width() / 2) / 2 , (tft.height() - 65) / 2 , 10, TFT_BLUE); // s4
These lines draw rounded rectangles on the TFT display at specified positions. Each rectangle represents a different parameter:
L1: VCO & CO Rect (White)
s1: Temp Rect (Blue)
s2: O2 Rect (Blue)
s3: Humi Rect (Blue)
s4: Methane Rect (Blue)
The parameters are organized on the display to visually represent different aspects of the monitoring system.
third step of the display setup looks like this :
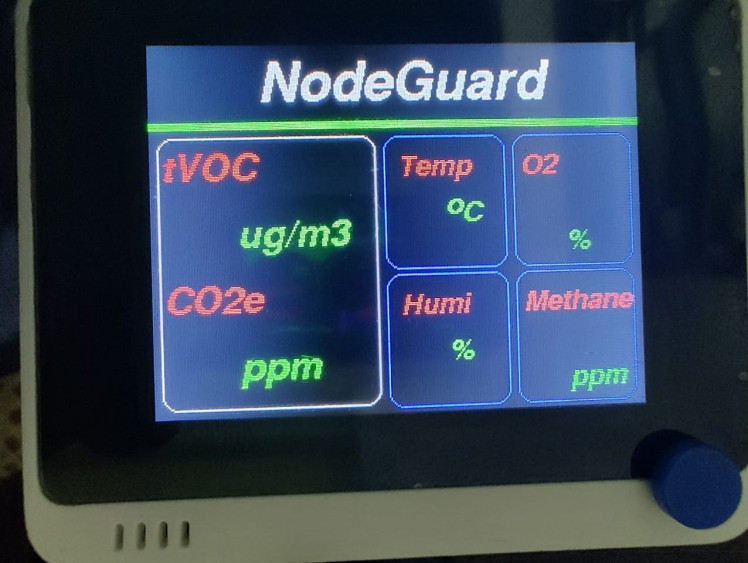
Now lets enter the code for the text(VOC, TEMP, humi, ppm etc) in the rectangle.
This is the whole code after entering the code for the text in the rectangles present on the screen
#include <TFT_eSPI.h>


TFT_eSPI tft;
TFT_eSprite spr = TFT_eSprite(&tft);  //sprite


void setup() {
  Serial.begin(115200);
  tft.begin();
  tft.setRotation(3);


  //Head
  tft.fillScreen(TFT_BLACK);
  tft.setFreeFont(&FreeSansBoldOblique18pt7b);
  tft.setTextColor(TFT_WHITE);
  tft.drawString("NodeGuard", 70, 10 , 1);

  //Line
  for (int8_t line_index = 0; line_index < 5 ; line_index++)
  {
    tft.drawLine(0, 50 + line_index, tft.width(), 50 + line_index, TFT_GREEN);
  }


tft.drawRoundRect(5, 60, (tft.width() / 2) - 20 , tft.height() - 65 , 10, TFT_WHITE);
  //tVCO Text
  tft.setFreeFont(&FreeSansBoldOblique12pt7b);
  tft.setTextColor(TFT_RED);
  tft.drawString("tVOC", 7 , 65 , 1);
  tft.setTextColor(TFT_GREEN);
  tft.drawString("ug/m3", 55, 108, 1);
  //CO2e Text
  tft.setFreeFont(&FreeSansBoldOblique12pt7b);
  tft.setTextColor(TFT_RED);
  tft.drawString("CO2e", 7 , 150 , 1);
  tft.setTextColor(TFT_GREEN);
  tft.drawString("ppm", 55, 193, 1);
  // Temp rect
  tft.drawRoundRect((tft.width() / 2) - 10  , 60, (tft.width() / 2) / 2 , (tft.height() - 65) / 2 , 10, TFT_BLUE);
  tft.setFreeFont(&FreeSansBoldOblique9pt7b);
  tft.setTextColor(TFT_RED) ;
  tft.drawString("Temp", (tft.width() / 2) - 1  , 70 , 1);
  tft.setTextColor(TFT_GREEN);
  tft.drawString("o", (tft.width() / 2) + 30, 95, 1);
  tft.drawString("C", (tft.width() / 2) + 40, 100, 1);
  //o2 rect
  tft.drawRoundRect(((tft.width() / 2) + (tft.width() / 2) / 2) - 5  , 60, (tft.width() / 2) / 2 , (tft.height() - 65) / 2 , 10, TFT_BLUE);
  tft.setFreeFont(&FreeSansBoldOblique9pt7b);
  tft.setTextColor(TFT_RED);
  tft.drawString("O2", ((tft.width() / 2) + (tft.width() / 2) / 2)   , 70 , 1);
  tft.setTextColor(TFT_GREEN);
  tft.drawString("%", ((tft.width() / 2) + (tft.width() / 2) / 2) + 30 , 120, 1);
  //Humi Rect
  tft.drawRoundRect((tft.width() / 2) - 10 , (tft.height() / 2) + 30, (tft.width() / 2) / 2 , (tft.height() - 65) / 2 , 10, TFT_BLUE);
  tft.setFreeFont(&FreeSansBoldOblique9pt7b);
  tft.setTextColor(TFT_RED) ;
  tft.drawString("Humi", (tft.width() / 2) - 1 , (tft.height() / 2) + 40 , 1);
  tft.setTextColor(TFT_GREEN);
  tft.drawString("%", (tft.width() / 2) + 30, (tft.height() / 2) + 70, 1);
  //methane Rect
  tft.drawRoundRect(((tft.width() / 2) + (tft.width() / 2) / 2) - 5  , (tft.height() / 2) + 30, (tft.width() / 2) / 2 , (tft.height() - 65) / 2 , 10, TFT_BLUE);
  tft.setFreeFont(&FreeSansBoldOblique9pt7b);
  tft.setTextColor(TFT_RED) ;
  tft.drawString("Methane", ((tft.width() / 2) + (tft.width() / 2) / 2)   , (tft.height() / 2) + 40 , 1);
  tft.setTextColor(TFT_GREEN);
  tft.drawString("ppm", ((tft.width() / 2) + (tft.width() / 2) / 2) + 30 , (tft.height() / 2) + 90, 1);

    delay(100);
}

void loop() {

}
now lets explain the newly added code :
Draw VOC Text:
tft.setFreeFont(&FreeSansBoldOblique12pt7b);
tft.setTextColor(TFT_RED);
tft.drawString("VOC", 7 , 65 , 1);
This code sets the font to a bold oblique style, changes the text color to red, and then draws the text "VOC" at coordinates (7, 65) on the TFT display.
Draw VOC Unit Text:
tft.setTextColor(TFT_GREEN);
tft.drawString("ppm", 55, 108, 1);
Following the VOC text, this sets the text color to green and draws the unit "ppm" at coordinates (55, 108) on the display.
These additions add visual elements to represent VOC (Volatile Organic Compounds) with its unit in parts per million (ppm) on the TFT display. The text is displayed in specific colors and positions within the rounded rectangle that was drawn earlier for VOC.
Draw Temperature (Temp) Text:
tft.setFreeFont(&FreeSansBoldOblique9pt7b);
tft.setTextColor(TFT_RED);
tft.drawString("Temp", (tft.width() / 2) - 1  , 70 , 1);
This code sets the font to a bold oblique style, changes the text color to red, and then draws the text "Temp" at coordinates ((tft.width() / 2) - 1, 70) on the TFT display. It represents the temperature.
Draw Temperature Unit Text:
tft.setTextColor(TFT_GREEN);
tft.drawString("o", (tft.width() / 2) + 30, 95, 1);
tft.drawString("C", (tft.width() / 2) + 40, 100, 1);
Continuing from the previous addition, this sets the text color to green and draws the degree symbol "o" at coordinates ((tft.width() / 2) + 30, 95) and the Celsius symbol "C" at coordinates ((tft.width() / 2) + 40, 100). Together, they represent the temperature unit in degrees Celsius.
Draw Humidity (Humi) Text:
tft.setFreeFont(&FreeSansBoldOblique9pt7b);
tft.setTextColor(TFT_RED) ;
tft.drawString("Humi", (tft.width() / 2) - 1 , (tft.height() / 2) + 40 , 1);
This code sets the font to a bold oblique style, changes the text color to red, and then draws the text "Humi" at coordinates ((tft.width() / 2) - 1, (tft.height() / 2) + 40) on the TFT display. It represents humidity.
Draw Humidity Unit Text:
tft.setTextColor(TFT_GREEN);
tft.drawString("%", (tft.width() / 2) + 30, (tft.height() / 2) + 70, 1);
Following the Humi text, this sets the text color to green and draws the percentage symbol "%" at coordinates ((tft.width() / 2) + 30, (tft.height() / 2) + 70). It represents the humidity unit.
Draw Methane Text:
tft.setFreeFont(&FreeSansBoldOblique9pt7b);
tft.setTextColor(TFT_RED) ;
tft.drawString("Methane", ((tft.width() / 2) + (tft.width() / 2) / 2)   , (tft.height() / 2) + 40 , 1);
This code sets the font to a bold oblique style, changes the text color to red, and then draws the text "Methane" at coordinates (((tft.width() / 2) + (tft.width() / 2) / 2), (tft.height() / 2) + 40) on the TFT display. It represents methane concentration.
Draw Methane Unit Text:
tft.setTextColor(TFT_GREEN);
tft.drawString("ppm", ((tft.width() / 2) + (tft.width() / 2) / 2) + 30 , (tft.height() / 2) + 90, 1);
Following the Methane text, this sets the text color to green and draws the unit "ppm" at coordinates (((tft.width() / 2) + (tft.width() / 2) / 2) + 30, (tft.height() / 2) + 90) on the display.
4th step of display setup :
the fourth step is to display sensor values and it should looks like this :
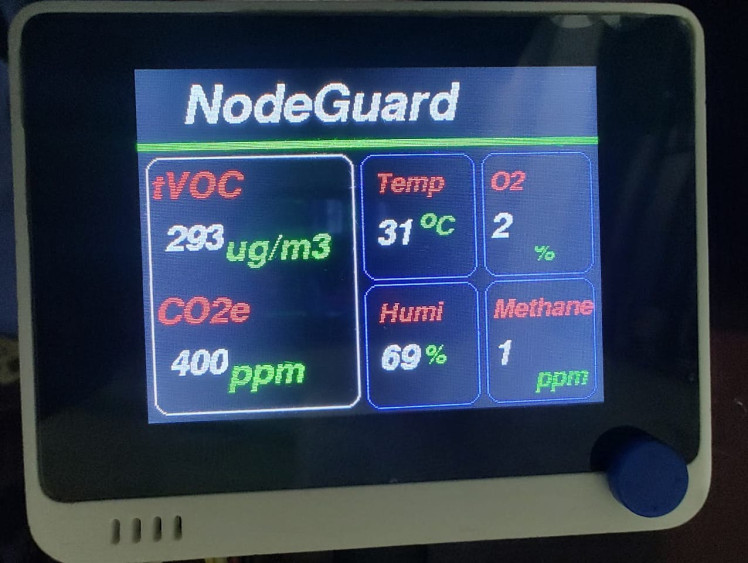
The code for displaying values on the display is added on to the main code and given below :
#include <TFT_eSPI.h>
#include <Multichannel_Gas_GMXXX.h>
#include <Wire.h>
#include <SensirionI2CSht4x.h>
#include "sensirion_common.h"
#include "sgp30.h"
#include "seeed_bme680.h"
#define BME_SCK 13
#define BME_MISO 12
#define BME_MOSI 11
#define BME_CS 10
#define IIC_ADDR  uint8_t(0x76)
Seeed_BME680 bme680(IIC_ADDR);


TFT_eSPI tft;
TFT_eSprite spr = TFT_eSprite(&tft);  //sprite
SensirionI2CSht4x sht4x;

const float VRefer = 3.3; // Voltage of ADC reference

const int pinAdc = A0;   // Analog pin connected to the Grove Gas Sensor (O2)


void setup() {
  Serial.begin(115200);
  tft.begin();
  tft.setRotation(3);


      // while (!Serial);
    Serial.println("Serial start!!!");
    delay(100);
    while (!bme680.init()) {
        Serial.println("bme680 init failed ! can't find device!");
        delay(10000);
    }


  //Head
  tft.fillScreen(TFT_BLACK);
  tft.setFreeFont(&FreeSansBoldOblique18pt7b);
  tft.setTextColor(TFT_WHITE);
  tft.drawString("NodeGuard", 70, 10 , 1);

  //Line
  for (int8_t line_index = 0; line_index < 5 ; line_index++)
  {
    tft.drawLine(0, 50 + line_index, tft.width(), 50 + line_index, TFT_GREEN);
  }


 tft.drawRoundRect(5, 60, (tft.width() / 2) - 20 , tft.height() - 65 , 10, TFT_WHITE);
  //tVCO Text
  tft.setFreeFont(&FreeSansBoldOblique12pt7b);
  tft.setTextColor(TFT_RED);
  tft.drawString("tVOC", 7 , 65 , 1);
  tft.setTextColor(TFT_GREEN);
  tft.drawString("ug/m3", 55, 108, 1);
  //CO2e Text
  tft.setFreeFont(&FreeSansBoldOblique12pt7b);
  tft.setTextColor(TFT_RED);
  tft.drawString("CO2e", 7 , 150 , 1);
  tft.setTextColor(TFT_GREEN);
  tft.drawString("ppm", 55, 193, 1);
  // Temp rect
  tft.drawRoundRect((tft.width() / 2) - 10  , 60, (tft.width() / 2) / 2 , (tft.height() - 65) / 2 , 10, TFT_BLUE);
  tft.setFreeFont(&FreeSansBoldOblique9pt7b);
  tft.setTextColor(TFT_RED) ;
  tft.drawString("Temp", (tft.width() / 2) - 1  , 70 , 1);
  tft.setTextColor(TFT_GREEN);
  tft.drawString("o", (tft.width() / 2) + 30, 95, 1);
  tft.drawString("C", (tft.width() / 2) + 40, 100, 1);
  //o2 rect
  tft.drawRoundRect(((tft.width() / 2) + (tft.width() / 2) / 2) - 5  , 60, (tft.width() / 2) / 2 , (tft.height() - 65) / 2 , 10, TFT_BLUE);
  tft.setFreeFont(&FreeSansBoldOblique9pt7b);
  tft.setTextColor(TFT_RED);
  tft.drawString("O2", ((tft.width() / 2) + (tft.width() / 2) / 2)   , 70 , 1);
  tft.setTextColor(TFT_GREEN);
  tft.drawString("%", ((tft.width() / 2) + (tft.width() / 2) / 2) + 30 , 120, 1);
  //Humi Rect
  tft.drawRoundRect((tft.width() / 2) - 10 , (tft.height() / 2) + 30, (tft.width() / 2) / 2 , (tft.height() - 65) / 2 , 10, TFT_BLUE);
  tft.setFreeFont(&FreeSansBoldOblique9pt7b);
  tft.setTextColor(TFT_RED) ;
  tft.drawString("Humi", (tft.width() / 2) - 1 , (tft.height() / 2) + 40 , 1);
  tft.setTextColor(TFT_GREEN);
  tft.drawString("%", (tft.width() / 2) + 30, (tft.height() / 2) + 70, 1);
  //methane Rect
  tft.drawRoundRect(((tft.width() / 2) + (tft.width() / 2) / 2) - 5  , (tft.height() / 2) + 30, (tft.width() / 2) / 2 , (tft.height() - 65) / 2 , 10, TFT_BLUE);
  tft.setFreeFont(&FreeSansBoldOblique9pt7b);
  tft.setTextColor(TFT_RED) ;
  tft.drawString("Methane", ((tft.width() / 2) + (tft.width() / 2) / 2)   , (tft.height() / 2) + 40 , 1);
  tft.setTextColor(TFT_GREEN);
  tft.drawString("ppm", ((tft.width() / 2) + (tft.width() / 2) / 2) + 30 , (tft.height() / 2) + 90, 1);

    delay(100);

}

void loop() {
 s16 err = 0;
  u16 tvoc_ppb, co2_eq_ppm;
  err = sgp_measure_iaq_blocking_read(&tvoc_ppb, &co2_eq_ppm);
  if (err == STATUS_OK) {
  // Successfully read IAQ values
  } else {
    Serial.println("error reading IAQ valuesn");
  }

  uint16_t error;
  char errorMessage[256];
  float temperature;
  float humidity;
  float randnumbr;
  float concentration;
  float voc;
  // VOC
    Serial.print("tvoc: ");
  Serial.print(tvoc_ppb);
  voc=tvoc_ppb/1000;

    float conc = readConcentration();
   concentration=conc;

   // tVOC

  Serial.print("tVOC: ");
  Serial.print(tvoc_ppb);
  Serial.println(" ppm");
  spr.createSprite(40, 30);
  spr.fillSprite(TFT_BLACK);
  spr.setFreeFont(&FreeSansBoldOblique12pt7b);
  spr.setTextColor(TFT_WHITE);
  spr.drawNumber(tvoc_ppb, 0, 0, 1);
  spr.pushSprite(15, 100);
  spr.deleteSprite();

  //CO2
  Serial.print("CO2e: ");
  Serial.print(co2_eq_ppm);
  Serial.println(" ppm");
  spr.createSprite(40, 30);
  spr.setFreeFont(&FreeSansBoldOblique12pt7b);
  spr.setTextColor(TFT_WHITE);
  spr.drawNumber(co2_eq_ppm, 0, 0, 1);
  spr.setTextColor(TFT_GREEN);
  spr.pushSprite(15, 185);
  spr.deleteSprite();

//Temp
  Serial.print("Temperature: ");
  Serial.print(bme680.sensor_result_value.temperature);
  Serial.println( "*C");
  spr.createSprite(30, 30);
  spr.setFreeFont(&FreeSansBoldOblique12pt7b);
  spr.setTextColor(TFT_WHITE);
  spr.drawNumber(bme680.sensor_result_value.temperature, 0, 0, 1);
  spr.setTextColor(TFT_GREEN);
  spr.pushSprite((tft.width() / 2) - 1, 100);
  spr.deleteSprite();
 //O2

  Serial.print("O2: ");
  Serial.print(concentration);
  Serial.println(" %");
  spr.createSprite(45, 30);
  spr.setFreeFont(&FreeSansBoldOblique12pt7b);
  spr.setTextColor(TFT_WHITE);
  spr.drawNumber(concentration, 0, 0, 1);
  spr.pushSprite(((tft.width() / 2) + (tft.width() / 2) / 2), 97);
  spr.deleteSprite();
 //Humidity
  Serial.print("Humidity: ");
  Serial.print(bme680.sensor_result_value.humidity);
  Serial.println( "%");
  spr.createSprite(30, 30);
  spr.setFreeFont(&FreeSansBoldOblique12pt7b);
  spr.setTextColor(TFT_WHITE);
  spr.drawNumber(bme680.sensor_result_value.humidity, 0, 0, 1);
  spr.pushSprite((tft.width() / 2) - 1, (tft.height() / 2) + 67);
  spr.deleteSprite();
 //Methane
  Serial.print("Methane: ");
  Serial.print(randnumbr);
  Serial.println(" ppm");
  spr.createSprite(45, 30);
  spr.setFreeFont(&FreeSansBoldOblique12pt7b);
  spr.setTextColor(TFT_WHITE);
  spr.drawNumber(randnumbr, 0 , 0, 1);
  spr.pushSprite(((tft.width() / 2) + (tft.width() / 2) / 2), (tft.height() / 2) + 67);
  spr.deleteSprite();


  delay(2000);
}
float readO2Vout() {
  long sum = 0;
  for (int i = 0; i < 32; i++) {
    sum += analogRead(pinAdc);
  }

  sum >>= 5;

  float MeasuredVout = sum * (VRefer / 1023.0);
  return MeasuredVout;
}

float readConcentration() {
  // Vout samples are with reference to 3.3V
  float MeasuredVout = readO2Vout();

  //when its output voltage is 2.0V,
  float Concentration = MeasuredVout * 0.21 / 2.0;
  float Concentration_Percentage = Concentration * 100;
  return Concentration_Percentage;
}
Code explanation :
Include Additional Libraries:
#include <Multichannel_Gas_GMXXX.h>
#include <SensirionI2CSht4x.h>
#include "sensirion_common.h"
#include "sgp30.h"
#include "seeed_bme680.h"
These lines include new libraries related to gas sensors (Multichannel_Gas_GMXXX, SensirionI2CSht4x, sgp30, seeed_bme680).
BME680 Sensor Configuration:
#define BME_SCK 13
#define BME_MISO 12
#define BME_MOSI 11
#define BME_CS 10
#define IIC_ADDR  uint8_t(0x76)
Seeed_BME680 bme680(IIC_ADDR);
This section configures and initializes the BME680 sensor using the Seeed_BME680 library.
Analog Pin Configuration:
const float VRefer = 3.3;
const int pinAdc = A0;
These lines define the reference voltage and the analog pin (A0) connected to the Grove Gas Sensor for O2 concentration measurement.
Gas Concentration Reading Functions:
float readO2Vout() { /* ... */ }
float readConcentration() { /* ... */ }
These functions are responsible for reading the voltage and calculating the concentration of oxygen (O2) based on the measured voltage.
Initialization of Gas Sensors:
SensirionI2CSht4x sht4x;This line initializes the SensirionI2CSht4x sensor for temperature and humidity measurements.
Reading Gas Sensor Values in the Loop:
s16 err = 0;
u16 tvoc_ppb, co2_eq_ppm;
err = sgp_measure_iaq_blocking_read(&tvoc_ppb, &co2_eq_ppm);
These lines read TVOC (Total Volatile Organic Compounds) and CO2 equivalent values using the sgp30 library.
Reading BME680 Sensor Values in the Loop:
Serial.print("Temperature: ");
Serial.print(bme680.sensor_result_value.temperature);
This section reads and prints temperature, humidity, and pressure values from the BME680 sensor using the Seeed_BME680 library.
Creating TFT Sprites for Display:
spr.createSprite(40, 30);These lines create a TFT sprite with a specified size for displaying numerical values on the TFT screen.
Drawing Gas Sensor Values on TFT:
spr.drawNumber(tvoc_ppb, 0, 0, 1);These lines draw the TVOC and CO2 equivalent values on the TFT display using the created sprites.
Deleting TFT Sprites:
spr.deleteSprite();After pushing the sprite onto the TFT display, it is deleted to free up resources.
Displaying Gas Sensor Values on TFT:
spr.pushSprite(15, 100);These lines push the created sprites onto the TFT display at specific coordinates.
These additions extend the functionality to read values from additional gas sensors (TVOC, CO2), temperature, humidity, and pressure sensors, and display them on the TFT screen.
Setup of MQTT(Message Queuing Telemetry Transport)What is MQTT?
MQTT is a lightweight messaging protocol for efficient machine-to-machine communication in IoT. It follows a publish-subscribe model, allowing devices to publish and subscribe to topics. Designed for low-resource and low-bandwidth environments, MQTT relies on a transport protocol (e.g., TCP/IP) for reliable, ordered, and bi-directional connections.
What is mosquitto broker?
A Mosquitto broker is a piece of software that implements the MQTT (Message Queuing Telemetry Transport) protocol and acts as a messaging intermediary between devices or applications. Specifically, it serves as a central hub for facilitating communication in a publish/subscribe model. Devices or clients can publish messages to specific "topics, " and other devices or clients interested in those topics can subscribe to receive the messages.
Installation of Mosquitto broker
Go to this link : https://mosquitto.org/download/
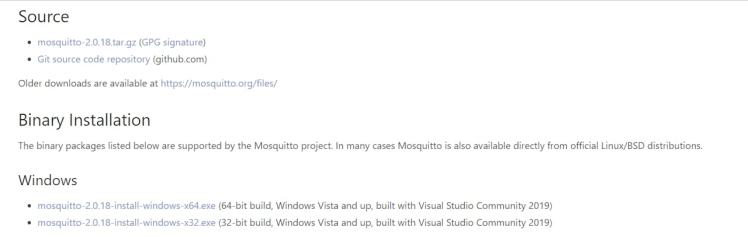
Download this : mosquitto-2.0.18-install-windows-x64.exe from that link
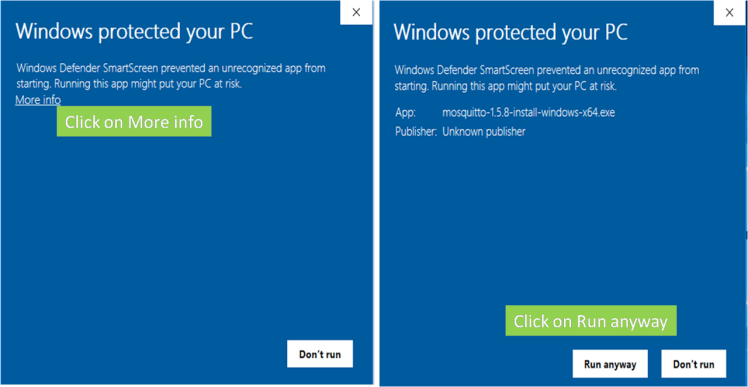
After Downloading, double Click on the Downloaded .exe file.If it is showing message Windows Defender SmartScreen prevented, then Click on More info and then Click on Run anyway. It shows Windows Defender SmartScreen prevented, when Windows Defender of your PC is enabled.?
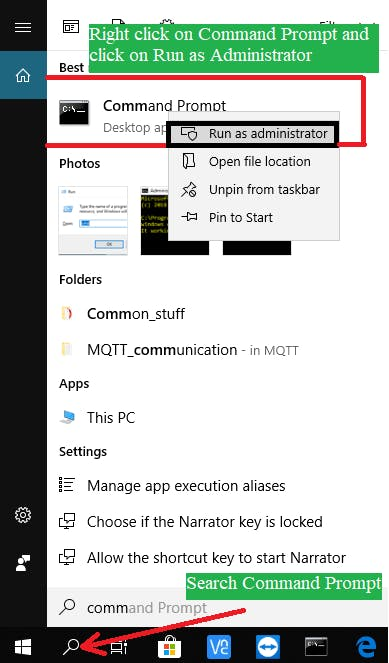
After installation Open Command Prompt as Administrator. Steps are given below.Search command Prompt in your computer -> Right click on command prompt -> Run as Administrator
Execute the following commands to Install Broker and start Mosquitto Service.
mosquitto install
net start mosquitto

After executing command net start mosquitto, If you are getting the messageThe Mosquitto Broker service was started successfully means Mosquitto Broker Installed Successfully.
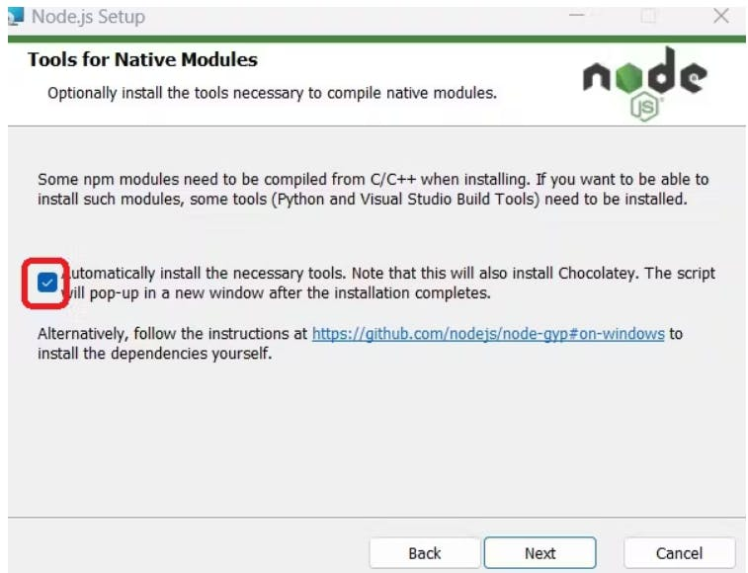
Now lets setup Node-red :1.Install Node.jsDownload the latest LTS version of Node.js from the official Node.js home page. It will offer you the best version for your system.
Run the downloaded MSI file. Installing Node.js requires local administrator rights; if you are not a local administrator, you will be prompted for an administrator password on install. Accept the defaults when installing. After installation completes, close any open command prompts and re-open to ensure new environment variables are picked up.
while installing make sure to tick this box
Once installed, open a command prompt and run the following command to ensure Node.js and npm are installed correctly.
Using Powershell: node --version; npm --version
Using cmd: node --version && npm --version
You should receive back output that looks similar to:
v18.15.0
9.5.0Installing Node-RED as a global module adds the command node-red to your system path. Execute the following at the command prompt:
npm install -g --unsafe-perm node-redOnce installed, you are ready to run Node-RED
Then open your comment prompt and type
node-redIt will show the initialization of the Node-red in the cmd
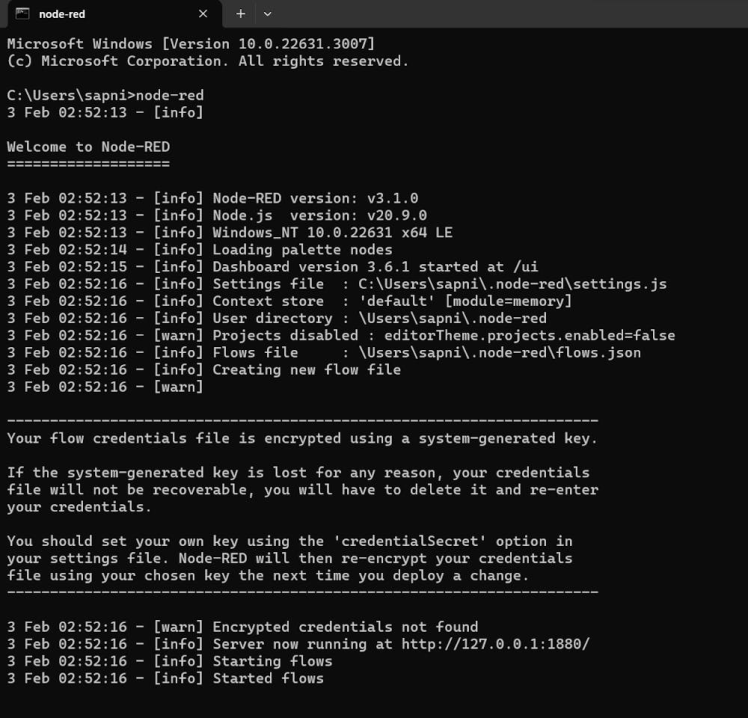
from there copy the http://127.0.0.1:1880/
and paste it into chrome browser
and this workspace will open up
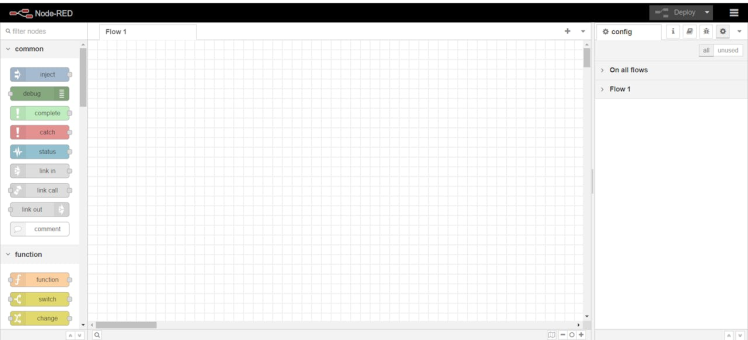
After that workspace has opened up we need something called the node-red-dashboard
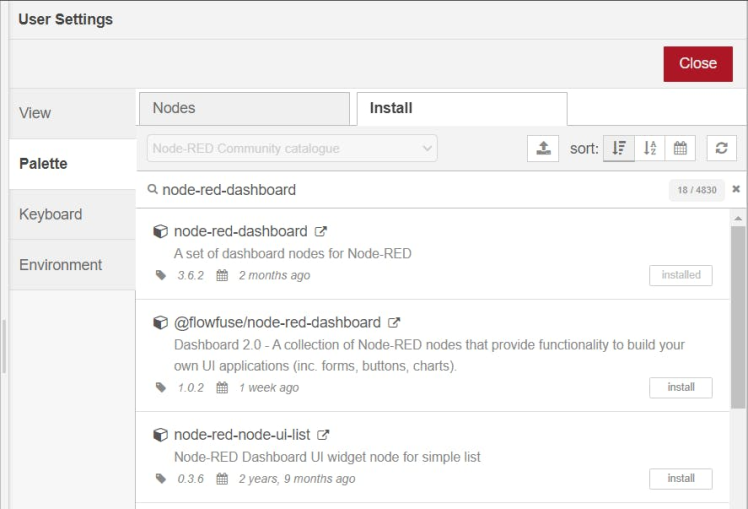
inorder to install it :
click on the three bars you see on the top right and then click on manage palette and then go to install section and paste "node-red-dashboard" there and install it
the window will look like this :
Now we can start setting up the flow in node-red :
After you have setup your flow it is going to look like this :
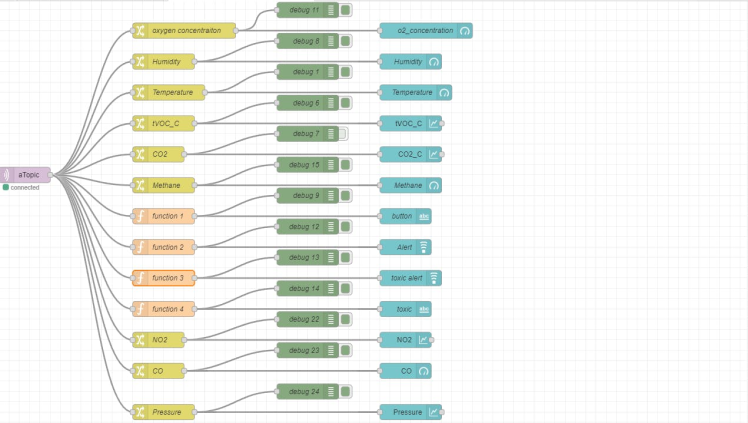
inorder to set it up like this you may manually do this by by clicking and dragging the nodes to the flow or,
just import the file we are giving you onto node-red
you can import by going to the top right corner and clicking on the three white bars and clicking import and then selecting the file that we have given you
in our there is a javascript code that we have added for added functionality to our project this functionality makes it suitable to be carried along during sewage cleaning and mining operations
the functionality are the danger buttons and their voice alerts :
Danger alert

Danger alert
Panic button

Panic button
these are present in the toxic alert and button function nodes.
Final code
#include <PubSubClient.h>
#include <rpcWiFi.h>
#include <SensirionI2CSht4x.h>
#include <Wire.h>
#include "sensirion_common.h"
#include "sgp30.h"
#include <TFT_eSPI.h>
#include "seeed_bme680.h"
#define BME_SCK 13
#define BME_MISO 12
#define BME_MOSI 11
#define BME_CS 10
#define IIC_ADDR  uint8_t(0x76)
Seeed_BME680 bme680(IIC_ADDR);
TFT_eSPI tft;
TFT_eSprite spr = TFT_eSprite(&tft);
SensirionI2CSht4x sht4x;
int randnumber;
const char *ssid = "******";      // your network SSID
const char *password = "*******";  // your network password
const char *ID = "node4";               // Name of our device, must be unique
const char *server = "test.mosquitto.org"; // Server URL
WiFiClient wifiClient;
PubSubClient client(wifiClient);
unsigned long lastMsg = 0;
#define MSG_BUFFER_SIZE  (50)
char msg[MSG_BUFFER_SIZE];
int value = 0;
float no2 = 0.1;
const float VRefer = 3.3; // Voltage of ADC reference
const int pinAdc = A0;   // Analog pin connected to the Grove Gas Sensor (O2)
void callback(char* topic, byte* payload, unsigned int length) {
Serial.print("Message arrived [");
Serial.print(topic);
Serial.print("] ");
for (int i = 0; i < length; i++) {
Serial.print((char)payload[i]);
}
Serial.println();
}
void reconnect() {
// Loop until we're reconnected
while (!client.connected()) {
Serial.print("Attempting MQTT connection...");
// Attempt to connect
if (client.connect(ID)) {
Serial.println("connected");
}
else {
Serial.print("failed, rc=");
Serial.print(client.state());
Serial.println(" try again in 5 seconds");
// Wait 5 seconds before retrying
delay(5000);
}
}
}
void setup() {
Serial.begin(115200);
Serial.print("Attempting to connect to SSID: ");
Serial.println(ssid);
WiFi.begin(ssid, password);
// attempt to connect to Wifi network:
while (WiFi.status() != WL_CONNECTED) {
Serial.print(".");
WiFi.begin(ssid, password);
// wait 1 second for re-trying
delay(1000);
}
Serial.print("Connected to ");
Serial.println(ssid);
delay(500);
client.setServer(server, 1883);
client.setCallback(callback);
pinMode(WIO_BUZZER, OUTPUT);
pinMode(WIO_5S_PRESS, INPUT_PULLUP);
// while (!Serial);
Serial.println("Serial start!!!");
delay(100);
while (!bme680.init()) {
Serial.println("bme680 init failed ! can't find device!");
delay(10000);
}
tft.begin();
tft.setRotation(3);
tft.fillScreen(TFT_BLACK);
tft.setFreeFont(&FreeSansBoldOblique18pt7b);
tft.setTextColor(TFT_WHITE);
tft.drawString("Surveillance bot", 30, 10 , 1);
//Line
for (int8_t line_index = 0; line_index < 5 ; line_index++)
{
tft.drawLine(0, 50 + line_index, tft.width(), 50 + line_index, TFT_GREEN);
}
tft.drawRoundRect(5, 60, (tft.width() / 2) - 20 , tft.height() - 65 , 10, TFT_WHITE);
//tVCO Text
tft.setFreeFont(&FreeSansBoldOblique12pt7b);
tft.setTextColor(TFT_RED);
tft.drawString("tVOC", 7 , 65 , 1);
tft.setTextColor(TFT_GREEN);
tft.drawString("ug/m3", 55, 108, 1);
//CO2e Text
tft.setFreeFont(&FreeSansBoldOblique12pt7b);
tft.setTextColor(TFT_RED);
tft.drawString("CO2e", 7 , 150 , 1);
tft.setTextColor(TFT_GREEN);
tft.drawString("ppm", 55, 193, 1);
// Temp rect
tft.drawRoundRect((tft.width() / 2) - 10  , 60, (tft.width() / 2) / 2 , (tft.height() - 65) / 2 , 10, TFT_BLUE);
tft.setFreeFont(&FreeSansBoldOblique9pt7b);
tft.setTextColor(TFT_RED) ;
tft.drawString("Temp", (tft.width() / 2) - 1  , 70 , 1);
tft.setTextColor(TFT_GREEN);
tft.drawString("o", (tft.width() / 2) + 30, 95, 1);
tft.drawString("C", (tft.width() / 2) + 40, 100, 1);
//o2 rect
tft.drawRoundRect(((tft.width() / 2) + (tft.width() / 2) / 2) - 5  , 60, (tft.width() / 2) / 2 , (tft.height() - 65) / 2 , 10, TFT_BLUE);
tft.setFreeFont(&FreeSansBoldOblique9pt7b);
tft.setTextColor(TFT_RED);
tft.drawString("O2", ((tft.width() / 2) + (tft.width() / 2) / 2)   , 70 , 1);
tft.setTextColor(TFT_GREEN);
tft.drawString("%", ((tft.width() / 2) + (tft.width() / 2) / 2) + 30 , 120, 1);
//Humi Rect
tft.drawRoundRect((tft.width() / 2) - 10 , (tft.height() / 2) + 30, (tft.width() / 2) / 2 , (tft.height() - 65) / 2 , 10, TFT_BLUE);
tft.setFreeFont(&FreeSansBoldOblique9pt7b);
tft.setTextColor(TFT_RED) ;
tft.drawString("Humi", (tft.width() / 2) - 1 , (tft.height() / 2) + 40 , 1);
tft.setTextColor(TFT_GREEN);
tft.drawString("%", (tft.width() / 2) + 30, (tft.height() / 2) + 70, 1);
//methane Rect
tft.drawRoundRect(((tft.width() / 2) + (tft.width() / 2) / 2) - 5  , (tft.height() / 2) + 30, (tft.width() / 2) / 2 , (tft.height() - 65) / 2 , 10, TFT_BLUE);
tft.setFreeFont(&FreeSansBoldOblique9pt7b);
tft.setTextColor(TFT_RED) ;
tft.drawString("Methane", ((tft.width() / 2) + (tft.width() / 2) / 2)   , (tft.height() / 2) + 40 , 1);
tft.setTextColor(TFT_GREEN);
tft.drawString("ppm", ((tft.width() / 2) + (tft.width() / 2) / 2) + 30 , (tft.height() / 2) + 90, 1);
delay(100);
// Wait for Serial to be ready
Wire.begin();
uint16_t error;
char errorMessage[256];
sht4x.begin(Wire);
uint32_t serialNumber;
s16 err;
u16 scaled_ethanol_signal, scaled_h2_signal;
Serial.println("serial start!!");
while (sgp_probe() != STATUS_OK) {
Serial.println("SGP failed");
while (1);
}
err = sgp_measure_signals_blocking_read(&scaled_ethanol_signal, &scaled_h2_signal);
if (err == STATUS_OK) {
Serial.println("get ram signal!");
} else {
Serial.println("error reading signals");
}
err = sgp_iaq_init();
Serial.println("Grove - Gas Sensor Test Code...");
}
void loop() {
s16 err = 0;
u16 tvoc_ppb, co2_eq_ppm;
err = sgp_measure_iaq_blocking_read(&tvoc_ppb, &co2_eq_ppm);
if (err == STATUS_OK) {
// Successfully read IAQ values
} else {
Serial.println("error reading IAQ valuesn");
}
uint16_t error;
char errorMessage[256];
float temperature;
float humidity;
float randnumbr;
float concentration;
float randco;
float voc;
char envDataBuf[1000];
randnumber = random(290, 300);
randnumbr = random(1.00, 2.00);
randco = random(2,3);
Serial.print("tvoc: ");
Serial.print(tvoc_ppb);
voc=tvoc_ppb/1000;
bme680.read_sensor_data();
// Read oxygen concentration from Grove Gas Sensor (O2)
float conc = readConcentration();
concentration=conc;
// Convert button state to 1 (activated) or 0 (not activated)
int buttonState = (digitalRead(WIO_5S_PRESS) == LOW) ? 1 : 0;
int toxic;
if(co2_eq_ppm>900){
analogWrite(WIO_BUZZER, 128);
tft.fillScreen(TFT_RED);
tft.setFreeFont(&FreeSansBoldOblique24pt7b);
tft.setTextColor(TFT_WHITE);
tft.drawString("DANGER", 65, 100 , 1);
delay(500);
analogWrite(WIO_BUZZER, 0);
tft.fillScreen(TFT_BLACK);
delay(500);
toxic=1;
}
else{
toxic=0;
tft.setFreeFont(&FreeSansBoldOblique18pt7b);
tft.setTextColor(TFT_WHITE);
tft.drawString("Surveillance bot", 30, 10 , 1);
//Line
for (int8_t line_index = 0; line_index < 5 ; line_index++)
{
tft.drawLine(0, 50 + line_index, tft.width(), 50 + line_index, TFT_GREEN);
}
tft.drawRoundRect(5, 60, (tft.width() / 2) - 20 , tft.height() - 65 , 10, TFT_WHITE);
//tVCO Text
tft.setFreeFont(&FreeSansBoldOblique12pt7b);
tft.setTextColor(TFT_RED);
tft.drawString("tVOC", 7 , 65 , 1);
tft.setTextColor(TFT_GREEN);
tft.drawString("ug/m3", 55, 108, 1);
//CO2e Text
tft.setFreeFont(&FreeSansBoldOblique12pt7b);
tft.setTextColor(TFT_RED);
tft.drawString("CO2e", 7 , 150 , 1);
tft.setTextColor(TFT_GREEN);
tft.drawString("ppm", 55, 193, 1);
// Temp rect
tft.drawRoundRect((tft.width() / 2) - 10  , 60, (tft.width() / 2) / 2 , (tft.height() - 65) / 2 , 10, TFT_BLUE); // s1
tft.setFreeFont(&FreeSansBoldOblique9pt7b);
tft.setTextColor(TFT_RED) ;
tft.drawString("Temp", (tft.width() / 2) - 1  , 70 , 1);
tft.setTextColor(TFT_GREEN);
tft.drawString("o", (tft.width() / 2) + 30, 95, 1);
tft.drawString("C", (tft.width() / 2) + 40, 100, 1);
//o2 rect
tft.drawRoundRect(((tft.width() / 2) + (tft.width() / 2) / 2) - 5  , 60, (tft.width() / 2) / 2 , (tft.height() - 65) / 2 , 10, TFT_BLUE); // s2
tft.setFreeFont(&FreeSansBoldOblique9pt7b);
tft.setTextColor(TFT_RED);
tft.drawString("O2", ((tft.width() / 2) + (tft.width() / 2) / 2)   , 70 , 1);
tft.setTextColor(TFT_GREEN);
tft.drawString("%", ((tft.width() / 2) + (tft.width() / 2) / 2) + 30 , 120, 1);
//Humi Rect
tft.drawRoundRect((tft.width() / 2) - 10 , (tft.height() / 2) + 30, (tft.width() / 2) / 2 , (tft.height() - 65) / 2 , 10, TFT_BLUE); // s3
tft.setFreeFont(&FreeSansBoldOblique9pt7b);
tft.setTextColor(TFT_RED) ;
tft.drawString("Humi", (tft.width() / 2) - 1 , (tft.height() / 2) + 40 , 1);
tft.setTextColor(TFT_GREEN);
tft.drawString("%", (tft.width() / 2) + 30, (tft.height() / 2) + 70, 1);
//methane Rect
tft.drawRoundRect(((tft.width() / 2) + (tft.width() / 2) / 2) - 5  , (tft.height() / 2) + 30, (tft.width() / 2) / 2 , (tft.height() - 65) / 2 , 10, TFT_BLUE); // s4
tft.setFreeFont(&FreeSansBoldOblique9pt7b);
tft.setTextColor(TFT_RED) ;
tft.drawString("Methane", ((tft.width() / 2) + (tft.width() / 2) / 2)   , (tft.height() / 2) + 40 , 1);
tft.setTextColor(TFT_GREEN);
tft.drawString("ppm", ((tft.width() / 2) + (tft.width() / 2) / 2) + 30 , (tft.height() / 2) + 90, 1);
// tVOC
Serial.print("tVOC: ");
Serial.print(randnumber);
Serial.println(" ppm");
spr.createSprite(40, 30);
spr.fillSprite(TFT_BLACK);
spr.setFreeFont(&FreeSansBoldOblique12pt7b);
spr.setTextColor(TFT_WHITE);
spr.drawNumber(randnumber, 0, 0, 1);
spr.pushSprite(15, 100);
spr.deleteSprite();
//CO2
Serial.print("CO2e: ");
Serial.print(co2_eq_ppm);
Serial.println(" ppm");
spr.createSprite(40, 30);
spr.setFreeFont(&FreeSansBoldOblique12pt7b);
spr.setTextColor(TFT_WHITE);
spr.drawNumber(co2_eq_ppm, 0, 0, 1);
spr.setTextColor(TFT_GREEN);
spr.pushSprite(15, 185);
spr.deleteSprite();
//Temp
Serial.print("Temperature: ");
Serial.print(bme680.sensor_result_value.temperature);
Serial.println( "*C");
spr.createSprite(30, 30);
spr.setFreeFont(&FreeSansBoldOblique12pt7b);
spr.setTextColor(TFT_WHITE);
spr.drawNumber(bme680.sensor_result_value.temperature, 0, 0, 1);
spr.setTextColor(TFT_GREEN);
spr.pushSprite((tft.width() / 2) - 1, 100);
spr.deleteSprite();
//O2
Serial.print("O2: ");
Serial.print(concentration);
Serial.println(" %");
spr.createSprite(45, 30);
spr.setFreeFont(&FreeSansBoldOblique12pt7b);
spr.setTextColor(TFT_WHITE);
spr.drawNumber(concentration, 0, 0, 1);
spr.pushSprite(((tft.width() / 2) + (tft.width() / 2) / 2), 97);
spr.deleteSprite();
//Humidity
Serial.print("Humidity: ");
Serial.print(bme680.sensor_result_value.humidity);
Serial.println( "%");
spr.createSprite(30, 30);
spr.setFreeFont(&FreeSansBoldOblique12pt7b);
spr.setTextColor(TFT_WHITE);
spr.drawNumber(bme680.sensor_result_value.humidity, 0, 0, 1);
spr.pushSprite((tft.width() / 2) - 1, (tft.height() / 2) + 67);
spr.deleteSprite();
//Methane
Serial.print("Methane: ");
Serial.print(randnumbr);
Serial.println(" ppm");
spr.createSprite(45, 30);
spr.setFreeFont(&FreeSansBoldOblique12pt7b);
spr.setTextColor(TFT_WHITE);
spr.drawNumber(randnumbr, 0 , 0, 1);
spr.pushSprite(((tft.width() / 2) + (tft.width() / 2) / 2), (tft.height() / 2) + 67);
spr.deleteSprite();
}
sprintf(envDataBuf, "{"temp":%f,n"hum":%f,n"tVOC_C":%d,n"CO2_C":%d,n"button":%d,n"o2_concentration":%.2f,n"toxic":%d,n"Methane":%f,n"NO2":%d,n"Pressure":%f,n"CO":%f}",
bme680.sensor_result_value.temperature, bme680.sensor_result_value.humidity, randnumber, co2_eq_ppm, buttonState, concentration,toxic,randnumbr,no2,bme680.sensor_result_value.pressure / 1000.0,randco);
Serial.println(envDataBuf);
delay(500);
if (!client.connected()) {
reconnect();
}
client.loop();
unsigned long now = millis();
if (now - lastMsg > 2000) {
lastMsg = now;
client.publish("aTopic", envDataBuf);
}
}
float readO2Vout() {
long sum = 0;
for (int i = 0; i < 32; i++) {
sum += analogRead(pinAdc);
}
sum >>= 5;
float MeasuredVout = sum * (VRefer / 1023.0);
return MeasuredVout;
}
float readConcentration() {
// Vout samples are with reference to 3.3V
float MeasuredVout = readO2Vout();
//when its output voltage is 2.0V,
float Concentration = MeasuredVout * 0.21 / 2.0;
float Concentration_Percentage = Concentration * 100;
return Concentration_Percentage;
}HOME AUTOMATION
Our air quality monitoring system operates on a sophisticated sensor array, capable of measuring various pollutants. These sensors communicate with a centralized hub, leveraging IoT protocols like MQTT, ensuring real-time data transmission to the user's home automation controller. The system's open API allows for effortless integration with popular platforms, granting users the flexibility to tailor automation rules based on specific air quality parameters. This seamless integration enhances user control, enabling actions like adjusting HVAC systems or activating air purifiers to maintain optimal indoor air quality.
these are some of the other smaller use cases :
Health Monitoring: Provide individuals with real-time air quality data to manage respiratory conditions and allergies, triggering alerts or actions to create a healthier living environment.
Smart HVAC Control: Integrate with heating, ventilation, and air conditioning systems to automatically adjust settings based on air quality, optimizing energy efficiency.
Workspace Optimization: Enhance office or workspace environments by deploying sensors to ensure optimal air quality, fostering productivity and well-being among occupants.
Smart Appliances Integration: Collaborate with smart appliances like air purifiers or humidifiers, enabling them to operate intelligently in response to changing air quality conditions.
Safety Alerts: Integrate with security systems to alert users in case of hazardous air quality, ensuring timely evacuation or necessary precautions.
Data Analytics for Urban Planning: Collaborate with city authorities to collect and analyze air quality data, contributing to urban planning for healthier and sustainable cities..
Educational Tool: Implement your system in schools or educational institutions to educate students about the impact of air quality on health and promote awareness.
Hospital Environments: Deploy in healthcare settings to ensure sterile and healthy air quality, crucial for patient recovery and staff well-being.
We would like to extend our sincere appreciation to Seeed Studio for generously providing the components necessary for this project. Their support has been integral to its success, and we are grateful for the opportunity to collaborate with such a dedicated and innovative team.
Additionally, we would like to express our gratitude to Salman Faris, Muhammed zain and Vishnu raj for their invaluable assistance throughout the development process. Their expertise, guidance, and unwavering support have played a crucial role in overcoming challenges and achieving the project's goals.
Schematics, diagrams and documents
CAD, enclosures and custom parts
Code
Credits
Related products


Leave your feedback...