
Iot- Plant Irrigation System

Made by santronix / Garden / Home Automation / Notifications / Plants / IoT
About the project
Build your own automatic IoT plant irrigation system with soil sensor, Particle Photon, relay and immersible water motor.
Project info
Items used in this project
Hardware components


Story
Building up plant irrigation system for your domestic use is quite easy and simple. It would take only 15 minutes to build one , if you have all the right ingredients in place. Let’s take a look at building one…
How does it work?
It’s simple, the system works on the principle of Sensing and Actuation on a local micro-controller. A soil moisture sensor would detect the moisture level of the soil and provide the analog output, this value then would be used by micro-controller program to compare against the threshold value. If the soil moisture goes below the predefined value then the sequence of relay actuation followed by start of immersion water motor will occur which will automatically water the plants, until again the soil moisture level is detected to be higher than the threshold value, at which time the relay will open, stopping the water.
Advantages
- Water the plants regularly, making sure plants get water as and when needed
- Water conservation by Intelligence
- Automatic watering ensures peace of mind (Comfort)
Ingredients
There are quite few components required to build this system. You can ideally use any micro-controller (but then you have to make sure of the software accordingly). We used Particle Photon board to build one, although the program written would work perfect with any Arduino compatible board. So what we need?
Hardware
Particle Photon x1 Click to buy
Soil Moisture sensor x1 Click to buy
5V Relay x1 Click to buy
Immersion motor x1 Click to buy
Tools
Soldering Iron Click to buy
Jumper cables Click to buy
Software
Particle Photon Web IDE or IDE Software Go here
Program Code DOWNLOAD HERE
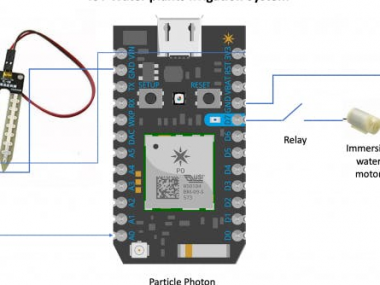
Wiring Diagram
Here’s how you should interface all the hardware
Connections details
- Soil moisture sensor Vcc to VIN (3V3) of Particle Photon
- Soil moisture sensor GND to Particle Photon GND
- Soil moisture sensor Analog out to Particle Photon A0
- Particle Photon VIN to Relay Power
- Particle Photon D7 to Relay Input signal
- Particle Photon GND to Relay GND
- Relay NO connection to immersive motor
Once the hardware is wired appropriately then its time to flash the program. You can use Particle Web IDE or download IDE to your mac or Windows computer and flash the program.
Once everything is set, just power on the system using 5V to Particle Photon. Your relay, moisture sensor and immersive motor will get energized if the connections are all good. As we have given a polling time of 5s, wait for some time. Please ensure that the soil moisture sensor is dipped in the soil. You can see the below video to ensure everything is setup correctly.
Author: santronix
Schematics, diagrams and documents
Code
Credits
Related products


Leave your feedback...