
Iot Bit (formally Pianywhere V1.31 4g & Lte For Raspberry Pi

Made by Altitude_Tech / Automotive / Communication / Garden / Home Automation / Lights
About the project
IOT BIT 4G & LTE Hat for the Raspberry Pi 4G (100 mbps down/ 50 mbps up) - Ultra fast internet connectivity for your raspberry pi, excellent for large downloads and video streaming.
Project info
Difficulty: Moderate
Platforms: Android, Qualcomm, Raspberry Pi, Samsung IoT, STMicroelectronics
Estimated time: 3 hours
Items used in this project
Hardware components

Story
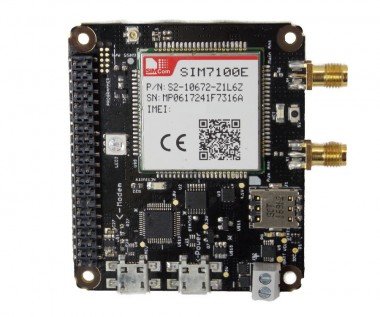
IOT BIT 4G & LTE Hat for the Raspberry Pi 4G
(100 mbps down/ 50 mbps up) – Ultra fast internet connectivity for your raspberry pi, excellent for large downloads and video streaming.TheIOT BIT 4G & LTE Hat for the Raspberry Pi Beta provides 4G mobile data for the Raspberry Pi mini computer. Our intelligent HAT module provides your Raspberry Pi with mobile data, GPS positioning information and battery support. This is the perfect module for hackers, scientists, and creators as it gives your Pi powerful connectivity wherever you are. Simple plug out module into your Raspberry Pi and start playing.Find out more & order at https://altitude.tech/shopThe HAT can integrate easily with the software on your operating system giving you access to general internet data through the mobile network. Using our API this hat gives you the ability to send SMS (text) messages. We also give easy access to the GPS onboard which exposes location data.HAT Features Supports any nano sim. Slot your sim card in and get going 4G Mobile Data for the Raspberry Pi Easy set-up, with a single terminal command setup our software to streamline Pi Anywhere with your Raspberry Pi. Wake up your Pi or trigger events with text messages. Optional external antenna for better reception. High-efficiency power regulation up to 3 amps. Use for external projects with a solar panel and battery pack. It can be used in conjunction with our Sensly gas monitoring HAT
Step 1: Whats in the Box?
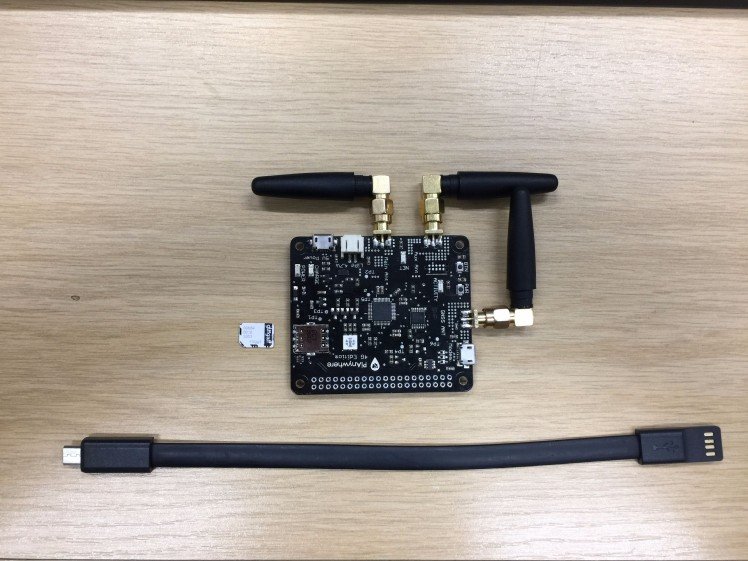
Step 1: Parts in the box
- GPS Antenna
- 1 4G antenna,
- 1 3G antenna.
- USB cable to connect to the Raspberry Pi.
Step 2: Put PiAnywhere Together With the Raspberry Pi

- Raspberry Pi wall plug Into IOT BIT to power both IOT BIT and Raspberry Pi. ( You don't need to also plug in the Raspberry Pi).
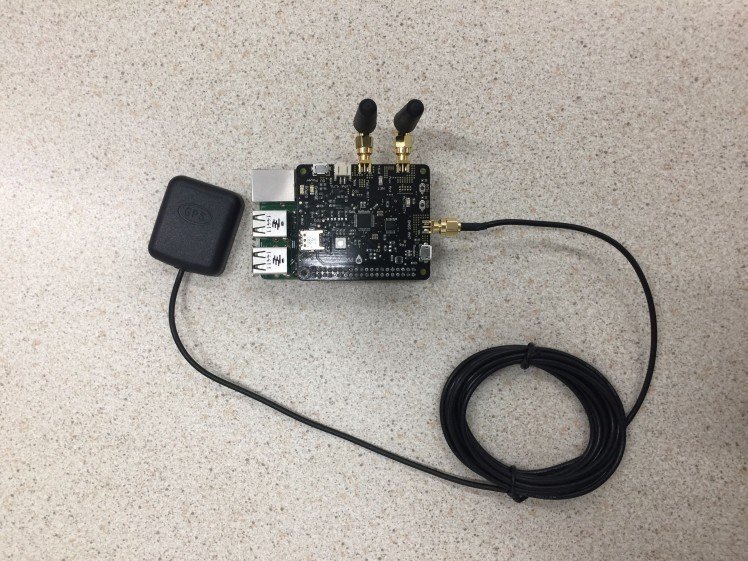
- Put the 2 antennas and the GPS antenna into IOT BIT.
- Sim card into the IOT BIT (which you can buy from any major sim provider )
- USB into the modem to connect to the Raspberry Pi.
Step 3: Setting Up the Raspberry Pi
Components needed for the Raspberry Pi to be operational:
- Raspberry Pi 2 or 3.
- Monitor.
- Mouse and keyboard.
- HDMI Cable.
- Raspberry Pi Charger.
- SD card (more than 8GB is required) with the latest version of Raspbian Jessie.
The guide to setup the Raspberry Pi software can be found at https://www.raspberrypi.org/learning/hardware-guide/
The latest version of the Raspbian Jessie can be found at https://www.raspberrypi.org/downloads/
Step 4: Connect the IOT BIT With Your Raspberry Pi
- Connect the 40-pin of the IOT BIT with the 40-pin of the Raspberry Pi.
- Connect the USB from the modem of the IOT BIT to the USB Slot of the Raspberry Pi.
-
Connect the Raspberry Pi charger to the power pin of the IOT BIT, the IOT BIT will power your Rasberry Pi.
For the IOT BIT to power, the Raspberry Pi, press the button that states PWR (power) in the IOT BIT.
Step 5: IOT BIT Easy Setup
There are multiple ways to get this up and running. The first is to download the disk image and flash it using Win32 Disk Imager. You will need an SD card that is 8GB or bigger. The link for the download is below:
https://download.altitude.tech
To use turn on the IOT BIT by plugging in the power cable to the USB port labeled 5V Power. Next, we press the button marked btn to turn on the modem. We then connect the other USB port to the raspberry pi and finally turn on the raspberry pi by pressing the pwr button.
Also, you can use IOT BIT on a windows system. All you have to do is use these drivers and install them: https://drive.google.com/file/d/0B4StAjolU_LeVjRx...
Step 6: Downoad and Install the Software.
Once the 2 boards are connected successfully and the power LED is on. The next task is to download the correct software for the IOT BIT to work with the Raspberry Pi. Using the latest version of Raspbian Jessie is recommended.
Open the terminal and type:
- git clone https://github.com/Altitude-Tech/iotbit_Insta...
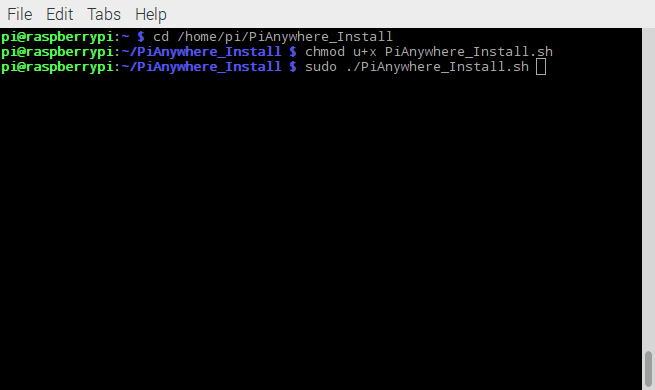
- cd PiAnywhere_Install/
- chmod u+x ./PiAnywhere_Install.sh
- sudo ./PiAnywhere_Install.sh
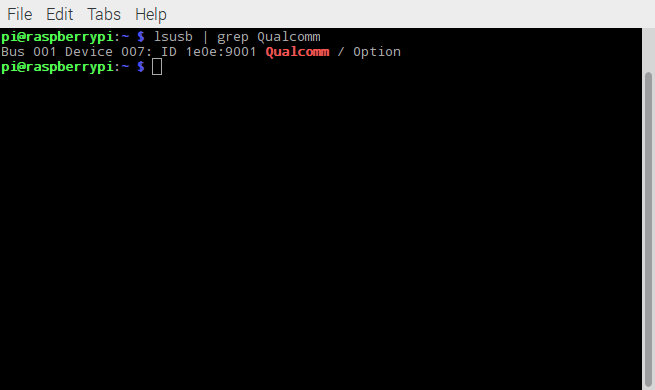
This should take around 30 minutes to complete as installing the kernel headers takes a long time. But once this is completed and your IOT BIT is connected via USB to the Raspberry Pi you should be able to run
- lsusb | grep Qualcomm
And see a Qualcomm device connected. As a final check you can also run
- ls /dev/ttyUSB*
And see 5 usb devices connected these are the virtual com ports for the modem.
.
Step 7: Set Up Wvdial and Connecting to the Internet

One of the important features of the IOT BIT 4G is its ability to connect to the internet using the mobile network, but for that, it needs to be configured to do so. This step will cover the link between the IOT BIT and the internet using the sim card information.
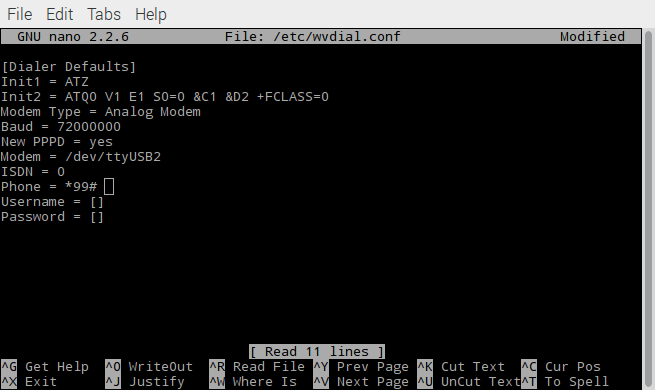
Now we need to configure the wvdial.conf file to enable IOT BIT to connect to the internet using your sim card. You will need the USSD code used to fetch the sim cards registered number. For example, on giffgaff this code is *99#. Or you can just use the sim cards phone number if you can't find the USSD code but just remember you will have to edit the file to change the number if you change the sim.
So we will need to open the file found in the iotbit_Install folder called wvdial.conf using a text editor of your choice.
- sudo nano /home/pi/iotbit_Install/wvdial.conf
Then add to the file your USSD code or phone number in the 'Phone =' field. Then save and exit the file by pressing ctrl+x then y
We now need to move this file to the correct place to the system can find it.
- sudo mv /etc/wvdial.conf /etc/wvdial.conf.bak
-
sudo mv /home/pi/iotbit_Install/wvdial.conf /etc/wvdial.conf
- sudo wvdial
This last step takes around 30 seconds. If successful, you should be connected to the internet with your Raspberry Pi. Congratulations!
Step 8: Setting Up the Network Interface to Use the Modem Automatically
To enable the Pi to connect IOT BIT to the internet using the mobile network automatically, we use the following steps.
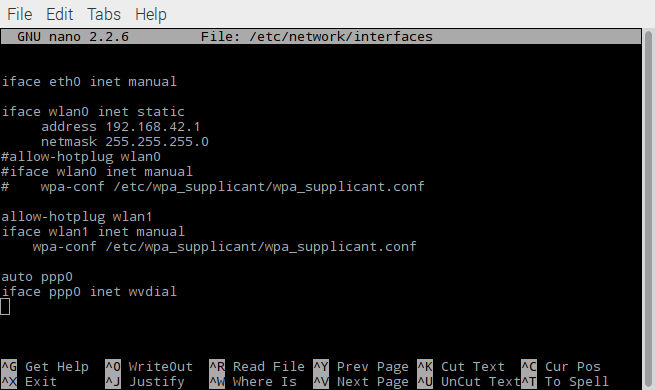
First, open the file called interfaces using:
- sudo nano /etc/network/interfaces
Then add the following lines at the bottom of the file:
- auto ppp0
- iface ppp0 inet wvdial
Then reboot the Pi, ensuring that the PiAnywhere is on and the Modem USB port is connected to the Pi.
- sudo reboot
If successful when the Raspberry Pi boots you should be able to connect to the internet using your IOT BIT.
Step 9: Enable the GPS
The IOT BIT has the GPS feature, but it needs to be activated. First, minicom needs to be installed in order to test the GPS. This is done by using the following command:
$sudo apt-get install minicom
This is a terminal that operates in the command window, enter the minicom terminal using:
minicom –D /dev/ttyUSB2
In order to operate the minicom press CTRL+A and then Z, this will show all the different options that can be used. The echo local will need to be enabled. This is done by pressing CTRL+A then E. Once this is enabled you can enable the GPS this is done by typing inside the minicom terminal:
AT+CGPS=1
It will show a message of Ok!The to get the information of the GPS location use the following command:
AT+CGPSINFO
Step 10: Congratulations!!!!
You have now gotten IOT BIT working, and you can do some amazing experiments with it. We are also running competitions for Instructables. If you buy an IOT BIT from us Pianywhere.com and you write an instructable about your project then we will give you up to 100% of your money back depending on the quality.
When you finish just tag us in it so we can take a look.
Code
Credits
Altitude_Tech
Altitude Tech LTD is founded by professionals and students in the area of robotics, electronics and product design, which makes the team the heart of the company.
Related products


Leave your feedback...