
Indoor Asset Tracking Using Wi-fi Triangulation

About the project
Build a complete indoor asset tracking IoT solution using the Blues Wireless Notecard, an ESP32 host MCU, the Notecarrier-F, and Datacake.
Project info
Difficulty: Easy
Platforms: Adafruit, SparkFun, Blues Wireless
Estimated time: 3 hours
License: MIT license (MIT)
Items used in this project
Hardware components

Story
In the IoT, when someone says "asset tracking", you likely think of monitoring the state and location of a package, container, r vehicle. Usually this involves one or more environmental sensors to track temperature, humidity, or atmospheric pressure. It may also include an accelerometer to track motion and sudden movements.
Of course, asset tracking also involves monitoring location in a physical space. This is typically performed with GNSS/GPS, which is far and away the most consistent and reliable means of ascertaining a physical location outdoors.

However, what if the device enclosure prevents you from acquiring GPS location due to a physical barrier? What if trying to get a GPS satellite fix consumes too much power? Or (and here's the real kicker) what if your goal is to track an asset indoors?
Well have I got a solution for you today! At least a proof-of-concept solution ?.
By using our old friend triangulation from trigonometry and geometry, we can build a fully-functional indoor asset tracking solution built upon on the Blues Wireless Notecard.
We can also tap into a commonly used sensor to measure altitude, giving us the ability to ascertain the building floor and provide "3D" asset tracking.
Ready to dive in? Let's start with the high level requirements of this indoor tracking solution.
Requirement: Location Data without GPS
GPS should always be the first choice when attempting to ascertain physical location. But it's good to have a backup in case getting a GPS satellite fix fails (which can often be the case inside a building).
You may already know that triangulation is the process of determining a location by forming overlapping diagrams on a common point of interest, from a series of other known points.
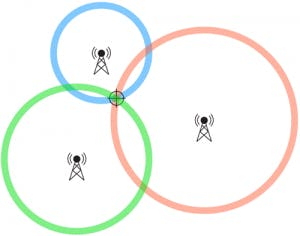
In this project, the Notecard is going to allow us to use both GPS and triangulation to accurately ascertain a device's position.
Requirement: Use Altitude to Track Floor
Tracking an asset on a 2D map is so last year ?.
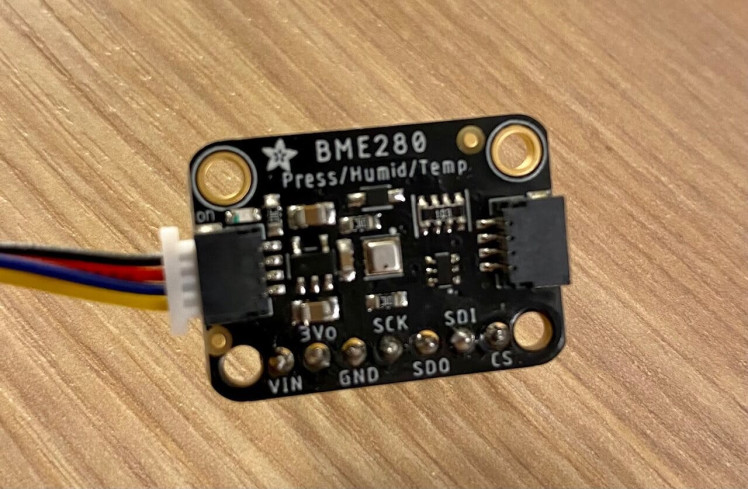
We can use data from a BME280 sensor to calculate a reasonably accurate altitude. What you may not know is, those altitude readings are commonly based on a standard sea level pressure measure of 1013.25 hPa.
Wouldn't it be cooler to actively query the sea level pressure for a known location before asking the sensor to calculate the altitude? This would provide a more accurate reading, letting us roughly calculate the floor of the building we are on.
Requirement: Device-to-Cloud Data Pump
We need a means of syncing our gathered location and altitude data to the cloud. And yeah, I already gave away our secret component: the Blues Wireless Notecard.
The Notecard is a prepaid cellular system-on-module, especially useful for low bandwidth cellular IoT communications. It comes preloaded with 500MB of data and 10 years of global cellular service, starting at $49 USD.

Even though the Notecard is a cellular device, you don't have to program the modem with archaic AT commands. The Notecard API is all JSON, all the time. For instance, say you wanted to query the last known location on the Notecard, you'd use the card.location API:
// Request
{ "req": "card.location" }

// Response
{
  "status": "GPS updated (58 sec, 41dB SNR, 9 sats),
  "mode":   "periodic",
  "lat":    42.577600,
  "lon":    -70.871340,
  "time":   1598554399
}
Even more importantly, security and cloud integration is turnkey. The Notecard communicates "off the public Internet" through private VPN tunnels, using the Blues Wireless cloud service Notehub.
Notehub is also our secret sauce when it comes to providing location data via triangulation. As we'll see later on, when we supply known Wi-Fi access point data to Notehub and enable the card.triangulate API, Notehub can actually look up shockingly accurate location data.
Requirement: Low Power
Any IoT solution that is battery-powered has to be power-conscious. Thankfully the Notecard is low power by default (to the tune of ~8uA when idle) and includes an on-board accelerometer, which allows us to calculate an asset's location only when it has detected motion!
With all of these requirements in mind, let's assemble our hardware.
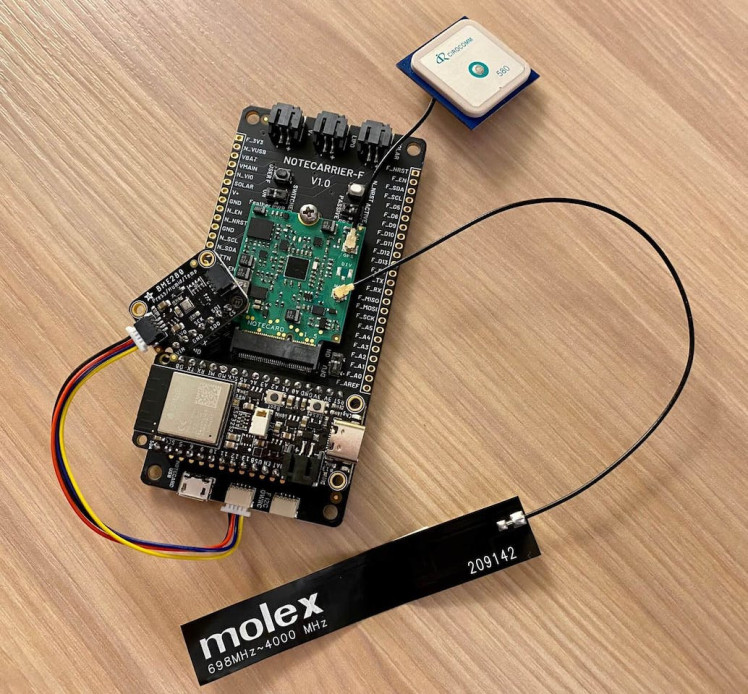
The Hardware
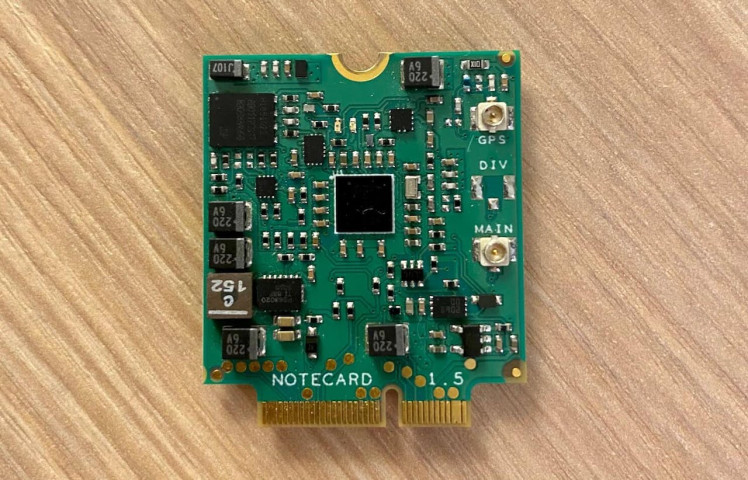
The Cellular Notecard is the core of our solution, providing onboard GPS, an accelerometer for motion detection, and cellular connectivity to relay collected data to the cloud.
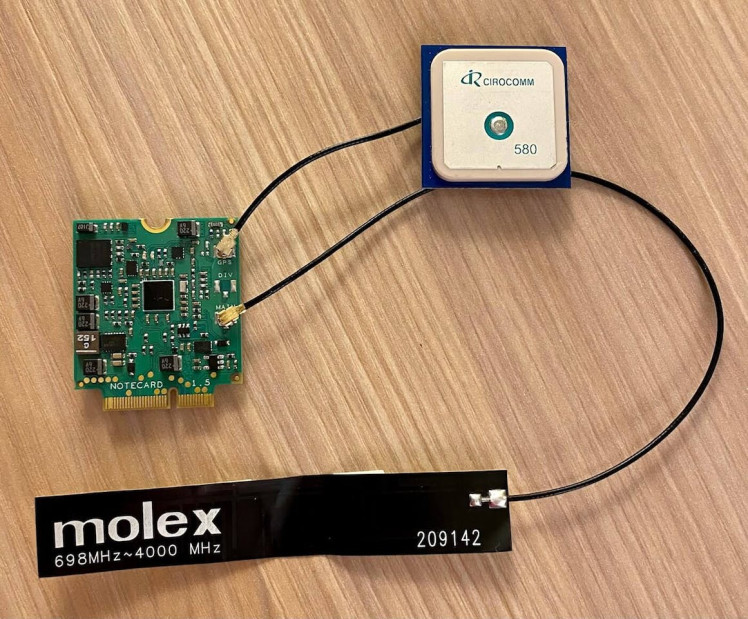
Since I'm not willing to give up on GPS (even for an indoor deployment) I'm going to use a small active GPS antenna alongside an LTE antenna for cellular data.
For gathering environmental data and calculating altitude, I'm including the venerable BME280 sensor from Bosch.
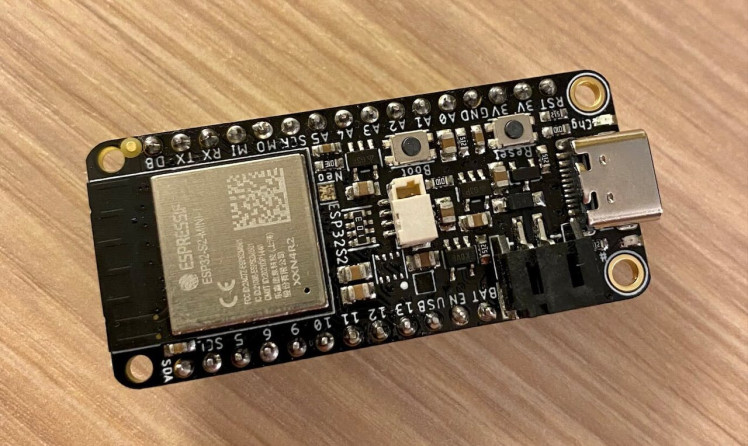
For a host microcontroller, I went with the ESP32-S2 Feather. I chose this MCU primarily because of its onboard Wi-Fi module and support for CircuitPython. Even though we can't use Wi-Fi for connectivity (since it's a moving system and won't be able to log in to the changing Wi-Fi APs), we will use it to gather public Wi-Fi access point data.
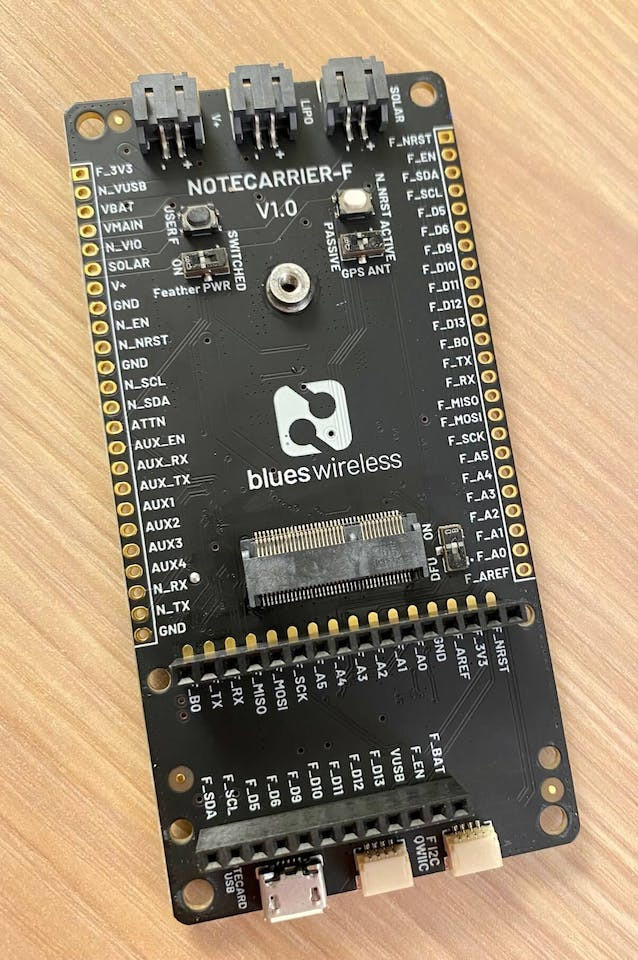
So how do we bring all the pieces together? That's what the new Blues Wireless Notecarrier-F is for!
Notecarriers are carrier boards that allow you to quickly prototype IoT solutions that use the Notecard. The Notecarrier-F is a great option for Feather-compatible MCUs and provides two Qwiic ports for adding peripherals (like the BME280) and JST connectors for connecting LiPo batteries.
And here is the final hardware setup, all connected and ready to be programmed:
The Firmware
I'm an unabashed Python fan, so CircuitPython was an easy choice for me.
Why CircuitPython? Valid question! In my humble opinion, CircuitPython has helped to open up the IoT to a new breed of developers who grew up with Python. Like its "parent" MicroPython (upon which CircuitPython is based), being able to use the uber-popular Python language to program these "things" and connect them to the world has broadened the reach and scope of IoT solutions.
So let's write some CircuitPython firmware!
NOTE: The full CircuitPython source code for this project is available in this Github repository.
Python Libraries and Imports
The only external dependencies we have are the Notecard and BME280 sensor. Both have well-supported Python libraries that work great with CircuitPython: note-python and adafruit-circuitpython-bme280.
The final set of imports looks like this:
import board
import busio
import notecard
from adafruit_bme280 import basic as adafruit_bme280
import utils
import keys
import time
from time import sleep
Device Initialization
We need to initialize access to our peripherals. Both the Notecard and BME280 communicate over I2C, making our init steps quite simple:
# initialize the Blues Wireless Notecard (blues.io)
i2c = busio.I2C(board.SCL, board.SDA)
card = notecard.OpenI2C(i2c, 0, 0, debug=True)

# create reference to BME280
bme280 = adafruit_bme280.Adafruit_BME280_I2C(i2c)
In order to calculate an accurate altitude, we need to know the current sea level pressure at our given location. More on this later on, but we're going start by supplying the sensor with a standard sea level pressure measure of 1013.25 hPa.
Later on, when using a remote service to gather pressure data, we will need to use latitude/longitude coordinates. We can program in some defaults and later update them if/when GPS becomes available:
bme280.sea_level_pressure = 1013.25
lat_def = 43.05769554337394
lon_def = -89.5070545945101
Next, we need to associate the Notecard with a cloud-based project on the Blues Wireless cloud service Notehub. This enables the Notecard to securely transmit data to a known location in the cloud:
# associate Notecard with a project on Notehub.io
req = {"req": "hub.set"}
req["product"] = "your-notehub-product-uid"
req["mode"] = "periodic"
rsp = card.Transaction(req)
We then want to enable the GPS module on the Notecard. Again, this is not strictly required, but it's certainly a best practice to at least try and gather GPS position if satellites are visible:
# enable GPS module on Notecard
req = {"req": "card.location.mode"}
req["mode"] = "periodic"
rsp = card.Transaction(req)
Finally, we enable motion tracking on the Notecard, which will let us ascertain the location of the device only if it has moved (as opposed to sampling at a timed interval, even if the device is stationary, unnecessarily consuming power).
# enable motion tracking on Notecard
req = {"req": "card.motion.mode"}
req["start"] = True
rsp = card.Transaction(req)
NOTE: Curious about these Notecard API requests? Consult the full Notecard API reference.
Check for Motion
We'll need a way to detect if the device has moved before attempting to ascertain its location. We can do so by using the card.motion API.
The count parameter in the response tells us how many motion events were registered since it was last checked:
def check_motion():
    """ check for Notecard movement to see if we need to update its location """

    req = {"req": "card.motion"}
    rsp = card.Transaction(req)

    if "count" in rsp and rsp["count"] > 0:
        # movement detected since last check!

        using_gps = False
        using_wifi = False

        # attempt to ascertain the current gps location
        using_gps = get_gps_location()

        if using_gps is False:
            # gps location timed out, switch to wi-fi triangulation
            using_wifi = set_wifi_triangulation()

        # send readings from the sensor to the cloud
        send_sensor_data(using_gps, using_wifi)
There are a couple other location-based methods mentioned in here, get_gps_location and set_wifi_triangulation. Let's take a quick look at these.
Get GPS Location
What follows is a highly condensed version of the Python code used to ascertain a GPS location. The full version is available as part of the project's Github repository and, long story short, contains additional logic to override the low-power nature of the GPS module.
def get_gps_location():
    """ attempt to ascertain the latest gps location """

    # get the latest GPS location
    req = {"req": "card.location"}
    rsp = card.Transaction(req)

    if "lat" in rsp and "lon" in rsp:
        # got an updated gps location
        lat_def = rsp["lat"]
        lon_def = rsp["lon"]
Again, since this is an indoor deployment, we will rarely get a valid GPS location. So let's look at using Wi-Fi triangulation instead!
Set Up Wi-Fi Triangulation
Did you know that our smartphones are constantly gathering data about available Wi-Fi access points, combining that data with lat/lon coordinates, and shipping the data to Apple and Google? Welcome to yet another questionable privacy practice by big tech!
On the bright side, it also allows us to utilize a capability of Notehub to gather positioning data from nearby Wi-Fi access points.
By providing a list of Wi-Fi access points to the card.triangulate API, we can tell Notehub to calculate positioning data for us (often with shockingly accurate results).
NOTE: I highly recommend reading the Cell Tower/Wi-Fi triangulation documentation. There are additional settings in Notehub that you may need to update based on how often you want to utilize triangulation.
Again, since we're using an ESP32-based MCU, we can use the built-in wifi CircuitPython library to create a list of visible Wi-Fi access points. The helper function, get_wifi_access_points, is available in the Github repository as well.
def set_wifi_triangulation():
    """ use the card.triangulate api to set the local wifi access points """

    req = {"req": "card.triangulate"}
    req["mode"] = "wifi"
    rsp = card.Transaction(req)

    all_wifi_aps = utils.get_wifi_access_points()

    if len(all_wifi_aps) > 0:
        req = {"req": "card.triangulate"}
        req["text"] = all_wifi_aps + "n"
        rsp = card.Transaction(req)
        return True
    else:
        return False
Get Updated Sea Level Pressure
In order to calculate the most accurate altitude possible, we need to know our current location's atmospheric pressure at sea level. The only way to reliably do so is to call a remote weather service to access this data on-demand.
This is where the OpenWeather API combined with the Web APIs from the Notecard come in handy. OpenWeather provides a developer-friendly way of accessing a variety of weather-related data.
The Notecard's Web APIs allow the Notecard to send/receive data to/from remote RESTful APIs. The method below is abridged for space:
def get_sea_level_pressure(card, lat, lon):
""" get the sea level pressure from openweather api """
# call openweather api to get latest pressure reading
weatherURL = "/weather?lat=" +
str(lat) + "&lon=" + str(lon) + "&appid=" + keys.WEATHER_API_KEY
req = {"req": "web.get"}
req["route"] = "GetWeather"
req["name"] = weatherURL
rsp = card.Transaction(req)
pressure = 0
if rsp and "body" in rsp and "main" in rsp["body"] and "pressure" in rsp["body"]["main"]:
pressure = rsp["body"]["main"]["pressure"]
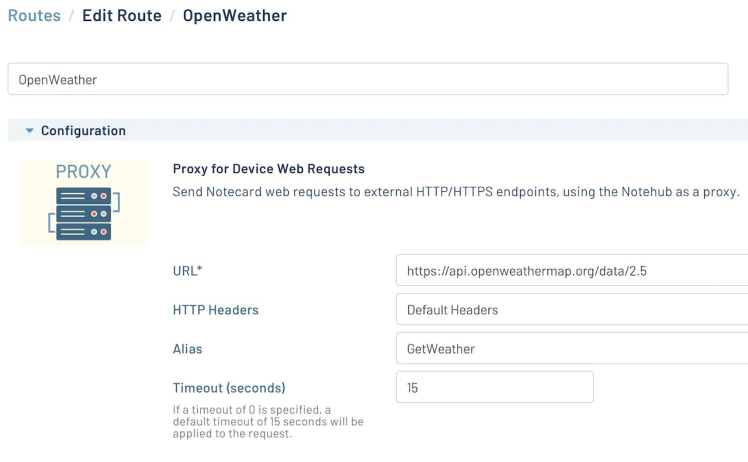
return pressureNotice the GetWeather string called in this method? This is the name of a Notehub route which is configured to query a remote service (OpenWeather) and return current weather data for the specified lat/lon coordinates. This particular route looks like this in the Notehub UI:
Send Data to the Cloud
Once we have the updated sea level pressure, we can update the BME280 sensor with that value and finally send environmental sensing data to Notehub for syncing with a to-be-created Datacake dashboard:
def send_sensor_data(using_gps, using_wifi):
    """ send sensor data to the cloud with the Notecard """

    # first get the updated sea level pressure
    sl_pressure = utils.get_sea_level_pressure(card, lat_def, lon_def)

    bme280.sea_level_pressure = sl_pressure
    sleep(1)

    note_body = {}

    # get 50 readings from the sensor and use the median values
    temp_list = []
    humidity_list = []
    pressure_list = []
    altitude_list = []

    for x in range(50):
        temp_list.append(bme280.temperature)
        humidity_list.append(bme280.relative_humidity)
        pressure_list.append(bme280.pressure)
        altitude_list.append(bme280.altitude)
        sleep(0.1)

    med_temp = utils.get_median(temp_list)
    med_humidity = utils.get_median(humidity_list)
    med_pressure = utils.get_median(pressure_list)
    med_altitude = utils.get_median(altitude_list)

    note_body["temperature"] = med_temp
    note_body["humidity"] = med_humidity
    note_body["pressure"] = med_pressure
    note_body["altitude"] = med_altitude
    note_body["sealevelpressure"] = sl_pressure

    # get the battery voltage
    req = {"req": "card.voltage"}
    rsp = card.Transaction(req)
    note_body["voltage"] = rsp["value"]

    # get the wireless bars and rssi values
    req = {"req": "card.wireless"}
    rsp = card.Transaction(req)
    note_body["bars"] = rsp["net"]["bars"]
    note_body["rssi"] = rsp["net"]["rssi"]

    # deliver note to the notecard and sync immediately
    req = {"req": "note.add"}
    req["sync"] = True
    req["file"] = "indoor_tracker.qo"
    req["body"] = note_body
    rsp = card.Transaction(req)
Take Note (yes, pun intended) of the final request in this method, note.add. A "Note" is simply a JSON object that includes arbitrary data you want to send to the cloud.
In this case, we are sending the following data elements in the body of our Note:
- temperature
- humidity
- pressure
- altitude
- sea level pressure
- voltage (from the connected LiPo battery)
- bars and rssi (connection quality data from the cellular modem)
The Cloud Dashboard
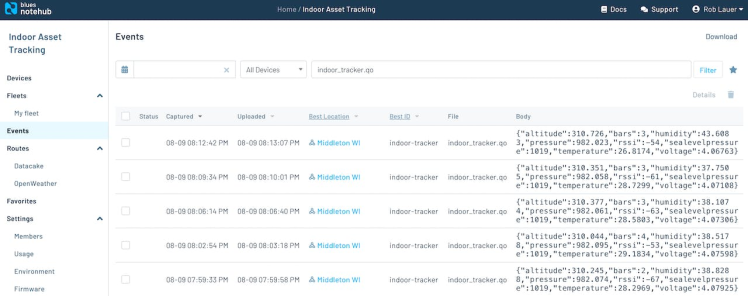
With the firmware written and deployed to the microcontroller, we can check Notehub to make sure valid data is being collected and synced:
But this data is only somewhat useful being visible in Notehub. What we really need to do is route this data to a cloud dashboard to make it digestible (and pretty!).
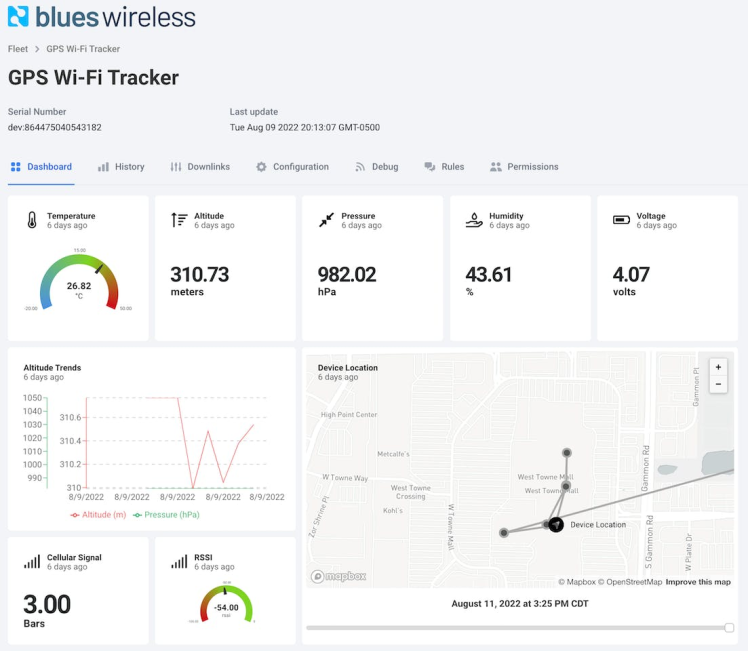
To do so, I built a fully functional dashboard with Datacake:
NOTE: There is a full end-to-end tutorial on building a cloud dashboard on Datacake available in the Blues Wireless developer site.
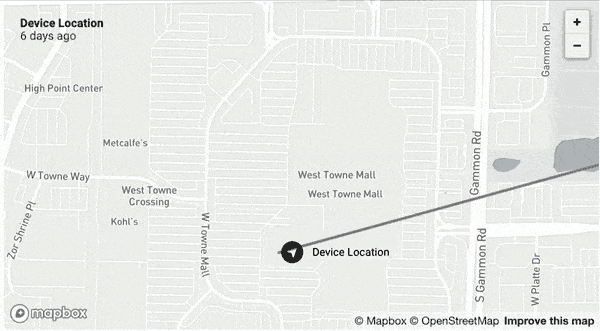
Let's zoom in on the map widget though, because I made the ultimate sacrifice by testing this project indoors...at the mall:

Image courtesy CNN. Not actually the mall I went to...
After spending about 20 minutes walking from end to end of this indoor shopping monstrosity (admittedly some of the big department starts at the corners were closed unfortunately) I was able to gather Wi-Fi triangulation data to ascertain a shockingly accurate set location points:
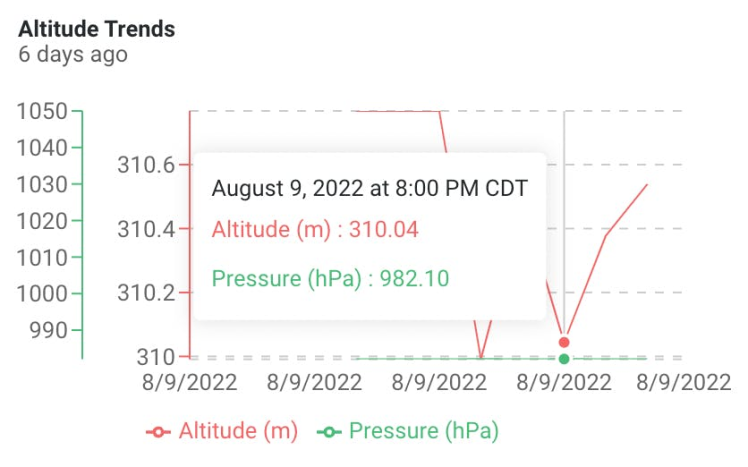
Now I made a big deal about using altitude data earlier. While we can't provide a true "3D" visualization of our location on Datacake (or frankly any cloud dashboard that I'm aware of, yet), we can correlate location data on the map with altitude data provided from the BME280 sensor. Setting a "baseline altitude" of floor one (or zero for you folks outside the States) we can roughly track the floor we are on as well based on the relative altitude measured:
Summary
Let me be crystal clear: you should always at least attempt to use GPS when ascertaining device location. It's going to be the most accurate option and, when using the right combination of hardware and firmware, uses a minimal amount of power in a battery-powered device.
However, if needed, it's great to have an option like the Blues Wireless Notecard with Notehub and its triangulation capabilities.
Curious to learn more? Pick up the Blues Wireless ESP32 starter kit today!
Happy Tracking! ??
Code
Credits
Related products


Leave your feedback...