
Items used in this project
Hardware components

Story
Preparing for a student "Fancy Dress" party can be a real challenge. I always struggle with finding an original and fun costume, as the majority of my ideas end up too generic, not achievable with my make-up skills, or most likely both.
This Halloween wasn't an exception. But the night of October 30th it dawned on me: I have an Arduino and a ton of LEDs in my electronics box. Thematic Fairy Lights always improve a party costume, and by adding a little sound sensor we can spice this idea up a little.
After a quick proof-of-concept with a single white LED and a tiny breadboard, I decided to design a shield for my Arduino Uno to make a relatively little and super-wavy festive accessory.
The SolderThe prototyping shield from my Elegoo Starter Kit wasn't big enough to fit all the components, so I designed a custom one instead. With a soldering iron, a 5X7cm generic PCB and some spare pins, it takes a few minutes to make a shield that sits perfectly on top of the Arduino Uno and connects to D0-D7, A0-A5, GND and 5V pins.
Figure 1. The main ingredients to making a custom prototyping shield (soldering iron omitted). I found it easiest to stick the barrette strip into the Arduino pins, position the PCB on top and then solder the through holes.
. I found it easiest to stick the barrette strip into the Arduino pins, position the PCB on top and then solder the through holes.")
Figure 1. The main ingredients to making a custom prototyping shield (soldering iron omitted). I found it easiest to stick the barrette strip into the Arduino pins, position the PCB on top and then solder the through holes.
Unfortunately, the D8-D13 pins were slightly misaligned with the through-holes on my PCB, so I could not access them.
After a few hours of late-night soldering, the "Halloween Shield" assumed its final form, sporting the following components and pin connections:
- 8x8 LED Matrix (D5-D7)
- Sound Sensor (A0, A1)
- Two green LEDs (D2, D3)
- Push button (D4)
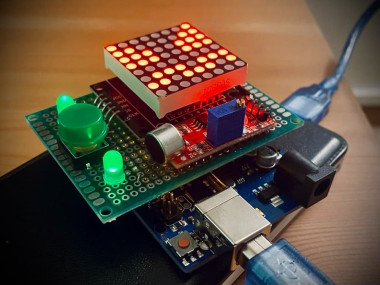
1 / 2 • Figures 2. The top of the "Halloween Shield". The diamond sticker on top of the sound sensor module is the most crucial detail.

Figures 2. The top of the "Halloween Shield". The diamond sticker on top of the sound sensor module is the most crucial detail.

Figure 3. The back of the "Halloween Shield" a.k.a. the ugly truth.
As a soldering amateur, I produced something in-between a work of art and an engineer's nightmare. But if it works, it works!The Program
Perhaps due to my fabled electronics skill, or maybe because of the component quality, the sound sensor did not comply. I could easily change the baseline of the analog output by rotating the potentiometer; however, I couldn't find a perfect signal-to-noise ratio.
As the result, this left me with a relatively narrow " therapeutic window" for discerning the ambient sounds from the background noise. Finding a perfect potentiometer position was quite complicated - I had to hit the interval of about 15 degrees - so I programmed the two LEDs to light up when I am in the correct range (from the bottom and from the top).
Figure 4. Sound sensor analog output in response to my coughing with baseline at 540.

Figure 4. Sound sensor analog output in response to my coughing with baseline at 540.
Seemingly, a lower baseline results in higher sensitivity, so feel free to play with the values to find your perfect thresholds.
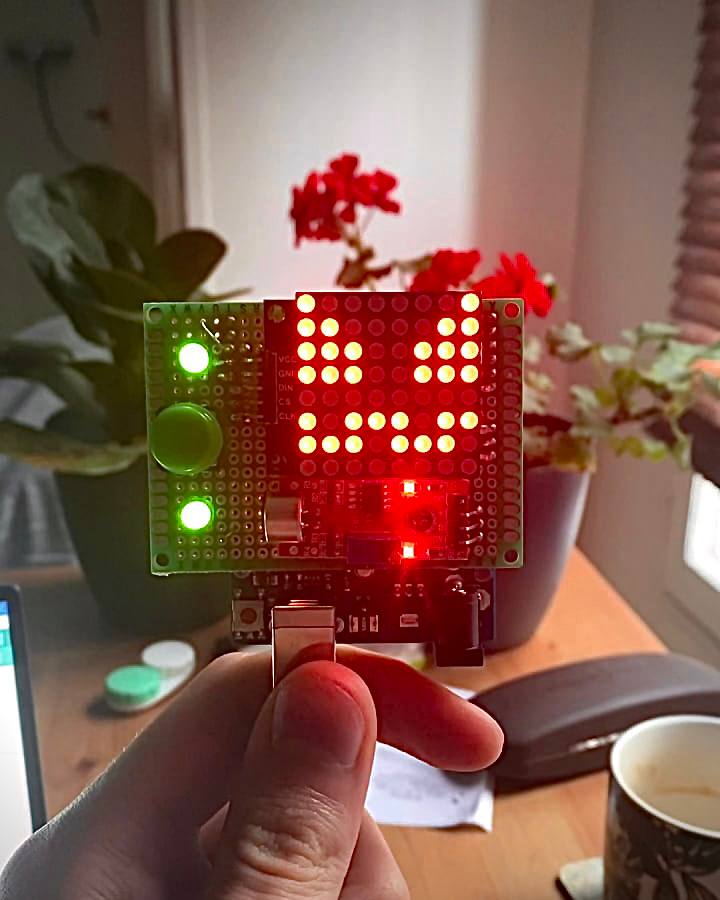
Now, there is no point using a LED matrix if you don't throw a few fun sprites into your algorithm. Since putting a microphone face-to-face with a laptop speaker isn't a perfect recreation of a night out's ambience, I wasn't certain whether my sound sensor will behave itself.
To stay on the safe side, I made two types of animations. Type I has a "passive" and an "active" phase: one is always running (e.g. moving mouth), and the other is sound-triggered (e.g. blinking). Type II only responds to sound, because I was running out of time.
The "Halloween shield" offers you to cycle through animations by pressing the button. The script regularly checks for the input; however, the cycle of the current animation has to end before the sprite is changed.
Here is a quick demo:
Figure 5. ASMR clapping and animations showcase. The EndshpilDespite the capricious sound sensor, it took minimal tuning with a guitar pick to achieve the desired effect. My posthoc observations conclude:
1. The sound module best responds to loud bass, especially when you get closer to the DJ booth.
2. People in the bar queue will almost certainly bend the microphone to the point of breaking. Who would've thought?
3. It looks pretty cool with a suit and a soda:
Figure 6. Proof that the "Halloween Shield" looks cool with a suit and a soda.

Figure 6. Proof that the "Halloween Shield" looks cool with a suit and a soda.
Tell me know what you think below!
Especially if you see any rookie mistakes and/or improvements that can be made to the project. :)
Schematics, diagrams and documents
Code
Credits
Related products


Leave your feedback...