
Fall Detection System With Edge Impulse And Blues Wireless

About the project
An intelligent device for seniors which detects falls and sends emergency alert messages with location information using a cellular network
Project info
Difficulty: Difficult
Platforms: Raspberry Pi, Seeed Studio, SparkFun, Twilio, Edge Impulse, KiCad, Blues Wireless
Estimated time: 2 days
License: MIT license (MIT)
Items used in this project
Hardware components


View all
Software apps and online services
Story
Overview
I live in Japan where the estimated number of people aged 65 or older stood at a record high of more than 36 million, the highest among 201 countries and regions across the world. We can easily find people more than 80 to 90 years old on streets or in stores on their own. The number of fall-related deaths in Japan increased significantly in recent years, of which around 80% involved persons aged ≥65 years. Falls can result in physical and psychological trauma, especially for the elderly.
To improve the quality of life of our seniors this project presents the development of a fall detection and alert system. Most of the elderly people (aged above 75) use Keitai Denwa, a basic cell phone with minimal functionality and no communication devices at all. It is not easy to track their activities without a smartphone/smartwatch and an intelligent app. In this project, I built a standalone, portable solution, requiring a low-maintenance and low-powered fall-detection device to keep eyes on their activities so that they can get timely help in emergency situations. A TensorFlow Lite model is trained using Edge Impulse Studio and is deployed to the Raspberry Pi Pico, which sends notes (messages) using a Blues Wireless Notecard.
Hardware selection
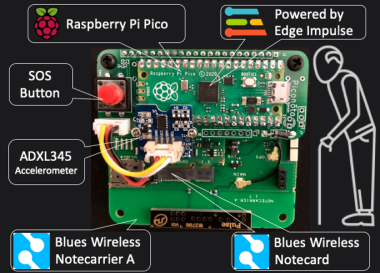
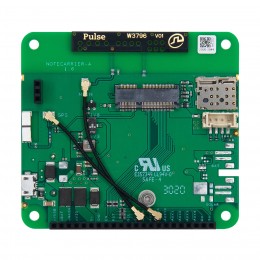
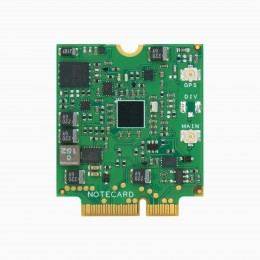
This project requires a low-powered, reliable, and widely available yet cost-effective cellular network radio to send alert messages to the phone. I will be using a Blues Wireless Notecard (for GPS and Cellular connectivity) and a Blues Wireless Notecarrier A with AA Battery harness, a carrier board for the Notecard, since Lithium Polymer batteries may not be a safe choice as a wearable for senior citizens.
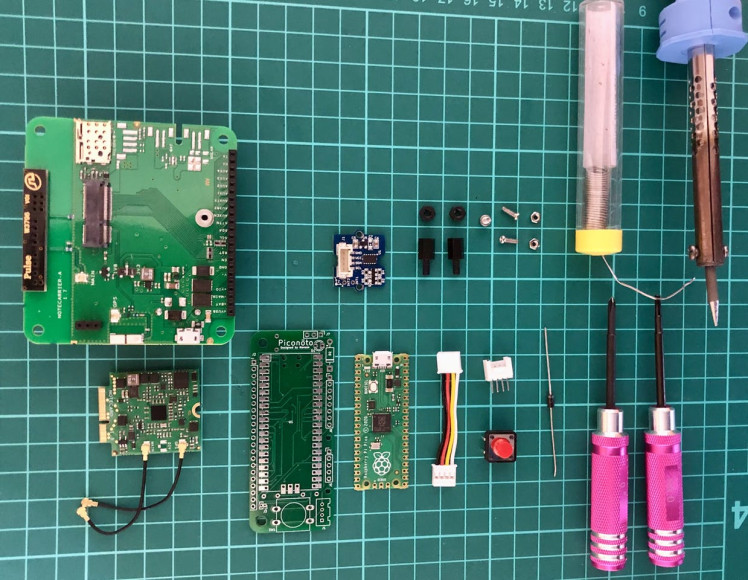
Although the Notecard is capable as a standalone device for tracking purposes, we need to run model inferencing using Edge Impulse, so I will be using a Raspberry Pi Pico as a host MCU. I designed a PCB using KiCad that incorporates Raspberry Pi Pico as a module, used simply as a component on a Notecarrier. This shield (Piconōto) is attached to the Notecarrier to make it a compact and portable device without any protruding wires. The name Piconōto is an amalgam of two words pico (tiny or small) and nōto (a note or message in Japanese). There are many other components used as shown in the image below.
PCB Design
This is my first PCB design, but the result was satisfactory and works without any obvious flaws. The design allows for the power input either from the main supply of the Notecarrier (VMAIN) or 3x AA batteries supply (VBAT) using solder jumper pads. There is a protection diode to make sure the RPi Pico cannot provide power to the Notecarrier. The design includes a Grove connector, a Stemma/Qwiic connector and two through-hole header footprints to connect the sensors. There is a solder jumper pad to connect the ATTN pin of the Notecarrier to either the RPi Pico 3V3_EN pin (to enable/disable power) or GPIO pin 7 (to set up interrupts).
Also, we can attach a push-button and an LED, if needed. Most of the Notecard pins are routed to the shield and can be used with the Raspberry Pi Pico. The AUX debug pins are routed as separate header pins just in case we would need them to debug the Notecard.
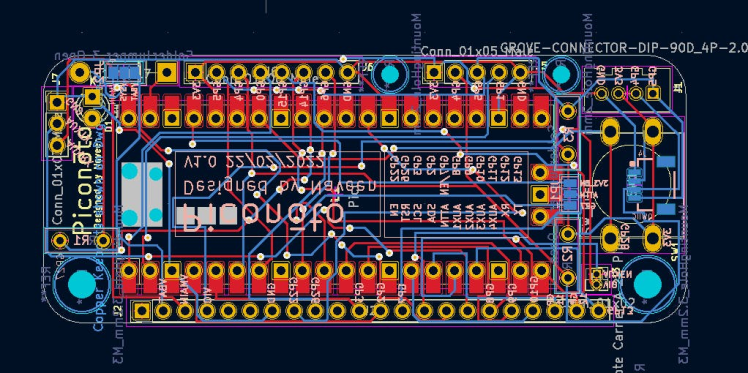
3D View
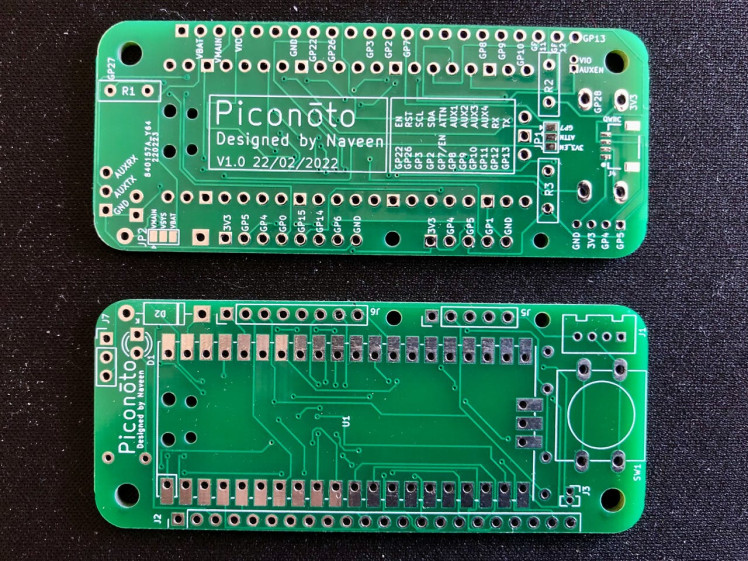
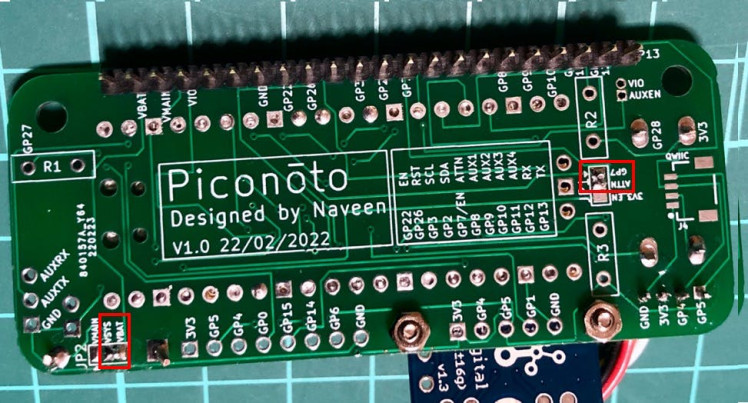
Fabricated PCB (front/rear)
The Notecarrier and Raspberry Pi Pico pin mapping are printed on the back of the PCB for convenience and easy lookup.
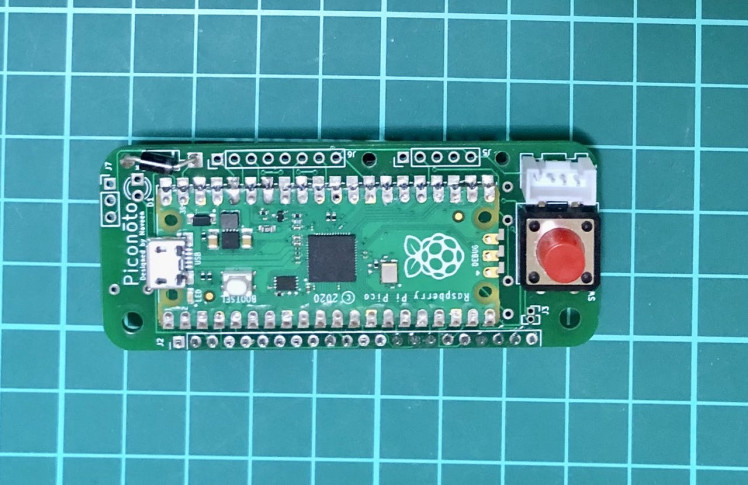
Assembly
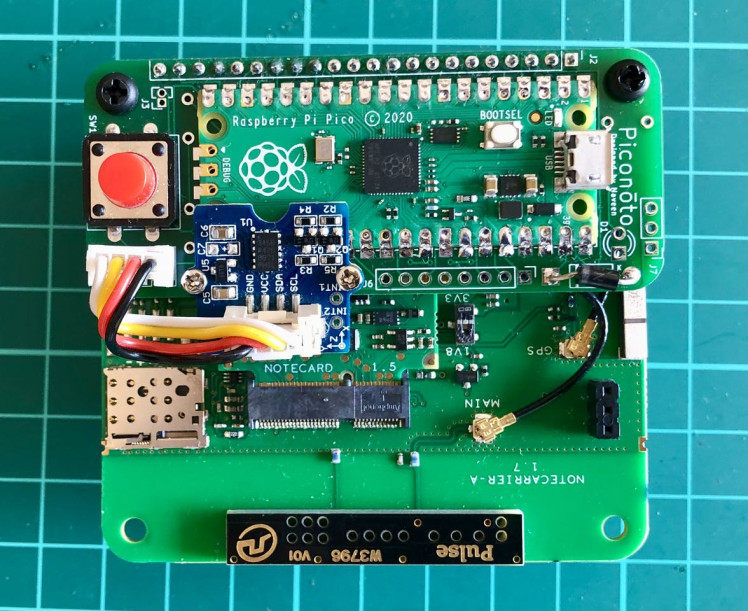
The RPi Pico is soldered directly on the SMD pad to keep it secured and to reduce the overall height. There is a Schottky diode which is used to prevent current from RPi Pico to Notecarrier when the RPi Pico is connected to the PC for programming or monitoring serial logs. The red button is used as an emergency SOS button. When it is long-pressed for more than 3 seconds, a note is added and an SMS alert message is routed to Twilio via Notehub.
Also, we need to make a solder bridge (highlighted in red color in the image below) between the Notecarrier ATTN to the RPi Pico GP7, and between the Notecarrier VBAT to the RPi Pico VSYS. This way the RPi Pico gets power from the Notecarrier 3x AA batteries, the GPIO 7 pin is configured as an interrupt pin, and the ATTN pin is configured to fire whenever the Notecard GPS module makes a position fix. The recent GPS locations are stored by the host MCU (RPi Pico) to track the incident location.
After attaching the shield and Grove ADXL345 accelerometer to the Notecarrier with Notecard the final product looks like below.
Assembly Video
Development Environment
I am using Edge Impulse Studio for the feature generation and TensorFlow Lite model creation and training. You need to sign up for a free account at https://studio.edgeimpulse.com and create a project to get started. I am using macOS for my local development work.
Training dataset
Collecting data for different kinds of activities of daily living (ADL) and falls is a time consuming and laborious task. It needs many people from different age groups and requires a lot of man-hours to curate the datasets.
Fortunately, there are many high quality public datasets available for similar kinds of data. I have used the SisFall: A Fall and Movement Dataset, which is a dataset of falls and ADL acquired with an accelerometer. The dataset contains 19 types of ADLs and 15 types of falls. It includes acceleration and rotation data from 38 volunteers divided into two groups: 23 adults between 19 and 30 years old, and 15 elderly people between 60 and 75 years old. Data were acquired with three sensors (2 accelerometers and 1 gyroscope) at a frequency sample of 200 Hz. For this project, I am using acceleration data from one of the sensors. Also, I am using the same accelerometer ADXL345 with the same configuration which was used for data collection. The datasets are available in the raw format and can be downloaded from the link given in the paper below.
https://www.ncbi.nlm.nih.gov/pmc/articles/PMC5298771/
The data sample is given below. Only the first 3 columns are used which are 3-axis accelerometer data from the ADXL345 sensor.
34,-259, -74, -38, 20, -3, 50,-987,-132;
36,-258, -73, -36, 19, -2, 52,-986,-130;
32,-257, -68, -37, 21, -1, 54,-993,-130;
37,-260, -73, -36, 22, -1, 51,-992,-131;
34,-259, -74, -34, 20,  0, 51,-992,-128;
35,-264, -79, -33, 21, -1, 52,-991,-133;
35,-261, -68, -30, 21,  0, 52,-992,-128;
33,-257, -67, -27, 21, -1, 51,-993,-126;
34,-263, -70, -26, 21,  0, 50,-993,-127;
35,-261, -76, -24, 21,  1, 51,-994,-130;
33,-261, -70, -24, 21,  0, 55,-992,-124;
36,-260, -68, -23, 20, -1, 51,-994,-126;
34,-260, -70, -23, 20, -2, 52,-993,-127;
34,-258, -72, -23, 19,  0, 52,-995,-127;
35,-260, -69, -23, 19, -1, 56,-996,-124;
37,-262, -73, -23, 18,  0, 51,-988,-124;
37,-262, -72, -26, 17, -1, 49,-996,-127;
33,-257, -68, -28, 18, -3, 51,-991,-127;
34,-262, -70, -30, 19, -2, 52,-990,-121;
35,-259, -71, -30, 17, -1, 55,-991,-125;
33,-259, -69, -30, 16, -2, 50,-989,-122;
35,-259, -69, -33, 16, -2, 52,-993,-129;
34,-259, -69, -33, 18, -2, 53,-984,-124;
Each 3-axis accelerometer data (x, y, z) are converted to gravity using the following conversion equation.
Resolution: 13 (13 bits)
Range: 16 (+-16g)

Acceleration [g]: [ ( 2 * Range ) / ( 2 ^ Resolution ) ] * raw_acceleration
Uploading data to Edge Impulse Studio
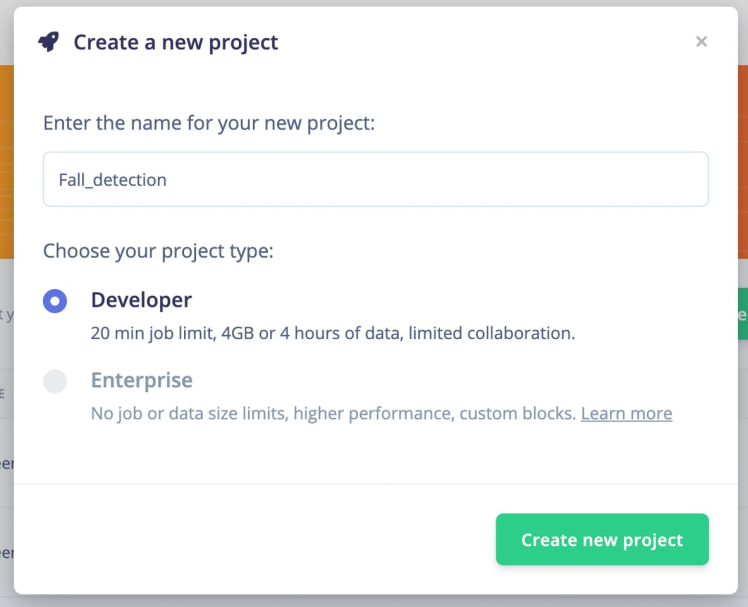
We need to create a new project to upload data to Edge Impulse Studio.
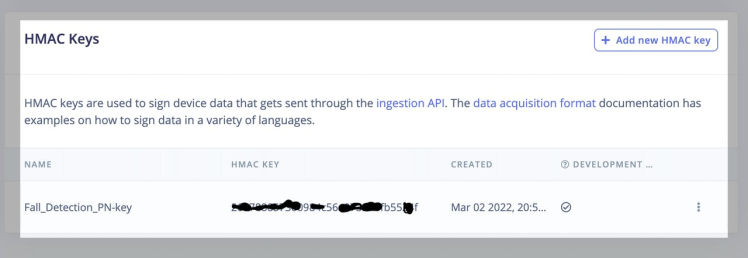
Also, we would need an HMAC key for the Edge Impulse Studio project to generate signatures for the data acquisition format. We can copy the HMAC key from the Dashboard > Keys [tab] at Edge Impulse Studio dashboard.
The accelerometer data are divided into two classes, ADL and FALL, and are converted to m/s^2 before uploading to the Edge Impulse Studio. I have written a Python script (below) which converts the raw accelerometer data into the data acquisition JSON format required by the Edge Impulse studio for feature generation.
import json
import time, hmac, hashlib
import glob
import os
import time

HMAC_KEY = "YOUR_HMAC_KEY"

# Empty signature (all zeros). HS256 gives 32 byte signature, and we encode in hex, so we need 64 characters here
emptySignature = ''.join(['0'] * 64)

def get_x_filename(filename):
    m_codes = ['D01', 'D02', 'D03', 'D04', 'D05', 'D06', 'D07', 'D08', 'D09', 'D10', 'D11', 'D12', 'D13', 'D14', 'D15', 'D16', 'D17', 'D18', 'D19']
f_codes = ['F01', 'F02', 'F03', 'F04', 'F05', 'F06', 'F07', 'F08', 'F09', 'F10', 'F11', 'F12', 'F13', 'F14', 'F15']
    code = filename.split('_')[0]
    label = ''
    if code in m_codes:
        label = 'ADL'
    if code in f_codes:
        label = 'FALL'
    if label == '':
        raise Exception('label not found')
    x_filename = './data/{}.{}.json'.format(label, os.path.splitext(filename)[0])
    return x_filename

if __name__ == "__main__":
    files = glob.glob("SisFall_dataset/*/*.txt")
    CONVERT_G_TO_MS2 = 9.80665
    for index, path in enumerate(files):
        filename = os.path.basename(path)
        values = []
        with open(path) as infile:
        for line in infile:
            line = line.strip()
            if line:
                row = line.replace(" ", "")
                cols = row.split(',')
                ax = ((2 * 16) / (2 ** 13)) * float(cols[0]) * CONVERT_G_TO_MS2
                ay = ((2 * 16) / (2 ** 13)) * float(cols[1]) * CONVERT_G_TO_MS2
                az = ((2 * 16) / (2 ** 13)) * float(cols[2]) * CONVERT_G_TO_MS2
                values.append([ax, ay, az])
        if (len(values) == 0):
            continue
        data = {
            "protected": {
                "ver": "v1",
                "alg": "HS256",
                "iat": time.time() # epoch time, seconds since 1970
             },
             "signature": emptySignature,
             "payload": {
             "device_name": "aa:bb:ee:ee:cc:ff",
             "device_type": "generic",
             "interval_ms": 5,
             "sensors": [
                 { "name": "accX", "units": "m/s2" },
                 { "name": "accY", "units": "m/s2" },
                 { "name": "accZ", "units": "m/s2" }
             ],
             "values": values
             }
        }
        # encode in JSON
        encoded = json.dumps(data)
        # sign message
        signature = hmac.new(bytes(HMAC_KEY, 'utf-8'), msg = encoded.encode('utf-8'), digestmod = hashlib.sha256).hexdigest()
        # set the signature again in the message, and encode again
        data['signature'] = signature
        encoded = json.dumps(data)
        x_filename = get_x_filename(filename)
    with open(x_filename, 'w') as fout:
        fout.write(encoded)
To execute the script above save it to format.py and run the commands below. It is assumed that the SisFall dataset has been downloaded to the SisFall_dataset directory.
$ mkdir data
$ python3 format.py
The converted data acquisition JSON is shown below. The sample rate is 200 Hz, therefore interval_ms is set to 5 (ms).
{
  "protected": {
    "ver": "v1",
    "alg": "HS256",
    "iat": 1646227572.4969049
  },
  "signature": "3a411ca804ff73ed07d41faf7fb16a8174a58a0bef9adc5cee346f0bc3261e90",
  "payload": {
  "device_name": "aa:bb:ee:ee:cc:ff",
  "device_type": "generic",
  "interval_ms": 5,
  "sensors": [
    {
      "name": "accX",
      "units": "m/s2"
    },
    {
      "name": "accY",
      "units": "m/s2"
    },
    {
      "name": "accZ",
      "units": "m/s2"
    }
  ],
  "values": [
      [
        0.0383072265625,
        -9.95987890625,
        -2.3367408203125
      ],
      [
        -0.0383072265625,
        -9.9215716796875,
        -2.4516625
      ],
      [
        -0.1149216796875,
        -9.95987890625,
        -2.375048046875
      ],
      ...
    ]
  }
}
The data is uploaded using the Edge Impulse CLI. Please follow the instructions to install the CLI here: https://docs.edgeimpulse.com/docs/cli-installation.
The JSON files are prefixed with the label name (e.g. FALL.F10_SA07_R01.json) by the script above so that label name is inferred automatically by the CLI. The command below is used to upload all JSON files to training datasets.
$ edge-impulse-uploader --category training data/*.jsonWe could have used --category split to automatically split the data into training and testing datasets, but we need to segment the sample so it is uploaded there for convenience. We can see the uploaded datasets in the Edge Impulse Studio's Data Acquisition page.
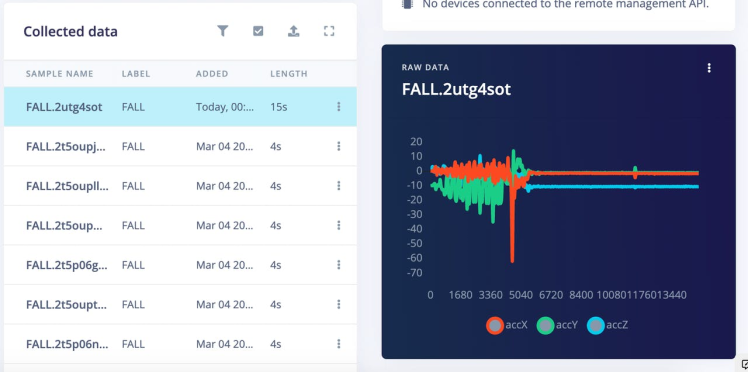
The uploaded FALL event data have mixed motion events before and after the fall event which are removed by splitting the segments. The ADL category data are used without any modifications.
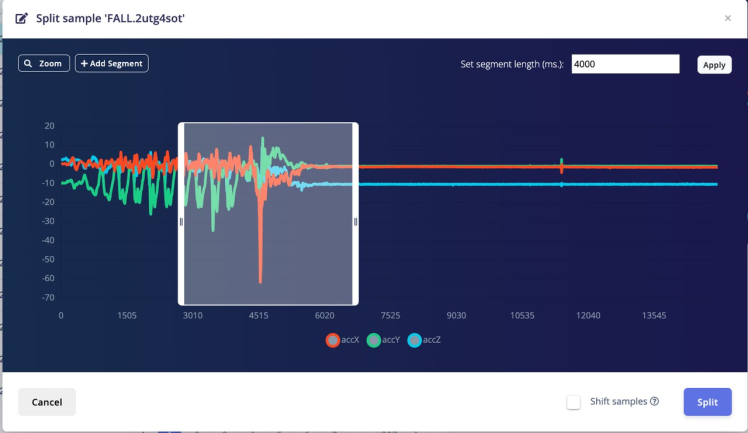
We can do splitting by selecting each sample and clicking on the Split sample from the drop down menu, but it is time-consuming and tedious work. Fortunately, there is an Edge Impulse SDK API which can be used to automate the whole process. After some experimentation, we have chosen a 4000 ms segment length which is the optimal length for detecting falls.
import json
import requests
import logging
import threading

API_KEY = "YOUR_API_KEY"
projectId = "YOUR_PROJECT_ID"
headers = {
    "Accept": "application/json",
    "x-api-key": API_KEY
}

def get_sample_len(sampleId):
    url = f'https://studio.edgeimpulse.com/v1/api/{projectId}/raw-data/{sampleId}'
    response = requests.request("GET", url, headers=headers)
    resp = json.loads(response.text)
    return resp['sample']['totalLengthMs']

def get_segments(sampleId):
    url = f'https://studio.edgeimpulse.com/v1/api/{projectId}/raw-data/{sampleId}/find-segments'
    payload = {
        "shiftSegments": False,
        "segmentLengthMs": 4000
    }
    response = requests.request("POST", url, json=payload, headers=headers)
    return json.loads(response.text)["segments"]

def crop_sample(sampleId):
    sample_len = get_sample_len(sampleId)
    cropStart = 200
    cropEnd = int(sample_len/5)
    payload = {"cropStart": cropStart, "cropEnd": cropEnd}
    #print(payload)
    url = f'https://studio.edgeimpulse.com/v1/api/{projectId}/raw-data/{sampleId}/crop'
    response  = requests.request("POST", url, json=payload, headers=headers)
    resp = json.loads(response.text)
    if resp['success']:
        logging.info(f'Crop: {sampleId}')
    else:
        logging.error(f'Crop: {sampleId} {resp["error"]}')

def segment(tid, ids):
    for sampleId in ids:
        try:
            crop_sample(sampleId)
            segments = get_segments(sampleId)
            if len(segments) > 0:
                payload = {"segments": segments}
                url = f'https://studio.edgeimpulse.com/v1/api/{projectId}/raw-data/{sampleId}/segment'
                response = requests.request("POST", url, json=payload, headers=headers)
                resp = json.loads(response.text)
                if resp['success']:
                    logging.info(f'Segment: {tid} {sampleId}')
                else:
                    logging.error(f'Segment: {tid} {sampleId} {resp["error"]}')
        except Exception as e:
            logging.error(f'Segment: exception {sampleId}')
            continue

def get_id_list():
    querystring = {"category":"training", "excludeSensors":"true", "labels": '["FALL"]'}
    url = f'https://studio.edgeimpulse.com/v1/api/{projectId}/raw-data'
    response = requests.request("GET", url, headers=headers, params=querystring)
    resp = json.loads(response.text)
    id_list = list(map(lambda s: s["id"], resp["samples"]))
    return id_list

if __name__ == "__main__":
    format = "%(asctime)s: %(message)s"
    logging.basicConfig(format=format, level=logging.INFO,
    datefmt="%H:%M:%S")
    id_list = get_id_list()
    logging.info('Sample Count: {}'.format(len(id_list)))
    div = 8
    n = int(len(id_list) / div)
    threads = list()
    for i in range(div):
        if i == (div - 1):
            ids = id_list[n*i: ]
        else:
            ids = id_list[n*i: n*(i+1)]
        x = threading.Thread(target=segment, args=(i, ids))
        threads.append(x)
        x.start()
    for thread in threads:
        thread.join()
    logging.info("Finished")
To execute the script above save it to a segments.py file and run the command below.
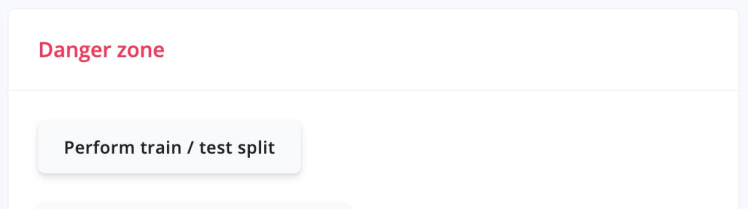
$ python3 segments.pyAfter segmenting the dataset we can split it into training and testing sets by clicking the Perform train / test split button on the Edge Impulse Studio dashboard.
Training
Go to the Impulse Design > Create Impulse page, click Add a processing block, and then choose Spectral Analysis, which is great for analyzing repetitive motion, such as data from accelerometers. Also, on the same page, click Add a learning block, and choose Classification (Keras), which learns patterns from data and can apply these to new data.. We have chosen a 4000ms Window size and a 4000ms Window increase, which means we are using the single frame. Now click on the Save Impulse button.
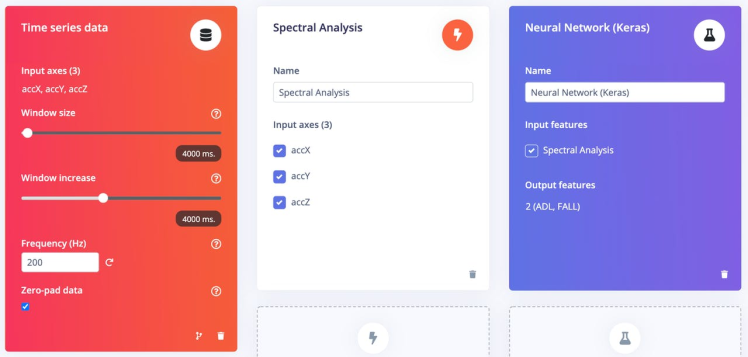
Next go to the Impulse Design > Spectral Analysis page, change the parameters as shown in the image below, and click the Save parameters button.

Clicking on the Save parameters button redirects to another page where we should click on the Generate Feature button. It usually takes a couple of minutes to complete feature generation. We can see the 3D visualization of the generated features in the Feature Explorer.
Now go to the Impulse Design > Neural Network (Keras) page and define Neural Network architecture. I have created the model with 2 dense (fully connected) layers. The number of training cycles were chosen as 30. Since the ADL and FALL classes datasets are not balanced, an Auto-balance dataset option is selected which mixes in more copies of data from classes that are uncommon and might help make the model more robust against overfitting.
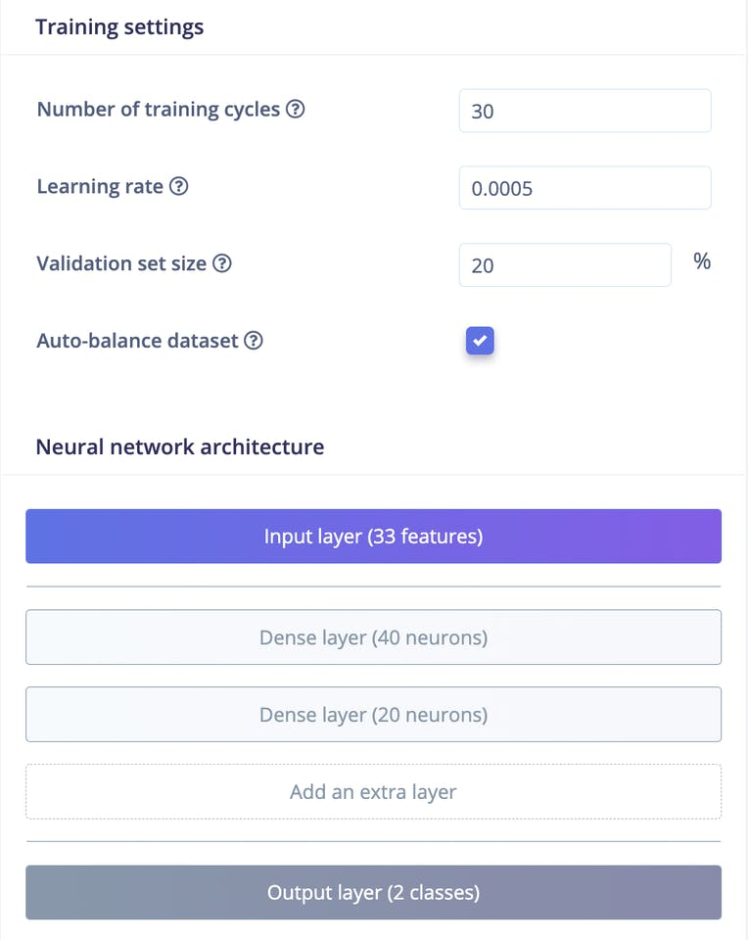
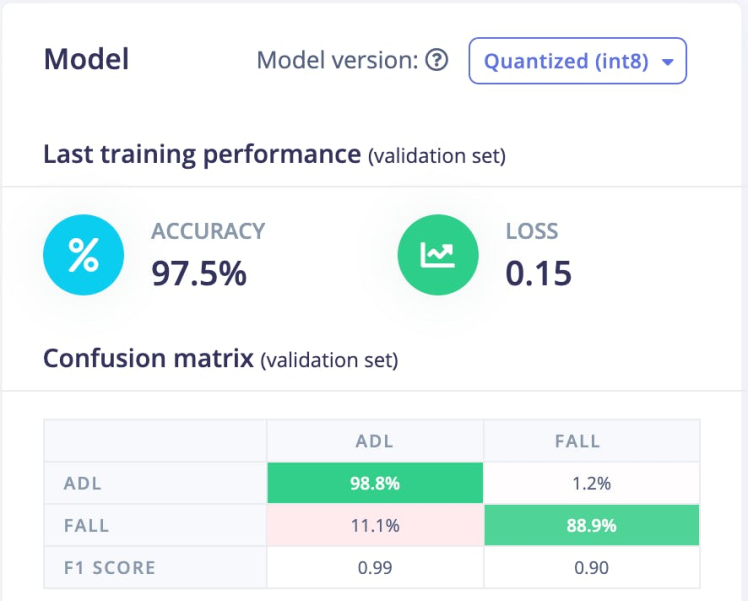
Now click the Start Training button and wait a few minutes until training is completed. We can see the Training output below. The quantized (int8) model has 97.5% accuracy.
Testing
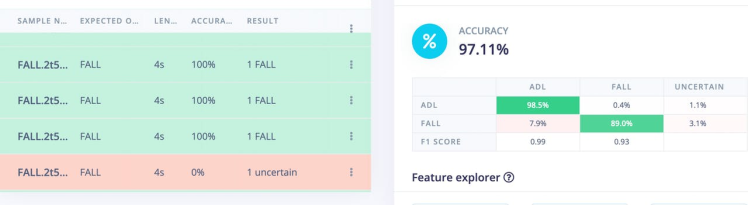
We can test the model on the test datasets by going to the Model testing page and clicking on the Classify all button. The model has 97.11% accuracy on the test datasets, so we are confident that the model should work in a real environment.
Deployment
The Edge Impulse Studio supports Raspberry Pi Pico C++ SDK, but the Blues Wireless Notecard does not support it yet. Fortunately, both support Arduino libraries, so at the Deployment page we will choose the Create Library > Arduino library option. For the Select optimizations option, we will choose Enable EON Compiler, which reduces the memory usage of the model. Also, we will opt for the Quantized (Int8) model. Now click the Build button, and in a few seconds the library bundle will be downloaded to your local computer.
Set up Blues Wireless Notecard and Notehub
Before starting to run the application we should set up the Notecard. Please see the easy-to-follow quick-start guide here to set up a Notecard with a Notecarrier AA to test that everything works as expected. The application code actually does the Notecard setup at boot up to make sure it is always in the known state. We also need to set up Notehub, which is a cloud service that receives data from the Notecard and allows us to manage the device, and route that data to our own cloud apps and services. We can create a free account at https://notehub.io/sign-up, and after successful login we can create a new project.
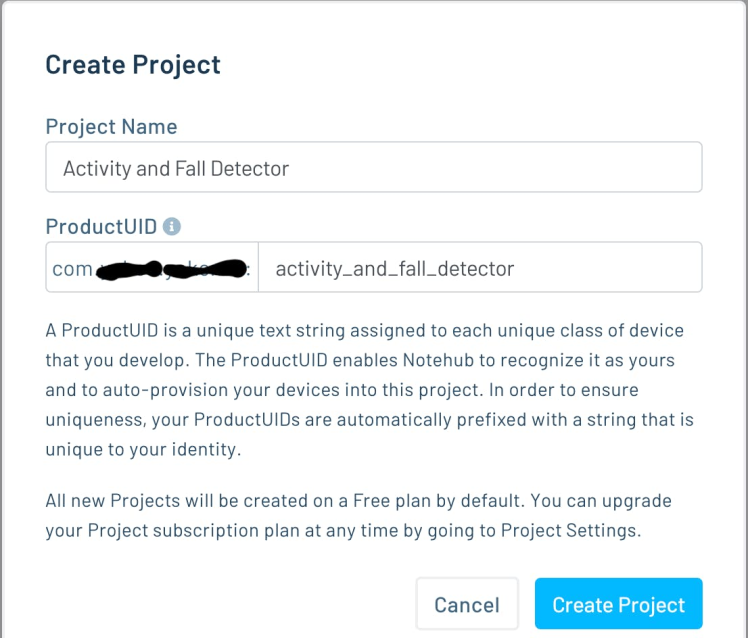
We should copy the ProjectUID which is used by Notehub to associate the Notecard to the project created. After a few Notehub syncs, we would be able to see the logs in the Notehub Events page as shown below.

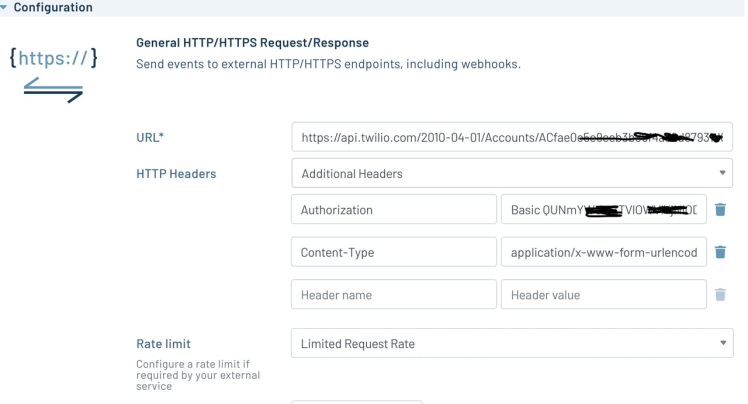
For SMS alerts we need to set up an account at Twilio and create a route by clicking the Create Route link at top right on the Route page. Please follow the instructions given in the nicely written guide provided by Blues Wireless, for leveraging the General HTTP/HTTPS Request/Response Route type to invoke the Twilio API.
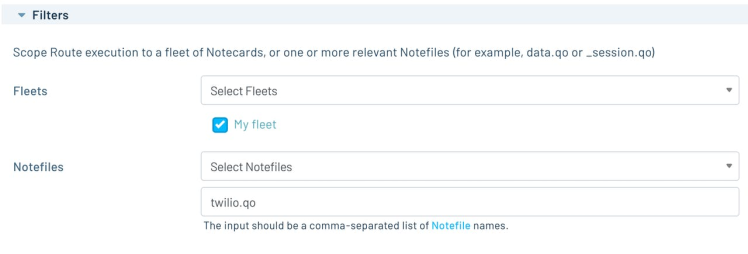
In the Filters section, we have to specify which Notecard outbound file data we want to route to Twilio. It would make sure that we always send out the intended data. In the application code we would add notes to the twilio.qo file.
To send SMS messages, the Twilio API expects form data with three key/value pairs (Body, From and To). This can be achieved using a JSONata (a query and transformation language for JSON data) expression to format the data into the required form. We should choose JSONata Expression in the Data > Transform field and we can enter the JSONata expression in the text area as shown below.
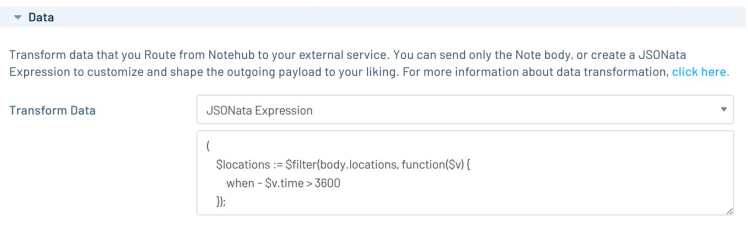
The complete JSONata expression is given below. This expression formats the JSON payload to a Twilio API consumable message format. The message is generated either by Fall Detection or a Button Press event. A Google map search or direction URL is included in the message based on location data availability.
(
$locations := $filter(body.locations, function($v) {
when - $v.time > 3600
});
$origin := $count($locations) > 0
? body.locations[0].lat & "," & body.locations[0].lon: "";
$waypoints := $count($locations) > 1
? $map($locations, function($v, $i) {
$i > 0 ? $v.lat & ',' & $v.lon : ""
}) : "";
$waypoints := $filter($waypoints, function($v) {
$v != ""
});
$destination := (where_lat ? where_lat : tower_lat) & "," & (where_lon ? where_lon : tower_lon);
$url_search := "https://google.com/maps/search/?api=1";
$url_direction := "https://google.com/maps/dir/?api=1";
"&Body=" & $replace(body.event, "_", " ") & " at "
& ( $origin = "" ? $url_search : $url_direction)
& ( $origin = "" ? "" : "%26origin=" & $origin)
& ($count($waypoints) > 0 ? "%26waypoints=" & $join($waypoints, "|") : "")
& ( $origin = "" ? "%26query=" & $destination : "%26destination=" & $destination)
& "&From=" & body.from & "&To=" & body.to & "&"
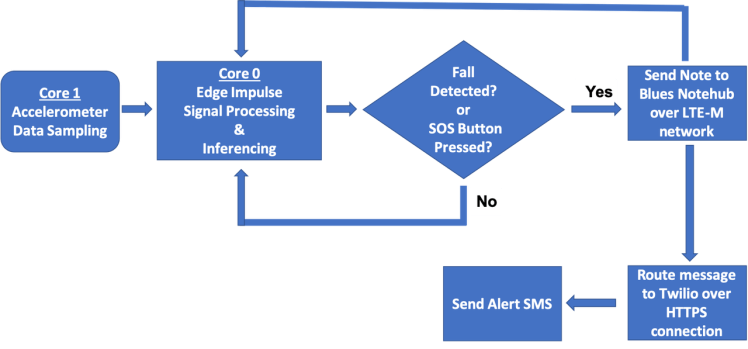
)Application workflow
This is a high-level overview of the application workflow.
Running Inferencing
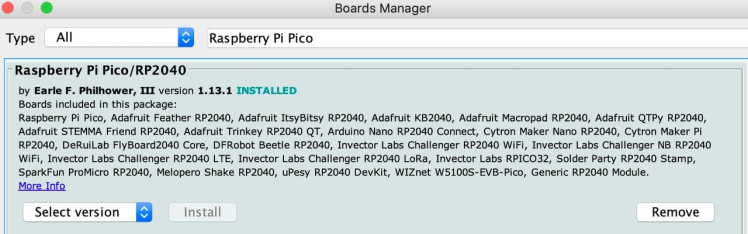
Please follow instructions here to download and install Arduino IDE. After installation, open the Arduino IDE and install the board package for Raspberry Pi Pico by going to Tools > Board > Boards Manager. Search the board package as shown below and install it.
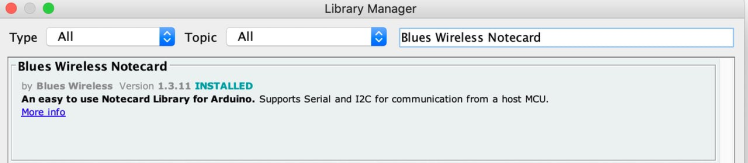
After the board package installation is completed, choose the Raspberry Pi Pico from Tools > Board > Raspberry Pi RP2040 boards menu and select serial port of the connected board from Tools > Port menu. We need to install Blues Wireless Notecard library using the Library Manager (Tool > Manage Libraries...) as. shown below.
Also, we need to install the RingBuffer library using the Library Manager.
Below is the Arduino sketch for inferencing. For continuous motion event detection, the application uses two available MCU cores, one for inferencing and another for data sampling so that no events should miss.
/* Includes ---------------------------------------------------------------- */
#include <Notecard.h>
#include <Wire.h>
#include <RingBuf.h>
#include <Adafruit_Sensor.h>
#include <Adafruit_ADXL345_U.h>
#include <Fall_Detection_inferencing.h>

#define serialDebugOut Serial
#define I2C_SDA_PIN  2
#define I2C_SCL_PIN  3
#define ATTN_PIN 7
#define EN_PIN  22
#define LED_PIN 25
#define BTN_PIN 28
#define BTN_LONG_PRESS_MS 3000
#define MY_PRODUCT_ID       "com.xxx.yyy:my_project"
#define FROM_PHONE_NUMBER   "+16xxxxxxxx"
#define TO_PHONE_NUMBER     "+8xxxxxxxxx"
#define N_LOC 5

void btnISR(void);
void attnISR(void);

volatile bool btnInterruptOccurred = false;
volatile bool notecardAttnFired = false;

typedef struct  {
  double lat;
  double lon;
  unsigned long timestamp;
} location_t;

RingBuf<location_t, N_LOC> locations;

// Accelerometer data queue
queue_t sample_queue;
// Init Accelerometer
Adafruit_ADXL345_Unified accel = Adafruit_ADXL345_Unified(12345);
// Notecard instance
Notecard notecard;

// This buffer is filled by the accelerometer data
float signal_buf[EI_CLASSIFIER_DSP_INPUT_FRAME_SIZE];

int raw_feature_get_data(size_t offset, size_t length, float *out_ptr)
{
  memcpy(out_ptr, signal_buf + offset, length * sizeof(float));
  return 0;
}

// Interrupt Service Routine for BTN_PIN transitions rising from LOW to HIGH
void btnISR()
{
  btnInterruptOccurred = true;
}

void  attnISR() {
  notecardAttnFired = true;
}

void restore_notecard()
{
  J *req = notecard.newRequest("card.restore");
  if (req) {
    JAddBoolToObject(req, "delete", true);
    if (!notecard.sendRequest(req)) {
      notecard.logDebug("ERROR: restore card requestn");
    }
  } else {
    notecard.logDebug("ERROR: Failed to restore card!n");
  }
}

void setup_notehub()
{
  // Setup Notehub
  J *req = notecard.newRequest("hub.set");
  if (req) {
    JAddStringToObject(req, "product", MY_PRODUCT_ID);
    JAddBoolToObject(req, "sync", true);
    JAddStringToObject(req, "mode", "periodic");
    JAddNumberToObject(req, "outbound", 15); // 15 mins
    JAddNumberToObject(req, "inbound", 60); // 60 mins
    if (!notecard.sendRequest(req)) {
      notecard.logDebug("ERROR: Setup Notehub requestn");
    }
  } else {
    notecard.logDebug("ERROR: Failed to set notehub!n");
  }
}

void enable_tracking_notecard()
{
  J *req = NoteNewRequest("card.location.mode");
  if (req) {
    JAddStringToObject(req, "mode", "periodic");
    JAddNumberToObject(req, "seconds", 300);
    if (!notecard.sendRequest(req)) {
      notecard.logDebug("ERROR: card.location.mode requestn");
    }

    J *req = notecard.newRequest("card.location.track");
    if (req) {
      JAddBoolToObject(req, "start", true);
      JAddBoolToObject(req, "sync", true);
      JAddBoolToObject(req, "heartbeat", true);
      JAddNumberToObject(req, "hours", 1);
      if (!notecard.sendRequest(req)) {
        notecard.logDebug("ERROR: card.location.track requestn");
      }

      J *req = NoteNewRequest("card.motion.mode");
      if (req) {
        JAddBoolToObject(req, "start", true);
        if (!notecard.sendRequest(req)) {
          notecard.logDebug("ERROR: card.motion.mode requestn");
        }
      }  else {
        notecard.logDebug("ERROR: Failed to set card motion mode!n");
      }
    } else {
      notecard.logDebug("ERROR: Failed to set location track!n");
    }
  } else {
    notecard.logDebug("ERROR: Failed to set  location mode!n");
  }
}

void register_location()
{
  J *rsp = notecard.requestAndResponse(notecard.newRequest("card.location"));

  if (rsp != NULL) {
    location_t location;
    location.lat = JGetNumber(rsp, "lat");
    location.lon = JGetNumber(rsp, "lon");
    location.timestamp = JGetNumber(rsp, "time");

    notecard.deleteResponse(rsp);
    notecard.logDebugf("lat=%f,  lon=%fn", location.lat, location.lon);

    if (locations.isFull()) {
      location_t loc;
      locations.pop(loc);
    }

    locations.push(location);
  }
}

void arm_attn()
{
  // Arm ATTN Interrupt
  J *req = NoteNewRequest("card.attn");
  if (req) {
    // arm ATTN if not already armed and fire whenever the Notecard GPS module makes a position fix.
    JAddStringToObject(req, "mode", "rearm,location");

   // JAddStringToObject(req, "mode", "sleep");
   // JAddNumberToObject(req, "seconds", 120);

    if (notecard.sendRequest(req)) {
      notecard.logDebug("Arm ATTN interrupt enabled!n");
    } else {
      notecard.logDebug("ERROR: Failed to arm ATTN interrupt!n");
    }
  }
}

void send_notification(char *event)
{
  // Add a note
  J *req = notecard.newRequest("note.add");
  if (req != NULL) {
    // send immediately
    JAddBoolToObject(req, "sync", true);
    JAddStringToObject(req, "file", "twilio.qo");
    J *body = JCreateObject();
    if (body != NULL) {
      JAddStringToObject(body, "event", event);
      J *arr = JAddArrayToObject(body, "locations");

      for (uint8_t i = 0; i < locations.size(); i++) {
        J *location = JCreateObject();
        if (location != NULL) {
          JAddNumberToObject(location, "lat", locations[i].lat);
          JAddNumberToObject(location, "lon", locations[i].lon);
          JAddNumberToObject(location, "time", locations[i].timestamp);
          JAddItemToObject(arr, "", location);
        }
      }
      JAddStringToObject(body, "from", FROM_PHONE_NUMBER);
      JAddStringToObject(body, "to", TO_PHONE_NUMBER);
      JAddItemToObject(req, "body", body);
    }

    if (!notecard.sendRequest(req)) {
      notecard.logDebug("ERROR: add note requestn");
    }
  }
}


// Running on core0
void setup()
{
  serialDebugOut.begin(115200);
  pinMode(LED_PIN, OUTPUT);

//  while (!serialDebugOut) {
//    delay(250);
//  }

  pinMode(EN_PIN, OUTPUT);
  digitalWrite(EN_PIN, HIGH);
  // Wait 2.5 seconds until Notecard is ready
  sleep_ms(10000);

  digitalWrite(LED_PIN, LOW);

  // Notecard I2C SDA/SCL is attached to RPi Pico GPIO 2/3 which uses i2c1/Wire1 instead of default i2c0/Wire
  Wire1.setSDA(I2C_SDA_PIN);
  Wire1.setSCL(I2C_SCL_PIN);
  Wire1.begin();

  // Attach Button Interrupt
  pinMode(BTN_PIN, INPUT);
  attachInterrupt(digitalPinToInterrupt(BTN_PIN), btnISR, RISING);

  // Attach Notecard Interrupt
  pinMode(ATTN_PIN, INPUT);
  attachInterrupt(digitalPinToInterrupt(ATTN_PIN), attnISR, RISING);

  // Initialize Notecard with I2C communication
  notecard.begin(NOTE_I2C_ADDR_DEFAULT, NOTE_I2C_MAX_DEFAULT, Wire1);
  notecard.setDebugOutputStream(serialDebugOut);

  // Restore Notecard
  //restore_notecard();
  //sleep_ms(100);
  setup_notehub();
  sleep_ms(100);
  // Configure location tracking
  enable_tracking_notecard();
  sleep_ms(100);
  // Arm ATTN
  arm_attn();
  sleep_ms(1000);
}

int sample_start = 0;
int sample_end = EI_CLASSIFIER_DSP_INPUT_FRAME_SIZE / 4;
int continous_fall_detected = 0;
uint64_t last_fall_detected_time = 0;

// Running on core0
void loop()
{

  if (notecardAttnFired) {
    notecardAttnFired = false;
    notecard.logDebug("ATTN firedn");
    // Save location data
    register_location();
    // Re-arm ATTN
    arm_attn();
  }

  if (btnInterruptOccurred) {
    btnInterruptOccurred = false;
    unsigned long int start_time = millis();

    while (digitalRead(BTN_PIN) == HIGH) {
      if (millis() - start_time > BTN_LONG_PRESS_MS) {
        send_notification("BUTTON_PRESSED");
        break;
      }
    }
  }


  ei_impulse_result_t result = { 0 };
  signal_t features_signal;
  features_signal.total_length = EI_CLASSIFIER_DSP_INPUT_FRAME_SIZE;
  features_signal.get_data = &raw_feature_get_data;

  // get data from the queue
  for (int i = sample_start; i < sample_end; i++) {
    queue_remove_blocking(&sample_queue, &signal_buf[i]);
  }

  if (sample_end ==  EI_CLASSIFIER_DSP_INPUT_FRAME_SIZE) {
    sample_start = 0;
    sample_end = EI_CLASSIFIER_DSP_INPUT_FRAME_SIZE / 4;
  } else {
    sample_start = sample_end;
    sample_end += EI_CLASSIFIER_DSP_INPUT_FRAME_SIZE / 4;
  }

  // invoke the impulse
  EI_IMPULSE_ERROR res = run_classifier(&features_signal, &result, false);
  if (res == 0) {
    // above 80% confidence score
    if (result.classification[1].value > 0.8f) {
      ei_printf("Predictions (DSP: %d ms., Classification: %d ms., Anomaly: %d ms.): n",
                result.timing.dsp, result.timing.classification, result.timing.anomaly);
      for (size_t ix = 0; ix < EI_CLASSIFIER_LABEL_COUNT; ix++) {
        ei_printf("t%s: %.5fn", result.classification[ix].label,
                  result.classification[ix].value);
      }

      continous_fall_detected += 1;

      if (continous_fall_detected > 2) {
        send_notification("FALL_DETECTED");
        continous_fall_detected = 0;
        digitalWrite(LED_PIN, HIGH);
      }
    } else {
      continous_fall_detected = 0;

      // turn off the led after 5s since last fall detected
      if (ei_read_timer_ms() - last_fall_detected_time >= 5000) {
        digitalWrite(LED_PIN, LOW);
      }
    }
  }
}

// Running on core1
void setup1()
{
  if (!accel.begin()) {
    /* There was a problem detecting the ADXL345 ... check your connections */
    Serial.println("Ooops, no ADXL345 detected ... Check your wiring!");
    while (1);
  }

  /* Set the range to whatever is appropriate for your project */
  accel.setRange(ADXL345_RANGE_16_G);
  accel.setDataRate(ADXL345_DATARATE_400_HZ);

  // add space for 4 additional samples to avoid blocking main thread
  queue_init(&sample_queue, sizeof(float), EI_CLASSIFIER_DSP_INPUT_FRAME_SIZE + (4 * sizeof(float)));

  // wait 10s until core0 finishes setup and starts fetching accelerometer data
  sleep_ms(10000);
}

uint64_t last_sample_time = 0;

// Running on core1
void loop1()
{
  sensors_event_t event;
  accel.getEvent(&event);
  float acceleration[EI_CLASSIFIER_RAW_SAMPLES_PER_FRAME];

  // read sample every 5000 us = 5ms (= 200 Hz)
  if (ei_read_timer_us() - last_sample_time >= 5000) {
    acceleration[0] = event.acceleration.x;
    acceleration[1] = event.acceleration.y;
    acceleration[2] = event.acceleration.z;

    //ei_printf("%.1f, %.1f, %.1fn", acceleration[0], acceleration[1], acceleration[2]);

    for (int i = 0; i < EI_CLASSIFIER_RAW_SAMPLES_PER_FRAME; i++) {
      if (queue_try_add(&sample_queue, &acceleration[i]) == false) {
        //ei_printf("Data queue full!n");
        sleep_ms(100);
        break;
      }
    }
    last_sample_time = ei_read_timer_us();
  }
}


void ei_printf(const char *format, ...) {
  static char print_buf[1024] = { 0 };

  va_list args;
  va_start(args, format);
  int r = vsnprintf(print_buf, sizeof(print_buf), format, args);
  va_end(args);

  if (r > 0) {
    Serial.write(print_buf);
  }
}
To run the inferencing sketch, clone the application repository using the command below.
$ git clone https://github.com/metanav/Piconoto_SOS.gitImport the library bundle Piconoto_SOS/Fall_Detection_inferencing.zip using the menu Sketch > Include Library > Add.ZIP Library in the Arduino IDE. Open the inferencing sketch by navigating the menu File > Examples > Fall_Detection_inferencing > piconoto_fall_detector and compile/upload the firmware to the connected RPi Pico board. We can monitor the inferencing output and Notecard debug logs using the Tools > Serial Monitor with baud rate 115200 bps.
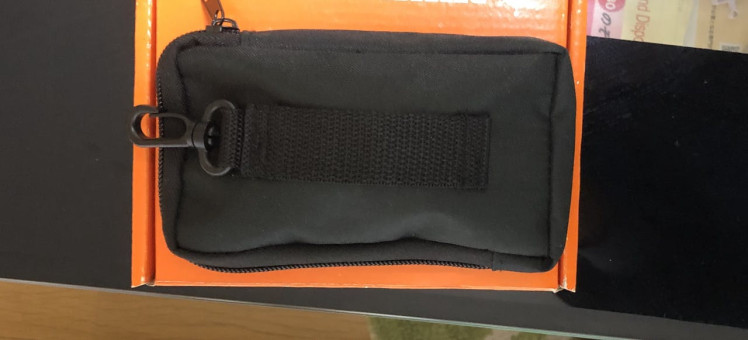
Casing
For protection and convenient wearing, the device is placed inside a pouch which can be fastened at the waist using a belt. Also, the pouch material allows for GPS and Cellular signal penetration.
Live Demo
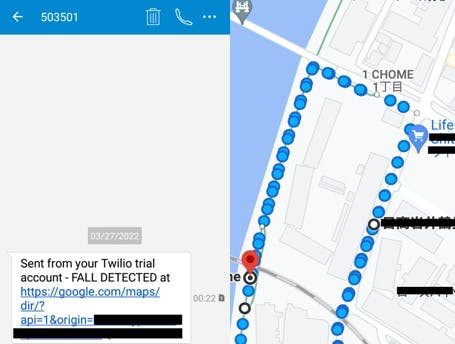
Fall detection alert message
We should get an SMS alert message as shown below within 5 seconds if a fall is detected. We can follow the link in the SMS which opens up Google Maps and we can know the exact location and find the person quickly. Since the device was able to capture the recent GPS locations, the Google Maps direction URL is included by the JSONata expression in the message which is routed to Twilio via Notehub.
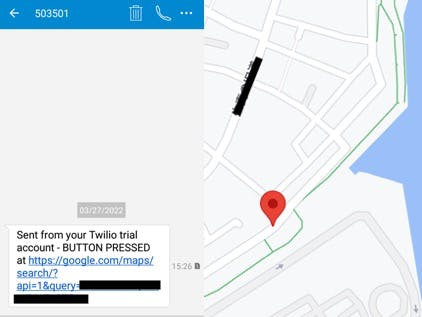
SOS Button long press alert message
In the screenshot below, the recent locations could not be captured when GPS could not get a fix, so only the cellular tower location is included in the Google Maps search URL by the JSONata expression which is routed to Twilio via Notehub.
Conclusion
This project presents a proof-of-concept device which is easy-to-use for elderly people. This project also showcases that a simple neural network can be used to solve complex problems with signal processing done in the right way, and can be run on low-powered resource-constrained devices with reliable and cost-effective location-aware cellular network connectivity.
Work Attribution
Sucerquia A, López JD, Vargas-Bonilla JF. SisFall: A Fall and Movement Dataset. Sensors (Basel). 2017 Jan 20;17(1):198. doi: 10.3390/s17010198. PMID: 28117691; PMCID: PMC5298771.
Schematics, diagrams and documents
Code
Credits
Related products


Leave your feedback...